Advertisement:

Read Later
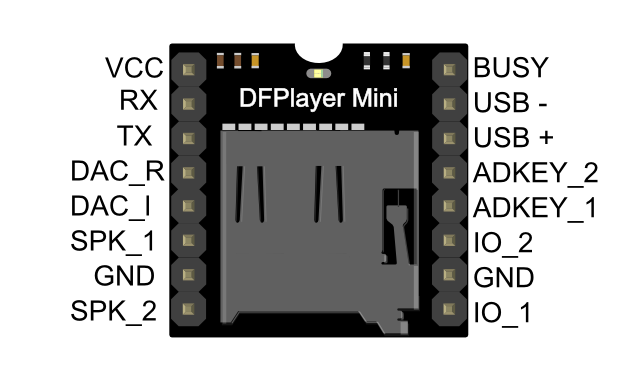
In this tutorial, I will show you how to add the DFPlayer Mini MP3 Player to your electronics projects with Arduino.
It is effortless to use a DFPlayer Mini MP3 Player with Arduino since it has a library, including all available UART commands and features. In that regard, you do not need to send UART commands manually to the DFPlayer Mini to play MP3 files.
As explained in its product wiki, "The DFPlayer Mini MP3 Player For Arduino is a small and low price MP3 module with a simplified output directly to the speaker. The module can be used as a stand-alone module with an attached battery, speaker, and push buttons or used in combination with Arduino".
To be able to use it with Arduino, the only thing you need to do is to download its library provided by DFRobot from here.
Important: For Arduino Nano 33 IoT alike, you have to use the second serial port on RX0 and TX1 pins - Serial1 - instead of the SoftwareSerial library like in the sample code.
  // Initiate DFPlayer Mini on the second serial port on RX0 and TX1 pins.
  Serial1.begin(9600);
  while(!myDFPlayer.begin(Serial1)){ Serial.println("Not Connected!"); }
  Serial.println("DFPlayer Connected!!!");
  myDFPlayer.setTimeOut(500); //Set serial communictaion time out 500ms
  //----Set volume----
  myDFPlayer.volume(30);  //Set volume value (0~30).
  //myDFPlayer.volumeUp(); //Volume Up
  //myDFPlayer.volumeDown(); //Volume Down
  // Set EQ
  myDFPlayer.EQ(DFPLAYER_EQ_NORMAL);
  // Set the SD Card as default source.
  myDFPlayer.outputDevice(DFPLAYER_DEVICE_SD);
And, to be able to execute commands accurately, save your songs by adding consecutive numbers to song names as did I:
001song_1.mp3
002song_2.mp3
003song_3.mp3
004song_4.mp3
...
Download the required library for the DFPlayer Mini Serial MP3 Player from here.
📄 Create the DFPlayer Mini object.
📄 Initiate the DFPlayer.
📄 Check whether the DFPlayer is running accurately or not.
📄 Use the SoftwareSerial library to communicate with the DFPlayer.
📄 Set serial communication time out 500ms.
📄 You can inspect all built-in functions to control the DFPlayer Mini MP3 Player as follows:
-------------- Arduino --------------

#include "Arduino.h"
#include "SoftwareSerial.h"
#include "DFRobotDFPlayerMini.h"

SoftwareSerial mySoftwareSerial(10, 11); // RX, TX

// Create the DFPlayer Mini object.
DFRobotDFPlayerMini myDFPlayer;

void setup() {
  // Initiate the DFPlayer.
  mySoftwareSerial.begin(9600);
  Serial.begin(115200);

  // Check whether the DFPlayer is running accurately or not.
  if (!myDFPlayer.begin(mySoftwareSerial)) {  // Use SoftwareSerial to communicate with the DFPlayer.
    Serial.println(F("Unable to begin:"));
    Serial.println(F("1.Please recheck the connection!"));
    Serial.println(F("2.Please insert the SD card!"));
    while(true);
  }
  Serial.println(F("DFPlayer Mini online."));

  myDFPlayer.setTimeOut(500); //Set serial communication time out 500ms

   //----Set volume----
  myDFPlayer.volume(10);  //Set volume value (0~30).
  myDFPlayer.volumeUp(); //Volume Up
  myDFPlayer.volumeDown(); //Volume Down

  //----Set different EQ----
  myDFPlayer.EQ(DFPLAYER_EQ_NORMAL);
//  myDFPlayer.EQ(DFPLAYER_EQ_POP);
//  myDFPlayer.EQ(DFPLAYER_EQ_ROCK);
//  myDFPlayer.EQ(DFPLAYER_EQ_JAZZ);
//  myDFPlayer.EQ(DFPLAYER_EQ_CLASSIC);
//  myDFPlayer.EQ(DFPLAYER_EQ_BASS);

  //----Set device we use SD as default----
//  myDFPlayer.outputDevice(DFPLAYER_DEVICE_U_DISK);
  myDFPlayer.outputDevice(DFPLAYER_DEVICE_SD);
//  myDFPlayer.outputDevice(DFPLAYER_DEVICE_AUX);
//  myDFPlayer.outputDevice(DFPLAYER_DEVICE_SLEEP);
//  myDFPlayer.outputDevice(DFPLAYER_DEVICE_FLASH);

  //----Mp3 control----
//  myDFPlayer.sleep();     //sleep
//  myDFPlayer.reset();     //Reset the module
//  myDFPlayer.enableDAC();  //Enable On-chip DAC
//  myDFPlayer.disableDAC();  //Disable On-chip DAC
//  myDFPlayer.outputSetting(true, 15); //output setting, enable the output and set the gain to 15

  //----Mp3 play----
  myDFPlayer.next();  //Play next mp3
  delay(1000);
  myDFPlayer.previous();  //Play previous mp3
  delay(1000);
  myDFPlayer.play(1);  //Play the first mp3
  delay(1000);
  myDFPlayer.loop(1);  //Loop the first mp3
  delay(1000);
  myDFPlayer.pause();  //pause the mp3
  delay(1000);
  myDFPlayer.start();  //start the mp3 from the pause
  delay(1000);
  myDFPlayer.playFolder(15, 4);  //play specific mp3 in SD:/15/004.mp3; Folder Name(1~99); File Name(1~255)
  delay(1000);
  myDFPlayer.enableLoopAll(); //loop all mp3 files.
  delay(1000);
  myDFPlayer.disableLoopAll(); //stop loop all mp3 files.
  delay(1000);
  myDFPlayer.playMp3Folder(4); //play specific mp3 in SD:/MP3/0004.mp3; File Name(0~65535)
  delay(1000);
  myDFPlayer.advertise(3); //advertise specific mp3 in SD:/ADVERT/0003.mp3; File Name(0~65535)
  delay(1000);
  myDFPlayer.stopAdvertise(); //stop advertise
  delay(1000);
  myDFPlayer.playLargeFolder(2, 999); //play specific mp3 in SD:/02/004.mp3; Folder Name(1~10); File Name(1~1000)
  delay(1000);
  myDFPlayer.loopFolder(5); //loop all mp3 files in folder SD:/05.
  delay(1000);
  myDFPlayer.randomAll(); //Random play all the mp3.
  delay(1000);
  myDFPlayer.enableLoop(); //enable loop.
  delay(1000);
  myDFPlayer.disableLoop(); //disable loop.
  delay(1000);

}

void loop(){

}
Result:
You can inspect my electronics project in which I used DFPlayer Mini Serial MP3 Player from here.