In the dental industry, there was a recent surge in utilizing 3D-printed dental casts (impressions) to identify and detect dental problems. As compared to a plaster cast, a 3D-printed cast is a more sturdy, stable, and precise option for a dental technician since 3D-printed casts can endure multiple inspections without losing details. As compared to a milled cast, a 3D-printed cast has a more complex structure with a higher level of detail[1]. Most importantly, a 3D-printed cast is a nonpareil timesaver since the dentist can transfer its digital copy to the dental technician after performing an intra-oral scanning on the patient in seconds. Besides providing the patient a more comfortable experience, a digital workflow ending with a 3D-printed cast often ensues a more accurate scanning result, obviating potential mistakes and inaccuracies.
Although 3D printing is relatively new to the dental industry, 3D-printed dental casts exhort countless benefits and opportunities when creating dental products. However, after perusing recent articles on 3D printing applications in the dental industry, I noticed that there are not many promising tools or methods to inspect the 3D-printed cast accuracy and efficiency for dental technicians. Therefore, I decided to build a user-friendly and accessible device employing an object detection model to classify 3D-printed casts in the hope of assisting dental technicians in detecting cast accuracy and malfunctions.
To extrapolate and interpret dental cast categories (classes) accurately, I needed to collect data from actual 3D-printed dental casts in order to train my object detection model with notable validity. Therefore, I purchased numerous dental cast STL files identified with different tags (labels) and printed them with my SLA (HALOT-ONE) and FDM (CR-200B) 3D printers:
Big Central Teeth
Antagonist Teeth
Orthodontic Superior
Prognathous
Strange Teeth Inferior
Strange Teeth Superior
Failed
Implant
Since Sony Spresense is a high-performance development board intended for edge computing in sensor analysis, machine learning, image processing, and data filtering, I decided to utilize Sony Spresense in this project. To capture images and store them on an SD card to train my object detection model, I connected the Spresense extension board and the Spresense camera board to the Spresense main board (CXD5602). Then, I utilized a TFT LCD touch screen (ILI9341) to display the video stream and captured images. Also, I added a tiny thermal printer to the device so as to print the detection result after running my object detection model on Sony Spresense.
After completing my data set by taking pictures of 3D-printed dental casts, I built my object detection model with Edge Impulse to make predictions on dental cast accuracy categories (classes). I utilized Edge Impulse FOMO (Faster Objects, More Objects) algorithm to train my model, which is a novel machine learning algorithm that brings object detection to highly constrained devices. Since Edge Impulse is nearly compatible with all microcontrollers and development boards, I had not encountered any issues while uploading and running my model on Sony Spresense. As labels, I appended three main categories (classes) to the file names while capturing and storing pictures:
Cast
Failed
Implant
After training and testing my object detection (FOMO) model, I deployed and uploaded the model on Sony Spresense. Therefore, the device is capable of detecting dental cast accuracy categories (classes) by running the model independently without any additional procedures.
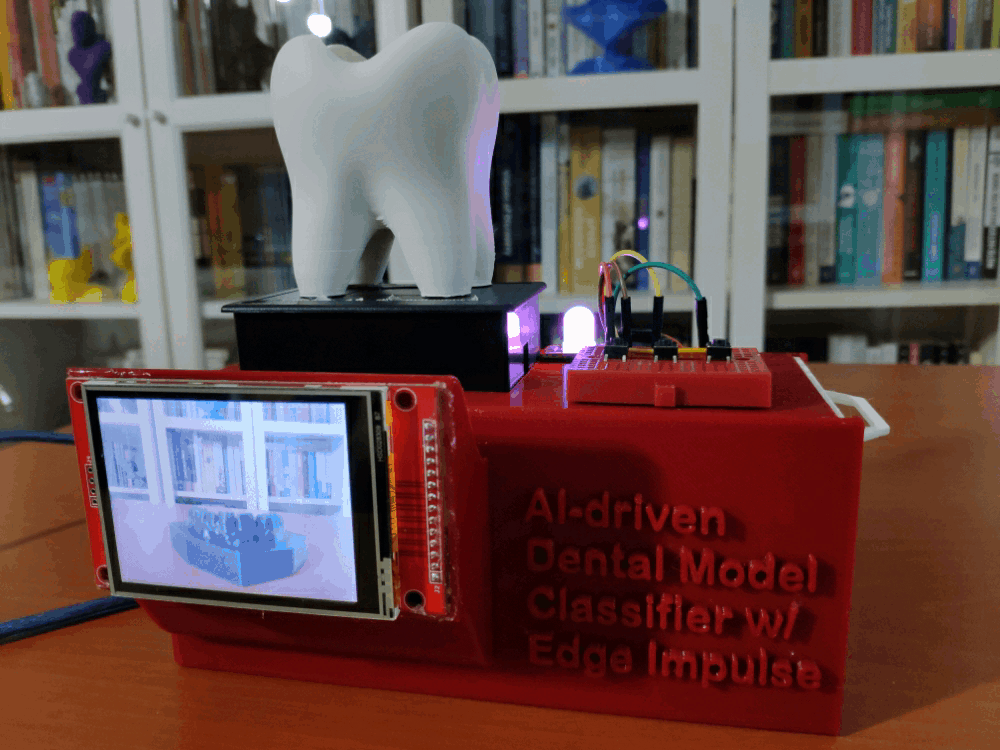
Lastly, to make the device as robust, sturdy, and compact as possible while experimenting with 3D-printed dental casts, I designed a dental-themed case with a sliding side cover (3D printable).
So, this is my project in a nutshell 😃
In the following steps, you can find more detailed information on coding, capturing dental cast pictures, storing pictures on an SD card, building an object detection (FOMO) model with Edge Impulse, and running it on Sony Spresense.
Step 1: Designing and printing a dental-themed case
Since I focused on building a user-friendly and accessible device for dental technicians in this project, I decided to design a robust and compact case allowing the user to capture dental cast images flawlessly. To avoid overexposure to dust and prevent inadvertent loose wire connections, I added a sliding side cover to the case. Also, I decided to fasten a tooth replica to the device and emboss a dental logo on the sliding side cover so as to emphasize the dental theme gloriously.
I designed the main case and its sliding side cover in Autodesk Fusion 360. You can download their STL files below.
Figure - 80.8
Figure - 80.9
Figure - 80.10
Figure - 80.11
For the tooth replica affixed to the top of the tiny thermal printer, I utilized this model from Thingiverse:
Then, I sliced all 3D models (STL files) in Ultimaker Cura.
Figure - 80.12
Figure - 80.13
Figure - 80.14
Since I wanted to create a solid structure for this device with a sliding side cover and complement the dental theme gloriously, I utilized these PLA filaments:
Fire Engine Red
ePLA-Matte Milky White
Finally, I printed all parts (models) with my Creality CR-200B 3D Printer. It is my first fully-enclosed FDM 3D printer, and I must say that I got excellent prints effortlessly with the CR-200B :)
Figure - 80.15
If you are a maker planning to print your 3D models to create more complex projects, I highly recommend the CR-200B. Since the CR-200B is fully-enclosed, you can print high-resolution 3D models with PLA and ABS filaments. Also, it has a smart filament runout sensor and the resume printing option for power failures.
According to my experience, there are only two downsides of the CR-200B: relatively small build size (200 x 200 x 200 mm) and manual leveling. Conversely, thanks to the large leveling nuts and assisted leveling, I was able to level the bed and start printing my first model in less than 30 minutes.
#️⃣ Before the first use, remove unnecessary cable ties and apply grease to the rails.
Figure - 80.16
Figure - 80.17
#️⃣ Test the nozzle and hot bed temperatures.
Figure - 80.18
#️⃣ Go to Settings ➡ Leveling and adjust four predefined points by utilizing the leveling nuts.
Figure - 80.19
Figure - 80.20
Figure - 80.21
Figure - 80.22
#️⃣ Finally, attach the spool holder and feed the extruder with the filament.
Figure - 80.23
#️⃣ Since the CR-200B is not officially supported by Cura, select the Ender-3 profile and change the build size to 200 x 200 x 200 mm. Also, to compensate for the nozzle placement, set the Nozzle offset X and Y values to -10 mm on the Extruder 1 tab.
Figure - 80.24
Figure - 80.25
Step 1.1: Assembling the case and making connections & adjustments
First of all, I connected the Spresense extension board and the Spresense camera board to the Spresense main board to capture images and connect components easily. Since the Spresense main board operates at 1.8V, it is not suitable to connect components directly to the main board without the expansion board, which supports 5V or 3.3V logic level voltage.
Then, I connected a TFT LCD touch screen (ILI9341) to the expansion board so as to display the video stream, captured images, and the predicted dental cast accuracy category (class) after running the object detection (FOMO) model. Also, I utilized a tiny (embedded) thermal printer to print the predicted class and its details to deduce dental cast specifications and accuracy effortlessly.
Since the Spresense extension board cannot power the tiny (embedded) thermal printer due to its operating voltage and current, I connected a USB buck-boost converter board to my Xiaomi power bank to elicit stable 9V to supply the thermal printer. The higher input voltage (voltage range is 5~9V) means faster printing speed and more clear printed records.
To append labels to the file names while capturing dental cast images and storing them on the SD card, I added three control buttons (6x6), as shown in the schematic below. Also, I added a 10mm common anode RGB LED module (Keyes) to indicate the outcomes of operating functions.
After completing breadboard connections and adjustments successfully, I made the breadboard connection points rigid by utilizing a hot glue gun.
Figure - 80.26
Figure - 80.27
After printing all parts (models), I fastened all components to their corresponding slots on the main case via the hot glue gun.
Then, I placed the sliding side cover via the dents on the main case.
Figure - 80.28
Figure - 80.29
Figure - 80.30
Figure - 80.31
Figure - 80.32
Figure - 80.33
Figure - 80.34
Figure - 80.35
Figure - 80.36
Figure - 80.37
Finally, I affixed the tooth replica to the top of the tiny thermal printer via the hot glue gun.
Figure - 80.38
Figure - 80.39
Figure - 80.40
Step 2: Printing numerous dental casts (models)
Since I needed to collect images from numerous dental casts, I decided to print actual dental casts (impressions) with my resin (SLA) 3D printer. Therefore, I purchased plenty of dental casts with different tags (labels) from Cults:
To print my dental casts similar to the casts molded by dental technicians, I utilized a special resin:
UV Sensitive Dental Castable Resin (Green)
Finally, I printed all dental casts (models) with my Creality HALOT-ONE Resin 3D Printer. Although I am a novice in resin 3D printing, and it is my first SLA (resin) 3D printer, I got incredible results effortlessly with the HALOT-ONE :)
Figure - 80.47
Also, I sliced some dental 3D models again in Ultimaker Cura to print them with my FDM 3D printer (CR-200B) in order to improve my object detection model's accuracy on 3D-printed dental casts molded with different materials or methods.
Figure - 80.48
After printing dental casts, I captured their images via the Spresense camera board, as explained in the following steps.
Figure - 80.49
Figure - 80.50
Step 3: Setting up Sony Spresense on the Arduino IDE
Before proceeding with the following steps, I needed to set up Sony Spresense on the Arduino IDE and install the required libraries for this project.
#️⃣ First of all, mount the provided shading seal on IC4 in the Spresense main board to prevent malfunctions under direct or in the proximity of an intense light source, e.g., sunlight or a bright lamp.
Figure - 80.51
#️⃣ To add the Sony Spresense board package to the Arduino IDE, navigate to File ➡ Preferences and paste the URL below under Additional Boards Manager URLs.
#️⃣ This package also includes the required libraries for the extension board modules (such as the SD card module) and the camera board.
#️⃣ Then, to install the required core, navigate to Tools ➡ Board ➡ Boards Manager and search for Spresense.
Figure - 80.54
Figure - 80.55
#️⃣ After installing the core, navigate to Tools → Board → Spresense Boards and select Spresense.
Figure - 80.56
#️⃣ To update the Spresense firmware so as to use the latest version of the Spresense Arduino libraries, go to Tools → Programmer → Spresense Firmware Updater. Then, select Burn Bootloader.
Figure - 80.57
Figure - 80.58
#️⃣ Finally, download the required libraries for the tiny (embedded) thermal printer and the TFT LCD touch screen (ILI9341).
#️⃣ Upload the monochromatic bitmap and select Horizontal in the Byte orientation section under Settings.
#️⃣ If necessary, change the image width because the LCD Assistant and the thermal printer handle images in horizontal groups of eight pixels. Therefore, if the image width is not a multiple of eight, it is truncated (cropped) to the nearest smaller 8-pixel boundary.
#️⃣ Convert the image (bitmap) and save the output (data array).
#️⃣ Finally, add the data array to the code and print it via the thermal printer.
printer.printBitmap(80, 80, dental_logo);
Figure - 80.63
Figure - 80.64
Step 4: Capturing and storing images w/ Sony Spresense
After setting up Sony Spresense and installing the required libraries, I programmed Sony Spresense to capture dental cast images in order to store them on the SD card and create appropriately labeled samples for the Edge Impulse object detection (FOMO) model.
Since I needed to assign dental cast accuracy categories as labels for each captured image to create a valid data set for the object detection model, I utilized the control buttons attached to Sony Spresense so as to choose among dental cast accuracy categories (classes). After selecting a dental cast accuracy class, Sony Spresense captures a picture, appends the selected class number with the current date & time to the file name, and then saves the captured image to the SD card.
Control Button (A) ➡ Cast [0]
Control Button (B) ➡ Failed [1]
Control Button (C) ➡ Implant [2]
You can download the dental_model_classifier_collect.ino file to try and inspect the code for capturing images and storing them on the SD card via Sony Spresense.
⭐ If the camera board throws any error, print the error details on the serial monitor.
Serial.println("Camera initializing...");
err = theCamera.begin();
if(err != CAM_ERR_SUCCESS) printError(err);
// Start video stream and print errors, if any.
Serial.println("Starting streaming...");
err = theCamera.startStreaming(true, CamCB);
if(err != CAM_ERR_SUCCESS) printError(err);
// Set the Auto white balance parameter and print errors, if any.
Serial.println("Setting the Auto white balance parameter...");
err = theCamera.setAutoWhiteBalanceMode(g_wb);
if(err != CAM_ERR_SUCCESS) printError(err);
// Set the still picture parameters and print errors, if any.
Serial.println("Setting the still picture parameters...\n");
err = theCamera.setStillPictureImageFormat(g_width, g_height, g_img_fmt, g_divisor);
if(err != CAM_ERR_SUCCESS) printError(err);
⭐ In the CamCB function:
⭐ Check whether the img instance is available or not.
⭐ Convert the image data format to RGB565 so as to display the captured image on the ILI9341 TFT touch screen.
⭐ Print the recently captured image data on the serial monitor.
⭐ Note: This function runs continuously in a loop unless the video stream is interrupted.
void CamCB(CamImage img){
// Check whether the img instance is available or not.
if (img.isAvailable()){
// Convert the image data format to RGB565 so as to display images on the ILI9341 TFT screen.
img.convertPixFormat(CAM_IMAGE_PIX_FMT_RGB565);
/* You can use image data directly by using getImgSize() and getImgBuff().
* for displaying image to a display, etc. */
tft.drawRGBBitmap(0, 0, (uint16_t *)img.getImgBuff(), 320, 240);
Serial.print("Image data size => "); Serial.print(img.getImgSize(), DEC); Serial.print(" , ");
Serial.print("Image buffer address => "); Serial.println((unsigned long)img.getImgBuff(), HEX);
}else{
Serial.println("Failed to get video stream image!");
}
}
⭐ In the takePicture function:
⭐ Take a picture with the given still picture settings.
⭐ Pause the video stream and print errors, if any.
⭐ Get the current date & time calculated by the RTC module.
⭐ Define the file name, including the selected class number and the current date & time.
⭐ If the given file name already exists on the SD card, remove it in advance to prevent file appending.
⭐ Save the recently captured picture to the SD card.
⭐ Display the recently saved image's information on the ILI9341 TFT touch screen.
⭐ Resume the video stream and print errors, if any.
void takePicture(int _class){
char filename[30] = {0};
// Take a picture with the given still picture settings.
CamImage img = theCamera.takePicture();
if(img.isAvailable()){
// Pause video stream and print errors, if any.
adjustColor(1,1,0);
Serial.println("\nPausing streaming...\n");
err = theCamera.startStreaming(false, CamCB);
if(err != CAM_ERR_SUCCESS) printError(err);
// Get the current date and time.
RtcTime rtc;
rtc = RTC.getTime();
// Define the file name.
sprintf(filename, "%d_D_%04d.%02d.%02d__%02d.%02d.%02d.%s", _class, rtc.year(), rtc.month(), rtc.day(), rtc.hour(), rtc.minute(), rtc.second(), "JPG");
// If the same file name exists, remove it in advance to prevent file appending.
theSD.remove(filename);
// Save the recently captured picture to the SD card.
File myFile = theSD.open(filename, FILE_WRITE);
myFile.write(img.getImgBuff(), img.getImgSize());
myFile.close();
Serial.println("Image captured successfully!");
Serial.print("Selected Class: "); Serial.println(_class);
Serial.printf("Name: %s\n", filename);
Serial.printf("Resolution: %dx%d\n", img.getWidth(), img.getHeight());
Serial.printf("Memory Size: %.2f / %.2f [KB]\n", img.getImgSize() / 1024.0, img.getImgBuffSize() / 1024.0);
// Display the recently saved image information on the ILI9341 TFT screen.
int c_x = 10, c_y = 100, r_x = 300, r_y = 120, r = 10, offset = 10, l = 15;
tft.drawRGBBitmap(10, 10, (uint16_t*)(data_collect.pixel_data), (int16_t)data_collect.width, (int16_t)data_collect.height);
tft.fillRoundRect(c_x, c_y, r_x, r_y, r, ILI9341_WHITE);
tft.fillRoundRect(c_x+offset, c_y+offset, r_x-(2*offset), r_y-(2*offset), r, ILI9341_DARKGREEN);
tft.setTextColor(ILI9341_WHITE); tft.setTextSize(1);
tft.setCursor(c_x+(2*offset), c_y+(2*offset));
tft.printf("Name: %s\n", filename);
tft.setCursor(c_x+(2*offset), c_y+(2*offset)+l);
tft.printf("Resolution: %dx%d\n", img.getWidth(), img.getHeight());
tft.setCursor(c_x+(2*offset), c_y+(2*offset)+(2*l));
tft.printf("Selected Class: %d", _class);
sleep(5);
// Resume video stream and print errors, if any.
adjustColor(0,1,0);
sleep(2);
Serial.println("\nResuming streaming...\n");
err = theCamera.startStreaming(true, CamCB);
if(err != CAM_ERR_SUCCESS) printError(err);
}else{
Serial.println("Failed to take a picture!");
adjustColor(1,0,0);
sleep(2);
}
}
⭐ According to the pressed control button (A, B, or C), append the selected dental cast accuracy category (class) number with the current date & time to the file name and save the recently captured picture to the SD card.
Step 4.1: Saving the captured pictures to the SD card as samples
After uploading and running the code for capturing pictures and saving them to the SD card on Sony Spresense:
🦷🖼️ The device turns the RGB LED to blue if the SD card module and the camera board connections with the Spresense main board are successful.
Figure - 80.70
Figure - 80.71
🦷🖼️ Then, the device turns the RGB LED to magenta as the default color and displays the video stream on the ILI9341 TFT LCD touch screen.
🦷🖼️ If the control button (A) is pressed, the device pauses the video stream and captures a picture. If the device captures the picture successfully, it turns the RGB LED to yellow, appends the Cast [0] dental cast category (class) number with the current date & time to the file name, and stores the recently captured image on the SD card.
0_D_2022.06.29__18.12.05.JPG
🦷🖼️ Then, the device displays the captured image information on the ILI9341 TFT LCD touch screen.
Name
Resolution
Selected Class
🦷🖼️ Finally, the device resumes the video stream and turns the RGB LED to green.
Figure - 80.72
Figure - 80.73
Figure - 80.74
Figure - 80.75
🦷🖼️ If the control button (B) is pressed, the device pauses the video stream and captures a picture. If the device captures the picture successfully, it turns the RGB LED to yellow, appends the Failed [1] dental cast category (class) number with the current date & time to the file name, and stores the recently captured image on the SD card.
1_D_2022.06.29__18.08.02.JPG
🦷🖼️ Then, the device displays the captured image information on the ILI9341 TFT LCD touch screen.
Name
Resolution
Selected Class
🦷🖼️ Finally, the device resumes the video stream and turns the RGB LED to green.
Figure - 80.76
Figure - 80.77
Figure - 80.78
Figure - 80.79
🦷🖼️ If the control button (C) is pressed, the device pauses the video stream and captures a picture. If the device captures the picture successfully, it turns the RGB LED to yellow, appends the Implant [2] dental cast category (class) number with the current date & time to the file name, and stores the recently captured image on the SD card.
2_D_2022.06.29__18.45.36.JPG
🦷🖼️ Then, the device displays the captured image information on the ILI9341 TFT LCD touch screen.
Name
Resolution
Selected Class
🦷🖼️ Finally, the device resumes the video stream and turns the RGB LED to green.
Figure - 80.80
Figure - 80.81
Figure - 80.82
Figure - 80.83
🦷🖼️ If Sony Spresense throws an error while operating, the device turns the RGB LED to red and prints the error details on the serial monitor.
Figure - 80.84
Figure - 80.85
🦷🖼️ Also, the device prints notifications and the captured image data on the serial monitor for debugging.
Figure - 80.86
Figure - 80.87
As far as my experiments go, the device operates impeccably while capturing dental cast images and saving them to the SD card :)
Figure - 80.88
After capturing images of numerous dental casts with different tags and storing them on the SD card, I elicited my data set, including training and testing samples for my object detection (FOMO) model.
📌 Dental cast tags:
Big Central Teeth
Antagonist Teeth
Orthodontic Superior
Prognathous
Strange Teeth Inferior
Strange Teeth Superior
Failed
Implant
Even though my 3D-printed dental casts have different tags pertinent to a dental problem, I categorized them under the dental cast accuracy classes (Cast, Failed, and Implant) since it is not possible to detect every cast individually with a limited data set and an object detection model running on an edge device.
Figure - 80.89
Figure - 80.90
Figure - 80.91
Figure - 80.92
Step 5: Building an object detection (FOMO) model with Edge Impulse
When I completed capturing dental cast images and storing them on the SD card, I had started to work on my object detection (FOMO) model to make predictions on the dental cast accuracy categories (classes).
Since Edge Impulse supports almost every microcontroller and development board due to its model deployment options, I decided to utilize Edge Impulse to build my object detection model. Also, Edge Impulse provides an elaborate machine learning algorithm (FOMO) for running more accessible and faster object detection models on edge devices such as Sony Spresense.
Edge Impulse FOMO (Faster Objects, More Objects) is a novel machine learning algorithm that brings object detection to highly constrained devices. FOMO models can count objects, find the location of the detected objects in an image, and track multiple objects in real-time, requiring up to 30x less processing power and memory than MobileNet SSD or YOLOv5.
Even though Edge Impulse supports JPG or PNG files to upload as samples directly, each training or testing sample needs to be labeled manually. Therefore, I needed to follow the steps below to format my data set so as to train my object detection model accurately:
Data Scaling (Resizing)
Data Labeling
Since I appended the assigned classes to the file names while capturing and storing dental cast images, I preprocessed my data set effortlessly to label my image samples on Edge Impulse:
0 — Cast
1 — Failed
2 — Implant
Plausibly, Edge Impulse allows building predictive models optimized in size and accuracy automatically and deploying the trained model as an Arduino library. Therefore, after scaling (resizing) and preprocessing my data set to label samples, I was able to build an accurate object detection model to predict dental cast accuracy categories (classes) and run the model on Sony Spresense effortlessly.
Step 5.1: Uploading images (samples) to Edge Impulse and labeling samples
After collecting training and testing image samples, I uploaded them to my project on Edge Impulse and labeled each sample with its assigned dental cast accuracy category (class).
#️⃣ First of all, sign up for Edge Impulse and create a new project.
Figure - 80.93
#️⃣ To be able to label image samples manually on Edge Impulse for object detection models, go to Dashboard ➡ Project info ➡ Labeling method and select Bounding boxes (object detection).
Figure - 80.94
#️⃣ Navigate to the Data acquisition page and click the Upload existing data button.
Figure - 80.95
Figure - 80.96
#️⃣ Then, choose the data category (training or testing), select image files, and click the Begin upload button.
Figure - 80.97
Figure - 80.98
Figure - 80.99
Figure - 80.100
After uploading my data set successfully, I labeled each image sample manually with its assigned dental cast accuracy category (class) - cast, failed, or implant. In Edge Impulse, labeling an object is as easy as dragging a box around it and entering a label. Also, Edge Impulse runs a tracking algorithm in the background while labeling objects, so it moves bounding boxes automatically for the same objects in different images.
#️⃣ Go to Data acquisition ➡ Labeling queue (Object detection labeling). It shows all the unlabeled images (training and testing) remaining in the given data set.
#️⃣ Finally, select an unlabeled image, drag bounding boxes around objects, click the Save labels button, and repeat this process until the whole data set is labeled.
Figure - 80.101
Figure - 80.102
Figure - 80.103
Figure - 80.104
Figure - 80.105
Figure - 80.106
Figure - 80.107
Figure - 80.108
Figure - 80.109
Figure - 80.110
Figure - 80.111
Step 5.2: Training the FOMO model on dental cast categories
After labeling my training and testing samples successfully, I designed an impulse and trained it on dental cast accuracy categories (classes).
An impulse is a custom neural network model in Edge Impulse. I created my impulse by employing the Image preprocessing block and the Object Detection (Images) learning block.
The Image preprocessing block optionally turns the input image format to grayscale and generates a features array from the raw image.
The Object Detection (Images) learning block represents a machine learning algorithm that detects objects on the given image, distinguished between model labels (cast, failed, and implant).
#️⃣ Go to the Create impulse page and set image width and height parameters to 160. Then, select the resize mode parameter as Fit shortest axis so as to scale (resize) given training and testing image samples.
#️⃣ Select the Image preprocessing block and the Object Detection (Images) learning block. Finally, click Save Impulse.
Figure - 80.112
#️⃣ Before generating features for the object detection model, go to the Image page and set the Color depth parameter as Grayscale. Then, click Save parameters.
Figure - 80.113
#️⃣ After saving parameters, click Generate features to apply the Image preprocessing block to training image samples.
Figure - 80.114
Figure - 80.115
#️⃣ Finally, navigate to the Object detection page and click Start training.
Figure - 80.116
Figure - 80.117
According to my experiments with my object detection model, I modified the neural network settings and architecture to build an object detection model with high accuracy and validity:
📌 Neural network settings:
Number of training cycles ➡ 150
Learning rate ➡ 0.025
Validation set size ➡ 10
📌 Neural network architecture:
FOMO (Faster Objects, More Objects) MobileNetV2 0.35
After generating features and training my FOMO model with training samples, Edge Impulse evaluated the F1 score (accuracy) as 84.6%.
Since I have a modest data set for dental casts in volume and variety, I am still collecting data to improve my training data set.
Figure - 80.118
Step 5.3: Evaluating the model accuracy and deploying the model
After building and training my object detection model, I tested its accuracy and validity by utilizing testing image samples.
The evaluated accuracy of the model is 87.50%.
#️⃣ To validate the trained model, go to the Model testing page and click Classify all.
Figure - 80.119
Figure - 80.120
Figure - 80.121
After validating my object detection model, I deployed it as a fully optimized and customizable Arduino library.
#️⃣ To deploy the validated model as an Arduino library, navigate to the Deployment page and select Arduino library.
#️⃣ Then, choose the Quantized (int8) optimization option to get the best performance possible while running the deployed model.
#️⃣ Finally, click Build to download the model as an Arduino library.
Figure - 80.122
Figure - 80.123
Figure - 80.124
Step 6: Setting up the Edge Impulse FOMO model on Sony Spresense
After building, training, and deploying my object detection (FOMO) model as an Arduino library on Edge Impulse, I needed to upload and run the Arduino library on Sony Spresense directly so as to create an easy-to-use and capable device operating with minimal latency and power consumption.
FOMO object detection models do not output bounding boxes but provide the detected object's location using centroids. Therefore, I modified the returned object location variables to create and display bounding boxes for detected objects on the ILI9341 TFT LCD touch screen.
Since Edge Impulse optimizes and formats preprocessing, configuration, and learning blocks into a single package while deploying models as Arduino libraries, I was able to import my model effortlessly to run inferences.
#️⃣ After downloading the model as an Arduino library in the ZIP file format, go to Sketch > Include Library > Add .ZIP Library...
#️⃣ Then, include the Dental_Model_Classifier_inferencing.h file to import the Edge Impulse object detection model.
#include <Dental_Model_Classifier_inferencing.h>
After importing my model successfully to the Arduino IDE, I employed the control button (B) attached to Sony Spresense to run inferences so as to predict dental cast accuracy categories (classes):
Press ➡ Run Inference
You can download the dental_model_classifier_run_model.ino file to try and inspect the code for running Edge Impulse neural network models on Sony Spresense.
You can inspect the corresponding functions and settings in Step 4.
⭐ Include the required libraries.
#include <Camera.h>
#include <Adafruit_GFX.h>
#include <Adafruit_ILI9341.h>
#include "Adafruit_Thermal.h"
// Include the Edge Impulse FOMO model converted to an Arduino library:
#include <Dental_Model_Classifier_inferencing.h>
⭐ Define the required parameters to run an inference with the Edge Impulse model.
⭐ Define the dental cast accuracy category (class) names and color codes.
⭐ In the run_inference_to_make_predictions function:
⭐ Summarize the object detection (FOMO) model inference settings (from model_metadata.h) and print them on the serial monitor.
⭐ Take a picture with the given still picture settings.
⭐ Pause the video stream and print errors, if any.
⭐ Resize the currently captured image depending on the given object detection (FOMO) model.
⭐ Convert the resized image (sample) data format to GRAYSCALE so as to run inferences with the model.
⭐ Create a signal object from the resized and converted image sample.
⭐ Then, run the classifier.
⭐ Print the inference timings on the serial monitor.
⭐ Obtain the object detection results and the object location (centroid) for the detected label (class).
⭐ Print the object location (centroid) variables on the serial monitor.
⭐ Get the predicted label (class) by the FOMO model.
⭐ Print the detected anomalies on the serial monitor, if any.
⭐ If the FOMO model predicts a label (class) successfully:
⭐ Modify (scale) the returned object location (centroid) variables to generate bounding box measurements.
⭐ Display the predicted label (class) and the generated bounding box of the detected object with its assigned color code on the ILI9341 TFT touch screen.
⭐ Print the predicted label (class) information and details via the tiny (embedded) thermal printer.
⭐ Clear the predicted label (class).
⭐ Resume the video stream and print errors, if any.
void run_inference_to_make_predictions(){
// Summarize the Edge Impulse FOMO model inference settings (from model_metadata.h):
ei_printf("\nInference settings:\n");
ei_printf("\tImage resolution: %dx%d\n", EI_CLASSIFIER_INPUT_WIDTH, EI_CLASSIFIER_INPUT_HEIGHT);
ei_printf("\tFrame size: %d\n", EI_CLASSIFIER_DSP_INPUT_FRAME_SIZE);
ei_printf("\tNo. of classes: %d\n", sizeof(ei_classifier_inferencing_categories) / sizeof(ei_classifier_inferencing_categories[0]));
// Take a picture with the given still picture settings.
CamImage img = theCamera.takePicture();
if(img.isAvailable()){
// Pause video stream and print errors, if any.
adjustColor(1,1,0);
Serial.println("\nPausing streaming...\n");
err = theCamera.startStreaming(false, CamCB);
if(err != CAM_ERR_SUCCESS) printError(err);
// Resize the currently captured image depending on the given FOMO model.
CamImage res_img;
img.resizeImageByHW(res_img, EI_CLASSIFIER_INPUT_WIDTH, EI_CLASSIFIER_INPUT_HEIGHT);
Serial.printf("Captured Image Resolution: %d / %d\nResized Image Resolution: %d / %d", img.getWidth(), img.getHeight(), res_img.getWidth(), res_img.getHeight());
// Convert the resized (sample) image data format to GRAYSCALE so as to run inferences with the model.
res_img.convertPixFormat(CAM_IMAGE_PIX_FMT_GRAY);
Serial.print("\nResized Image Format: ");
Serial.println((res_img.getPixFormat() == CAM_IMAGE_PIX_FMT_GRAY) ? "GRAYSCALE" : "ERROR");
// Run inference:
ei::signal_t signal;
ei_camera_capture_out = res_img.getImgBuff();
// Create a signal object from the resized and converted sample image.
signal.total_length = EI_CLASSIFIER_INPUT_WIDTH * EI_CLASSIFIER_INPUT_HEIGHT;
signal.get_data = &ei_camera_cutout_get_data;
// Run the classifier:
ei_impulse_result_t result = { 0 };
EI_IMPULSE_ERROR _err = run_classifier(&signal, &result, false);
if(_err != EI_IMPULSE_OK){
ei_printf("ERR: Failed to run classifier (%d)\n", err);
return;
}
// Print the inference timings on the serial monitor.
ei_printf("\nPredictions (DSP: %d ms., Classification: %d ms., Anomaly: %d ms.): \n",
result.timing.dsp, result.timing.classification, result.timing.anomaly);
// Obtain the object detection results and bounding boxes for the detected labels (classes).
bool bb_found = result.bounding_boxes[0].value > 0;
for(size_t ix = 0; ix < EI_CLASSIFIER_OBJECT_DETECTION_COUNT; ix++){
auto bb = result.bounding_boxes[ix];
if(bb.value == 0) continue;
// Print the detected bounding box measurements on the serial monitor.
ei_printf(" %s (", bb.label);
ei_printf_float(bb.value);
ei_printf(") [ x: %u, y: %u, width: %u, height: %u ]\n", bb.x, bb.y, bb.width, bb.height);
b_b_x = bb.x; b_b_y = bb.y; b_b_w = bb.width; b_b_h = bb.height;
// Get the predicted label (class).
if(bb.label == "cast") predicted_class = 0;
if(bb.label == "failed") predicted_class = 1;
if(bb.label == "implant") predicted_class = 2;
Serial.print("\nPredicted Class: "); Serial.println(predicted_class);
}
if(!bb_found) ei_printf(" No objects found!\n");
// Detect anomalies, if any:
#if EI_CLASSIFIER_HAS_ANOMALY == 1
ei_printf("Anomaly: ");
ei_printf_float(result.anomaly);
ei_printf("\n");
#endif
// If the Edge Impulse FOMO model predicted a label (class) successfully:
if(predicted_class != -1){
// Scale the detected bounding box.
int box_scale_x = tft.width() / EI_CLASSIFIER_INPUT_WIDTH;
b_b_x = b_b_x * box_scale_x;
b_b_w = b_b_w * box_scale_x * 16;
if((b_b_w + b_b_x) > (tft.width() - 10)) b_b_w = tft.width() - b_b_x - 10;
int box_scale_y = tft.height() / EI_CLASSIFIER_INPUT_HEIGHT;
b_b_y = b_b_y * box_scale_y;
b_b_h = b_b_h * box_scale_y * 16;
if((b_b_h + b_b_y) > (tft.height() - 10)) b_b_h = tft.height() - b_b_y - 10;
// Display the predicted label (class) and the detected bounding box on the ILI9341 TFT screen.
for(int i=0; i<5; i++){
tft.drawRect(b_b_x+i, b_b_y+i, b_b_w-(2*i), b_b_h-(2*i), color_codes[predicted_class]);
}
int c_x = 10, c_y = 10, r_x = 120, r_y = 40, r = 3, offset = 6;
tft.drawRGBBitmap(10, c_y+r_y+10, (uint16_t*)(dental.pixel_data), (int16_t)dental.width, (int16_t)dental.height);
tft.fillRoundRect(c_x, c_y, r_x, r_y, r, ILI9341_WHITE);
tft.fillRoundRect(c_x+offset, c_y+offset, r_x-(2*offset), r_y-(2*offset), r, color_codes[predicted_class]);
tft.setTextColor(ILI9341_WHITE); tft.setTextSize(2);
tft.setCursor(c_x+(2*offset), c_y+(2*offset));
tft.printf(classes[predicted_class]);
// Print the predicted label (class) information via the thermal printer.
print_thermal(predicted_class);
// Clear the predicted class (label).
predicted_class = -1;
}
sleep(10);
// Resume video stream and print errors, if any.
adjustColor(0,1,0);
sleep(2);
Serial.println("\nResuming streaming...\n");
err = theCamera.startStreaming(true, CamCB);
if(err != CAM_ERR_SUCCESS) printError(err);
}else{
Serial.println("Failed to take a picture!");
adjustColor(1,0,0);
sleep(2);
}
}
⭐ If the control button (B) is pressed, run an inference with the object detection (FOMO) model to predict dental cast accuracy categories (classes).
Step 7: Running the FOMO model on Sony Spresense to classify dental casts
My Edge Impulse object detection (FOMO) model scans a captured image and predicts possibilities of labels (dental cast accuracy categories) to recognize an object on the given captured image. The prediction result (score) represents the model's "confidence" that the detected object corresponds to each of the three different dental cast accuracy categories (classes) [0 - 2], as shown in Step 5:
0 — Cast
1 — Failed
2 — Implant
After executing the dental_model_classifier_run_model.ino file on Sony Spresense:
🦷🖼️ The device turns the RGB LED to blue if the camera board connection with the Spresense main board is successful.
Figure - 80.131
Figure - 80.132
🦷🖼️ Then, the device turns the RGB LED to magenta as the default color and displays the video stream on the ILI9341 TFT LCD touch screen.
🦷🖼️ If the control button (B) is pressed, the device pauses the video stream and captures a picture. If the device captures the picture successfully, it turns the RGB LED to yellow, resizes the currently captured image, and converts its data format to GRAYSCALE.
🦷🖼️ Then, the device runs an inference with the Edge Impulse object detection (FOMO) model.
🦷🖼️ Finally, the device displays the detection result (dental cast accuracy category) and the generated bounding boxes on the ILI9341 TFT LCD touch screen.
🦷🖼️ Each dental cast accuracy category (class) has a unique color code to be shown on the ILI9341 TFT screen when being predicted (detected) by the FOMO model:
Cast ➡ Green
Failed ➡ Magenta
Implant ➡ Orange
🦷🖼️ Also, the device prints the predicted label (dental cast accuracy class) information and details via the tiny (embedded) thermal printer.
🦷🖼️ After printing information successfully, the device resumes the video stream and turns the RGB LED to green.
Figure - 80.133
Figure - 80.134
Figure - 80.135
Figure - 80.136
Figure - 80.137
Figure - 80.138
Figure - 80.139
Figure - 80.140
Figure - 80.141
Figure - 80.142
Figure - 80.143
Figure - 80.144
Figure - 80.145
Figure - 80.146
Figure - 80.147
🦷🖼️ Also, the device prints notifications and the captured image data on the serial monitor for debugging.
Figure - 80.148
Figure - 80.149
As far as my experiments go, the device recognizes objects with different dental cast accuracy categories (classes) precisely and shows accurate bounding boxes around the detected objects :)
Figure - 80.150
Videos and Conclusion
After completing all steps above and experimenting, I have employed the device to predict and detect dental cast accuracy categories (classes) of various 3D-printed dental casts so as to check potential mistakes and inaccuracies.
Figure - 80.151
Further Discussions
By applying object detection models trained on captured 3D-printed dental cast images in detecting dental cast accuracy categories, we can achieve to:
🦷🖼️ obtain more stable, flexible, and precise 3D-printed dental casts,
🦷🖼️ preclude potential mistakes and inaccuracies on the 3D-printed dental casts before diagnosis,
🦷🖼️ predict and detect dental problems faster and more straightforward,
🦷🖼️ assist dental technicians who are novices in 3D printing.
Figure - 80.152
References
[1] Erik Borgwardt, Great benefits of using 3D-printing and digital models in the dental industry, March 15, 2017, https://elosmedtech.com/great-benefits-of-using-3d-printing-and-digital-models-in-the-dental-industry/
/////////////////////////////////////////////
// AI-driven Dental Model Classifier //
// w/ Edge Impulse //
// --------------- //
// (Sony Spresense) //
// by Kutluhan Aktar //
// //
/////////////////////////////////////////////
//
// Via Spresense; collect dental cast images on an SD card to train an object detection model, display video stream, and run the model directly.
//
// For more information:
// https://www.theamplituhedron.com/projects/AI_driven_Dental_Model_Classifier_w_Edge_Impulse
//
//
// Connections
// Sony Spresense (w/ Extension Board) :
//                                2.8'' 240x320 TFT LCD Touch Screen (ILI9341)
// D7   --------------------------- CS
// D8   --------------------------- RESET
// D9   --------------------------- D/C
// MOSI --------------------------- SDI (MOSI)
// SCK  --------------------------- SCK
// 3.3V --------------------------- LED
// MISO --------------------------- SDO(MISO)
//                                Tiny (Embedded) Thermal Printer
// TX   --------------------------- RX
// RX   --------------------------- TX
// GND  --------------------------- GND
//                                Control Button (A)
// D2   --------------------------- +
//                                Control Button (B)
// D4   --------------------------- +
//                                Control Button (C)
// D14  --------------------------- +
//                                Keyes 10mm RGB LED Module (140C05)
// D3   --------------------------- R
// D5   --------------------------- G
// D6   --------------------------- B
// Include the required libraries:
#include <Camera.h>
#include <SDHCI.h>
#include <RTC.h>
#include <Adafruit_GFX.h>
#include <Adafruit_ILI9341.h>
// Include graphics (color bitmaps):
#include "data_collect.c"
// Define camera settings:
int g_pict_id = 0;
int g_width = CAM_IMGSIZE_QUADVGA_H;
int g_height = CAM_IMGSIZE_QUADVGA_V;
CAM_IMAGE_PIX_FMT g_img_fmt = CAM_IMAGE_PIX_FMT_JPG;
CAM_WHITE_BALANCE g_wb = CAM_WHITE_BALANCE_FLUORESCENT;
CAM_COLOR_FX g_cfx = CAM_COLOR_FX_NONE;
int g_divisor = 7;
// Define the camera error object.
CamErr err;

// Initialize the SD class.
SDClass  theSD;

// Define the required pins for the 240x320 TFT LCD Touch Screen (ILI9341):
#define TFT_CS   7
#define TFT_RST  8
#define TFT_DC   9

// Use hardware SPI (on Spresense, SCK, MISO, MOSI) and the above for DC/CS/RST.
Adafruit_ILI9341 tft = Adafruit_ILI9341(TFT_CS, TFT_DC, TFT_RST);
// Define the control button pins:
#define button_A 2
#define button_B 4
#define button_C 14
// Define the RGB LED pins:
#define redPin 3
#define greenPin 5
#define bluePin 6
// Define the data holders:
#define TFT_ROTATION 1
void setup(){
Serial.begin(115200);
pinMode(button_A, INPUT_PULLUP);
pinMode(button_B, INPUT_PULLUP);
pinMode(button_C, INPUT_PULLUP);
pinMode(redPin, OUTPUT);
pinMode(greenPin, OUTPUT);
pinMode(bluePin, OUTPUT);
// Initialize the RTC timer and set the date and time as the compiled date and time.
  RTC.begin();
  RtcTime compiledDateTime(__DATE__, __TIME__);
  RTC.setTime(compiledDateTime);
// Initialize the TFT LCD Touch Screen (ILI9341):
  tft.begin();
  tft.setRotation(TFT_ROTATION);
  tft.fillScreen(ILI9341_NAVY);
  tft.setTextColor(ILI9341_WHITE);  tft.setTextSize(2);
  tft.setCursor(10, 10);
  tft.println("Initializing...");
// Check the connection status between Spresense and the SD card.
  while(!theSD.begin()){
    Serial.println("Insert SD card.");
    adjustColor(1,0,0);
    sleep(1);
  }
  Serial.println("SD card is detected successfully!\n");
// Initialize the camera and print errors, if any.
/* begin() without parameters means that
* number of buffers = 1, 30FPS, QVGA, YUV 4:2:2 format */
  Serial.println("Camera initializing...");
  err = theCamera.begin();
  if(err != CAM_ERR_SUCCESS) printError(err);

  // Start video stream and print errors, if any.
  Serial.println("Starting streaming...");
  err = theCamera.startStreaming(true, CamCB);
  if(err != CAM_ERR_SUCCESS) printError(err);

  // Set the Auto white balance parameter and print errors, if any.
  Serial.println("Setting the Auto white balance parameter...");
  err = theCamera.setAutoWhiteBalanceMode(g_wb);
  if(err != CAM_ERR_SUCCESS) printError(err);

  // Set the still picture parameters and print errors, if any.
  Serial.println("Setting the still picture parameters...\n");
  err = theCamera.setStillPictureImageFormat(g_width, g_height, g_img_fmt, g_divisor);
  if(err != CAM_ERR_SUCCESS) printError(err);
adjustColor(0,0,1);
sleep(2);
}
void loop(){
// Set the default color.
adjustColor(1,0,1);
// Save the recently captured picture to the SD card, named according to the selected class.
if(!digitalRead(button_A)) takePicture(0);
if(!digitalRead(button_B)) takePicture(1);
if(!digitalRead(button_C)) takePicture(2);
}
void CamCB(CamImage img){
  // Check whether the img instance is available or not.
  if (img.isAvailable()){
    // Convert the image data format to RGB565 so as to display images on the ILI9341 TFT screen.
    img.convertPixFormat(CAM_IMAGE_PIX_FMT_RGB565);
    /* You can use image data directly by using getImgSize() and getImgBuff().
     * for displaying image to a display, etc. */
    tft.drawRGBBitmap(0, 0, (uint16_t *)img.getImgBuff(), 320, 240);
    Serial.print("Image data size => "); Serial.print(img.getImgSize(), DEC); Serial.print(" , ");
    Serial.print("Image buffer address => "); Serial.println((unsigned long)img.getImgBuff(), HEX);
  }else{
    Serial.println("Failed to get video stream image!");
  }
}
void takePicture(int _class){
  char filename[30] = {0};
  // Take a picture with the given still picture settings.
  CamImage img = theCamera.takePicture();
  if(img.isAvailable()){
    // Pause video stream and print errors, if any.
    adjustColor(1,1,0);
    Serial.println("\nPausing streaming...\n");
    err = theCamera.startStreaming(false, CamCB);
    if(err != CAM_ERR_SUCCESS) printError(err);
    // Get the current date and time.
    RtcTime rtc;
    rtc = RTC.getTime();
    // Define the file name.
    sprintf(filename, "%d_D_%04d.%02d.%02d__%02d.%02d.%02d.%s", _class, rtc.year(), rtc.month(), rtc.day(), rtc.hour(), rtc.minute(), rtc.second(), "JPG");
    // If the same file name exists, remove it in advance to prevent file appending.
    theSD.remove(filename);
    // Save the recently captured picture to the SD card.
    File myFile = theSD.open(filename, FILE_WRITE);
    myFile.write(img.getImgBuff(), img.getImgSize());
    myFile.close();
    Serial.println("Image captured successfully!");
    Serial.print("Selected Class: "); Serial.println(_class);
    Serial.printf("Name: %s\n", filename);
    Serial.printf("Resolution: %dx%d\n", img.getWidth(), img.getHeight());
    Serial.printf("Memory Size: %.2f / %.2f [KB]\n", img.getImgSize() / 1024.0, img.getImgBuffSize() / 1024.0);
    // Display the recently saved image information on the ILI9341 TFT screen.
    int c_x = 10, c_y = 100, r_x = 300, r_y = 120, r = 10, offset = 10, l = 15;
    tft.drawRGBBitmap(10, 10, (uint16_t*)(data_collect.pixel_data), (int16_t)data_collect.width, (int16_t)data_collect.height);
    tft.fillRoundRect(c_x, c_y, r_x, r_y, r, ILI9341_WHITE);
    tft.fillRoundRect(c_x+offset, c_y+offset, r_x-(2*offset), r_y-(2*offset), r, ILI9341_DARKGREEN);
    tft.setTextColor(ILI9341_WHITE); tft.setTextSize(1);
    tft.setCursor(c_x+(2*offset), c_y+(2*offset));
    tft.printf("Name: %s\n", filename);
    tft.setCursor(c_x+(2*offset), c_y+(2*offset)+l);
    tft.printf("Resolution: %dx%d\n", img.getWidth(), img.getHeight());
    tft.setCursor(c_x+(2*offset), c_y+(2*offset)+(2*l));
    tft.printf("Selected Class: %d", _class);
    sleep(5);
    // Resume video stream and print errors, if any.
    adjustColor(0,1,0);
    sleep(2);
    Serial.println("\nResuming streaming...\n");
    err = theCamera.startStreaming(true, CamCB);
    if(err != CAM_ERR_SUCCESS) printError(err);
  }else{
    Serial.println("Failed to take a picture!");
    adjustColor(1,0,0);
    sleep(2);
  }
}
void printError(enum CamErr err){
adjustColor(1,0,0);
sleep(2);
Serial.print("Error: ");
switch(err){
case CAM_ERR_NO_DEVICE: Serial.println("No Device"); break;
case CAM_ERR_ILLEGAL_DEVERR: Serial.println("Illegal device error"); break;
case CAM_ERR_ALREADY_INITIALIZED: Serial.println("Already initialized"); break;
case CAM_ERR_NOT_INITIALIZED: Serial.println("Not initialized"); break;
case CAM_ERR_NOT_STILL_INITIALIZED: Serial.println("Still picture not initialized"); break;
case CAM_ERR_CANT_CREATE_THREAD: Serial.println("Failed to create thread"); break;
case CAM_ERR_INVALID_PARAM: Serial.println("Invalid parameter"); break;
case CAM_ERR_NO_MEMORY: Serial.println("No memory"); break;
case CAM_ERR_USR_INUSED: Serial.println("Buffer already in use"); break;
case CAM_ERR_NOT_PERMITTED: Serial.println("Operation not permitted"); break;
default:
break;
}
}
void adjustColor(int r, int g, int b){
digitalWrite(redPin, (1-r));
digitalWrite(greenPin, (1-g));
digitalWrite(bluePin, (1-b));
}