In recent years, spreading forest fires impinged on endangered animal populations, water resources, pasture lands, farms, and property. Due to climate change, it is more challenging to extinguish or manage forest fires than ever before. Since the expected rain seasons are getting shorter each following year, forests encounter an irrevocable threat because of wildfires. Therefore, it is crucial to avert possible forest fires even before being ignited.
Although wildfires can start intrinsically due to lightning, hot and humid weather, or volcanic activity, unfortunately, humans engender more than 8 in 10 forest fires — 84 percent — worldwide[1]. Human-caused forest fires are mostly instigated by campfires left unattended, burning debris, equipment use and malfunctions, negligently discarded cigarettes, and intentional acts of arson[2]. Since cigarette butts and burning debris can start a fire by getting exposed to a reflected light beam through glass, plastic, or natural triggers even after being extinguished, it is most effective to eliminate cigarette butts and burning debris immediately to avoid possible forest fires. Even small fires caused by negligently discarded cigarette butts can beset us with the pernicious consequences of conflagration.
After perusing recent research papers on eliminating forest fire risks, I found out that removing negligently discarded cigarette butts and detecting small burning debris are arduous and strenuous for fire wardens. Due to irresponsible and reckless people, it is nearly impossible for fire wardens to eliminate each threat causing forest fires in time. Also, most countries do not earmark adequate funds to track these little treats due to the demanding workload. Therefore, I decided to build a remote-controlled robot that can:
track negligently discarded cigarette butts with object detection and multi-color detection,
remove the detected cigarette butts,
detect and extinguish burning debris,
inform the user of the incident location via SMS.
To build my robot base and integrate object detection and multi-color detection, I decided to utilize parts manufactured by EZ-Robot. Since EZ-Robot provides official support in the Synthiam ARC software for their robot parts and kits, I was able to use built-in computer vision algorithms, program robot features, and design a unique user interface effortlessly. EZ-Robot products provide a coding and robotics platform which is easy enough for elementary use cases and powerful for universities and real-world applications.
In addition to the EZ-Robot parts, I connected a TS01 IR temperature sensor and an L9110 fan motor to the EZ-B v4 smart controller (the brain of the robot) so as to detect and quench burning debris remotely. I implemented these features on the robot in the hope of preventing small fires from entrenching themselves in forests rapidly.
Since I wanted to notify the user of the incident location via SMS for detected cigarette butts and burning debris, I decided to employ an Arduino MKR GSM 1400 compatible with GSM and GPRS. After transferring the incident location via SMS successfully, I also connected a 10mm common anode RGB LED module (Keyes) to the MKR GSM 1400, which can be controlled via the ARC user interface remotely.
After training my robot to recognize cigarette butts with object detection and multi-color detection and programming robot features on the Synthiam ARC, I designed custom 3D-printable parts to make my robot as robust and sturdy as possible while operating outdoors.
So, this is my project in a nutshell 😃
In the following steps, you can find more detailed information on coding on the Synthiam ARC, training the EZ-B camera block to detect cigarette butts, extinguishing small burning debris, and sending the incident location via SMS with the MKR GSM 1400.
🎁🎨 Huge thanks to EZ-Robot for sponsoring these products:
Step 1: Designing and printing the additional robot parts
Although I utilized built-in robot parts from EZ-Robot, I decided to design custom robot parts to improve my robot. To collect the detected cigarette butts in a container and prevent loose wire connections, I designed the main case, which can be connected to the EZ-Robot robot chassis directly via its built-in EZ-Bit connection points. In that regard, the user can remove negligently discarded cigarette butts effortlessly and operate the robot remotely without worrying about connection issues.
Since I wanted to protect the EZ-B camera block from crashes and add a laser pointer on top of it, I designed the camera head, which can be connected to the EZ-B camera block via its built-in EZ-Bit connection point.
I employed the EZ-Robot peg as an extension for the IR temperature sensor and the cooling fan. Therefore, I designed the peg joint to connect the mentioned components to the EZ-Robot peg effortlessly. The peg joint covers the peg perfectly, so it is easy to repair or change malfunctioning sensors.
Also, I decided to adorn the main case with forest fire and no smoking icons so as to highlight the predicament of wildfires. Since I thought it would make the robot's design align with the fire theme, I decided to fasten a Charizard figure to the main case, well-known for its blazing fire attacks :)
I designed the main case, the camera head, and the peg joint in Autodesk Fusion 360. You can download their STL files below.
Figure - 84.10
Figure - 84.11
Figure - 84.12
Figure - 84.13
Figure - 84.14
Figure - 84.15
Figure - 84.16
For the Charizard figure (replica) affixed to the top of the main case, I utilized this model from Thingiverse:
Then, I sliced all 3D models (STL files) in Ultimaker Cura.
Figure - 84.17
Figure - 84.18
Figure - 84.19
Since I wanted to create a solid structure for additional robot parts representing scorching and withering fire, I utilized these PLA filaments:
Orange
Fire Engine Red
Finally, I printed all parts (models) with my Creality Sermoon V1 3D Printer and Creality CR-200B 3D Printer in combination with the Creality Sonic Pad. You can find more detailed information regarding the Sonic Pad in Step 1.1.
Figure - 84.20
Figure - 84.21
If you are a maker or hobbyist planning to print your 3D models to create more complex and detailed projects, I highly recommend the Sermoon V1. Since the Sermoon V1 is fully-enclosed, you can print high-resolution 3D models with PLA and ABS filaments. Also, it has a smart filament runout sensor and the resume printing option for power failures.
Furthermore, the Sermoon V1 provides a flexible metal magnetic suction platform on the heated bed. So, you can remove your prints without any struggle. Also, you can feed and remove filaments automatically (one-touch) due to its unique sprite extruder (hot end) design supporting dual-gear feeding. Most importantly, you can level the bed automatically due to its user-friendly and assisted bed leveling function.
#️⃣ Before the first use, remove unnecessary cable ties and apply grease to the rails.
Figure - 84.22
Figure - 84.23
Figure - 84.24
#️⃣ Test the nozzle and hot bed temperatures.
Figure - 84.25
#️⃣ Go to Print Setup ➡ Auto leveling and adjust five predefined points automatically with assisted leveling function.
Figure - 84.26
Figure - 84.27
#️⃣ Finally, place the filament into the integrated spool holder and feed the extruder with the filament.
Figure - 84.28
Figure - 84.29
#️⃣ Since the Sermoon V1 is not officially supported by Cura, download the latest Creality Slicer version and copy the official printer settings provided by Creality, including Start G-code and End G-code, to a custom printer profile on Cura.
Figure - 84.30
Figure - 84.31
Figure - 84.32
Figure - 84.33
Figure - 84.34
Step 1.1: Improving print quality and speed with the Creality Sonic Pad
Since I wanted to improve my print quality and speed with Klipper, I decided to upgrade my Creality CR-200B 3D Printer with the Creality Sonic Pad.
Creality Sonic Pad is a beginner-friendly device to control almost any FDM 3D printer on the market with the Klipper firmware. Since the Sonic Pad uses precision-oriented algorithms, it provides remarkable results with higher printing speeds. The built-in input shaper function mitigates oscillation during high-speed printing and smooths ringing to maintain high model quality. Also, it supports G-code model preview.
Although the Sonic Pad is pre-configured for some Creality printers, it does not support the CR-200B officially yet. Therefore, I needed to add the CR-200B as a user-defined printer to the Sonic Pad. Since the Sonic Pad needs unsupported printers to be flashed with the self-compiled Klipper firmware before connection, I flashed my CR-200B with the required Klipper firmware settings via FluiddPI by following this YouTube tutorial.
If you do not know how to write a printer configuration file for Klipper, you can download the stock CR-200B configuration file from here.
#️⃣ After flashing the CR-200B with the Klipper firmware, copy the configuration file (printer.cfg) to a USB drive and connect the drive to the Sonic Pad.
Figure - 84.35
#️⃣ After setting up the Sonic Pad, select Other models. Then, load the printer.cfg file.
Figure - 84.36
Figure - 84.37
Figure - 84.38
#️⃣ After connecting the Sonic Pad to the CR-200B successfully via a USB cable, the Sonic Pad starts the self-testing procedure, which allows the user to test printer functions and level the bed.
Figure - 84.39
Figure - 84.40
Figure - 84.41
#️⃣ After completing setting up the printer, the Sonic Pad lets the user control all functions provided by the Klipper firmware.
Figure - 84.42
Figure - 84.43
#️⃣ In Cura, export the sliced model in the ufp format. After uploading .ufp files to the Sonic Pad via the USB drive, it converts them to G-code automatically.
#️⃣ Also, the Sonic Pad can display model preview pictures generated by Cura with the Create Thumbnail script.
Figure - 84.44
Figure - 84.45
Step 1.2: Assembling the robot and making connections & adjustments
// EZ-B v4 Smart Robot Controller Connections :
//
// EZ-B Camera Block ➡ EZ-B v4 Camera port
// EZ-Robot Lever Servo (Camera First Joint) ➡ D13
// EZ-Robot Rotation Servo (Camera Second Joint) ➡ D12
//
// EZ-Robot Robot Chassis HBridge Left A (Blue) ➡ D1
// EZ-Robot Robot Chassis HBridge Left B (Purple) ➡ D2
// EZ-Robot Robot Chassis HBridge PWM Left (Green) ➡ D0
// EZ-Robot Robot Chassis HBridge PWM Right (Black) ➡ D5
// EZ-Robot Robot Chassis HBridge Right A (Grey) ➡ D3
// EZ-Robot Robot Chassis HBridge Right B (White) ➡ D4
//
// EZ-Robot Lever Servo (Peg Joint) ➡ D23
//
// EZ-Robot Gripper➡ D8
// EZ-Robot Lever Servo (Gripper First Joint) ➡ D11
// EZ-Robot Rotation Servo (Gripper Second Joint) ➡ D10
// EZ-Robot Rotation Servo (Gripper Third Joint) ➡ D9
//
// L9110 Keyes Fan Motor ➡ D21, D20
//
// KY-008 Laser Module ➡ D22
//
// DFRobot TS01 Non-contact IR Temperature Sensor ➡ ADC0
//
//
//
// Arduino MKR GSM 1400 Connections :
//                                EZ-B V4 SMART ROBOT CONTROLLER
// D13 (RX) ---------------------- TX
// D14 (TX) ---------------------- RX
//                                Keyes 10mm RGB LED Module (140C05)
// D2  --------------------------- R
// D3  --------------------------- G
// D4  --------------------------- B
First of all, I attached all EZ-Robot parts to the EZ-B v4 smart controller. Then, I connected the DFRobot TS01 IR temperature sensor and the L9110 fan motor (Keyes) to the EZ-B smart controller. Also, I connected a KY-008 laser module to the EZ-B controller to activate it as a laser pointer when the EZ-B camera block is initialized.
Since I wanted to inform the user of the incident location via SMS after detecting cigarette butts or burning debris, I decided to add an Arduino MKR GSM 1400 to my robot. To be able to send commands from the EZ-B smart controller to the MKR GSM 1400 via serial communication, I connected the UART0 port on the EZ-B controller to the hardware serial port (Serial1) on the MKR GSM 1400. Also, I connected a 10mm common anode RGB LED module (Keyes) to the MKR GSM 1400 so as to adjust it via the robot's user interface on the Synthiam ARC.
Since the MKR GSM 1400 operates at 3.3V, it cannot be connected to the EZ-B smart controller directly, which requires 5V logic level voltage. Therefore, I utilized a bi-directional logic level converter to shift the voltage for the connections between the EZ-B controller and the MKR GSM 1400. For the same reason, I employed a 3.7V LiPo battery to power the MKR GSM 1400 via its built-in JST battery connector.
Finally, I placed the EZ-B v4 smart controller on the EZ-Robot robot chassis.
Figure - 84.46
Figure - 84.47
Figure - 84.48
After printing all additional parts (models), I connected the TS01 IR temperature sensor, the L9110 fan motor, and the laser module to the peg joint and the camera head.
I attached the main case to the EZ-Robot robot chassis and the camera head to the EZ-B camera block via the built-in EZ-Bit connection points.
Then, I placed the peg joint on the EZ-Robot peg.
Figure - 84.49
Figure - 84.50
Figure - 84.51
Figure - 84.52
Figure - 84.53
Figure - 84.54
Figure - 84.55
Figure - 84.56
Figure - 84.57
Figure - 84.58
Figure - 84.59
Figure - 84.60
Figure - 84.61
Finally, I affixed the Charizard figure to the top of the main case via a hot glue gun.
Figure - 84.62
Figure - 84.63
Figure - 84.64
Step 2: Creating and programming the robot interface in the Synthiam ARC
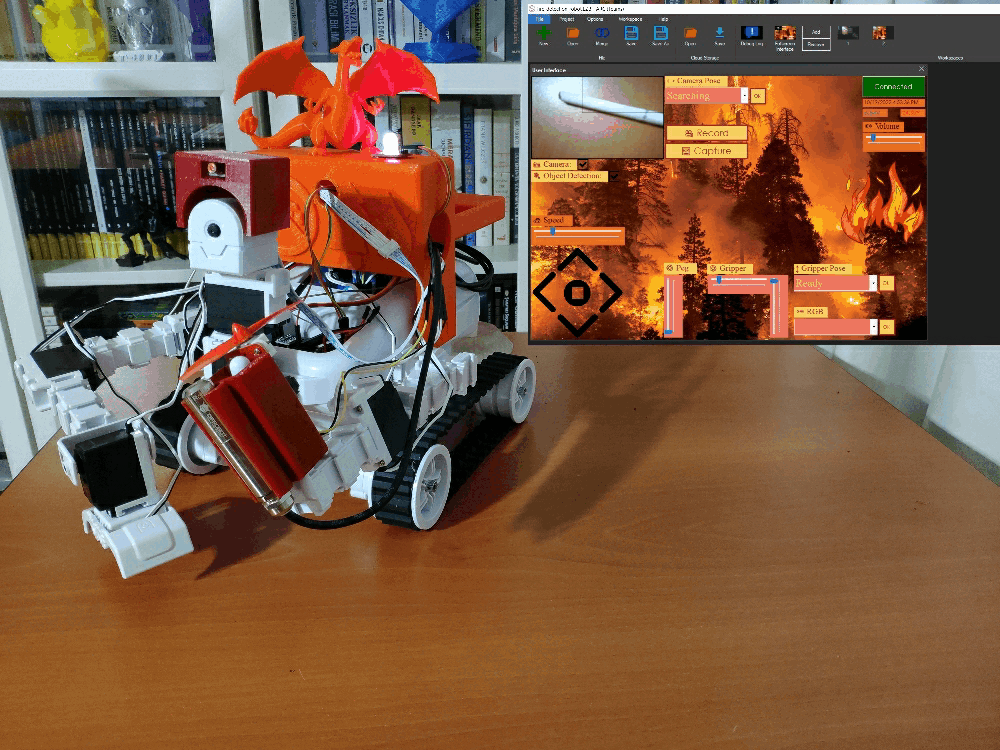
EZ-Robot provides official support in the Synthiam ARC software for their robot parts and kits. Therefore, I was able to design an advanced user interface, program my robot, and use the built-in features provided by the ARC. Since EZ-Robot focuses on teaching real-world robotics to thousands of students each year and offers versatility for users, I highly recommend trying their kits if you are a novice in robotics. Also, you can build more advanced robots, as shown in this tutorial, depending on your experience in the field.
#️⃣ After completing assembling my robot, I downloaded the latest version of the Synthiam ARC software from here.
#️⃣ Then, I created a new project in the ARC and added the required robot skills for my project, officially supported by Synthiam. Each robot skill is a behavior for the robot and provides various abilities such as speech recognition, computer vision, and more. You can inspect all supported skills from here.
Figure - 84.65
#️⃣ After adding the required robot skills, I designed a unique user interface to control my robot remotely. Since the ARC software provides a built-in drag-and-drop interface-building program with various elements, I was able to create my interface easily.
Figure - 84.66
#️⃣ After designing my interface, I started to program functions and features for my robot, controlled via the user interface remotely. ARC provides programming options for beginner users and advanced developers:
RoboScratch
Blockly
EZ-Script
Python
JavaScript
#️⃣ Even though I have experience with programming in Python and JavaScript, I decided to utilize EZ-Script in this project to try and learn it.
#️⃣ EZ-Script is well-documented and provides built-in functions and commands if you are not familiar with developing with EZ-Robot products. While coding in EZ-Script, I did not encounter any problems. You can inspect all built-in EZ-Script commands from here.
⭐ First, I programmed settings for Servo Tracking, which lets the EZ-B camera block track the detected cigarette butts via the assigned servo motors.
Figure - 84.67
⭐ Then, I programmed my robot functions individually for each interface element via the built-in interface builder.
⭐ Click the Edit Script button to add an event script to the selected interface element.
Figure - 84.68
Figure - 84.69
Figure - 84.70
Figure - 84.71
Figure - 84.72
Figure - 84.73
Figure - 84.74
Figure - 84.75
Figure - 84.76
Figure - 84.77
Figure - 84.78
Figure - 84.79
Figure - 84.80
⭐ When the fire detection button on the user interface is clicked:
⭐ Obtain the temperature measurement generated by the TS01 IR temperature sensor.
⭐ If the evaluated temperature is higher than 50 degrees Celsius:
⭐ Notify people nearby by playing the fire truck siren via the built-in speaker.
⭐ Capture a picture of the detected burning debris.
⭐ Initialize the L9110 fan motor (cooling fan) for 5 seconds.
⭐ Via serial communication, transfer the location command to the Arduino MKR GSM 1400 so as to send the incident location to the user as an SMS message.
if($temperature > 50)
  # Notify the user with the fire truck siren.
  controlCommand("Soundboard v4", "Track_0")
  sleep(2000)
  # Capture a picture of the burning debris.
  controlCommand("Camera", "CameraSnapshot")
  sleep(3000)
  # Initialize the cooling fan.
  Set(D21, ON)
  Set(D20, OFF)
  sleep(5000)
  Set(D21, OFF)
  Set(D20, OFF)
  # Send an SMS including the robot location to the user
  # via the Arduino MKR GSM 1400.
  UARTInit(0,0,115200)
  UARTWrite(0,0,"location")
  sleep(2000)
endif
Since I needed to program every interface element individually on the interface builder, I only thoroughly explained the code for detecting burning debris and communicating with the MKR GSM 1400 via serial communication.
However, you can download the fire_detection_robot.EZB file to try and inspect my code, functions, and interface design on the ARC software.
Figure - 84.81
Figure - 84.82
Step 3: Training the robot to recognize cigarette butts via object detection and multi-color detection
After programming the interface features for my robot, I started to work on utilizing object detection and multi-color detection algorithms to detect negligently discarded cigarette butts on the frames captured by the EZ-B camera block.
Since the ARC software provides built-in computer vision algorithms with the Camera robot skill, I was able to train my robot to recognize cigarette butts easily.
Figure - 84.83
#️⃣ First, connect and start the EZ-B camera block.
#️⃣ To train the robot to detect objects, go to the Camera robot skill and select Object.
#️⃣ Then, click the Train New Object button and draw a bounding box around the object.
#️⃣ Finally, click the Learn Selected Area button.
#️⃣ Repeat these steps until training the object detection algorithm on different angles of cigarette butts to get better detection results.
Figure - 84.84
Figure - 84.85
Figure - 84.86
Figure - 84.87
Figure - 84.88
Figure - 84.89
Figure - 84.90
Figure - 84.91
Figure - 84.92
Figure - 84.93
Figure - 84.94
Figure - 84.95
Figure - 84.96
Figure - 84.97
Figure - 84.98
After training my robot to detect cigarette butts with the object detection algorithm, I realized it could not detect them correctly after seeing three or more cigarette butts in the same captured frame. Therefore, I decided to train the robot to track cigarette butts with multi-color detection in addition to object detection.
#️⃣ To train the robot to detect multiple colors, go to the Camera robot skill and select Multi Color.
#️⃣ Then, click the Add button.
#️⃣ Adjust saturation, luminance, and size variables until seeing objects with the given multi-color settings as black in the captured frames.
#️⃣ Finally, click the Save button.
Figure - 84.99
Figure - 84.100
After training the robot on tracking cigarette butts with object detection and multi-color detection, the user interface shows the detected cigarette butts with bounding boxes on the screen.
Figure - 84.101
Step 4: Setting up the Arduino MKR GSM 1400
Since the Arduino MKR GSM 1400 can send SMS messages, I decided to utilize it to obtain commands from the EZ-B smart controller via serial communication and transfer the incident location to inform the user.
Also, the MKR GSM 1400 can pinpoint its approximate location via GPRS (General Packet Radio Service). Although GPRS is not accurate as GPS (Global Positioning System) for location tracking, it provides enough accuracy for a fire prevention robot within +/- 200 meters inaccuracy.
To enable the GSM modem features, I attached a DFRobot GSM antenna tuned for the frequency band in use in the GSM / 3G range to the MKR GSM 1400.
Before proceeding with the following steps, I needed to set up the MKR GSM 1400 on the Arduino IDE and install the required libraries for this project.
#️⃣ To install the required core, navigate to Tools ➡ Board ➡ Boards Manager and search for Arduino SAMD Boards.
Figure - 84.102
Figure - 84.103
#️⃣ To send SMS messages and retrieve the board location via GPRS with a data-enabled SIM card, download the MKRGSM library: Go to Sketch ➡ Include Library ➡ Manage Libraries… and search for MKRGSM.
Figure - 84.104
Since the MKRGSM library requires the Access Point Name (APN) of the data-enabled SIM card to connect to the GPRS network, I needed to find the APN information of my service provider.
You can find the APN information of your service provider from here or in the Settings app on your mobile phone, as did I.
Figure - 84.105
Step 5: Transferring the incident location via SMS w/ the MKR GSM 1400
After setting up the MKR GSM 1400 and installing the required libraries, I programmed the MKR GSM 1400 to obtain commands transferred by the EZ-B smart controller via serial communication and send the approximate incident location via SMS so as to notify the user, pinpointed by using GPRS.
Also, the MKR GSM 1400 adjusts the RGB LED color depending on the received command from the EZ-B smart controller.
You can download the fire_detection_robot_SMS_service.ino file to try and inspect the code for obtaining commands via serial communication, pinpointing the approximate board location via GPRS, and sending SMS messages.
⭐ Include the required libraries.
#include <MKRGSM.h>
⭐ Define the APN (Access Point Name) information.
⭐ Initialize GSM, GPRS, SMS, and location instances.
⭐ Initiate the hardware serial port (Serial1) to communicate with the EZ-B smart controller.
  Serial1.begin(115200);
  Serial.begin(115200);
⭐ Start the GSM modem and attach the MKR GSM 1400 to the GPRS network with the APN, login, and password variables.
⭐ If the GPRS network connection is successful, turn the RGB LED to blue. Otherwise, turn the RGB LED to red.
  bool connected = false;
  // Uncomment to debug errors with AT commands.
  //MODEM.debug();
  while(!connected){
    if((gsmAccess.begin(PINNUMBER) == GSM_READY) && (gprs.attachGPRS(GPRS_APN, GPRS_LOGIN, GPRS_PASSWORD) == GPRS_READY)){
      connected = true;
    }else{
      Serial.println("GSM Modem: Not connected!\n");
      adjustColor(255,0,0);
      delay(1000);
    }
  }
  // After connecting to the GPRS network successfully:
  Serial.println("GSM Modem: Connected successfully to the GPRS network!\n");
  adjustColor(0,0,255);
  delay(5000);
⭐ In the getLocation function, pinpoint the approximate board location by using GPRS (General Packet Radio Service), including latitude, longitude, altitude, and accuracy.
⭐ In the SMS function, send an SMS message including the estimated board location to the given mobile phone number over the GSM network.
⭐ If the SMS message is transferred successfully, turn the RGB LED to green.
void SMS(const char* phone, String msg){
  // Send an SMS to the given mobile phone number over the GSM network.
  sms.beginSMS(phone);
  sms.print(msg);
  sms.endSMS();
  Serial.println("SMS sent successfully!");
  adjustColor(0,255,0);
  delay(3000);
}
⭐ Obtain the commands transferred by the EZ-B smart controller via serial communication.
🤖🔥🚬 The ARC software connects to the EZ-B smart controller over the Wi-Fi network if the connection button is pressed.
🤖🔥🚬 Then, the user interface shows the remaining battery supply voltage and the evaluated CPU temperature of the robot on the screen.
🤖🔥🚬 When the robot receives a command from the user interface via the Wi-Fi network, it informs people nearby by talking via the built-in speaker on the EZ-B smart controller.
🤖🔥🚬 Furthermore, the user interface lets the user control the robot via the movement buttons and adjust its speed and built-in speaker volume remotely.
Figure - 84.110
🤖🔥🚬 The robot starts the EZ-B camera block and activates the laser module as a laser pointer if the Camera checkbox is selected.
Figure - 84.111
Figure - 84.112
Figure - 84.113
🤖🔥🚬 The robot activates object detection and multi-color detection for cigarette butts if the Object Detection checkbox is selected.
🤖🔥🚬 If the robot detects cigarette butts on the captured frames by the EZ-B camera block, the user interface displays them on the screen with bounding boxes and notifies people nearby by playing the crackling fire sound via the built-in speaker on the EZ-B smart controller.
Figure - 84.114
🤖🔥🚬 If the Capture button is clicked, the user interface saves the latest captured frame by the EZ-B camera block.
🤖🔥🚬 If the Record button is clicked, the user interface records a video for 10 seconds.
Figure - 84.115
Figure - 84.116
Figure - 84.117
Figure - 84.118
🤖🔥🚬 If a camera position option is selected under the Camera Pose combo box, the robot changes the camera position to:
Default
Searching
Left
Right
Figure - 84.119
Figure - 84.120
Figure - 84.121
Figure - 84.122
Figure - 84.123
🤖🔥🚬 If a gripper position is selected under the Gripper Pose combo box, the robot changes the gripper position to:
Default
Ready
Activated
Figure - 84.124
Figure - 84.125
Figure - 84.126
Figure - 84.127
🤖🔥🚬 After positioning the gripper, the user interface lets the user control the gripper manually via the Gripper sliders.
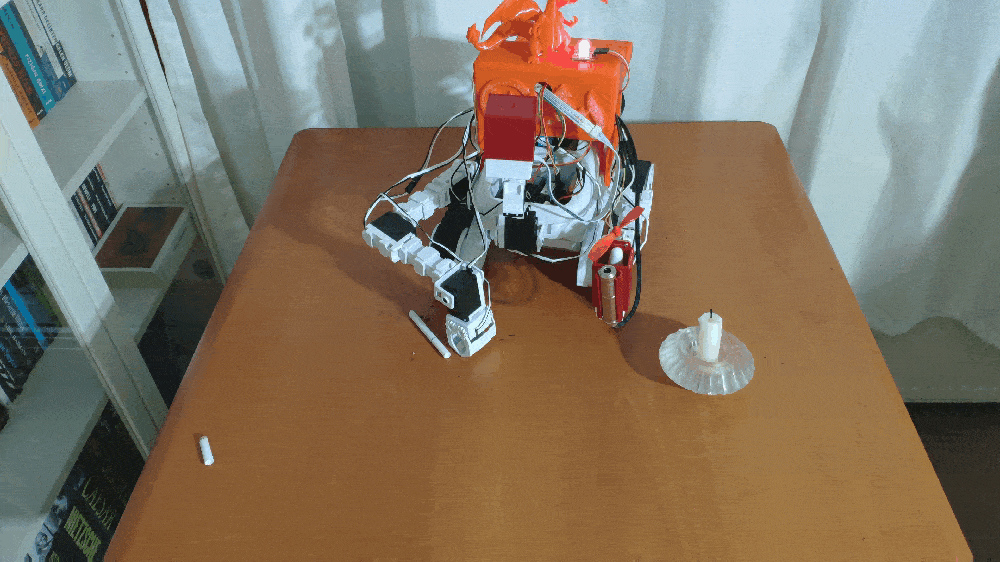
🤖🔥🚬 In this regard, the user can remove the detected cigarette butts from the forest and collect them in the integrated container (the main case) so as to avoid any possible wildfire risk remotely.
Figure - 84.128
Figure - 84.129
Figure - 84.130
Figure - 84.131
🤖🔥🚬 The user interface allows the user to change the TS01 IR temperature sensor and the L9110 fan motor positions by utilizing the Peg slider since they are attached to the peg via the peg joint.
Figure - 84.132
Figure - 84.133
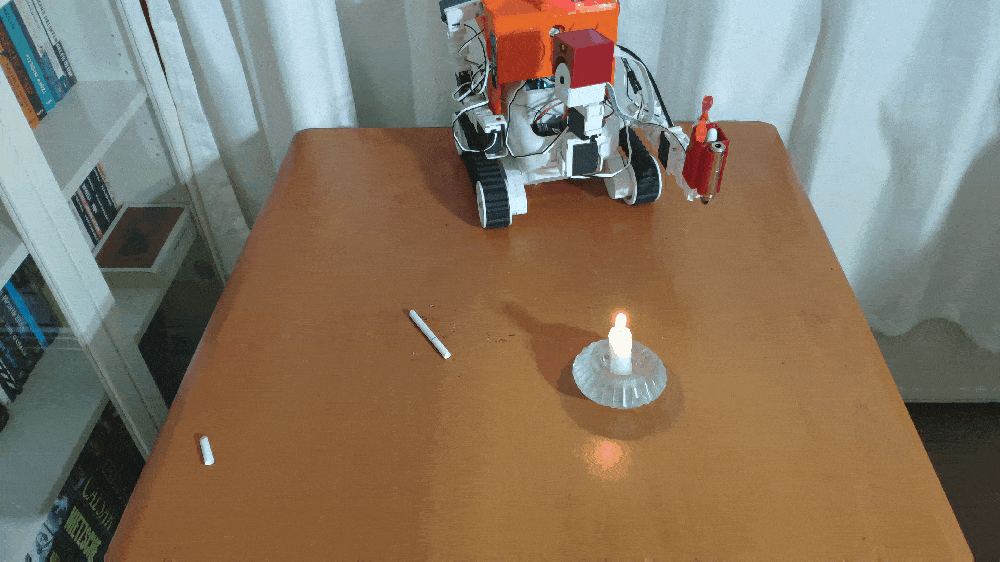
🤖🔥🚬 If the fire detection button is pressed, the user interface changes the button icon from fire to cooling fan and starts obtaining temperature measurements generated by the TS01 IR temperature sensor.
🤖🔥🚬 If the evaluated temperature is higher than 50 degrees Celsius, the robot activates the L9110 fan motor to extinguish the detected burning debris.
🤖🔥🚬 Also, the robot captures a picture of the detected burning debris automatically and notifies people nearby by playing the fire truck siren via the built-in speaker on the EZ-B smart controller.
🤖🔥🚬 Then, the robot transfers the location command to the Arduino MKR GSM 1400 via serial communication.
🤖🔥🚬 After receiving the location command, the MKR GSM 1400 sends the incident location to the user via SMS:
Latitude
Longitude
Altitude
Accuracy
Figure - 84.134
Figure - 84.135
Figure - 84.136
🤖🔥🚬 If a color option is selected under the RGB combo box, the robot sends the selected color option as a command to the MKR GSM 1400 via serial communication:
OFF
Red
Green
Blue
Yellow
Magenta
Orange
Pink
White
🤖🔥🚬 Then, the MKR GSM 1400 adjusts the RGB LED color depending on the received command.
Figure - 84.137
Figure - 84.138
Figure - 84.139
Figure - 84.140
Videos and Conclusion
Further Discussions
By building autonomous robots which tracks negligently discarded cigarette butts with computer vision, removes them from forests, and extinguish burning debris remotely, we can achieve to:
🤖🔥🚬 prevent potential wildfire and conflagration risks,
🤖🔥🚬 protect wildlife and endangered species,
🤖🔥🚬 maintain water resources and pasture lands,
🤖🔥🚬 avoid property damage,
🤖🔥🚬 ameliorate soil retrogression and degradation.
Figure - 84.141
Figure - 84.142
References
[1] Christopher Joyce,What's The Leading Cause Of Wildfires In The U.S.? Humans, National Public Radio (NPR), https://www.npr.org/sections/thetwo-way/2017/02/27/517100594/whats-the-leading-cause-of-wildfires-in-the-u-s-humans
[2]Wildfire Causes and Evaluations, National Park Service (NPS), https://www.nps.gov/articles/wildfire-causes-and-evaluation.htm