As the last few years attested, distance education (remote learning) provides countless advantages, such as better accessibility, higher productivity, time flexibility, and increased motivation. Furthermore, distance education is singled out as a vital tool in bridging the gap between students internationally since remote learning does not set strict schedules and thus enables students to review courses at a pace that is more appropriate to their needs.
Also, distance education can benefit undergraduate students or interns while acquiring new skills to improve their careers. Since accessing online lectures and courses is effortless thanks to online course providers, distance education allows students to obtain new skills, certifications, and degrees with the highest course quality, even from renowned pioneers of various fields.
Nonetheless, distance education still lacks the glamour of providing directions or suggestions without a live Q&A session while working on a student project or a solution for a real-world problem. Since it is crucial to give students insightful and engaging feedback while conducting experiments, distance education methods are yet dependent on the availability of constructive Q&A sessions for experiment-based learning.
After scrutinizing recent research papers on distance education, I noticed there are very few methods focusing on applying object detection with artificial intelligence to provide auto-generated insightful suggestions and guidance, especially for lab-related studies. Since lab-related studies rely on experiments with different types of lab equipment, I decided to build an AI-driven interactive lab assistant counseling students regarding lab equipment, their proper utilization, and history.
Since lab equipment can be opaque, transparent, in various shapes, and change volume depending on the research subject, it is arduous to construct a valid and notable data set for object detection models. Thus, I decided to employ OpenCV modification features to convert images to generate meaningful data samples for diverse lab equipment regardless of their complex structures. Depending on the given lab equipment, I utilized canny edge detection, erosion and dilation morphological operators, Gaussian blur, and color space conversions so as to generate unique and meaningful samples.
Since NVIDIA Jetson Nano is a compact and easy-to-use platform tailored for running multiple neural networks in parallel for applications like image classification, object detection, segmentation, and speech processing, I decided to utilize Jetson Nano as the centerpiece of this lab assistant. To collect lab equipment images (samples), I connected a high-quality USB webcam to Jetson Nano.
In order to construct my data set, I established a basic laboratory, including various lab equipment related to biology, chemistry, and physics. After applying and testing different OpenCV features on the camera feed for each lab equipment, I collected my data samples so as to construct a notable data set.
After completing my data set, I built my object detection model with Edge Impulse to detect diverse lab equipment from my laboratory. I utilized the Edge Impulse FOMO (Faster Objects, More Objects) algorithm to train my model, which is a novel machine learning algorithm that brings object detection to highly constrained devices. Since Edge Impulse is nearly compatible with all microcontrollers and development boards, I have not encountered any issues while uploading and running my model on Jetson Nano. As labels, I utilized the names of each lab equipment (10 classes). Furthermore, while developing this project, I employed some Edge Impulse Enterprise features to improve device accessibility, as described in the following steps.
After training and testing my object detection (FOMO) model, I deployed and uploaded the model on Jetson Nano as a Linux (AARCH64) application (.eim). Therefore, this lab assistant is capable of detecting lab equipment by running the model independently without any additional procedures or latency. Even though the RGB image format is required to run the model with the Python SDK, I managed to run my model with the modified frames, according to the applied OpenCV features for each lab equipment while collecting data, by iterating temporary image files as modified samples. Thus, the model accuracy is vastly increased for on-device real-time analytics.
Since I focused on building a full-fledged AI-based lab assistant, after running the object detection model successfully, I decided to employ the OpenAI API to obtain ChatGPT-powered insightful suggestions and guidance as auto-generated lessons so as to inform the user (student) of the detected lab equipment thoroughly. To enable ChatGPT to generate effective lessons not dependent on a single approach, I provided different inquiries (topics) related to the given lab equipment automatically.
After generating ChatGPT-powered lessons successfully, I decided to use the gTTS (Google Text-to-Speech) module to convert the generated lesson to speech and provide students with the option to save the speech as an audio file on the system for later study sessions or repeating a course.
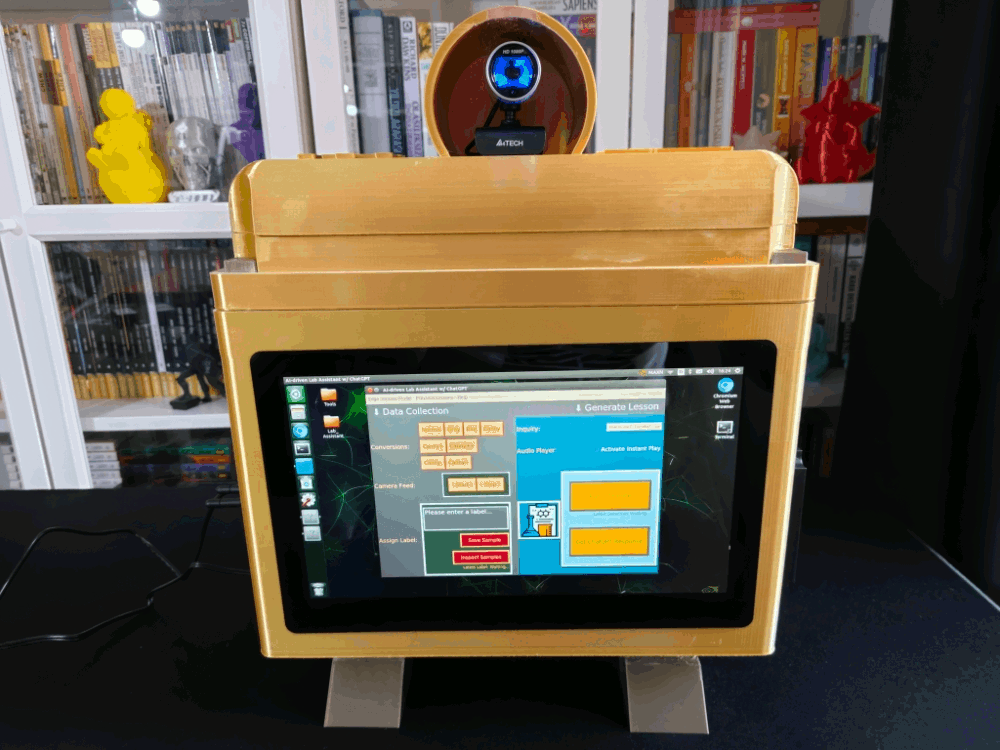
Since I wanted to make this device as accessible as possible, hence the interactive emphasis, I decided to develop an enhanced user interface from scratch with Tkinter (guizero). To let students utilize the user interface (Tkinter application) effortlessly, I utilized a CrowVision high-quality 11.6” (1366x768) touchscreen module. Thanks to its slidable rear-side spacers, I was able to mount Jetson Nano to the back of the screen perfectly. Also, since Jetson Nano does not include built-in speakers, I was able to connect 5W speakers directly to the control board of the screen so as to play the ChatGPT-generated lessons.
As explained in the following steps, the user interface (GUI) provides these features:
change the applied OpenCV feature on the real-time camera feed,
display the modified camera feed,
assign labels and collect image samples,
run an inference directly with the OpenCV-modified frames,
display the model detection results,
select a topic (inquiry) related to the detected lab equipment,
generate a lesson via ChatGPT through OpenAI API according to the selected inquiry,
inspect the ChatGPT-powered lesson (text) on a new window,
select to convert the generated lesson to speech and play it immediately,
save the converted lesson as an audio file on the system.
Considering I wanted to make this lab assistant a compact plug-and-play device, I designed a BMO-inspired (from Adventure Time) case with removable top and bottom parts (3D printable) that allow the user to attach the 11.6” touchscreen module, USB webcam, external speakers, and the OSD adjustment board. Also, the main case includes slots for AC8265 NIC antennas.
So, this is my project in a nutshell 😃
In the following steps, you can find more detailed information on coding, applying OpenCV features to the camera feed, generating ChatGPT-powered lessons, converting lessons to speech, and developing a full-fledged user interface (Tkinter).
Step 1: Designing and printing a BMO-inspired case
Since I focused on building a feature-rich and accessible AI-driven lab assistant that enhances the distance learning experience with auto-generated lessons, I decided to design a user-friendly and compact case that allows the user to connect the high-quality screen (control panel), USB webcam, and the speakers effortlessly. Since I got inspired by BMO (Adventure Time) while designing my lab assistant's appearance, I decided to place the high-quality touchscreen as the centerpiece. To avoid overexposure to dust and prevent loose wire connections, I added a removable top cover sealed with specially designed triangular screws. Then, I added a slot on the main case in order to attach the CrowVision 11.6'' touchscreen. On the removable top cover, I added a cylindrical camera mount that lets the user position the USB webcam freely while detecting lab equipment and apply proper cable management. Also, I decided to emblazon the NVIDIA logo, the R2-D2 logo, and the lab equipment indicators on both the top cover and the detachable legs to highlight the capabilities of this AI-based lab assistant.
Since I loosely follow the design structure of BMO, I decided to print different BMO figures to accompany my lab assistant as a reminder of the original design. Even though BMO has operating legs, I decided to design rigid and detachable legs so as to simplify my iteration's assembly process since it is intended to be a compact lab assistant.
I designed the main case, the removable top cover, the detachable legs, and triangular screws in Autodesk Fusion 360. You can download their STL files below.
Figure - 93.20
Figure - 93.21
Figure - 93.22
Figure - 93.23
Figure - 93.24
Figure - 93.25
Figure - 93.26
Figure - 93.27
Figure - 93.28
Figure - 93.29
Figure - 93.30
Figure - 93.31
Figure - 93.32
Figure - 93.33
For the BMO figures accompanying the lab assistant, I utilized these models from Thingiverse:
Then, I sliced all 3D models (STL files) in Ultimaker Cura.
Figure - 93.34
Figure - 93.35
Figure - 93.36
Figure - 93.37
Figure - 93.38
Figure - 93.39
Figure - 93.40
Figure - 93.41
Since I wanted to create a metallic structure for my BMO case iteration and apply a stylish gold coating theme contrasting the original color palette, I utilized these PLA filaments:
ePLA-Silk Magic Gold-Silver (main case and top cover)
ePLA-Silk Bronze (legs and screws)
To represent the original BMO color palette, I utilized this PLA filament:
Anycubic High-Speed Grey
Finally, I printed all parts (models) with my brand-new Anycubic Kobra 2 Max 3D Printer.
Figure - 93.42
Since Anycubic Kobra 2 Max is budget-friendly and specifically designed for high-speed printing with a gigantic build volume, I highly recommend Anycubic Kobra 2 Max if you are a maker or hobbyist needing to print large prints without compartmentalizing your design and losing structural integrity while working on multiple prototypes before finalizing a complex project.
Thanks to its upgraded direct extruder and vibration compensation features, Anycubic Kobra 2 Max provides 300mm/s recommended print speed (up to 500mm/s) and enhanced layer quality. Also, it provides a high-speed optimized cooling system, reducing visible layer lines and complementing the fast printing experience. Since the Z-axis has dual-motors and dual-support rods, it prevents vibration from affecting layer smoothness and integrity, even at higher print speeds.
Furthermore, Anycubic Kobra 2 Max provides a magnetic suction platform on the heated bed for the scratch-resistant PEI spring steel build plate, allowing the user to remove prints without any struggle, even for larger prints up to 420x420x500 mm. Most importantly, you can level the bed automatically via its user-friendly LeviQ 2.0 automatic leveling system and custom Z-axis compensation. Also, it has a smart filament runout sensor and supports Anycubic APP for remote control and management.
#️⃣ First of all, remove all fixing plates. Then, install the gantry frame and support rods.
Figure - 93.43
Figure - 93.44
#️⃣ Install the print head and adjust the X-axis belt tensioner. Then, install the touchscreen and the filament runout sensor.
Figure - 93.45
Figure - 93.46
#️⃣ Connect the stepper, switch, screen, and print head cables. Then, attach the filament tube and use cable ties to secure the cables properly.
Figure - 93.47
Figure - 93.48
#️⃣ If the print head or bed is shaking, adjust the hexagonal isolation columns underneath them.
Figure - 93.49
#️⃣ To avoid software-related print failures, update the device firmware manually via USB or directly over Wi-Fi.
I encountered some errors due to Cura configurations before the official 2.3.6 firmware.
Figure - 93.50
#️⃣ After the firmware upgrade, go to Settings ➡ More Settings ➡ Guide so as to initiate the LeviQ 2.0 automatic bed leveling system and configure vibration calibration.
Figure - 93.51
#️⃣ Finally, fix the filament tube with the cable clips, install the filament holder, and insert the filament into the extruder.
Figure - 93.52
#️⃣ Since Anycubic Kobra 2 Max is not officially supported by Cura yet, we need to set it manually. Fortunately, Anycubic provides detailed configuration steps for Anycubic Kobra 2 Max on Cura.
#️⃣ First of all, create a custom printer profile on Cura for Anycubic Kobra 2 Max with given printer settings.
Figure - 93.53
Figure - 93.54
Figure - 93.55
#️⃣ Then, import the printer profile (configuration) file provided by Anycubic, depending on the filament type.
Figure - 93.56
Figure - 93.57
Step 1.1: Assembling the case and making connections & adjustments
Since I mounted Jetson Nano to CrowVision 11.6'' touchscreen module via its slidable rear-side spacers, I did not need to use a breadboard to test my prototype's wire connections. Fortunately, the CrowVision 11.6'' touchscreen module supports a 4-pin speaker connection out of the box, while Jetson Nano lacks built-in speakers or a 3.5 mm audio jack. Hence, I was able to connect 8Ω 5W speakers directly to the control board of the touchscreen. After that, I just made some adjustments before proceeding with the following steps.
#️⃣ First of all, I connected an AC8265 dual-mode NIC to Jetson Nano via its built-in M.2 Key E connector.
#️⃣ Then, I connected the USB webcam (PK-910H) to Jetson Nano.
Figure - 93.58
Figure - 93.59
Figure - 93.60
#️⃣ After connecting the USB webcam, I connected the CrowVision 11.6'' touchscreen module to Jetson Nano via an HDMI to Mini-HDMI cable and a USB Type-A to Micro-B cable: USB connection is required to enable the touchscreen feature.
#️⃣ I mounted Jetson Nano directly to the back of the touchscreen module via its slidable rear-side spacers compatible with nearly every SBC structure.
#️⃣ Then, I connected WaveShare 8Ω 5W speakers to the control board of the touchscreen via its built-in 4-pin speaker interface. Unfortunately, the speaker's 4-pin JST connector is not compatible with that of the control board. Therefore, I utilized a secondary JST (2 mm) and jumper wires to complete the speaker connection.
#️⃣ Finally, I connected the on-screen-display (OSD) adjustment board to the touchscreen control board.
If you are planning to replicate this lab assistant but with a smaller case, you can utilize the CrowVision 7" touchscreen module.
Figure - 93.61
Figure - 93.62
After printing all parts (models), I fastened the touchscreen module into its slot on the main case via the module's integrated 3M adhesive frame.
Then, I attached the USB webcam to the cylindrical camera mount on the removable top cover. I fastened the speakers and the OSD adjustment board to their corresponding slots on the main case via a hot glue gun. I placed the AC8265 NIC WiFi/BT antennas on the main case via their assigned slots.
Finally, I placed the triangular screws and affixed the detachable legs through the dents underneath the main case.
Note: Due to a firmware issue with Anycubic Kobra 2 Max (below 2.5.6) regarding Cura settings, I needed to print the top cover in separate pieces and glue them together.
Figure - 93.63
Figure - 93.64
Figure - 93.65
Figure - 93.66
Figure - 93.67
Figure - 93.68
Figure - 93.69
Figure - 93.70
Figure - 93.71
Figure - 93.72
Figure - 93.73
Figure - 93.74
Figure - 93.75
Figure - 93.76
Figure - 93.77
Figure - 93.78
Figure - 93.79
Figure - 93.80
Figure - 93.81
Figure - 93.82
Figure - 93.83
Figure - 93.84
Figure - 93.85
Figure - 93.86
Figure - 93.87
Figure - 93.88
Figure - 93.89
Figure - 93.90
Thanks to the OSD adjustment board, the user can change screen settings effortlessly while running the AI-driven lab assistant.
Figure - 93.91
Since the centerpiece of this lab assistant is a CrowVision high-quality 11.6” touchscreen module, the user can employ all device features without a keyboard and mouse, maximizing device accessibility.
Figure - 93.92
Figure - 93.93
Figure - 93.94
Figure - 93.95
Figure - 93.96
Figure - 93.97
After completing the case assembly, I showcased my lab assistant case iteration with BMO figures to emphasize the original design.
Figure - 93.98
Figure - 93.99
Step 2: Creating an OpenAI account to generate credentials for ChatGPT
Since I focused on developing a state-of-the-art AI-driven lab assistant providing auto-generated lessons on lab equipment, I decided to employ the OpenAI API to generate ChatGPT-powered lessons according to the selected inquiry related to the given lab equipment as an AI-based recommendation system.
To minimize latency and provide a better user experience while generating ChatGPT-powered lessons, I needed to integrate ChatGPT into my lab assistant's Python application (interface) via the OpenAI API.
Although OpenAI provides official libraries in different programming languages for the OpenAI API, including Python, I decided to make cURL calls (HTTP requests) to utilize the API functions since I only needed to employ one of the built-in algorithms — gpt-3.5-turbo.
#️⃣ First of all, sign up for OpenAI to create a free account.
#️⃣ Even though a free account has limited tokens for API calls, it is more than capable of generating insightful suggestions and guidance as auto-generated lessons for diverse lab equipment.
#️⃣ Then, go to API keys and click the Create new secret key button.
Figure - 93.100
Figure - 93.101
Figure - 93.102
Figure - 93.103
Figure - 93.104
#️⃣ After creating the secret key, you can make direct API requests to the OpenAI API so as to generate ChatGPT-powered recommendations as auto-generated lessons.
Figure - 93.105
Step 3: Setting up NVIDIA® Jetson Nano
Before proceeding with the following steps, I needed to set up the proper software for coding and install the required Python models on Jetson Nano.
#️⃣ First of all, if you are a novice in programming with Jetson Nano, please visit the official NVIDIA guidelines to install the operating system (Image) to the microSD card.
#️⃣ After installing the SD Card Image successfully, go to the VS Code developer page and install the officially supported Arm64 version (.deb) to utilize a properly optimized code editor on Jetson Nano.
Figure - 93.106
Figure - 93.107
Figure - 93.108
#️⃣ To run Edge Impulse object detection models on Jetson Nano, install the Edge Impulse Linux Python SDK by utilizing the terminal.
#️⃣ To be able to utilize the Linux Python SDK, the Cython module is required on Jetson Nano. However, the latest Cython version is not compatible with the SDK. According to my experiments, the Cython 0.29.36 version works without a problem.
pip3 install cython==0.29.36
#️⃣ After downloading the correct Cython version, continue installing the Linux Python SDK.
pip3 install pyaudio edge_impulse_linux
Figure - 93.109
Figure - 93.110
Figure - 93.111
#️⃣ To design a Tkinter application (GUI) with simple built-in functions, install the guizero module, which provides accessible documentation.
Figure - 93.112
#️⃣ To convert the text (lesson) generated by ChatGPT, install the gTTS (Google Text-to-Speech) module, which supports saving converted speeches as files in the MP3 format.
Figure - 93.113
#️⃣ To play MP3 files in Python effortlessly, including the converted ChatGPT-powered lessons, install the mpg123 module.
Figure - 93.114
Step 4: Developing a full-fledged user interface (app) w/ Tkinter (guizero)
Since I wanted to build an AI-driven lab assistant as accessible as possible, I decided to capitalize on the high-quality touchscreen by designing a user interface (GUI) from scratch to enable the user to employ all provided device features effortlessly.
I decided to develop my user interface with the guizero module (based on Tkinter) due to its simplified function set and comprehensive documentation. Since designing a layout and utilizing Tkinter-based widgets are undemanding with straightforward documentation, I will not cover the guizero structure in detail. You can inspect all guizero widgets here.
I integrated all device features into this user interface, including camera frame controls. In the following steps, I will explain each feature implemented in the user interface thoroughly.
To bundle all functions under a specific structure, I created a class named lab_assistant_op in the _class.py file. In the following steps, I will clarify each function under this class. Please refer to the _class.py file to inspect all functions.
⭐ In the create_user_interface function:
⭐ Initiate the user interface (app).
⭐ Disable the window resizing by utilizing the internal Tkinter object to provide a better user experience.
⭐ Design the interface layout.
⭐ Design the camera frame conversion and configurations sections.
⭐ Design the Data Collection section, including label settings.
⭐ Design the object detection model configuration section, including inquiry selection (Combo) and audio player settings.
⭐ Create the second window layout to display the information generated by ChatGPT separately.
⭐ Utilize the internal Tkinter objects of the guizero widgets to enable some restricted features, such as TextBox border and menubar color scheme settings.
⭐ In the show_interface function, initialize and display the designed user interface (GUI) on the screen.
    def show_interface(self):
        # Show the designed user interface (GUI) on the screen.
        self.app.display()
Figure - 93.115
Figure - 93.116
Figure - 93.117
Figure - 93.118
After completing the user interface design and layout, I executed the main.py file (explained below) to test the implemented user interface features.
Figure - 93.119
Figure - 93.120
Figure - 93.121
Step 5.0: Establishing a basic laboratory
Since I needed to collect diverse lab equipment images to construct a valid data set, I decided to build a basic laboratory, including biology, chemistry, and physics lab equipment.
Spoon spatula
Forcep
Dynamometer
Bunsen burner
Alcohol burner
Test tube
Human skeleton model
Microscope
Hatchery
Microscope slide
I trained my object detection model on the mentioned lab equipment. Nevertheless, as explained in the following steps, data variety can be improved by adding data sets from multiple sources via Edge Impulse Enterprise for different laboratory settings.
Figure - 93.122
Figure - 93.123
Figure - 93.124
Figure - 93.125
Figure - 93.126
Figure - 93.127
Step 5: Capturing lab equipment images w/ the USB webcam
After configuring the user interface (GUI) on Jetson Nano and installing the required modules, I programmed Jetson Nano to capture lab equipment images with the USB webcam and save them as samples.
Since I wanted to simplify the data collection process, I added a specific data collection menu (section) to the user interface. In that regard, I was able to add the corresponding lab equipment names as labels to the file names of each sample while collecting data to create a valid data set for the object detection model.
As explained earlier, each lab assistant feature is implemented into the user interface and accessible via the touchscreen module. Thus, please refer to the _class.py file to inspect the code for capturing lab equipment images via the USB webcam and saving them as samples.
⭐ In the __init__ function:
⭐ Initialize the USB high-quality camera feed.
⭐ Define the required variables to configure camera settings.
⭐ Assign the designed user interface (GUI) structure to the app object.
class lab_assistant_op():
    def __init__(self, model_file):
        # Initialize the USB high-quality camera feed.
        self.camera = cv2.VideoCapture(0)
        sleep(3)
        # Define the required variables to configure camera settings.
        self.con_opt = "normal"
        self.cam_init = True
        self.frame_size = (480,480)

		...

        # Assign the defined user interface structure.
        self.create_user_interface()
        sleep(10)
⭐ In the display_camera_feed function:
⭐ Display the real-time video stream generated by the USB webcam.
⭐ Resize the captured frame depending on the given object detection model.
⭐ Define the structuring element used for canny edge modifications.
⭐ Apply the selected image conversion option to the resized camera frame.
⭐ Show the modified frame on the screen in a separate window.
⭐ Stop the camera feed if requested.
    def display_camera_feed(self, threshold1=120, threshold2=170, iterations=1):
        if(self.cam_init == True):
            # Display the real-time video stream generated by the USB camera.
            ret, img = self.camera.read()
            # Resize the captured frame depending on the given object detection model.
            mod_img = cv2.resize(img, self.frame_size)
            # Define the structuring element used for canny edge modifications.
            kernel = numpy.ones((4,4), numpy.uint8)
            # Apply the given image conversion option to the resized frame.
            if(self.con_opt == "normal"):
                self.latest_frame = mod_img
            if(self.con_opt == "gray"):
                self.latest_frame = cv2.cvtColor(mod_img, cv2.COLOR_BGR2GRAY)
            if(self.con_opt =="blur"):
                self.latest_frame = cv2.GaussianBlur(mod_img, (11,11), 0)
            if(self.con_opt =="canny"):
                self.latest_frame = cv2.Canny(mod_img, threshold1, threshold2)
            if(self.con_opt =="canny+"):
                canny_img = cv2.Canny(mod_img, threshold1, threshold2)
                self.latest_frame = cv2.dilate(canny_img, kernel, iterations=iterations)
            if(self.con_opt =="canny++"):
                canny_img = cv2.Canny(mod_img, threshold1, threshold2)
                self.latest_frame = cv2.dilate(canny_img, kernel, iterations=iterations+1)
            if(self.con_opt =="canny-"):
                canny_img = cv2.Canny(mod_img, threshold1, threshold2)
                canny_img = cv2.dilate(canny_img, kernel, iterations=iterations)
                self.latest_frame = cv2.erode(canny_img, kernel, iterations=iterations)
            if(self.con_opt =="canny--"):
                canny_img = cv2.Canny(mod_img, threshold1, threshold2)
                canny_img = cv2.dilate(canny_img, kernel, iterations=iterations)
                self.latest_frame = cv2.erode(canny_img, kernel, iterations=iterations+1)
            # Show the modified frame on the screen.
            cv2.imshow("Lab Assistant Camera Feed", self.latest_frame)
        else:
            s_img = cv2.imread("assets/camera_stopped.png")
            s_img = cv2.resize(s_img, self.frame_size)
            cv2.imshow("Lab Assistant Camera Feed", s_img)
        # Stop the camera feed if requested.
        if cv2.waitKey(1) & 0xFF == ord('q'):
            self.camera.release()
            cv2.destroyAllWindows()
            print("\nCamera Feed Stopped!")
⭐ In the save_img_sample function:
⭐ Create the file name for the image sample with the entered label on the text box and the current date & time.
⭐ Save the recently captured image (latest frame) with the applied OpenCV modification to the samples folder.
⭐ Notify the user on the user interface after saving the sample.
    def save_img_sample(self):
        # Create the file name for the image sample.
        date = datetime.datetime.now().strftime("%Y%m%d_%H%M%S")
        given_class = self.col_buttons_input.value.strip()
        filename = "./samples/IMG_{}_{}.jpg".format(given_class, date)
        # If requested, save the recently captured image (latest frame) with the applied conversion as a sample.
        cv2.imwrite(filename, self.latest_frame)
        # Notify the user after saving the sample.
        self.col_save_notify.value = "Latest Label: " + given_class
        print("\nSample Saved Successfully: " + filename)
⭐ In the change_img_conv function, change the OpenCV image conversion (modification) option.
⭐ In the camera_stop function, stop or resume the real-time camera feed.
    def camera_stop(self, action):
        # Stop or resume the real-time camera feed.
        if(action == True):
            self.cam_init = False
            print("\nCamera Feed Stopped!")
            sleep(1)
        else:
            self.cam_init = True
            print("\nCamera Feed Resume!")
            sleep(1)
⭐ In the camera_feed function, initiate the camera frame feed in a loop for the defined Python thread.
    def camera_feed(self):
        # Start the camera feed loop.
        while True:
            self.display_camera_feed()
Figure - 93.128
Figure - 93.129
Figure - 93.130
Step 5.1: Modifying frames by applying OpenCV features
Since lab equipment can be opaque, transparent, in various shapes, and miscellaneous depending on the research subject, it would be strenuous to collect images with traditional methods so as to construct a valid and notable data set for object detection models. Thus, I decided to employ built-in OpenCV image modification features to convert images in order to generate meaningful data samples for diverse lab equipment regardless of their complex structures. Depending on the given lab equipment, I utilized these OpenCV features to generate unique samples:
🔬⚗️🧬🤖 The user interface allows the user to apply an OpenCV modification feature automatically by clicking a conversion button on the Data Collection section.
Normal
Gray
Blur
Canny
Canny+
Canny++
Canny-
Canny--
Figure - 93.131
Figure - 93.132
Figure - 93.133
Figure - 93.134
Figure - 93.135
Figure - 93.136
Figure - 93.137
Figure - 93.138
Figure - 93.139
Step 5.2: Saving the modified images via the user interface
🔬⚗️🧬🤖 When the user clicks an image conversion button on the Data Collection section, the user interface applies the selected OpenCV modification feature to the camera frames automatically.
🔬⚗️🧬🤖 Then, the user interface lets the user enter a label for samples via the text box.
🔬⚗️🧬🤖 After entering a label, when the user clicks the Save Sample button, the user interface saves a new image sample by adding the entered label and the current date to the file name under the samples folder.
IMG_alcohol_burner_20231212_001135.jpg
🔬⚗️🧬🤖 After saving the sample, the user interface informs the user of the latest given label under the Data Collection section.
Figure - 93.140
Figure - 93.141
Figure - 93.142
Figure - 93.143
Figure - 93.144
Figure - 93.145
🔬⚗️🧬🤖 When the user clicks the Inspect Samples button, the user interface opens the samples folder automatically to allow the user to check all saved samples.
Figure - 93.146
🔬⚗️🧬🤖 Furthermore, the user interface prints notifications and reports on the shell for debugging.
Figure - 93.147
After conducting rigorous experiments, I managed to assign an OpenCV image modification feature for each lab equipment at my disposal.
Spoon spatula ➡ Canny++
Forcep ➡ Canny-
Dynamometer ➡ Canny+
Bunsen burner ➡ Gray
Alcohol burner ➡ Blur
Test tube ➡ Canny-
Human skeleton model ➡ Canny
Microscope ➡ Canny
Hatchery ➡ Canny
Microscope slide ➡ Canny--
Then, I collected image samples of different lab equipment to construct my valid data set.
Figure - 93.148
Figure - 93.149
Figure - 93.150
Figure - 93.151
Figure - 93.152
Figure - 93.153
Figure - 93.154
Figure - 93.155
Figure - 93.156
Figure - 93.157
Figure - 93.158
Figure - 93.159
Figure - 93.160
Figure - 93.161
Figure - 93.162
Figure - 93.163
Figure - 93.164
Figure - 93.165
Figure - 93.166
Figure - 93.167
Figure - 93.168
Figure - 93.169
Figure - 93.170
Figure - 93.171
Figure - 93.172
Figure - 93.173
Figure - 93.174
Figure - 93.175
Figure - 93.176
Figure - 93.177
After completing my data set, I inspected all of my samples in the samples folder and performed some data quality checks manually.
Figure - 93.178
Figure - 93.179
Figure - 93.180
Figure - 93.181
Figure - 93.182
Figure - 93.183
Figure - 93.184
Figure - 93.185
Figure - 93.186
Figure - 93.187
Figure - 93.188
Figure - 93.189
Figure - 93.190
Step 6: Building an object detection (FOMO) model w/ Edge Impulse Enterprise
When I completed capturing images of lab equipment with the applied OpenCV modification features and storing the captured samples on Jetson Nano, I started to work on my object detection (FOMO) model to detect diverse lab equipment so as to generate insightful ChatGPT-powered lessons automatically.
Since Edge Impulse supports almost every microcontroller and development board due to its model deployment options, I decided to utilize Edge Impulse to build my object detection model. Also, Edge Impulse provides an elaborate machine learning algorithm (FOMO) for running more accessible and faster object detection models on edge devices such as Jetson Nano.
Edge Impulse FOMO (Faster Objects, More Objects) is a novel machine learning algorithm that brings object detection to highly constrained devices. FOMO models can count objects, find the location of the detected objects in an image, and track multiple objects in real-time, requiring up to 30x less processing power and memory than MobileNet SSD or YOLOv5.
Even though Edge Impulse supports JPG or PNG files to upload as samples directly, each target object in a training or testing sample needs to be labeled manually. Therefore, I needed to follow the steps below to format my data set so as to train my object detection model accurately:
Data Scaling (Resizing)
Data Labeling
Usually, I built my Edge Impulse models with the generic free subscription account since I enjoy developing open-source and easy-to-replicate projects. Nevertheless, I decided to utilize advanced Edge Impulse Enterprise features in this project to improve device accessibility and capabilities.
I utilized the Auto-labeler feature, which creates embeddings or segmentation maps for image datasets and then clusters (or groups) these embeddings based on given settings, to compartmentalize my lab equipment data set with different OpenCV modification features. In that regard, I was able to reduce the workload greatly while labeling each target object.
Then, I employed the Data campaigns feature to showcase tracking the model performance on data sets from multiple sources and improving data variety.
Since I already assigned lab equipment names to the file names while capturing images of diverse lab equipment, I preprocessed my data set effortlessly to label each target object on an image sample on Edge Impulse by utilizing the given lab equipment name:
spoon_spatula
forcep
dynamometer
bunsen_burner
alcohol_burner
test_tube
skeleton_model
microscope
hatchery
microscope_slide
Plausibly, Edge Impulse allows building predictive models optimized in size and accuracy automatically and deploying the trained model as a supported firmware (Linux AARCH64) for NVIDIA Jetson Nano. Therefore, after scaling (resizing) and preprocessing my data set to label target objects, I was able to build an accurate object detection model to recognize lab equipment with the applied OpenCV conversion, which runs on Jetson Nano without any additional requirements.
Step 6.1: Uploading images (samples) to Edge Impulse and labeling objects
After collecting training and testing image samples, I uploaded them to my project on the Edge Impulse Enterprise account. Then, I labeled each target object on the image samples.
#️⃣ First of all, to utilize collaboration tools and more advanced features on Edge Impulse, sign up for Edge Impulse Enterprise.
#️⃣ Then, create a new project under your organization.
Figure - 93.191
Figure - 93.192
#️⃣ To be able to label image samples manually on Edge Impulse for object detection models, go to Dashboard ➡ Project info ➡ Labeling method and select Bounding boxes (object detection).
Figure - 93.193
#️⃣ Navigate to the Data acquisition page and click the Upload data icon.
Figure - 93.194
Figure - 93.195
#️⃣ Then, choose the data category (training or testing), select the folder containing image files, and click the Upload data button.
Figure - 93.196
Figure - 93.197
Figure - 93.198
Figure - 93.199
Figure - 93.200
After uploading my data set successfully, I utilized the Auto-labeler Enterprise feature to cluster (or group) my data set based on the applied OpenCV modification feature. Then, I associated the corresponding lab equipment names as labels for each selected cluster. After associating labels, Edge Impulse created the labeled bounding boxes around each of the target objects in each selected cluster automatically. In that regard, I was able to perform some data quality checks and save time while labeling my samples.
#️⃣ Go to Data acquisition ➡ Auto-labeler. Then, change the segmentation settings based on your data set.
Figure - 93.201
#️⃣ Click the Run the auto-labeler button and wait for the segmentation process to complete.
Figure - 93.202
#️⃣ After inspecting the generated clusters, associate labels to the appropriate clusters and click Save samples.
Figure - 93.203
Figure - 93.204
Figure - 93.205
Figure - 93.206
Figure - 93.207
Figure - 93.208
Since it is not suitable to label every image sample with Auto-labeler, I labeled each target object on the remaining image samples manually by utilizing the lab equipment names. In Edge Impulse, labeling an object is as easy as dragging a box around it and entering a class. Also, Edge Impulse runs a tracking algorithm in the background while labeling objects, so it moves the bounding boxes automatically for the same target objects in different images.
#️⃣ Go to Data acquisition ➡ Labeling queue. It shows all unlabeled items (training and testing) remaining in the given data set.
#️⃣ Finally, select an unlabeled item, drag bounding boxes around target objects, click the Save labels button, and repeat this process until all samples have at least one labeled target object.
Figure - 93.209
Figure - 93.210
Figure - 93.211
Figure - 93.212
Figure - 93.213
Figure - 93.214
Figure - 93.215
Figure - 93.216
Figure - 93.217
Figure - 93.218
Figure - 93.219
Figure - 93.220
Figure - 93.221
Figure - 93.222
Figure - 93.223
Figure - 93.224
Figure - 93.225
Figure - 93.226
Step 6.2: Training the FOMO model on various lab equipment
After labeling target objects on my training and testing samples successfully, I designed an impulse and trained it on detecting diverse lab equipment with the applied OpenCV modification features.
An impulse is a custom neural network model in Edge Impulse. I created my impulse by employing the Image preprocessing block and the Object Detection (Images) learning block.
The Image preprocessing block optionally turns the input image format to grayscale and generates a features array from the raw image.
The Object Detection (Images) learning block represents a machine learning algorithm that detects objects on the given image, distinguished between model labels.
#️⃣ Go to the Create impulse page and set image width and height parameters to 300. Then, select the resize mode parameter as Fit shortest axis so as to scale (resize) given training and testing image samples.
#️⃣ Select the Image preprocessing block and the Object Detection (Images) learning block. Finally, click Save Impulse.
Figure - 93.227
#️⃣ Before generating features for the object detection model, go to the Image page and set the Color depth parameter as Grayscale. Then, click Save parameters.
Figure - 93.228
#️⃣ After saving parameters, click Generate features to apply the Image preprocessing block to training image samples.
Figure - 93.229
Figure - 93.230
#️⃣ After generating features successfully, navigate to the Object detection page and click Start training.
Figure - 93.231
Figure - 93.232
According to my experiments with my object detection model, I modified the neural network settings and architecture to build an object detection model with high accuracy and validity:
📌 Neural network settings:
Number of training cycles ➡ 100
Learning rate ➡ 0.015
Validation set size ➡ 6%
📌 Neural network architecture:
FOMO (Faster Objects, More Objects) MobileNetV2 0.35
After generating features and training my FOMO model with training samples, Edge Impulse evaluated the F1 score (accuracy) as 100%.
The F1 score (accuracy) is approximately 100% due to the modest volume of training samples of lab equipment images with distinct OpenCV modification features. Since the model can recognize these distinguishable conversions rigorously, it performs excellently with a minute validation set. Therefore, I am still collecting samples to improve my data set.
Figure - 93.233
Step 6.3: Evaluating the model accuracy and deploying the model
After building and training my object detection model, I tested its accuracy and validity by utilizing testing image samples.
The evaluated accuracy of the model is 78.79%.
#️⃣ To validate the trained model, go to the Model testing page and click Classify all.
Figure - 93.234
Figure - 93.235
Figure - 93.236
After validating my object detection model, I deployed it as a fully optimized and customizable Linux (AARCH64) application (.eim).
#️⃣ To deploy the validated model as a Linux (AARCH64) application, navigate to the Deployment page and search for Linux (AARCH64).
#️⃣ Then, choose the Quantized (int8) optimization option to get the best performance possible while running the deployed model.
#️⃣ Finally, click Build to download the model as a Linux (AARCH64) application (.eim).
Figure - 93.237
Figure - 93.238
Figure - 93.239
Step 6.4: Employing Data campaigns to track model performance for diverse sets of lab equipment
Since I wanted to build a lab assistant that allows different students (or researchers) to examine the model performance on diverse sets of lab equipment from multiple sources to improve data variety, I decided to employ the Data campaigns Enterprise feature so as to showcase generating correlating model performance metrics.
Considering vast lab equipment applications in different fields, Data campaigns lets the user inspect previous data sets from different laboratory settings and cross-reference existing lab equipment data in a similar field so as to construct a more reliable data set.
#️⃣ Navigate to the Data campaigns tab in your organization.
#️⃣ Click the + Create new dashboard button and configure the required settings.
Figure - 93.240
Figure - 93.241
#️⃣ Go to Actions... -> Add campaign and create a new data set if there is no available data set.
Figure - 93.242
Figure - 93.243
#️⃣ Then, specify which metrics (data sets, pipelines, etc.) are significant to visualize and select the associated Edge Impulse project.
Figure - 93.244
Figure - 93.245
Figure - 93.246
#️⃣ Finally, click Add campaign to save the configured custom campaign.
Figure - 93.247
Since I did not work with multiple collaborators in this project, I could not show the full potential of custom data campaigns. However, it should look like this when multiple collaborators are involved.
Figure - 93.248
Step 7: Setting up the Edge Impulse FOMO model on Jetson Nano
After building, training, and deploying my object detection model as a Linux (AARCH64) application on Edge Impulse, I needed to upload the generated Linux application to Jetson Nano to run the model directly via the Linux Python SDK so as to create an accessible AI-driven lab assistant operating with minimal latency, memory usage, and power consumption.
Since Edge Impulse optimizes and formats signal processing, configuration, and learning blocks into a single EIM file while deploying models as a Linux (AARCH64) application, I was able to import my model effortlessly to run inferences in Python.
#️⃣ After downloading the generated Linux (AARCH64) application to the model folder and installing the required modules, make sure to change the file permissions to be able to execute the model file.
Figure - 93.249
#️⃣ Then, create the required folder tree in the root directory of the lab assistant on Jetson Nano:
/assets
/audio_lesson
/model
/samples
/tmp
_class.py
main.py
Figure - 93.250
After uploading the Linux application successfully, I programmed Jetson Nano to run inferences via the user interface (GUI) to detect different lab equipment with the applied OpenCV modification feature.
As explained earlier, I assigned a specific OpenCV image modification feature to each lab equipment at my disposal while collecting image samples. Therefore, I wanted to utilize the exact OpenCV modification feature while running an inference. However, unfortunately, it is not possible to utilize an OpenCV-modified camera frame other than the RGB format to run an inference with the Linux Python SDK.
To bypass the incompatible image array issue, I saved the OpenCV-modified frames as temporary JPG files to the tmp folder and read them in the RGB format before running an inference. In this regard, I managed to run my model with the exact OpenCV modification features for each lab equipment. Thus, the model accuracy is vastly increased for on-device real-time analytics.
As explained in the following steps, I utilized the detected class (label) to provide the user with different inquiries (topics) related to the given lab equipment. According to the selected inquiry, the lab assistant can obtain a ChatGPT-powered lesson and convert the auto-generated lesson to speech.
Since I utilized the same code file to execute all device features consecutively, you can inspect the overlapping functions and instructions in Step 4.
⭐ In the __init__ function:
⭐ Define the required configurations to run the Edge Impulse FOMO object detection model.
⭐ Define the required credentials for the OpenAI API.
class lab_assistant_op():
    def __init__(self, model_file):

		...

		# Define the required configurations to run the Edge Impulse FOMO object detection model.
        dir_path = os.path.dirname(os.path.realpath(__file__))
        self.model_file = os.path.join(dir_path, model_file)
        self.detected_class = "Waiting..."
        # Define the required variables for the OpenAI API.
        self.OPENAI_API_KEY = "OPENAI_API_KEY"
        self.OPENAI_ENDPOINT = "https://api.openai.com/v1/chat/completions"

		...
⭐ In the run_inference function:
⭐ Summarize the Edge Impulse FOMO model inference settings and print them on the shell.
⭐ Get the currently captured image frame with the applied OpenCV modification feature via the high-quality USB webcam.
⭐ Then, convert any OpenCV-modified frame to the required RGB format by temporarily saving the modified frame as a JPG file to the tmp folder and processing (reading) it.
⭐ After reading the temporary JPG file, resize the processed frame depending on the given model settings.
⭐ Run an inference.
⭐ Obtain labels (classes) and bounding box measurements for each detected target object on the given frame.
⭐ If the Edge Impulse model predicts a class successfully, get the imperative predicted label (class).
⭐ After running an inference, show the resulting image with the passed bounding boxes (if any) on the screen in a separate window.
⭐ Remove the temporary JPG image file from the tmp folder.
⭐ Update the inquiry options on the user interface according to the predicted class (label).
⭐ Print the predicted label on the Generate Lesson section of the user interface to inform the user.
⭐ If requested, inform the user of the latest predicted label via a pop-up window on the screen (set as default).
⭐ Finally, stop the running inference.
    def run_inference(self, notify=False):
        # Run inference to detect various types of lab equipment.
        with ImageImpulseRunner(self.model_file) as runner:
            try:
                # Print the information of the Edge Impulse model converted to a Linux (AARCH64) application (.eim).
                model_info = runner.init()
                print('Loaded runner for "' + model_info['project']['owner'] + ' / ' + model_info['project']['name'] + '"')
                labels = model_info['model_parameters']['labels']
                # Get the currently captured image with the high-quality USB camera.
                # Then, convert the any given frame format to RGB by temporarily saving the frame as a JPG file and reading it.
                cv2.imwrite("./tmp/temp_frame.jpg", self.latest_frame)
                # After reading the temporary JPG file, resize the converted frame depending on the given model so as to run an inference.
                test_img = cv2.imread("tmp/temp_frame.jpg")
                features, cropped = runner.get_features_from_image(test_img)
                res = runner.classify(features)
                # Obtain the prediction (detection) results for each label (class).
                if "bounding_boxes" in res["result"].keys():
                    print('Found %d bounding boxes (%d ms.)' % (len(res["result"]["bounding_boxes"]), res['timing']['dsp'] + res['timing']['classification']))
                    # If the Edge Impulse model predicts a class successfully:
                    if(len(res["result"]["bounding_boxes"]) == 0):
                        self.detected_class = "[...]"
                    else:
                        for bb in res["result"]["bounding_boxes"]:
                            # Get the latest detected labels:
                            self.detected_class = bb['label']
                            print('\t%s (%.2f): x=%d y=%d w=%d h=%d' % (bb['label'], bb['value'], bb['x'], bb['y'], bb['width'], bb['height']))
                            cropped = cv2.rectangle(cropped, (bb['x'], bb['y']), (bb['x'] + bb['width'], bb['y'] + bb['height']), (255, 0, 0), 1)
                # Show the model detection image with the passed bounding boxes if any on the screen.
                cv2.imshow("Model Detection Image", cropped)
                # Remove the temporary image file.
                os.remove("./tmp/temp_frame.jpg")
                # Update the interface inquiry options according to the predicted class (label).
                __l = self.detected_class.replace("_", " ")
                self.inquiry_input.clear()
                self.inquiry_input.insert(0, "How to use {} in labs?".format(__l))
                self.inquiry_input.insert(1, "Please list the lab experiments with {}".format(__l))
                self.inquiry_input.insert(2, "Tell me about recent research papers on {}".format(__l))
                self.inquiry_input.insert(3, "How to repair {}?".format(__l))
                # Notify the user of the detection results.
                self.model_notify.value = "Latest Detection: " + self.detected_class
                print("\n\nLatest Detected Label => " + self.detected_class)
                # If requested, also inform the user via a pop-up window on the screen.
                if notify:
                    self.app.warn("Latest Detected Label", self.detected_class)
            # Stop the running inference.
            finally:
                if(runner):
                    runner.stop()
⭐ In the chatgpt_get_information function:
⭐ Define the required HTML headers, including the OpenAI API key, for authentification.
⭐ Define POST data parameters in the JSON format, including the selected inquiry related to the lab equipment detected by the object detection model.
⭐ Make a cURL call (request) to the OpenAI API in order to generate a ChatGPT-powered lesson according to the selected inquiry.
⭐ After getting the response from the OpenAI API, decode the received JSON object to obtain the lesson generated by ChatGPT — gpt-3.5-turbo.
    def chatgpt_get_information(self, inquiry):
        # Make a cURL call (request) to the OpenAI API in order to get information regarding the given lab component from ChatGPT.
        # Define the required HTML headers.
        headers = {"Authorization": "Bearer " + self.OPENAI_API_KEY, "Content-Type": "application/json"}
        # Define POST data parameters in the JSON format.
        json_data = {"model": "gpt-3.5-turbo", "messages": [{"role": "user", "content": inquiry}, {"role": "user", "content": "Please add the latest asked question before the answer."}], "temperature": 0.6}
        # Obtain information from ChatGPT by making a cURL call to the OpenAI API.
        curl = requests.post(self.OPENAI_ENDPOINT, json=json_data, headers=headers)
        if(curl.status_code == 200):
            chatgpt_info = curl.json()
            chatgpt_info = chatgpt_info["choices"][0]["message"]["content"]
            return chatgpt_info
        else:
            return "Error: ChatGPT"
⭐ In the chatgpt_show_information function:
⭐ Inform the user of the selected inquiry via a pop-up window before making a cURL call (request) to the OpenAI API with it.
⭐ Obtain the auto-generated ChatGPT-powered lesson regarding the passed inquiry related to the detected lab equipment.
⭐ Display the decoded ChatGPT-powered lesson on the second window.
⭐ Then, open a confirmation pop-up window about whether the auto-generated lesson should be converted to speech or not.
⭐ If requested, convert the ChatGPT-powered lesson to speech (audio lesson).
    def chatgpt_show_information(self):
        selected_inquiry = self.inquiry_input.value
        # Notify the user of the passed inquiry.
        user_notification = "Inquiry: " + selected_inquiry + "\n\nWaiting response from ChatGPT..."
        info("Status", user_notification)
        # Obtain information from ChatGPT.
        chatgpt_info = self.chatgpt_get_information(selected_inquiry)
        print("ChatGPT Response Received Successfully!")
        # Display the received information generated by ChatGPT on the second window.
        self.second_window.show()
        self.second_w_text.value = chatgpt_info
        # If requested, convert the received ChatGPT response to audio lesson and save it.
        audio_lesson_opt = yesno("Audio Lesson", "Save the obtained ChatGPT response as audio lesson?")
        if (audio_lesson_opt == True):
            print("\n\nConverting ChatGPT response...")
            self.text_to_speech_lesson(chatgpt_info)
⭐ In the text_to_speech_lesson function:
⭐ Convert the given text information to speech via the gTTS (Google Text-to-Speech) module.
⭐ Define the audio file (MP3) name, including the latest detected class and the current date & time.
⭐ Save the generated MP3 (audio) file to the audio_lesson folder.
⭐ If configured on the user interface via the assigned checkbox, play the generated audio lesson immediately.
    def text_to_speech_lesson(self, _text, language="en"):
        # Convert the information about the given lab equipment, generated by ChatGPT, to speech (audio lesson).
        text_to_speech = gTTS(text=_text, lang=language, slow=False)
        # Define the audio file (MP3) path, including the current date.
        date = datetime.datetime.now().strftime("%Y%m%d_%H%M%S")
        file_name = self.detected_class + "_" + date + ".mp3"
        file_path = "audio_lesson/" + file_name
        # Save the generated speech (audio) file.
        text_to_speech.save(file_path)
        sleep(2)
        print("\nAudio Lesson Saved: " + file_name)
        # If requested, play the generated audio lesson immediately.
        if(self.audio_input.value == True):
            print("\nLatest Audio Lesson: Playing...")
            os.system("mpg123 " + file_path)
Figure - 93.251
Figure - 93.252
📁 main.py
I employed the main.py file to initialize the user interface (GUI) with the camera feed simultaneously.
⭐ Define the lab_assistant object of the lab_assistant_op class.
⭐ Define and initialize a Python thread to start the camera feed.
⭐ Enable the user interface (GUI) consecutively.
# Define the lab_assistant object.
lab_assistant = lab_assistant_op("model/ai-driven-interactive-lab-assistant-linux-aarch64.eim")

# Define and initialize threads.
Thread(target=lab_assistant.camera_feed).start()

# Activate the user interface (GUI).
lab_assistant.show_interface()
Figure - 93.253
Step 8: Running the model w/ the OpenCV-modified images directly
My Edge Impulse object detection (FOMO) model scans a captured image buffer and predicts the possibilities of trained labels to recognize a target object on the given picture. The prediction result (score) represents the model's "confidence" that the detected target object corresponds to each of the ten different labels (classes) [0 - 9], as shown in Step 6:
0 — alcohol_burner
1 — bunsen_burner
2 — dynamometer
3 — forcep
4 — hatchery
5 — microscope
6 — microscope_slide
7 — skeleton_model
8 — spoon_spatula
9 — test_tube
After setting up and running the Edge Impulse object detection (FOMO) model on Jetson Nano:
🔬⚗️🧬🤖 The user interface displays the OpenCV image modification features applied to each lab equipment while collecting samples via a pop-up window when the user clicks the Sample Image Mod List button (image button) on the Generate Lesson section.
Figure - 93.254
Figure - 93.255
🔬⚗️🧬🤖 Then, the user interface allows the user to apply the exact OpenCV modification feature to the camera frame automatically by clicking a conversion button on the Data Collection section.
🔬⚗️🧬🤖 After applying the required OpenCV modification feature, the user interface can run an inference with the OpenCV-modified camera frames directly by saving the modified frames as temporary JPG files to the tmp folder and reading them in the required RGB format.
🔬⚗️🧬🤖 To run an inference with the object detection model, click the Run Inference button on the Generate Lesson section.
🔬⚗️🧬🤖 After running an inference successfully, the user interface shows the predicted lab equipment class (label) on a pop-up window in order to inform the user of the model detection results.
🔬⚗️🧬🤖 Also, the user interface shows the resulting image with the passed bounding boxes (if any) on the screen in a separate window.
Figure - 93.256
Figure - 93.257
Figure - 93.258
Figure - 93.259
Figure - 93.260
Figure - 93.261
Figure - 93.262
Figure - 93.263
Figure - 93.264
Figure - 93.265
Figure - 93.266
Figure - 93.267
Figure - 93.268
Figure - 93.269
Figure - 93.270
Figure - 93.271
Figure - 93.272
Figure - 93.273
Figure - 93.274
Figure - 93.275
Figure - 93.276
Figure - 93.277
Figure - 93.278
Figure - 93.279
Figure - 93.280
Figure - 93.281
Figure - 93.282
Figure - 93.283
Figure - 93.284
Figure - 93.285
Figure - 93.286
Figure - 93.287
Figure - 93.288
Figure - 93.289
Figure - 93.290
Figure - 93.291
Figure - 93.292
Figure - 93.293
Figure - 93.294
Figure - 93.295
Figure - 93.296
Figure - 93.297
Figure - 93.298
Figure - 93.299
Figure - 93.300
Figure - 93.301
Figure - 93.302
Figure - 93.303
Figure - 93.304
Figure - 93.305
After conducting experiments by directly running inferences with the OpenCV-modified images, I obtained vastly increased real-time model accuracy for each lab equipment class.
Figure - 93.306
Step 8.1: Generating ChatGPT-powered insightful lessons about detected lab equipment
🔬⚗️🧬🤖 After informing the user of the predicted lab equipment class (label), the user interface employs the predicted label to provide the user with different inquiries (topics) related to the detected lab equipment automatically.
How to use [...] in labs?
Please list the lab experiments with [...]
Tell me about recent research papers on [...]
How to repair [...]?
🔬⚗️🧬🤖 Then, the user interface lets the user select an inquiry to enable ChatGPT to generate highly effective lessons not dependent on a single approach.
🔬⚗️🧬🤖 When the user clicks the Get ChatGPT Response button, the user interface notifies the user via a pop-up window to double-check the selected inquiry before making a cURL call (request) to the OpenAI API.
🔬⚗️🧬🤖 After confirming the selected inquiry, the user interface obtains the ChatGPT-powered lesson, decodes the text content, and displays the auto-generated lesson on the second interface window. Also, ChatGPT adds the passed inquiry at the beginning of each lesson to clarify the given subject.
🔬⚗️🧬🤖 Finally, the user interface asks the user whether the ChatGPT-generated lesson should be converted to speech (audio lesson) via a confirmation pop-up window.
Figure - 93.307
Figure - 93.308
Figure - 93.309
Figure - 93.310
Figure - 93.311
Figure - 93.312
Figure - 93.313
Figure - 93.314
Figure - 93.315
Figure - 93.316
Figure - 93.317
Figure - 93.318
Figure - 93.319
Figure - 93.320
Figure - 93.321
Figure - 93.322
Figure - 93.323
Figure - 93.324
Figure - 93.325
Figure - 93.326
Figure - 93.327
Figure - 93.328
Figure - 93.329
Figure - 93.330
Figure - 93.331
Figure - 93.332
Figure - 93.333
Figure - 93.334
Figure - 93.335
Figure - 93.336
Figure - 93.337
Figure - 93.338
Step 8.2: Converting ChatGPT-generated lessons to speech
🔬⚗️🧬🤖 If approved via the confirmation pop-up window, the user interface converts the ChatGPT-generated lesson to speech (audio lesson) via the gTTS (Google Text-to-Speech) module and provides students with the option to save the converted speech as an audio file on the system for later study sessions or repeating a course.
🔬⚗️🧬🤖 If requested, the user interface saves the generated audio lesson as an audio file (MP3) to the audio_lesson folder.
🔬⚗️🧬🤖 Each saved audio lesson (MP3) file name includes the detected lab equipment and the current date & time.
skeleton_model_20231218_182424.mp3
🔬⚗️🧬🤖 If configured on the user interface via the Activate Instant Play checkbox, the user interface plays the converted audio lesson (speech) immediately after saving it as an MP3 file.
Figure - 93.339
Figure - 93.340
🔬⚗️🧬🤖 In addition to the described capabilities, the user interface provides beneficial features for users (students) via the Menubar drop-down options:
Edge Impulse Model ➡ Go to public model page
Edge Impulse Model ➡ Inspect Enterprise Features
Previous Lessons ➡ Inspect (Opens the audio_lesson folder)
Help ➡ Project Tutorial
Help ➡ ChatGPT
Figure - 93.341
Figure - 93.342
Figure - 93.343
Figure - 93.344
Figure - 93.345
Figure - 93.346
Figure - 93.347
Figure - 93.348
Figure - 93.349
Figure - 93.350
🔬⚗️🧬🤖 The user interface allows the user to stop or resume the real-time camera feed via the camera feed control buttons in the Data Collection section.
Figure - 93.351
🔬⚗️🧬🤖 Also, the user interface prints progression notifications on the shell for debugging.
Figure - 93.352
Videos and Conclusion
Further Discussions
By applying object detection models trained on detecting diverse lab equipment to generate ChatGPT-powered lessons, we can achieve to:
🔬⚗️🧬🤖 assist undergraduate students or interns while acquiring new skills,
🔬⚗️🧬🤖 provide directions or suggestions without a live Q&A session,
🔬⚗️🧬🤖 give students auto-generated insightful and engaging feedback while conducting experiments,
# AI-driven Interactive Lab Assistant w/ OpenCV & ChatGPT
#
# NVIDIA® Jetson Nano
#
# By Kutluhan Aktar
#
# In remote learning, provide insightful guidance on lab equipment as auto-generated lessons
# via object detection and artificial intelligence.
#
#
# For more information:
# https://www.hackster.io/kutluhan-aktar


from _class import lab_assistant_op
from threading import Thread


# Define the lab_assistant object.
lab_assistant = lab_assistant_op("model/ai-driven-interactive-lab-assistant-linux-aarch64.eim")

# Define and initialize threads.
Thread(target=lab_assistant.camera_feed).start()

# Activate the user interface (GUI).
lab_assistant.show_interface()