Hi everyone, thank you for reading this project tutorial. I had been working on sending data packets with NodeMCU using HTTP Get Request Method which is embedded in its default library, and gathering heart rate from KY-039 Heart Rate Sensor accurately; they culminated in a new feature – IoT Services – for my website subscribers as explained down below, allowing you to display the data gathered by NodeMCU etc. through my website database. Also, I thought that it might be a good study to inspect the heart rate at a given temperature and humidity value, and therefore added a DHT11 Temperature and Humidity Sensor Module to this project as though it is essentially a part of KY-039. As a conclusion, by following the steps below, you will learn how to send heart rate, temperature and humidity through NodeMCU to your dashboard on TheAmplituhedron(my website), and be able to monitor these data packets from the specialized MySQL database table that of your account in your IoT Dashboard. I programmed the aforementioned IoT service by myself in PHP, jQuery and AJAX, and confined it to only save 6 entry recursively because of the storage space of my website server host. In other words, TheAmplituhedron IoT Services is for only displaying recent data coming from NodeMCU and, of course, other devices that can make an HTTP Request such as Arduino WiFi Shield, as the last 6 data packets received by the dashboard.
Figure - 17.1
What is TheAmplituhedron IoT Services?
Aside from the cloud system of TheAmplituhedron used in other projects of mine, TheAmplituhedron IoT Services is for displaying and saving data packets received from NodeMCU etc. in HTTP Get Request Method only. Like the cloud system of TheAmplituhedron that can receive and transmit data packets through web server in either HTTP Get Request or HTTP Post Request, specialized for Arduino Ethernet Shield and Raspberry Pi, TheAmplituhedron IoT Services is programmed by myself in PHP, jQuery and AJAX as an available system for only my website subscribers. But, as opposed to the cloud system of TheAmplituhedron, it can only receive data packets in HTTP Get Request Method, and display recent data packets only; TheAmplituhedron IoT Services is dedicated to showing the recent data gathered by NodeMCU etc. via sensor readings properly through TheAmplituhedron database and server. To use this feature, please follow the steps down below and subscribe to my website if you have not yet.
How can I subscribe to TheAmplituhedron?
It is very simple to subscribe to benefit all available system provided by me; you just have to sign up to TheAmplituhedron.com, which is programmed by myself.
As showed by the figure down below, you have three options to sign up - Sign In with Google Plus, Continue with Twitter and Sign Up(Create an account).
Figure - 17.2
1) Sign In with Google Plus
Just click Sign In with Google Plus and accept permissions. After that, you are ready to use IoT Services freely.
Figure - 17.3
2) Continue with Twitter
Just click Continue with Twitter and authorize TheAmplituhedron. After that, you are ready to use IoT Services freely.
Figure - 17.4
Figure - 17.5
3) Sign Up
Or, if you do not want to use a third party account for verification, you can create your own account on TheAmplituhedron, as depicted down below.
Figure - 17.6
Figure - 17.7
After signing up process, your hedron - the unique 20-digit ID that used as an identifier in your connection path URL - generated by the server; you can display it under personal information section.
Personal Information -> Hedron -> Display
Figure - 17.8
How can I send data packets to my IoT Dashboard?
After subscribing, you have to create your unique connection path URL under IoT Services on your dashboard. Just click Create+ to auto-generate your connection path URL; after clicking, a pop-up bar will re-direct you to your connection path URL, containing your username and hedron.
Do not forget that you can create one connection page named with your username, and save in a constricted database - up to 6 entry.
Your secure connection path should be like this;
/dashboard/IoTServices/USERNAME-HEDRON
Now, you can send data packets - up to 6 entry - by using HTTP Get Request Method like down below.
How to use NodeMCU [ESP-12E] to send data packets with its default libraries
NodeMCU is an open source IoT platform, and also the name of an ESP8266 integrated development board. I used an ESP-12E V2.0 2.4Ghz in this demonstration project.
First of all, download its default board along with libraries from GitHub on here.
Add, the included libraries in the source code from example files - the rest of it is well-explained at the source code down below.
To make an HTTP Get or Post Request is simple and easy with HTTPClient Library, but if you make this request to a website protected with SSL Certificate like my website(TheAmplituhedron.com), you may need to learn how to manage to glean a website SSL FingerPrint or ThumbPrint.
SSL FingerPrint works like an ID card; when you visit a web-page that of a SSL protected website, it verifies your connection secure according to whether you have the fingerprint or not. As a result of that, every browser has a file that contains the fingerprint of the website, mostly known as ThumbPrint.
For instance,if you are using Google Chrome as default browser on your computer, just click lock icon on the url path to glean ThumbPrint.
Lock Icon -> Certificate -> Details -> ThumbPrint
I provided the FingerPrint in current use, but you can find it easily if it is changed by the service provider, as showed above.
Copy and paste it to the source code in http.begin() function.
http.begin(connectionPath, "SSL FingerPrint or ThumbPrint");
Figure - 17.13
Figure - 17.14
How to elicit heart rate, temperature and humidity values for this demonstration project
As I explained above, I choose to use a KY-039 Heart Rate Sensor and a DHT11 Temperature and Humidity Sensor for this demonstration project.
For getting the heart rate from KY-039 sensor, I create a simple algorithm based on the average heart rate - 70 bpm.
Figure - 17.15
Implement this library from here, to use DHT11 Temperature and Humidity Sensor module efficiently.
Figure - 17.16
Connections
Connect DHT11 Sensor module and KY-039 sensor to the NodeMCU as depicted by the fritzing schematic and the source code.
Slide
Do not forget to connect the control led informing you whether the WiFi connection is ready to transfer data packets to the assigned database or not.
Slide
Conclusion
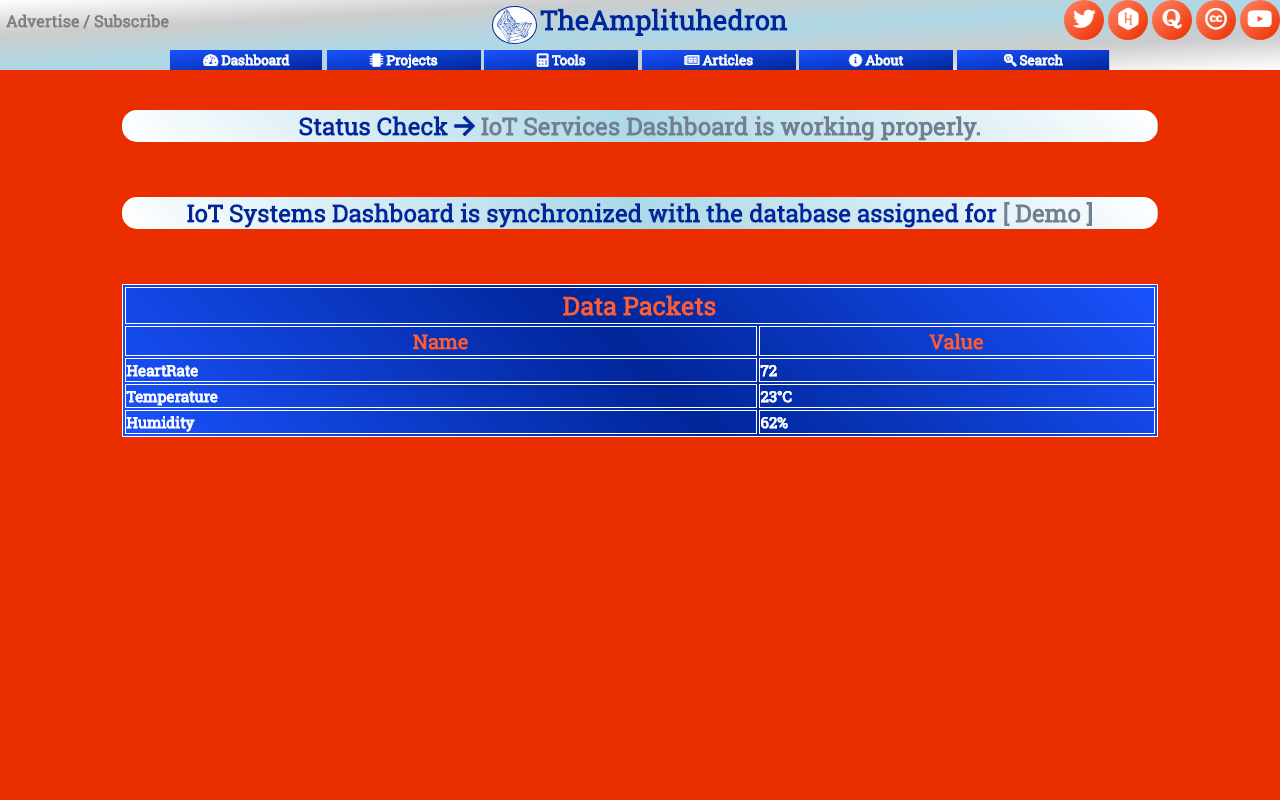
After all these steps, just upload the source code along with your WiFi settings, username and hedron to NodeMCU, and open your IoT Dashboard.
Astonishingly, you can monitor your data packets in every 5 seconds on your encrypted connection page, coming from your database table hosted on TheAmplituhedron server :)
Figure - 17.17
Figure - 17.18
Also, you can check your database state on your IoT Dasboard - Status Check Variable.
I hope that IoT Services, that of my website(TheAmplituhedron.com), may help you to create new projects by modifying the source code, with the benefits of Internet connection.
I will keep posting new demonstration projects about TheAmplituhedron IoT Services.
Videos
Hedron Authorization - Display Hedron on Dashboard, and Paste it to the source code
Monitor Data Packets via NodeMCU - Get Data Packets
         /////////////////////////////////////////////
        // IoT Heart Rate and Temperature Detector //
       //    via TheAmplituhedron IoT Services    //
      //          ---------------------          //
     //           NodeMCU (ESP-12E)             //
    //           by Kutluhan Aktar             //
   //                                         //
  /////////////////////////////////////////////

// By only subscribing to TheAmplituhedron, you will be able get your data packets from NodeMCU, or any other device that can make an HTTP GET Request, to your IoT Dashboard on your account page.
// TheAMplituhedron IoT Services is an available system for TheAmplituhedron.com subscribers only, and simple to use.
// Follow the steps down below to create and communicate your connection path on which you will display your data packets in every 2 seconds.
// 1) Go to your Dashboard.
// 2) Click Iot Services under Available Systems.
// 3) Read the given instructions and click Create+
// 4) Copy the url to use in the souce code.
// After creating your unique connection path, you can send data packets through NodeMCU by entering your WiFi settings and required information down below.
//
// As a reminder, my website has SSL protection so that you need to identify your NodeMCU connection by entering TheAmplituhedron FingerPrint or ThumbPrint.
// You can learn about it more from the link below.
// https://www.theamplituhedron.com/dashboard/IoTServices/
//
// In this project turorial, I decided to use a KY-039 Heart Rate Sensor and a DHT11 Temperature and Humidity as data providers.
// But do not forget that the heart rate value generated by KY-039 is not accurate most of the time; it is merely a demonstration sensor for this project tutorial. If you want to
// get more accurate data in that subject, I recommend you to use an heart rate detector with enhanced accuracy and efficieny.
//
// Connections
// NodeMCU (ESP-12E) :
//                                Control Led
// D1  --------------------------- +
//                                DHT11 Temperature and Humidity Sensor Module
// D2  --------------------------- Data
//                                KY-039 Heart Rate Sensor
// A0  --------------------------- S


// Include required libraries to send data to a website, in this case TheAmplituhedron.com.
#include <ESP8266WiFi.h>
#include <WiFiClient.h>
#include <ESP8266WebServer.h>
#include <ESP8266HTTPClient.h>

// Include DHT master library to elicit information from DHT11 Temperture and Humidity Sensor.
#include "DHT.h"

// Define DHT object.
DHT dht;

// Define your WIFI settings.
const char *ssid = "WiFi_SSID";
const char *password = "WiFi_Password";

// Define Finger Heart Rate Sensor signal pin.
#define fingerSignal A0

// Define a default average heartbeat value as integer to count heartbeat.
int count = 70;

// Define a control pin for WiFi test.
#define control D1

// Create data holders to send data packets.
int temperature, humidity;
String connectionPath, USERNAME, HEDRON, data_name_1, data_name_2, data_name_3, data_1, data_2, data_3;


void setup() {
  // Start DHT object at digital pin 2.
  dht.setup(D2);

  // Activate control led.
  pinMode(control, OUTPUT);
  digitalWrite(control, LOW);

  // Wait until connected.
  delay(1000);
  Serial.begin(115200);
  // It is just for assuring connection is alive.
  WiFi.mode(WIFI_OFF);
  delay(1000);
  // This mode allows NodeMCU to connect any WiFi directly.
  WiFi.mode(WIFI_STA);
  // Connect NodeMCU to your WiFi.
  WiFi.begin(ssid, password);

  Serial.print("\n\n");
  Serial.print("Try to connect to WiFi. Please wait! ");
  Serial.print("\n\n");
  // Halt the code until connected to WiFi.
  while (WiFi.status() != WL_CONNECTED) {
    delay(500);
    Serial.print("*");
  }

  // If connection is successful, turn control led on and write WiFi SSID to serial monitor along with assigned IPAddress.
  digitalWrite(control, HIGH);
  Serial.print("\n\n");
  Serial.print("-------------------------------------");
  Serial.print("\n\n");
  Serial.print("Connection is successful!");
  Serial.print("\n\n");
  Serial.print("Connected WiFi SSID : ");
  Serial.print(ssid);
  Serial.print("\n\n");
  Serial.println("Connected IPAddress : ");
  Serial.println(WiFi.localIP());
  Serial.print("\n\n");
}

void loop() {
  // Detect the heart beat approximately in a given range point.
  heartBeat(1000);
  // Get tenperature and humidity from DHT11.
  getTemperatureandHumidity();

  // Create HTTP object to make a request.
  HTTPClient http;

  // Enter your connection path variables and define a name and a value for each data packet below - up to 6 entry.
  USERNAME = "Account_Username";
  HEDRON = "Account_Hedron";
  // You can change these names if you want.
  data_name_1 = "HeartRate";
  data_name_2 = "Temperature";
  data_name_3 = "Humidity";
  data_1 = String(count);
  data_2 = String(temperature) + "°C";
  data_3 = String(humidity) + "%";

  connectionPath = "https://www.theamplituhedron.com/dashboard/IoTServices/" + USERNAME + "-" + HEDRON + ".php?dataNameFirst=" + data_name_1 + "&dataNameSecond=" + data_name_2 + "&dataNameThird=" + data_name_3 + "&data1=" + data_1 + "&data2=" + data_2 + "&data3=" + data_3;

  http.begin(connectionPath, "xx xx xx xx xx xx xx xx xx xx xx xx xx xx xx xx xx xx xx xx");

  int httpCode = http.GET();
  String payload = http.getString();

  Serial.println(httpCode);

  // End HTTP Get Request.
  http.end();

  // Send data packets every 2 seconds to TheAmplituhedron.
  delay(2000);

}

// KY-039 Heart Rate Sensor detection unit is based on the peaks generated by the sensor, and by conunting them in a defined time period, you can approximately detect the heart beat. Nevertheless, this data might not be accurate becouse of the circuit schematic of KY-039; it is just a demonstration.
void heartBeat(int Delay){
  // Read sensor after a delay to detect peaks for conunting them later.
  int firstReading = analogRead(fingerSignal);
  delay(Delay);
  int secondReading = analogRead(fingerSignal);
  // Calculate the range to define peaks.
  int peak = firstReading - secondReading;
  // If there is a peak, count them to evaluate the heart beat at a given time. These values are accurate for my sensor but you might need to test yours to get data explicitly.
  if(peak >= 2){
    count++;
    }else if(peak < 2 && peak >= 0){
      count = count;
      }else if(peak < 0){
        count--;
        }
  }

  void getTemperatureandHumidity(){
      // Wait until DHT11 Temperature and Humidity Sensor became ready.
      delay(dht.getMinimumSamplingPeriod());
      // Get temperature and humidity.
      humidity = dht.getHumidity();
      temperature = dht.getTemperature();
    }