For some time ago, I have received a DIY Mini Tesla Coil Module as an affiliate marketing points bonus product. It is joyful to conduct experiments with a Tesla coil for an electronics enthusiast. However, although the Tesla coil module had some intriguing features, it was not as enhanced as I wanted it to be for adding it to my collection. And, most importantly, the module was overheating after 15 minutes of continuous load.
And thus, I decided to upgrade the module by adding an external cooling fan to resolve the overheating problem. But, I thought that it would not be enough to improve the module. So, I developed a web application in PHP and JavaScript (jQuery and AJAX) to control the mini Tesla module and the fan via Arduino Nano 33 IoT :)
Some of the mentioned products and components in this project are sponsored by digitspace:
- How to develop a web application communicating Arduino Nano 33 IoT in PHP, HTML, and JavaScript
- How to send form data without requiring the user to click a submit button in jQuery and AJAX
- How to customize radio buttons in CSS
- How to create a database table in MySQL
- How to set up and program Arduino Nano 33 IoT
- How to split strings to glean information as substrings in Arduino
- How to use a 2-Way Relay (5V) with Arduino Nano 33 IoT
- How to assemble a DIY Mini Tesla Coil Module
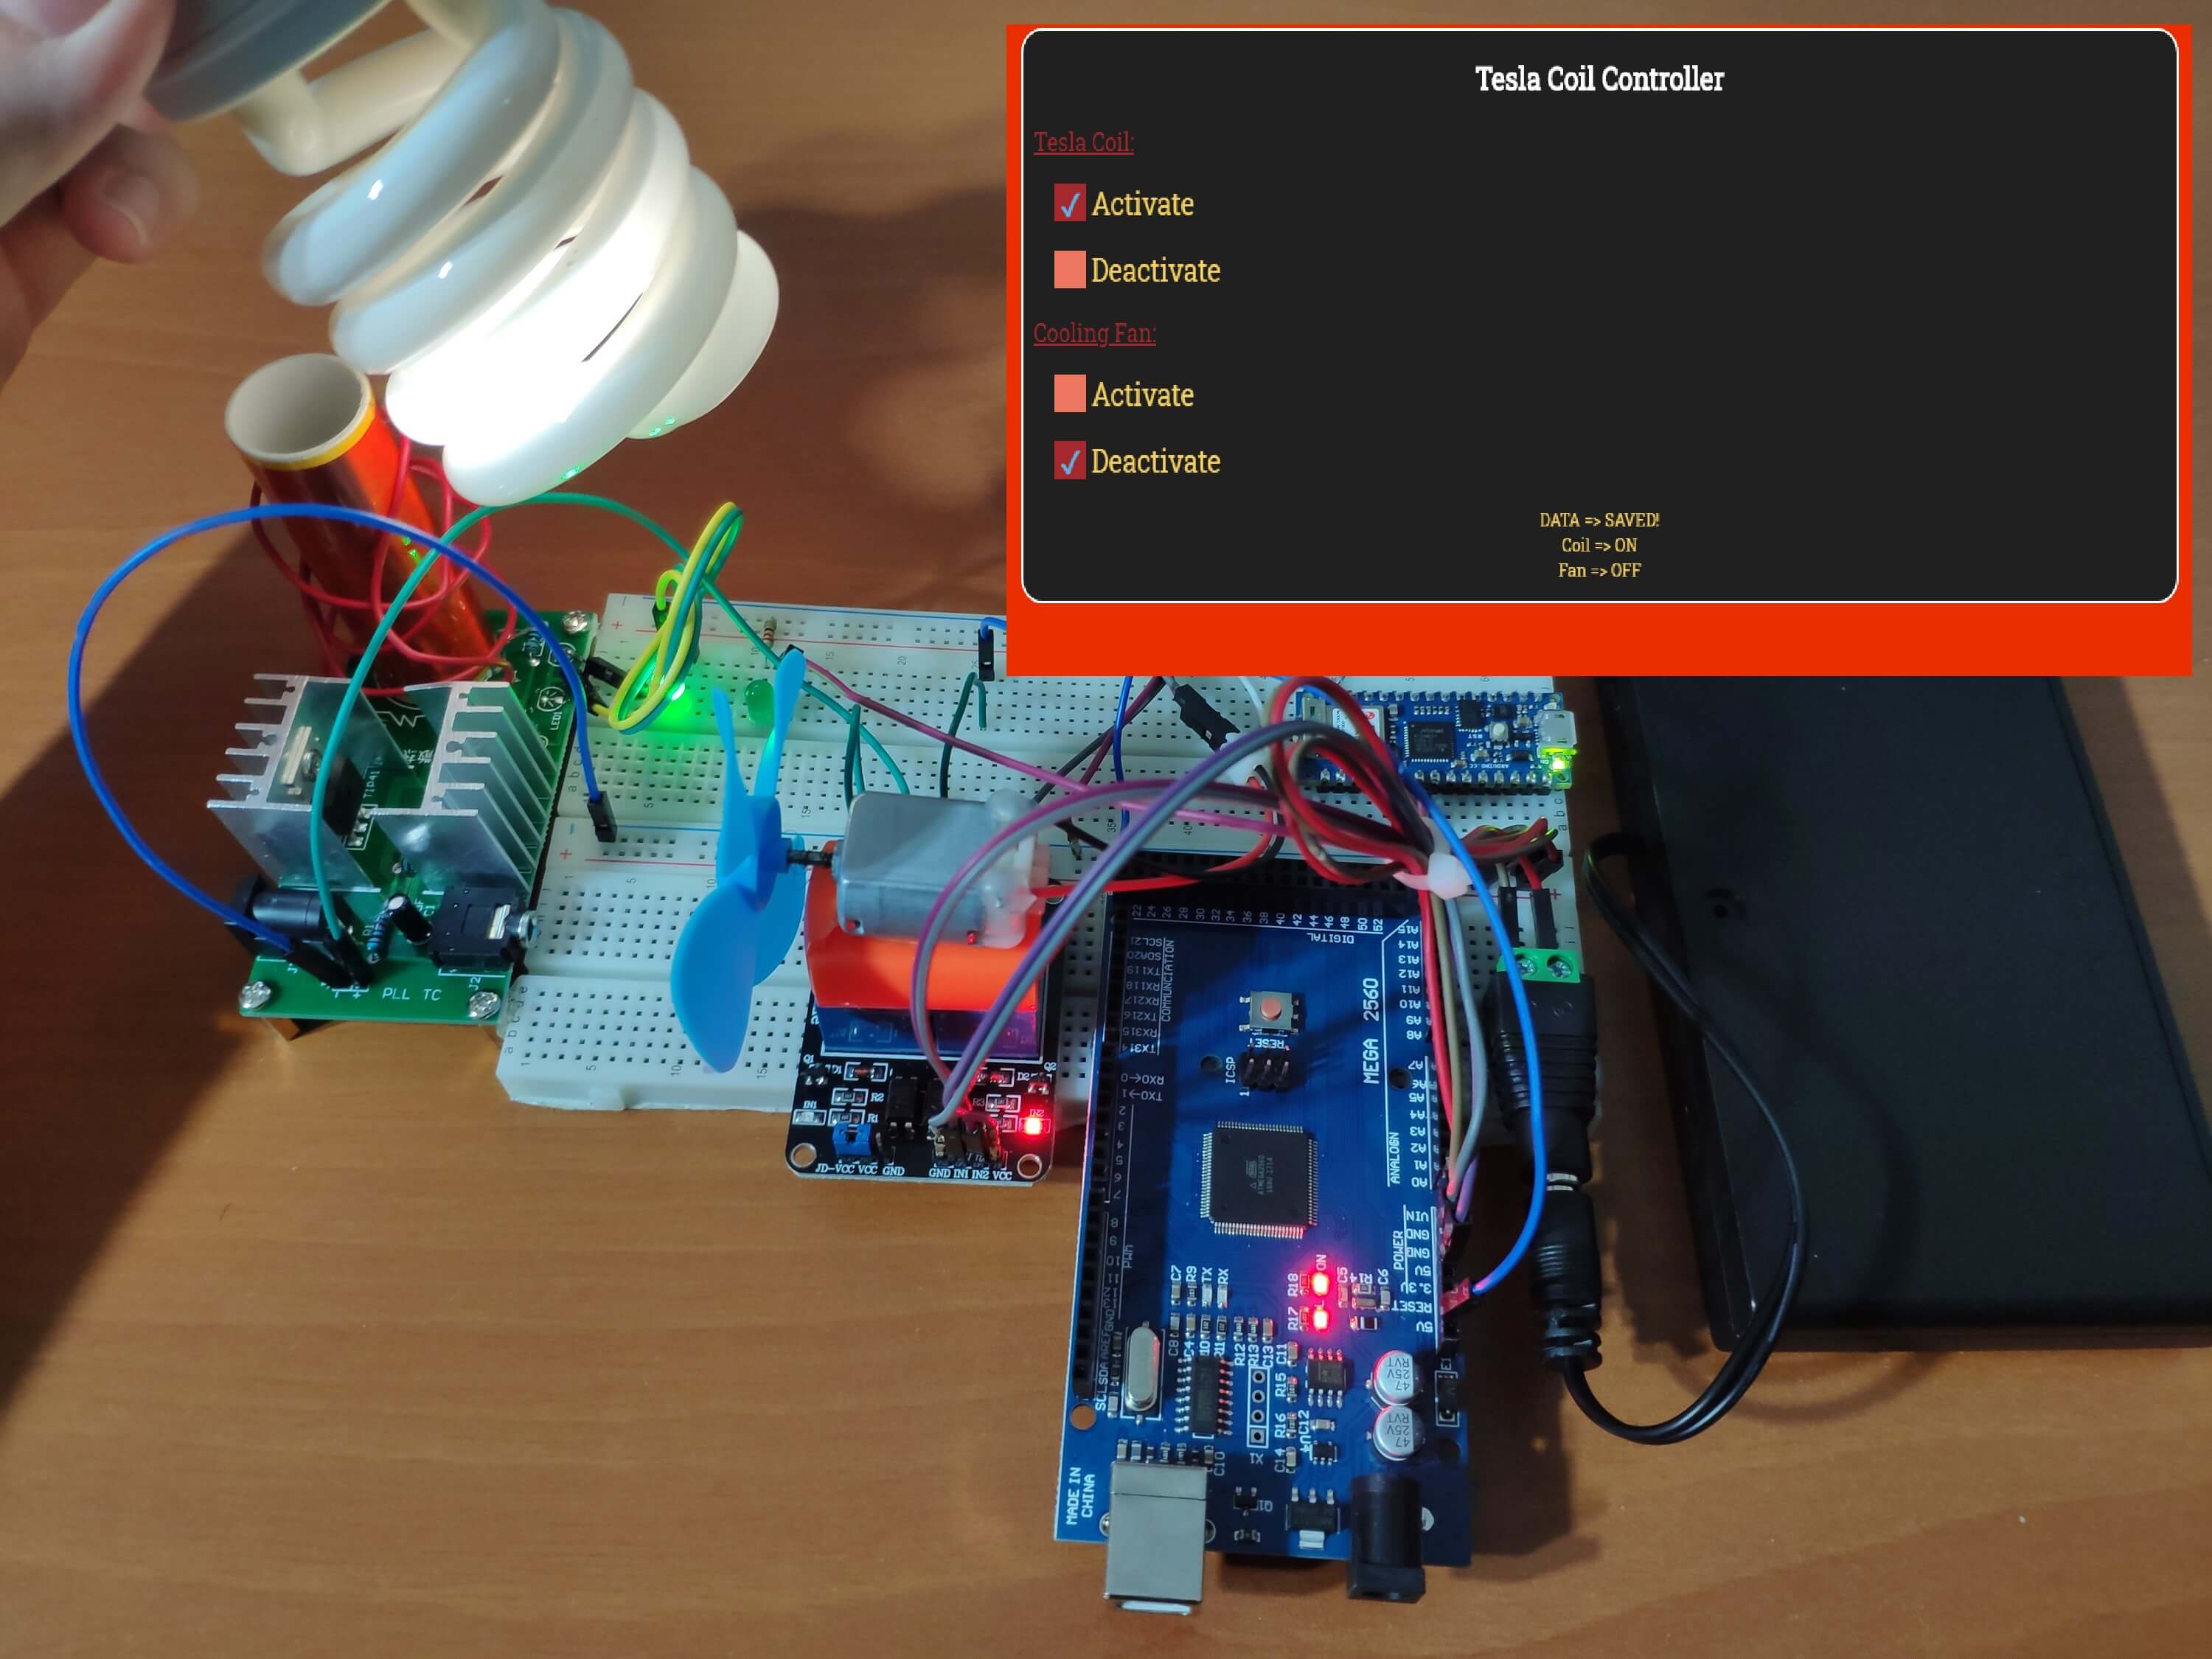
Step 1: Developing the Tesla Coil Controller web application in PHP and JS
With this web application named Tesla Coil Controller, you can control a mini Tesla coil module and a cooling fan on the localhost. It saves the recently entered commands to a database table and prints the current information when requested by Arduino Nano 33 IoT.
You can test the web application (Tesla Coil Controller) before downloading from here.
You can download the web application with all assets and code files in a zipped folder from here.
Features:
1) Send form data (radio button values) without needing to click a classic submit button to Arduino Nano 33 IoT.
2) Turn on or off the mini Tesla coil module.
3) Turn on or of the cooling fan.
Figure - 41.3
Figure - 41.4
Database:
Create a database named `teslacoilcontroller` with a table named `values` in the localhost to save the recently selected commands and print that information when requested by Arduino Nano 33 IoT.
- Create a database named `teslacoilcontroller` using the interface.
- In MySQL, create a table named `values` with three variables - id, coil, and fan.
- In MySQL, insert the default variables - OFF, OFF.
- You can inspect the MySQL code in the table.sql file.
Figure - 41.5
Figure - 41.6
Figure - 41.7
Figure - 41.8
Figure - 41.9
Class (PHP):
I wrote a class named tesla_coil for this project, which includes the functions and global variables used in the web application (Tesla Coil Controller). You can inspect it in the class.php file.
- In the database_define() function, define the database settings, the global conn, and table variables to connect to the database.
- In the save_data() function, update the database table with new commands to save them and return a feedback message.
- In the print_data() function, print the current commands in the database table.
Figure - 41.10
Terminal (PHP):
Via the terminal, you can save data to the database table and send them to Arduino Nano 33 IoT when requested simultaneously.
- Include the tesla_coil class.
- Define a new tesla_coil object.
- Define the database and the table in which you want to save data.
- Enter the server name, the user name, the user password, the database name (teslacoilcontroller), and the table name (values).
- On the localhost, the given settings are the default settings. Change the database name (teslacoilcontroller) and the table name (values) if you created a different database and table.
- Obtain variables by an HTTP GET request - feature, coil, fan.
- Depending on the feature variable, save new commands to the table or print the current command variables.
Figure - 41.11
Figure - 41.12
Figure - 41.13
Index (HTML):
- This is the user interface of the web application by which you can send data to the terminal and thus Arduino Nano IoT.
- Include the index.css and the index.js files.
- Define the radio button values for each option.
Figure - 41.14
Index (CSS):
- Customize the radio buttons using the label tag and the :after pseudo-selector.
- Design the web application interface.
Figure - 41.15
Index (JS):
- Add an event listener (input) to detect whether the user selects a new command by clicking a radio button to trigger an AJAX call.
- Define variables - coil and fan.
- Using the forEach() function, get the values of the checked radio buttons by the user as the selected commands - coil and fan.
- Make an AJAX call to send the selected commands to the terminal.
- Print the response message to see whether the commands are saved to the database table or not.
- In this way, you can send form data without needing to click a submit button.
Figure - 41.16
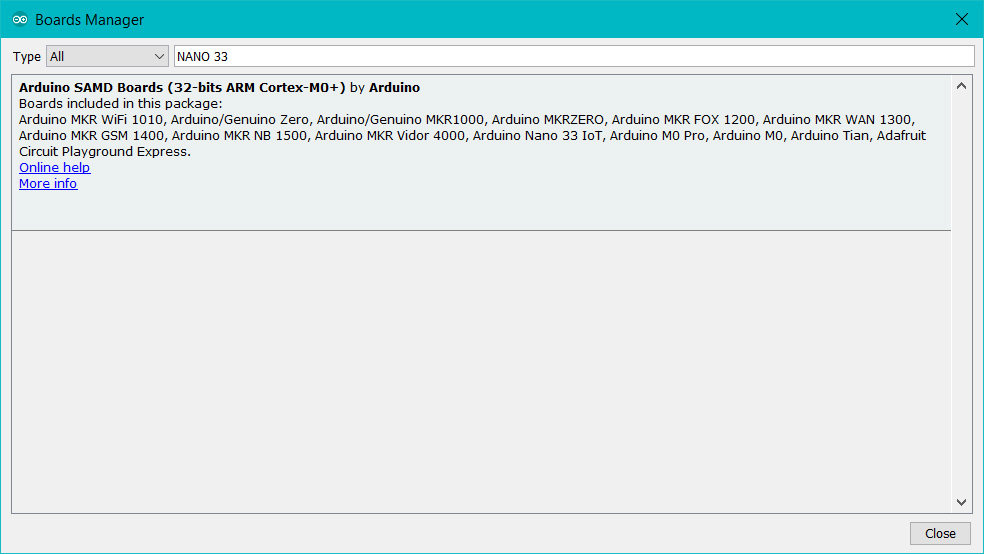
Step 2: Setting up Arduino Nano 33 IoT
If you are a novice in programming with Arduino Nano 33 IoT: do not worry, it is simple to use with Arduino IDE. Just download the required drivers - Arduino SAMD Core - as well-explained here.
Figure - 41.17
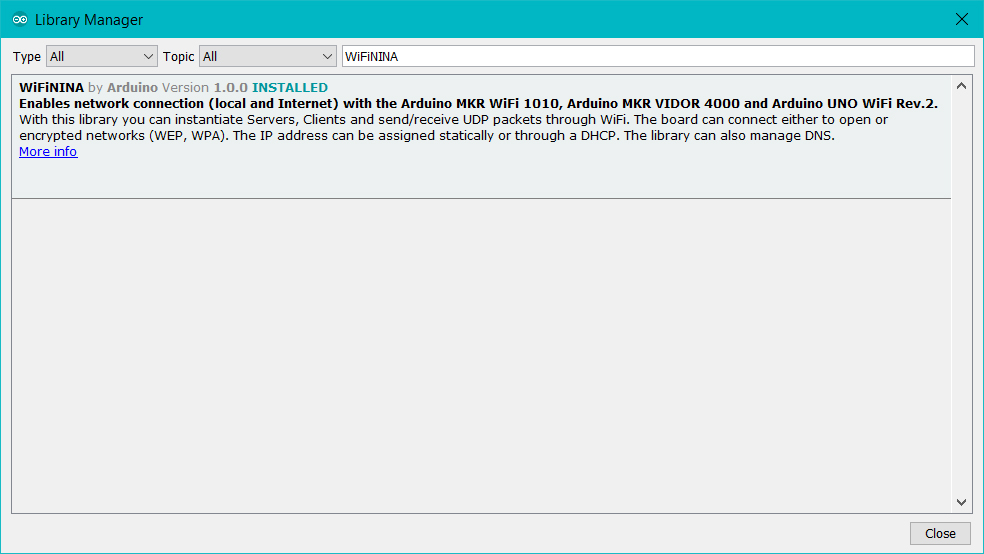
To be able to connect to the WiFi via Arduino Nano 33 IoT, download the WiFiNINA library from here.
Figure - 41.18
Then, Arduino Nano 33 IoT will be ready to execute the source code for this project :)
Step 3: Programming Arduino Nano 33 IoT
- Include required libraries - SPI and WIFININA.
- Define your WiFi settings and localhost address (e.g., 192.1.168.22).
- Define the application (Tesla Coil Controller) terminal path in the localhost.
- Initialize the Ethernet client (WiFiClient) library.
- Define the data holders - readString, coil_status, and fan_status.
- Define the 2-Way relay input pins, and the control LED pin.
- Connect to the WiFi network.
- Connect to the web application named Tesla Coil Controller on the localhost - server, 80.
- Make an HTTP Get request to get data as the response - ?feature=print.
- Get the response text to obtain the command variables (coil and fan).
- Split the response string by a predefined delimiter in a simple way. I used '%' (percentage) as the delimiter in this project - indexOf("%").
- %ON%OFF%
- Glean information as substrings - substring(delimiter_1 + 1, delimiter_2).
- ON
- Blank the readString after obtaining information.
- Print the received commands.
- Activate features depending on the received commands.
Figure - 41.19
Figure - 41.20
Figure - 41.21
Bonus: Observe the progress of data transferring on the serial monitor.
Figure - 41.22
Figure - 41.23
Step 4: Assembling the Mini Tesla Coil Module
I ordered this cheap module to spend my affiliate points but, in the end, it turns out to be an intriguing contraption via Arduino Nano 33 IoT :)
I only follow the well-explained instructions on the product page to solder all components precisely.
You can inspect the module and the instructions from here.
Figure - 41.24
- Install 4 resistors - 2 x 10K and 2 x 2K.
Figure - 41.25
- Install a ceramic capacitor, an electrolytic capacitor, an audio socket, and a power socket.
- Install heat sinks for 2 x IC - IRF530N and TIP41C.
Figure - 41.26
- Install the primary coil and the secondary coil.
Figure - 41.27
- Solder jumper wires to the power LED pins to move the LED to the breadboard.
Figure - 41.28
Features
When the coil command is transferred from the web application (Tesla Coil Controller) to Arduino Nano IoT, turn on or off the mini Tesla coil module depending on the value - ON, OFF.
Figure - 41.29
When the fan command is transferred from the web application (Tesla Coil Controller) to Arduino Nano IoT, turn on or off the cooling fan, and its control LED depending on the value - ON, OFF.
Figure - 41.30
Connections
To supply the Tesla coil module, the cooling fan, and Arduino Nano 33 IoT, I used a 12V battery.
With a DC barrel power to wire jack, I connected the battery on the breadboard.
I affixed all components to the breadboards using a hot glue gun.
Due to the fact that I had a spare Arduino Mega at my disposal and am thinking further improvements for this project, I used the Arduino Mega to feed the 2-Way relay with stable 5V as depicted on the schematic. But, you can use a simple voltage divider instead.
Also, you can supply the cooling fan from Arduino Mega (5V) instead of directly from the battery to reduce torque.
You can view the pin connections on the schematic and in the Arduino code.
         ////////////////////////////////////////////////////
        //       IoT Tesla Coil and Cooling Fan           //
       //                on Localhost                    //
      //           -------------------------            //
     //              Arduino Nano 33 IoT               //
    //               by Kutluhan Aktar                //
   //                                                //
  ////////////////////////////////////////////////////

// Develop a web application in PHP (Tesla Coil Controller) to control a Tesla coil and fan via Arduino Nano 33 IoT.
// Get information from the Tesla Coil Controller without needing to trigger an event by hand.
//
// For more information:
// https://www.theamplituhedron.com/projects/IoT-Tesla-Coil-and-Cooling-Fan-on-the-Localhost
//
// You can inspect the mentioned web application in free version on TheAmplituhedron before downloading on your computer if you are a subscriber:
// https://www.theamplituhedron.com/dashboard/Tesla-Coil-Controller
//
// Connections
// Arduino Nano 33 IoT:
//                                2-Way Relay (5V)
// D2  --------------------------- IN_1
// D3  --------------------------- IN_2
//                                Cooling Fan Control LED (Green)
// D4  ---------------------------


// Include required libraries:
#include <SPI.h>
#include <WiFiNINA.h>

char ssid[] = "[SSID]";       // your network SSID (name)
char pass[] = "[PASSWORD]";               // your network password (use for WPA, or use as key for WEP)
int keyIndex = 0;                          // your network key Index number (needed only for WEP)

int status = WL_IDLE_STATUS;

char server[] = "192.168.1.20";    // enter the loclhost address

// Define the application (Tesla Coil Controller) terminal path in the localhost.
String terminal = "/Tesla_Coil_Controller/terminal.php";

// Initialize the Ethernet client library
WiFiClient client;

// Define the data holders.
String readString, coil_status, fan_status;

// Define the 2-Way Relay input pins:
#define IN_1 2
#define IN_2 3

// Define the cooling fan control LED:
#define c_LED 4

void setup() {
Serial.begin(9600);

pinMode(IN_1, OUTPUT);
pinMode(IN_2, OUTPUT);
pinMode(c_LED, OUTPUT);

 // check for the WiFi module:
  if (WiFi.status() == WL_NO_MODULE) { Serial.println("Communication with WiFi module failed!"); }
  // attempt to connect to Wifi network:
  while (status != WL_CONNECTED) {
    Serial.print("Attempting to connect to SSID: ");
    Serial.println(ssid);
    // Connect to WPA/WPA2 network. Change this line if using open or WEP network:
    status = WiFi.begin(ssid, pass);
    // wait 10 seconds for connection:
    delay(10000);
     // Verify connection on the serial monitor.
     Serial.println("Connected to WiFi!");
  }

}

void loop() {
 // Connect to the web application named Tesla Coil Controller on the localhost.
 if (client.connect(server, 80)) {
   Serial.println("Connected to the localhost!"); // if you get a connection, report back via serial:
   // Make an HTTP request:
   client.println("GET " + terminal + "?feature=print HTTP/1.1");
   client.println("Host: 192.168.1.20");
   client.println("Connection: close");
   client.println();
   delay(1000);
 }else{
   Serial.print("Conection Failed!");
 }

 // Get the response text to obtain the command variables (coil and fan).
 while(client.available()){ char c = client.read(); readString += c; }
 if(readString != ""){
   // Split the reposnse string by a pre-defined delimiter in a simple way. '%'(percentage) is defined as the delimiter in this project.
   int delimiter_1 = readString.indexOf("%");
   int delimiter_2 = readString.indexOf("%", delimiter_1 +1);
   int delimiter_3 = readString.indexOf("%", delimiter_2 +1);
   // Glean information as substrings.
   coil_status = readString.substring(delimiter_1 + 1, delimiter_2);
   fan_status = readString.substring(delimiter_2 + 1, delimiter_3);

   readString = "";
 }

 Serial.println("Coil Status: " + coil_status);
 Serial.println("Fan Status: " + fan_status);

 // Activate the requested commands:
 if(coil_status == "ON"){ digitalWrite(IN_1, HIGH); }else if(coil_status == "OFF"){ digitalWrite(IN_1, LOW); }
 if(fan_status == "ON"){ digitalWrite(IN_2, HIGH); digitalWrite(c_LED, HIGH); }else if(fan_status == "OFF"){ digitalWrite(IN_2, LOW); digitalWrite(c_LED, LOW); }

}
<?php

class tesla_coil {
	public $conn, $table;

	public function database_define($DBServerName, $DBUserName, $DBPassword, $DBName, $table){
		// Define the table name, and connect to the database.
		$this->table = $table;
		$this->conn = mysqli_connect($DBServerName, $DBUserName, $DBPassword, $DBName);
	}

	public function save_data($coil, $fan){
		// Save new commmands to the table.
		$sql = "UPDATE `$this->table` SET `coil`='$coil', `fan`='$fan' WHERE id=1";
		if(mysqli_query($this->conn, $sql)){ echo "SAVED!<br>Coil => ".$coil."<br>Fan => ".$fan; }else{ echo 'ERROR!'; }

	}

	public function print_data(){
		// Print the current command variables.
		$sql = "SELECT * FROM `$this->table` WHERE id=1";
		$result = mysqli_query($this->conn, $sql);
		while($rows = mysqli_fetch_assoc($result)){
			echo '%'.$rows['coil'].'%'.$rows['fan'].'%';
		}
	}
}

?>
<?php

// Include the tesla_coil class.
include_once "class.php";
// Define a new tesla_coil object.
$tesla_coil = new tesla_coil();

// Define the database and the table in which you want to save data.
// Enter the server name, the user name, the user password, the database name (teslacoilcontroller), and the table name (values).
// On the localhost, these are the default settings. Change the database name (teslacoilcontroller) and the table name (values) if you created a different database and table.
$tesla_coil->database_define("localhost", "root", "", "teslacoilcontroller", "values");

// Depending on the feature variable, save new commands to the table or print the current command variables.
if(isset($_GET["feature"]) && $_GET["feature"] == "save" && isset($_GET["coil"]) && isset($_GET["fan"])){
	$tesla_coil->save_data($_GET["coil"], $_GET['fan']);
}

if(isset($_GET["feature"]) && $_GET["feature"] == "print"){
	$tesla_coil->print_data();
}


?>
-- CREATE A DATABASE TABLE NAMED VALUES --

CREATE TABLE `values`(
   id int(11) AUTO_INCREMENT PRIMARY KEY NOT NULL,
   coil varchar(255) NOT NULL,
   fan varchar(255) NOT NULL

);

-- INSERT DEFAULT VARIABLES --

INSERT INTO `values`(`coil`, `fan`) VALUES ('OFF', 'OFF');