[1]SenseCAP K1100 - The Sensor Prototype Kit with LoRa® and AI
[1]Wio Terminal
[1]Grove - CO2 & Temperature & Humidity Sensor
[1]LattePanda 3 Delta 864
[1]DFRobot 7'' HDMI Display with Capacitive Touchscreen
[1]Creality CR-200B 3D Printer
[1]MicroSD Card (FAT32)
Description
Due to climate change and excessive deforestation, trees and plants are becoming more susceptible to contagious diseases. Most tree diseases are fungal and are instigated mainly by drought, high carbon dioxide levels, overcrowding, and damage to stem or roots[1]. Tree diseases can disperse rapidly and travel over long distances with high expansion rates.
Since trees are crucial for pollination, spreading tree diseases can cause crop yield loss, animal deaths, widespread infectious epidemics, and even land degradation due to soil erosion. Therefore, it is important to detect tree diseases before permeating forests to avoid their hazardous consequences. However, it may not be enough to merely detect diseases since various environmental factors can cause trees to be stressed and catch a highly contagious disease that leads to unrecoverable damage to forests, farms, and arable lands. Hence, it is also important to check and log environmental factors to achieve better detection results. In this regard, by getting prescient warnings regarding potential tree diseases and environmental factors, we can take necessary precautions to avoid hazardous outcomes related to forest degradation and crop yield loss.
After perusing recent research papers on tree disease detection methods and monitoring, I decided to create an easy-to-use and budget-friendly device to detect tree diseases with object detection in the hope of providing an advanced and accessible way to prevent contagious tree diseases.
To detect tree diseases precisely, I needed to collect data from trees infected with different diseases in order to train my object detection model with notable validity. Since Seeed Studio recently released the SenseCAP K1100 kit providing all required sensors for an IoT and computer vision (object detection) project, I decided to build my device based on the SenseCAP K1100 kit, including a Vision AI module and Wio Terminal. Additionally, I connected a Grove CO2 & Temperature & Humidity sensor (SCD30) to obtain accurate environmental factor measurements. Also, I could easily log the collected environmental factors in a CSV file on an SD card since Wio Terminal has a built-in MicroSD card module.
However, I could not capture tree images and run an object detection model simultaneously on Wio Terminal due to memory and RAM limitations. Therefore, I decided to utilize LattePanda 3 Delta 864 to capture images via the Vision AI module and run my object detection model according to the commands transmitted by Wio Terminal via serial communication. Since LattePanda 3 Delta is an SBC (Single-Board Computer) which can run Ubuntu operating system (x86_64), I could use Python to process the captured images and run my model.
After completing my data set by taking pictures of various infected trees, I built my object detection model with Edge Impulse to detect tree disease categories. I utilized Edge Impulse FOMO (Faster Objects, More Objects) algorithm to train my model, which is a novel machine learning algorithm that brings object detection to highly constrained devices. Since Edge Impulse is nearly compatible with all microcontrollers, development boards, and SBCs, I have not encountered any issues while uploading and running my model on LattePanda 3 Delta.
Since I had the chance to collect data on many different tree diseases while wandering in a forest, it was impractical to train the model on each disease separately with limited data. Therefore, I decided to categorize diseases based on the infected parts (stem, branch, or leaf) and use these categories as labels to train my model:
leaf_rust_spot_blister
stem_bark_branch_mildew
After training and testing my object detection (FOMO) model, I deployed and uploaded the model on LattePanda 3 Delta as a Linux (x86) application (.eim). Therefore, the device is capable of detecting tree diseases by running the model independently without any additional procedures.
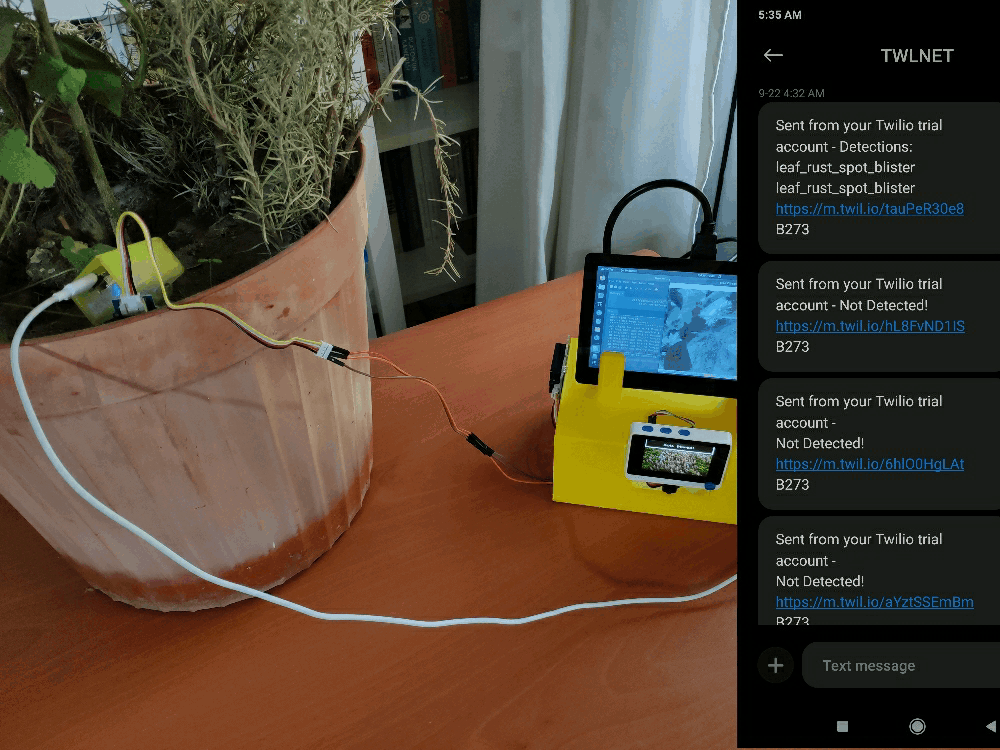
Since I decided to make the device to inform the user of the detection results via MMS remotely after running the object detection model, I utilized Twilio's API to send the detected labels and the modified image with bounding boxes to the verified phone number.
Lastly, to make the device as robust and sturdy as possible while operating outdoors, I designed a forest-themed case with a sliding back cover and a laterally moveable Vision AI module handle (3D printable).
So, this is my project in a nutshell 😃
In the following steps, you can find more detailed information on coding, capturing tree images with the Vision AI module, logging environmental factors with Wio Terminal, building an object detection (FOMO) model with Edge Impulse, running the model on LattePanda 3 Delta, and sending the detection results via MMS.
🎁🎨 Huge thanks to Seeed Studio for sponsoring these products:
⭐ SenseCAP K1100 - The Sensor Prototype Kit | Inspect
⭐ Grove - CO2 & Temperature & Humidity Sensor (SCD30) | Inspect
🎁🎨 Huge thanks to DFRobot for sponsoring these products:
Step 1: Designing and printing a forest-themed case
Since I focused on building a budget-friendly and accessible device that collects data in forests and informs the user of detected tree diseases, I decided to design a robust and sturdy case allowing the user to leave the device outdoors and capture tree pictures effortlessly. To avoid overexposure to dust and prevent loose wire connections, I added a sliding back cover with a handle to the case. Then, I designed a laterally moveable part for the Vision AI module to place the module on the case via its attachable trail. Also, I decided to adorn the sliding back cover with tree icons so as to complement the forest theme gloriously.
Since I needed to connect an HDMI screen to LattePanda 3 Delta to observe the running operations and the captured images, I added two stands on the top of the case to place the connected screen.
I designed the main case, its sliding back cover, and the laterally moveable part in Autodesk Fusion 360. You can download their STL files below.
Figure - 83.9
Figure - 83.10
Figure - 83.11
Figure - 83.12
Figure - 83.13
Figure - 83.14
Figure - 83.15
Then, I sliced all 3D models (STL files) in Ultimaker Cura.
Figure - 83.16
Figure - 83.17
Note: The pictures above are for demonstrating the sliced models: I needed to split some models to make them compatible with the CR-200B build size (200 x 200 x 200 mm).
Since I wanted to create a solid structure representing a recuperating and transforming autumn forest, I utilized these PLA filaments:
Yellow
Glass Lemon Yellow
Finally, I printed all parts (models) with my Creality CR-200B 3D Printer. It is my first fully-enclosed FDM 3D printer, and I must say that I got excellent prints effortlessly with the CR-200B :)
If you are a maker planning to print your 3D models to create more complex projects, I highly recommend the CR-200B. Since the CR-200B is fully-enclosed, you can print high-resolution 3D models with PLA and ABS filaments. Also, it has a smart filament runout sensor and the resume printing option for power failures.
According to my experience, there are only two downsides of the CR-200B: relatively small build size (200 x 200 x 200 mm) and manual leveling. Conversely, thanks to the large leveling nuts and assisted leveling, I was able to level the bed and start printing my first model in less than 30 minutes.
#️⃣ Before the first use, remove unnecessary cable ties and apply grease to the rails.
Figure - 83.18
Figure - 83.19
#️⃣ Test the nozzle and hot bed temperatures.
Figure - 83.20
#️⃣ Go to Settings ➡ Leveling and adjust four predefined points by utilizing the leveling nuts.
Figure - 83.21
Figure - 83.22
Figure - 83.23
Figure - 83.24
#️⃣ Finally, attach the spool holder and feed the extruder with the filament.
Figure - 83.25
#️⃣ Since the CR-200B is not officially supported by Cura, select the Ender-3 profile and change the build size to 200 x 200 x 200 mm. Also, to compensate for the nozzle placement, set the Nozzle offset X and Y values to -10 mm on the Extruder 1 tab.
Figure - 83.26
Figure - 83.27
Step 1.1: Assembling the case and making connections & adjustments
// Connections
// Wio Terminal :
//                                Grove - VOC and eCO2 Gas Sensor
// SDA --------------------------- SDA
// SCL --------------------------- SCL
//                                Grove - CO2 & Temperature & Humidity Sensor
// SDA --------------------------- SDA
// SCL --------------------------- SCL
//                                Grove - Soil Moisture Sensor
// A0  --------------------------- SIG
Then, I connected Wio Terminal and the Vision AI module to LattePanda 3 Delta via USB cables.
To observe running processes, I attached the 7'' HDMI display to LattePanda 3 Delta via a standard HDMI cable.
Figure - 83.28
Figure - 83.29
Figure - 83.30
After printing all parts (models), I fastened all components except the Vision AI module to their corresponding slots on the main case via the hot glue gun.
Then, I attached the Vision AI module to the laterally moveable part allowing placing the module on the case's attachable trail or a separate location.
Finally, I placed the sliding back cover via the dents on the case.
Figure - 83.31
Figure - 83.32
Figure - 83.33
Figure - 83.34
Figure - 83.35
Figure - 83.36
Figure - 83.37
Figure - 83.38
Figure - 83.39
Figure - 83.40
Figure - 83.41
Figure - 83.42
Figure - 83.43
Figure - 83.44
Figure - 83.45
Step 2: Creating a Twilio account to send MMS
To send the detected labels and the modified picture via MMS after running the model, I utilized Twilio's API. Twilio gives the user a simple and reliable way to send MMS internationally to a verified phone number free of charge for trial accounts. Also, Twilio provides official helper libraries for different programming languages, including Python.
#️⃣ First of all, sign up for Twilio and create a new free trial account (project).
Figure - 83.46
Figure - 83.47
#️⃣ Then, verify a phone number for the account (project) and set the account settings for SMS (MMS) in Python.
Figure - 83.48
Figure - 83.49
#️⃣ To activate the free virtual phone number, go to the project dashboard and click Get a Twilio phone number. Then, click Start setup to create a Messaging Service.
Figure - 83.50
Figure - 83.51
Figure - 83.52
#️⃣ After creating the Messaging Service, add the given Twilio (virtual) phone number to the Messaging Service.
Figure - 83.53
Figure - 83.54
#️⃣ Finally, click Try SMS to download the Twilio Python Helper Library and go to Account ➡ API keys & tokens to get the account SID and the auth token under Live credentials so as to send MMS via Twilio's API.
Figure - 83.55
Figure - 83.56
Figure - 83.57
Step 3: Developing a web application in PHP to save the transferred detection results (images)
Since Twilio needs a publicly accessible URL to send media (pictures) via MMS, I developed a simple web application in PHP to save the modified images with bounding boxes after running the object detection model. LattePanda 3 Delta adds bounding boxes for each detected object and sends the detection result (modified image) to the web application.
Since I have a website (theamplituhedron.com), I utilized its server to host this web application named tree_disease_detection_web. However, you can employ a localhost tunneling service like ngrok to send images directly from your localhost via Twilio.
As shown below, the web application consists of one file:
index.php
⭐ If LattePanda 3 Delta transfers the modified image (detection result) after running an inference with the Edge Impulse model successfully:
⭐ Check whether the uploaded file extension is in the allowed file formats.
⭐ Check whether the uploaded file size exceeds the 5MB data limit.
⭐ Save the transferred image to the detections folder.
if(!empty($_FILES["captured_image"]['name'])){
	// Image File:
	$captured_image_properties = array(
	    "name" => $_FILES["captured_image"]["name"],
	    "tmp_name" => $_FILES["captured_image"]["tmp_name"],
		"size" => $_FILES["captured_image"]["size"],
		"extension" => pathinfo($_FILES["captured_image"]["name"], PATHINFO_EXTENSION)
	);

    // Check whether the uploaded file extension is in the allowed file formats.
	$allowed_formats = array('jpg', 'png');
	if(!in_array($captured_image_properties["extension"], $allowed_formats)){
		echo 'FILE => File Format Not Allowed!';
	}else{
		// Check whether the uploaded file size exceeds the 5MB data limit.
		if($captured_image_properties["size"] > 5000000){
			echo "FILE => File size cannot exceed 5MB!";
		}else{
			// Save the uploaded file (image).
			move_uploaded_file($captured_image_properties["tmp_name"], "./detections/".$captured_image_properties["name"]);
			echo "FILE => Saved Successfully!";
		}
	}
}
Figure - 83.58
Step 4: Setting up Wio Terminal on the Arduino IDE
Since Wio Terminal supports reading and writing information from/to files on an SD card, I decided to utilize a CSV file so as to log the collected environmental factors on the SD card without applying any additional procedures. However, before proceeding with the following steps, I needed to set up Wio Terminal on the Arduino IDE and install the required libraries for this project.
#️⃣ To add the Wio Terminal board to the Arduino IDE, navigate to File ➡ Preferences and paste the URL below under Additional Boards Manager URLs.
#️⃣ Click Tools ➡ Board ➡ Boards Manager, and search for Wio Terminal in the search box. Then, install Seeed SAMD Boards.
Figure - 83.59
#️⃣ Download the required libraries for Wio Terminal, the Grove VOC & eCO2 gas sensor (SGP30), and the Grove CO2 & Temperature & Humidity sensor (SCD30):
Step 4.1: Loading and displaying images from the SD card
To display images on the TFT LCD screen integrated into Wio Terminal successfully, I needed to convert them to a compatible BMP file format and then load them from the SD card.
#️⃣ First, open Microsoft Paint to rescale images to the required sizes and save them as the 24-bit bitmap (.bmp) files in the bmp folder.
#️⃣ To convert the 24-bit bitmap (.bmp) files to Wio Terminal's required BMP file format, download the bmp_converter.py file and save it to the bmp folder.
#️⃣ Then, modify the folder location in the bmp_converter.py file and run it.
#️⃣ Enter 1 for 8-bit BMP file format conversion or 2 for 16-bit BMP file format conversion.
#️⃣ Finally, the bmp_converter.py file converts all the given 24-bit bitmap (.bmp) files and saves them to rgb332 (8-bit) or rgb565 (16-bit) folders in the bmp folder.
Figure - 83.60
Figure - 83.61
Figure - 83.62
Figure - 83.63
#️⃣ To display the converted BMP files on the TFT LCD screen, move them to the SD card.
#️⃣ Then, copy the RawImage.h file to the Arduino sketch folder.
// To draw the 8-bit color image on screen, starting from point (x, y):
drawImage<uint8_t>("path to sd card image", x, y);

// To draw the 16-bit color image on screen, starting from point (x, y):
drawImage<uint16_t>("path to sd card image", x, y);
Figure - 83.64
Step 5: Collecting environmental factors and sending commands to LattePanda 3 Delta w/ Wio Terminal
After setting up Wio Terminal and installing the required libraries and modules, I programmed Wio Terminal to collect environmental factors and save them to the given CSV file on the SD card by appending the current date & time:
Date
CO2
Temperature
Humidity
Moisture
tVOC (total volatile organic compounds)
CO2eq (carbon dioxide equivalent)
Since I needed to send commands to LattePanda 3 Delta to capture tree images or run the object detection model, I utilized the configurable buttons integrated into Wio Terminal to choose among commands. After selecting a command, Wio Terminal sends the selected command to LattePanda 3 Delta via serial communication.
Button A ➡ Capture image ('A')
Button B ➡ Run model ('B')
Also, Wio Terminal sends the model run command ('B') to LattePanda 3 Delta via serial communication automatically every 5 minutes.
Before programming Wio Terminal, I had to modify the Histogram library to resize histograms and adjust their colors simultaneously.
#️⃣ First, open the Histogram.cpp file and modify the shrinkShowHistogram and changeParam functions.
Figure - 83.65
Figure - 83.66
#️⃣ Then, open the Histogram.h file and add the new parameters to the shrinkShowHistogram function.
Or, you can download the modified files directly on Downloads.
Figure - 83.67
You can download the tree_disease_detection_wio_controls.ino file to try and inspect the code for collecting environmental factors, saving information to a given CSV file on the SD card, and transferring commands via serial communication.
⭐ Initialize the built-in RTC module. Then, adjust the date & time as the compiled date & time.
  rtc.begin();
  DateTime now = DateTime(F(__DATE__), F(__TIME__));
  rtc.adjust(now);
⭐ Check the connection status between Wio Terminal and the SD card.
if(!SD.begin(SDCARD_SS_PIN, SDCARD_SPI)) while (1);
⭐ Check the SGP probe status on the VOC and eCO2 gas sensor. Then, read the H2 and Ethanol signal.
⭐ Set the default absolute humidity value - 13.000 g/m^3.
⭐ Initiate the VOC and eCO2 gas sensor.
  while(sgp_probe() != STATUS_OK){
    if(DEBUG) Serial.println("VOC and eCO2 Gas Sensor => SGP probe failed!");
    while (1);
  }
  // Read the H2 and Ethanol signal with the VOC and eCO2 gas sensor.
  err = sgp_measure_signals_blocking_read(&scaled_ethanol_signal, &scaled_h2_signal);
  // Check the VOC and eCO2 gas sensor status after reading the signal.
  if(err == STATUS_OK){ if(DEBUG) Serial.println("VOC and eCO2 Gas Sensor => Signal acquired successfully!"); }
  else{ if(DEBUG) Serial.println("VOC and eCO2 Gas Sensor => Signal reading error!"); }
  // Set the default absolute humidity value - 13.000 g/m^3.
  sgp_set_absolute_humidity(13000);
  // Initiate the VOC and eCO2 gas sensor.
  err = sgp_iaq_init();
⭐ Initialize the CO2 & Temperature & Humidity sensor.
⭐ In the get_VOC_and_eCO2 function, get the VOC (Volatile Organic Compounds) and CO2eq (Carbon dioxide equivalent) measurements evaluated by the VOC and eCO2 gas sensor.
void get_VOC_and_eCO2(){
  // Get the VOC (Volatile Organic Compounds) and CO2eq (Carbon dioxide equivalent) measurements evaluated by the VOC and eCO2 gas sensor.
  s16 err = 0;
  u16 tvoc_ppb, co2_eq_ppm;
  err = sgp_measure_iaq_blocking_read(&tvoc_ppb, &co2_eq_ppm);
  if(err == STATUS_OK){
    tvoc_value = tvoc_ppb;
    co2_eq_value = co2_eq_ppm;
    if(DEBUG){ Serial.print("tVOC (Volatile Organic Compounds): "); Serial.print(tvoc_value); Serial.println(" ppb"); }
    if(DEBUG){ Serial.print("CO2eq (Carbon dioxide equivalent): "); Serial.print(co2_eq_value); Serial.println(" ppm\n"); }
  }else{
    if(DEBUG) Serial.println("VOC and eCO2 Gas Sensor => IAQ values reading error!\n");
  }
  delay(1000);
}
⭐ In the get_co2_temp_humd function, obtain the CO2, temperature, and humidity measurements generated by the CO2 & Temperature & Humidity sensor.
void get_co2_temp_humd(){
  // Obtain the CO2, temperature, and humidity measurements generated by the CO2 & Temperature & Humidity sensor.
  float result[3] = {0};
  if(scd30.isAvailable()){
    scd30.getCarbonDioxideConcentration(result);
    co2_value = result[0];
    temp_value = result[1];
    humd_value = result[2];
    if(DEBUG){ Serial.print("CO2 (Carbon dioxide): "); Serial.print(co2_value); Serial.println(" ppm"); }
    if(DEBUG){ Serial.print("Temperature: "); Serial.print(temp_value); Serial.println(" ℃"); }
    if(DEBUG){ Serial.print("Humidity: "); Serial.print(result[2]); Serial.println(" %\n"); }
  }
  delay(1000);
}
⭐ In the get_moisture function, get the soil moisture measurement generated by the Grove - Soil Moisture sensor.
⭐ In the show_resize_histogram function, resize, place, and display the histogram on the TFT screen.
⭐ Then, set the background image for the TFT screen.
void show_resize_histogram(int text, int background){
  // Resize, place, and display the histogram on the TFT screen.
  histogram.shrinkShowHistogram(25, 45, 1.4, text, background, background);
  tft.setRotation(3);
  tft.setTextSize(1);
  tft.drawString("a:CO2 b:Temp c:Humd d:Mois e:tVOC f:CO2eq", 30, 5);
  delay(5000);
  // Set the background image.
  drawImage<uint8_t>("forest_disease.bmp", 0, 0);
  delay(2000);
}
⭐ In the save_data_to_SD_Card function, open the given CSV file on the SD card in the APPEND file mode.
⭐ There are three file modes supported by Wio Terminal: WRITE, READ, and APPEND.
⭐ If the given CSV file is opened successfully, obtain the current date & time from the built-in RTC module and create the data record to be inserted as a new row.
⭐ Then, append the data record with the current date & time and close the CSV file.
⭐ After appending the given data record successfully, notify the user via the TFT screen.
void save_data_to_SD_Card(){
  // Open the given CSV file on the SD card in the APPEND file mode.
  // FILE MODES: WRITE, READ, APPEND
  myFile = SD.open(data_file, FILE_APPEND);
  // If the given file is opened successfully:
  if(myFile){
    if(DEBUG){ Serial.print("\nWriting to "); Serial.print(data_file); Serial.println("..."); }
    // Obtain the current date & time.
    DateTime now = rtc.now();
    String _date = String(now.year(), DEC) + "_" + String(now.month(), DEC) + "_" + String(now.day(), DEC) + "_" + String(now.hour(), DEC) + "_" + String(now.minute(), DEC) + "_" + String(now.second(), DEC);
    // Create the data record to be inserted as a new row:
    String data_record = String(_date)
                         + "," + String(co2_value)
                         + "," + String(temp_value)
                         + "," + String(humd_value)
                         + "," + String(moisture_value)
                         + "," + String(tvoc_value)
                         + "," + String(co2_eq_value)
                       ;
    // Append the data record:
    myFile.println(data_record);
    // Close the CSV file:
    myFile.close();
    if(DEBUG) Serial.println("Data saved successfully!\n");
    // Notify the user after appending the given data record successfully.
    tft.fillRect(0, 0, w, h, TFT_WHITE);
    tft.fillRect(offset, offset, w-2*offset, h-2*offset, TFT_BLACK);
    tft.setTextSize(2);
    tft.drawString("Data Stored!", (w-12*12)/2, 23);
  }else{
    // If Wio Terminal cannot open the given CSV file successfully:
    if(DEBUG) Serial.println("Wio Terminal cannot open the given CSV file!\n");
    tft.setTextSize(2);
    tft.drawString("Wio Terminal", 35, 10);
    tft.drawString("cannot open the file!", 35, 30);
  }
  // Exit and clear:
  delay(3000);
}
⭐ Every 1 minute, update the histogram and append the collected environmental factors to the CSV file on the SD card.
⭐ Every 5 minutes, send the model run command ('B') automatically to LattePanda 3 Delta via serial communication.
  if(millis() - timer > 60*1000 || timer == 0){
    // Display the histogram on the TFT screen.
    update_histogram();
    show_resize_histogram(TFT_WHITE, TFT_BLACK);
    // Save the collected environmental factors to the SD card.
    save_data_to_SD_Card();
    // Every 5 minutes, send the model run command ('B') automatically to LattePanda 3 Delta.
    if(millis() - model_timer > 5*60*1000){
      Serial.println("B"); delay(500);
      tft.fillRect(0, TFT_WIDTH-h, w, h, TFT_WHITE);
      tft.fillRect(offset, TFT_WIDTH-h+offset, w-2*offset, h-2*offset, TFT_BLACK);
      tft.setTextSize(2);
      tft.drawString("Model Running!", (w-14*12)/2, TFT_WIDTH-25-12);
      // Update the model timer.
      model_timer = millis();
    }
    // Update the timer.
    timer = millis();
  }
⭐ If the configurable button A is pressed, send the capture command ('A') to LattePanda 3 Delta via serial communication.
After uploading and running the tree_disease_detection_wio_controls.ino file on Wio Terminal:
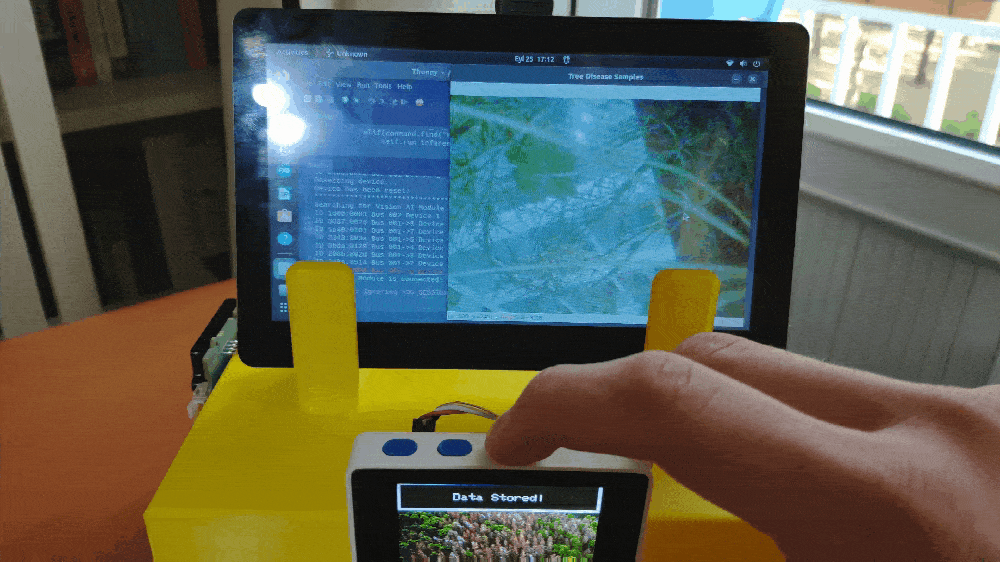
🌳📲 The device displays the collected environmental factors as a histogram on the built-in TFT screen.
🌳📲 The device notifies the user via the built-in buzzer if the collected environmental factors exceed the defined thresholds.
Figure - 83.73
Figure - 83.74
🌳📲 Every 1 minute, the device updates the histogram and appends the collected environmental factors to the environmental_factors.csv file on the SD card.
Figure - 83.75
Figure - 83.76
🌳📲 If the configurable button A is pressed, the device sends the capture command ('A') to LattePanda 3 Delta via serial communication.
Figure - 83.77
🌳📲 Every 5 minutes, the device transfers the model run command ('B') automatically to LattePanda 3 Delta via serial communication.
🌳📲 Alternatively, the device sends the model run command ('B') manually if the configurable button B is pressed.
Figure - 83.78
🌳📲 If Wio Terminal cannot open the given CSV file successfully, the device displays the error message on the TFT screen.
Figure - 83.79
🌳📲 If the DEBUG variable is set as 1, the device prints notifications and sensor measurements on the serial monitor for debugging.
Figure - 83.80
Figure - 83.81
Step 6: Capturing and storing images of diseased trees w/ the Grove Vision AI module
After managing to transfer commands with Wio Terminal via serial communication, I programmed LattePanda 3 Delta to capture tree images with the Vision AI module if it receives the capture command ('A').
Before proceeding with the following steps, I needed to set the correct settings for Wio Terminal and the Vision AI module on LattePanda 3 Delta and upload (flash) the data collection firmware to the Vision AI module.
#️⃣ First of all, to capture tree images with the Vision AI module in Python, connect the module to the PC and double-click the boot button to enter the boot mode.
#️⃣ Save the new rules file to the /etc/udev/rules.d/ folder.
#️⃣ Then, restart the udev rules via the terminal.
sudo udevadm control --reload-rules
Figure - 83.83
Figure - 83.84
Figure - 83.85
#️⃣ Since Ubuntu throws a permission error while attempting to get data from serial communication as non-root, find the Wio Terminal serial port on LattePanda 3 Delta with the Arduino IDE.
#️⃣ Then, change the permission of the Wio Terminal serial port folder via the terminal:
sudo chmod 666 /dev/ttyACM1
Figure - 83.86
Figure - 83.87
Figure - 83.88
Since I utilized a single code file to run all functions, you can find more detailed information regarding the code in Step 8.
To obtain the generated image buffer from the Vision AI module, I modified these functions provided by Seeed Studio.
⭐ Define the Vision AI module image descriptions, vendor ID, and product ID.
⭐ In the wio_commands function, obtain commands from Wio Terminal via serial communication.
Capture sample images or run an inference with the Edge Impulse object detection model depending on the received command.
    def wio_commands(self):
        # Obtain commands from Wio Terminal via serial communication.
        command = self.wio.read(1).decode("utf-8")
        if(command.find("A") >= 0):
            self.vision_ai_save_sample()
        elif(command.find("B") >= 0):
            self.run_inference()
⭐ In the find_vision_ai function, search all connected USB devices to find the Vision AI module.
⭐ If the connected device's vendor and product IDs correspond to the Vision AI module, start serial communication.
    def find_vision_ai(self, _open=True):
        print('*' * 50)
        print('Searching for Vision AI Module...')
        # Search all connected USB devices to find the Vision AI module.
        for device in self.context.getDeviceIterator(skip_on_error=True):
            product_id = device.getProductID()
            vendor_id = device.getVendorID()
            device_addr = device.getDeviceAddress()
            bus = '->'.join(str(x) for x in ['Bus %03i' % (device.getBusNumber(),)] + device.getPortNumberList())
            # If the device vendor and product IDs correspond to the Vision AI module vendor and product IDs, start communicating with the Vision AI module.
            if vendor_id == VendorId and product_id == ProductId:
                print('\r' + f'\033[4;31mID {vendor_id:04x}:{product_id:04x} {bus} Device {device_addr} \033[0m',
                      end='')
                if _open:
                    return device.open()
                else:
                    device.close()
                    print(
                        '\r' + f'\033[4;31mID {vendor_id:04x}:{product_id:04x} {bus} Device {device_addr} CLOSED\033[0m',
                        flush=True)
            else:
                print(f'ID {vendor_id:04x}:{product_id:04x} {bus} Device {device_addr}')
⭐ In the vision_ai_connect function, set up the default Vision AI module settings to read data (image buffer) from the connected device.
    def vision_ai_connect(self):
        # Connect to the Vision AI module if found successfully.
        self.handle = self.find_vision_ai(True)
        if self.handle is None:
            print('\rPlease plug in the Vision AI Module!')
            return False
        with self.handle.claimInterface(2):
            # Set up the default Vision AI module settings to read data (buffer).
            self.handle.setInterfaceAltSetting(2, 0)
            self.handle.controlRead(0x01 << 5, request=0x22, value=0x01, index=2, length=2048, timeout=1000)
            print('\nVision AI Module is connected!')
        return True
⭐ In the read_vision_ai_data function, obtain the transferred image buffer from the Vision AI module by utilizing endpoints.
⭐ Save all transferred objects in a list so as to avoid any possible glitch.
⭐ Wait until one successful transfer.
    def read_vision_ai_data(self):
        # Obtain the transferred data from the Vision AI module.
        with self.handle.claimInterface(2):
            # Utilize endpoints:
            self.handle.setInterfaceAltSetting(2, 0)
            self.handle.controlRead(0x01 << 5, request=0x22, value=0x01, index=2, length=2048, timeout=1000)
            # Save all transferred objects in a list so as to avoid any possible glitch.
            transfer_list = []
            for _ in range(1):
                transfer = self.handle.getTransfer()
                transfer.setBulk(usb1.ENDPOINT_IN | 2, 2048, callback=self.process_vision_ai_data, timeout=1000)
                transfer.submit()
                transfer_list.append(transfer)
            # Wait until one successful transfer.
            while any(x.isSubmitted() for x in transfer_list):
                self.context.handleEvents()
⭐ In the process_vision_ai_data function, decode the transferred image buffer and get the accurate buffer size.
⭐ If the obtained buffer size is equal to the actual buffer size, show the recently captured image on the screen.
⭐ Resubmit the transfer object after being processed.
    def process_vision_ai_data(self, transfer):
        # If the Vision AI module transferred an object successfully, process the received data.
        if transfer.getStatus() != usb1.TRANSFER_COMPLETED:
            # transfer.close()
            return
        # Obtain the transferred data.
        data = transfer.getBuffer()[:transfer.getActualLength()]
        # Get the accurate buffer size.
        if len(data) == 8 and int.from_bytes(bytes(data[:4]), 'big') == WEBUSB_JPEG_MAGIC:
            self.expect_size = int.from_bytes(bytes(data[4:]), 'big')
            self.buff = bytearray()
        elif len(data) == 8 and int.from_bytes(bytes(data[:4]), 'big') == WEBUSB_TEXT_MAGIC:
            self.expect_size = int.from_bytes(bytes(data[4:]), 'big')
            self.buff = bytearray()
        else:
            self.buff = self.buff + data
        # If the obtained buffer size is equal to the actual buffer size, show the captured image on the screen.
        if self.expect_size == len(self.buff) and self.show_img:
            try:
                self.captured_img = self.buff
                img = Image.open(BytesIO(self.buff))
                img = np.array(img)
                cv2.imshow('Tree Disease Samples', cv2.cvtColor(img,cv2.COLOR_RGB2BGR))
                cv2.waitKey(1)
            except:
                self.buff = bytearray()
                return
        # Resubmit the transfer object after being processed.
        transfer.submit()
⭐ In the vision_ai_save_sample function, get the current date & time and save the recently captured image by appending the current date & time to the file name:
IMG_20220917_183601.jpg
    def vision_ai_save_sample(self):
        date = datetime.datetime.now().strftime("%Y%m%d_%H%M%S")
        filename = './samples/IMG_{}.jpg'.format(date)
        # If requested, save the recently captured image as a sample.
        with open(filename, 'wb') as f:
            f.write(bytes(self.captured_img))
        print("\nSaved: " + filename)
Figure - 83.89
Figure - 83.90
Figure - 83.91
Step 6.1: Saving the captured pictures as samples
Since I needed to collect various infected tree images to create a data set with notable validity, I wandered a forest near my hometown to capture infected tree pictures.
I managed to find samples of different foliar and bark tree diseases:
Leaf Rusts
Leaf Spots
Leaf Blisters
Powdery Mildew
Needle Rusts
Needle Casts
Tar Spots
Rusts
Anthracnose
Figure - 83.92
Figure - 83.93
Figure - 83.94
As far as my experiments go, the device operates faultlessly while capturing infected tree images and saving them on LattePanda 3 Delta :)
Figure - 83.95
After capturing numerous infected tree images denoting different foliar and bark diseases, I elicited my data set, including training and testing samples for my object detection (FOMO) model.
Figure - 83.96
Step 7: Building an object detection (FOMO) model with Edge Impulse
When I completed capturing infected tree images and storing them on LattePanda 3 Delta, I started to work on my object detection (FOMO) model to detect potential tree diseases so as to prevent them from dispersing.
Since Edge Impulse supports almost every microcontroller, development board, and SBC due to its model deployment options, I decided to utilize Edge Impulse to build my object detection model. Also, Edge Impulse provides an elaborate machine learning algorithm (FOMO) for running more accessible and faster object detection models on Linux x86_64 devices such as LattePanda 3 Delta.
Edge Impulse FOMO (Faster Objects, More Objects) is a novel machine learning algorithm that brings object detection to highly constrained devices. FOMO models can count objects, find the location of the detected objects in an image, and track multiple objects in real time, requiring up to 30x less processing power and memory than MobileNet SSD or YOLOv5.
Even though Edge Impulse supports JPG or PNG files to upload as samples directly, each training or testing sample needs to be labeled manually. Therefore, I needed to follow the steps below to format my data set so as to train my object detection model accurately:
Data Scaling (Resizing)
Data Labeling
Since I had the chance to collect samples on various tree diseases while wandering in a forest, it was impractical to train the model on each disease separately with limited data. Therefore, I decided to categorize diseases based on the infected tree parts (foliar or bark) and use these categories to preprocess my data set in order to label each image sample on Edge Impulse:
leaf_rust_spot_blister
stem_bark_branch_mildew
Plausibly, Edge Impulse allows building predictive models optimized in size and accuracy automatically and deploying the trained model as a Linux x86_64 application. Therefore, after scaling (resizing) and preprocessing my data set to label samples, I was able to build an accurate object detection model to detect potential tree diseases, which runs on LattePanda 3 Delta without any additional requirements.
Step 7.1: Uploading images (samples) to Edge Impulse and labeling samples
After collecting training and testing image samples, I uploaded them to my project on Edge Impulse. Then, I labeled each disease sample depending on its category (foliar or bark).
#️⃣ First of all, sign up for Edge Impulse and create a new project.
Figure - 83.97
#️⃣ To be able to label image samples manually on Edge Impulse for object detection models, go to Dashboard ➡ Project info ➡ Labeling method and select Bounding boxes (object detection).
Figure - 83.98
#️⃣ Navigate to the Data acquisition page and click the Upload existing data button.
Figure - 83.99
Figure - 83.100
#️⃣ Then, choose the data category (training or testing), select image files, and click the Begin upload button.
Figure - 83.101
Figure - 83.102
Figure - 83.103
Figure - 83.104
After uploading my data set successfully, I labeled different tree diseases on each infected tree image sample manually with the two mentioned tree disease categories. In Edge Impulse, labeling an object is as easy as dragging a box around it and entering a label. Also, Edge Impulse runs a tracking algorithm in the background while labeling objects, so it moves bounding boxes automatically for the same objects in different images.
#️⃣ Go to Data acquisition ➡ Labeling queue (Object detection labeling). It shows all the unlabeled images (training and testing) remaining in the given data set.
#️⃣ Finally, select an unlabeled image, drag bounding boxes around objects, click the Save labels button, and repeat this process until the whole data set is labeled.
Figure - 83.105
Figure - 83.106
Figure - 83.107
Figure - 83.108
Figure - 83.109
Figure - 83.110
Figure - 83.111
Figure - 83.112
Figure - 83.113
Figure - 83.114
Figure - 83.115
Figure - 83.116
Figure - 83.117
Figure - 83.118
Figure - 83.119
Figure - 83.120
Figure - 83.121
Figure - 83.122
Figure - 83.123
Figure - 83.124
Figure - 83.125
Step 7.2: Training the FOMO model on contagious tree diseases
After labeling my training and testing samples successfully, I designed an impulse and trained it on detecting tree disease categories — leaf_rust_spot_blister and stem_bark_branch_mildew.
An impulse is a custom neural network model in Edge Impulse. I created my impulse by employing the Image preprocessing block and the Object Detection (Images) learning block.
The Image preprocessing block optionally turns the input image format to grayscale and generates a features array from the raw image.
The Object Detection (Images) learning block represents a machine learning algorithm that detects objects on the given image, distinguished between model labels (leaf_rust_spot_blister and stem_bark_branch_mildew).
#️⃣ Go to the Create impulse page and set image width and height parameters to 320. Then, select the resize mode parameter as Fit shortest axis so as to scale (resize) given training and testing image samples.
#️⃣ Select the Image preprocessing block and the Object Detection (Images) learning block. Finally, click Save Impulse.
Figure - 83.126
#️⃣ Before generating features for the object detection model, go to the Image page and set the Color depth parameter as Grayscale. Then, click Save parameters.
Figure - 83.127
#️⃣ After saving parameters, click Generate features to apply the Image preprocessing block to training image samples.
Figure - 83.128
Figure - 83.129
#️⃣ Finally, navigate to the Object detection page and click Start training.
Figure - 83.130
Figure - 83.131
According to my experiments with my object detection model, I modified the neural network settings and architecture to build an object detection model with high accuracy and validity:
📌 Neural network settings:
Number of training cycles ➡ 20
Learning rate ➡ 0.020
Validation set size ➡ 12
📌 Neural network architecture:
FOMO (Faster Objects, More Objects) MobileNetV2 0.35
After generating features and training my FOMO model with training samples, Edge Impulse evaluated the F1 score (accuracy) as 54%.
The F1 score (accuracy) is approximately 54% due to the minuscule volume and miscellaneous variety of training samples showing distinct bark tree diseases. Since I had to use limited and distinctive validation samples, I found out the model misinterprets some bark (stem) tree diseases. However, I got pretty high accuracy scores from my testing samples depicting foliar (leaf) tree diseases. To improve the F1 score and my training data set, I am still collecting bark tree disease samples.
Figure - 83.132
Step 7.3: Evaluating the model accuracy and deploying the model
After building and training my object detection model, I tested its accuracy and validity by utilizing testing image samples.
The evaluated accuracy of the model is 90%.
#️⃣ To validate the trained model, go to the Model testing page and click Classify all.
Figure - 83.133
Figure - 83.134
Figure - 83.135
After validating my object detection model, I deployed it as a fully optimized Linux x86_64 application (.eim).
#️⃣ To deploy the validated model as a Linux x86_64 application, navigate to the Deployment page and select Linux boards.
#️⃣ On the pop-up window, open the deployment options for any Linux-based development board.
#️⃣ From the new deployment options, select Linux (x86).
#️⃣ Then, choose the Quantized (int8) optimization option to get the best performance possible while running the deployed model.
#️⃣ Finally, click Build to download the model as a Linux x86_64 application.
Figure - 83.136
Figure - 83.137
Figure - 83.138
Figure - 83.139
Figure - 83.140
Step 8: Setting up the Edge Impulse FOMO model on LattePanda 3 Delta
After building, training, and deploying my object detection (FOMO) model as a Linux x86_64 application on Edge Impulse, I needed to upload the generated application to LattePanda 3 Delta to run the model directly so as to create an easy-to-use and capable device operating with minimal latency, memory usage, and power consumption.
FOMO object detection models can count objects under the assigned classes and provide the detected object's location using centroids. Therefore, I was able to highlight the detected tree diseases with bounding boxes on the captured images in Python.
Since Edge Impulse optimizes and formats preprocessing, configuration, and learning blocks into an EIM file while deploying models as a Linux x86_64 application, I was able to import my object detection model effortlessly to run inferences in Python.
#️⃣ After downloading the generated Linux x86_64 application (.eim), install the required libraries on Thonny to run the model and capture images with the Vision AI module.
I chose to run my program on Thonny since it includes a built-in shell to observe detection results easily, but you can also run it directly on the terminal.
libusb1
opencv-python
edge-impulse-linux
Pillow
PyAudio
requests
twilio
Figure - 83.141
Figure - 83.142
Figure - 83.143
Figure - 83.144
Figure - 83.145
Figure - 83.146
Figure - 83.147
#️⃣ Since Thonny cannot open the EIM files as non-root, change the Linux x86_64 application's permissions to allow Thonny to execute the file as a program.
Figure - 83.148
After uploading the application successfully, I programmed LattePanda 3 Delta to capture tree images via the Vision AI module and run inferences so as to detect potential tree diseases.
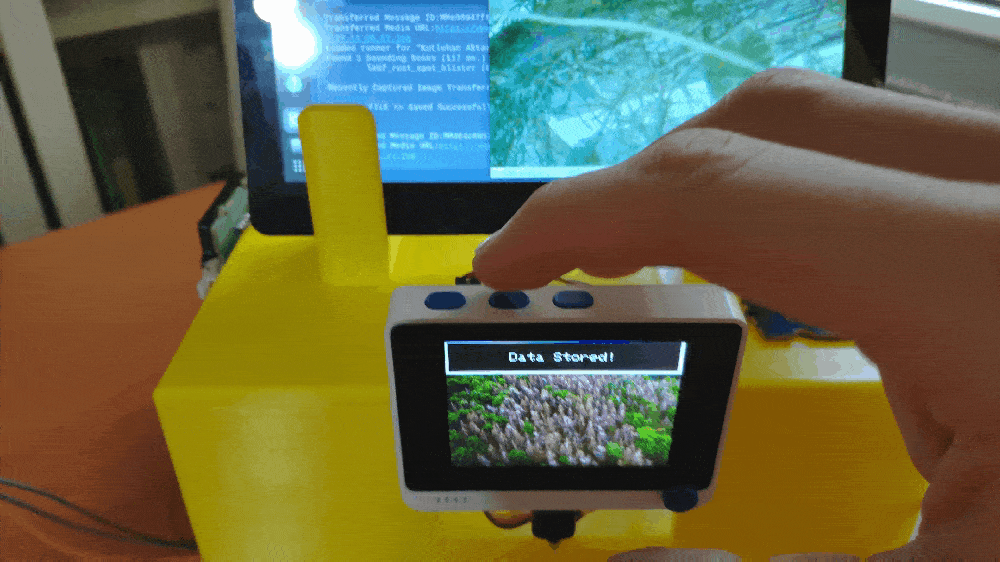
Also, after running inferences successfully, I employed LattePanda 3 Delta to transmit the detected labels and the modified image as MMS to the verified phone number via Twilio's API.
You can download the main.py file to try and inspect the code for capturing images and running Edge Impulse neural network models on LattePanda 3 Delta.
⭐ Include the required modules.
import serial
import usb1
from PIL import Image
from io import BytesIO
from time import sleep
import cv2
import numpy as np
import datetime
from threading import Thread
import os
from edge_impulse_linux.image import ImageImpulseRunner
import requests
from twilio.rest import Client
⭐ In the __init__ function:
⭐ Define the required parameters for the Vision AI module.
⭐ Get data from the connected USB devices.
⭐ Find the Vision AI module if connected via a USB cable.
⭐ Initialize serial communication with Wio Terminal to get the transferred commands.
⭐ Define the Edge Impulse model path (Linux x86_64 application).
⭐ Define the required Twilio account settings.
⭐ Define the PHP web application settings.
    def __init__(self, show_img, modelfile):
        # Define the required parameters for the Vision AI module.
        self.expect_size = 0
        self.buff = bytearray()
        self.show_img = show_img
        # Get data from the connected USB devices.
        self.context = usb1.USBContext()
        # Find the Vision AI module if connected.
        self.find_vision_ai(False)
        self.vision_ai_disconnect()
        # Initialize serial communication with Wio Terminal to get commands.
        self.wio = serial.Serial("/dev/ttyACM1", 115200, timeout=1000)
        # Define the Edge Impulse model settings.
        dir_path = os.path.dirname(os.path.realpath(__file__))
        self.modelfile = os.path.join(dir_path, modelfile)
        self.detection_result = ""
        # Define the required Twilio account settings.
        self.tw_account_sid = '<account_sid>'
        self.tw_auth_token = '<auth_token>'
        self.tw_messaging_service_sid = '<messaging_service_sid>'
        self.verified_number = '+<verified_number>'
        # Define the PHP web application (image logger) settings.
        self.server = "www.theamplituhedron.com"
        self.url_path = "https://" + self.server + "/tree_disease_detection_web/"
⭐ In the run_inference function:
⭐ Print the information of the Edge Impulse model converted to a Linux x86_64 (64-bit) application (.eim).
⭐ Get the currently captured image with the Vision AI module, resize it depending on the given model, and run inference.
⭐ Obtain the prediction (detection) results for each label (class).
⭐ Modify the captured image with bounding boxes for each detected object.
⭐ Save the resized and modified image to the detections folder by appending the current date & time to its file name.
⭐ Then, send the saved image to the web application.
⭐ After uploading the image to the given server via the web application, send an MMS to the verified phone number via Twilio so as to inform the user of the detection results.
⭐ Stop the running inference.
    def run_inference(self):
        # Run inference to detect potential tree diseases to prevent them from spreading.
        with ImageImpulseRunner(self.modelfile) as runner:
            try:
                # Print the information of the Edge Impulse model converted to a Linux x86_64 (64-bit) application (.eim).
                model_info = runner.init()
                print('Loaded runner for "' + model_info['project']['owner'] + ' / ' + model_info['project']['name'] + '"')
                labels = model_info['model_parameters']['labels']
                # Get the currently captured image with the Vision AI module, resize it depending on the given model, and run inference.
                test_img = Image.open(BytesIO(self.captured_img))
                test_img = np.array(test_img)
                features, cropped = runner.get_features_from_image(test_img)
                res = runner.classify(features)
                # Obtain the prediction (detection) results for each label (class).
                results = "Detections: "
                if "bounding_boxes" in res["result"].keys():
                    print('Found %d bounding boxes (%d ms.)' % (len(res["result"]["bounding_boxes"]), res['timing']['dsp'] + res['timing']['classification']))
                    for bb in res["result"]["bounding_boxes"]:
                        # Get the detected labels:
                        results+="\n"+bb['label']
                        print('\t%s (%.2f): x=%d y=%d w=%d h=%d' % (bb['label'], bb['value'], bb['x'], bb['y'], bb['width'], bb['height']))
                        cropped = cv2.rectangle(cropped, (bb['x'], bb['y']), (bb['x'] + bb['width'], bb['y'] + bb['height']), (255, 0, 0), 1)
                # Save the resized (modified) image to the computer by appending the current date & time to its filename.
                date = datetime.datetime.now().strftime("%Y-%m-%d_%H_%M_%S")
                filename = 'detections/{}.jpg'.format(date)
                cv2.imwrite(filename, cv2.cvtColor(cropped, cv2.COLOR_RGB2BGR))
                # Then, send the saved image to the web application.
                self.send_captured_image(filename)
                # After uploading the image to the given server via the web application,
                # send an MMS to the verified phone number via Twilio so as to inform the user of the detection results.
                if not results == "Detections: ":
                    self.detection_result = "\n" + results
                else:
                    self.detection_result = "\nNot Detected!"
                self.send_MMS_via_Twilio(self.detection_result, filename)

            # Stop the running inference.
            finally:
                if(runner):
                    runner.stop()
⭐ In the send_captured_image function, make an HTTP POST request to the given web application to send the resized and modified image.
⭐ Then, print the response from the server.
    def send_captured_image(self, file_path):
        files = {'captured_image': open("./"+file_path, 'rb')}
        # Make an HTTP POST request to the given web application to send the captured image.
        request = requests.post(self.url_path, files=files)
        print("\nRecently Captured Image Transferred!")
        # Print the response from the server.
        print("\nServer: " + request.text + "\n")
⭐ In the send_MMS_via_Twilio function, define the Twilio client object.
⭐ Then, send an MMS to the verified phone number via the Twilio Python Helper Library.
    def send_MMS_via_Twilio(self, body, file_path):
        # Define the Twilio client object.
        tw_client = Client(self.tw_account_sid, self.tw_auth_token)
        # Send an MMS to the verified phone number via Twilio.
        media_url = self.url_path + file_path
        message = tw_client.messages.create(
                                  messaging_service_sid=self.tw_messaging_service_sid,
                                  body=body,
                                  media_url=media_url,
                                  to=self.verified_number
                              )
        print("\nTransferred Message ID:" + message.sid)
        print("Transferred Media URL:" + media_url)
#️⃣ Since displaying a real-time video stream from the Vision AI module and running the Edge Impulse object detection model cannot be executed in a single program, I utilized the Python Thread class to run simultaneous processes (functions).
# Define and initialize threads.
def start_data_collection():
    while True:
        detection.read_vision_ai_data()

def activate_wio_commands():
    while True:
        detection.wio_commands()
        sleep(1)

Thread(target=start_data_collection).start()
Thread(target=activate_wio_commands).start()
Figure - 83.149
Figure - 83.150
Figure - 83.151
Figure - 83.152
Step 9: Running the FOMO model on LattePanda 3 Delta to detect tree diseases
My Edge Impulse object detection (FOMO) model scans a captured image and predicts possibilities of trained labels to recognize an object on the given captured image. The prediction result (score) represents the model's "confidence" that the detected object corresponds to each of the two different labels (classes) [0 - 1], as shown in Step 7:
leaf_rust_spot_blister
stem_bark_branch_mildew
After executing the main.py file on LattePanda 3 Delta:
🌳📲 If Wio Terminal sends the model run command ('B') automatically in every 5 minutes or the user presses the configurable button B to send the command manually, the device captures an image and runs an inference with the Edge Impulse object detection model.
Figure - 83.153
Figure - 83.154
Figure - 83.155
Figure - 83.156
Figure - 83.157
🌳📲 After running inference, the device modifies the captured image by adding bounding boxes for each detected object to emphasize potential tree diseases.
🌳📲 Then, the device saves the resized and modified image to the detections folder and sends the saved image to the web application via an HTTP POST request.
Figure - 83.158
Figure - 83.159
🌳📲 Finally, the device sends an MMS, including the detected labels and the modified image, to the verified phone number via Twilio's API.
🌳📲 If the model does not detect any labels, the device sends Not Detected! instead of the detected label list.
Figure - 83.160
Figure - 83.161
Figure - 83.162
🌳📲 Also, the device prints notifications and the detection results on the shell for debugging.
Figure - 83.163
Figure - 83.164
Figure - 83.165
As far as my experiments go, the device detects foliar tree diseases precisely and shows accurate bounding boxes around the detected objects :)
Figure - 83.166
Videos and Conclusion
Further Discussions
By applying object detection models trained on captured infected tree images in detecting potential tree diseases, we can achieve to:
[1]Common Forest Disease Problems, UNIVERSITY OF ARKANSAS SYSTEM DIVISION OF AGRICULTURE, https://www.uaex.uada.edu/environment-nature/forestry/health/disease-problems.aspx
# IoT AI-driven Tree Disease Identifier w/ Edge Impulse & MMS
#
# LattePanda 3 Delta 864
#
# Detect tree diseases and get informed of the results via MMS
# to prevent them from spreading and harming forests, farms, and arable lands.
#
# By Kutluhan Aktar


import serial
import usb1
from PIL import Image
from io import BytesIO
from time import sleep
import cv2
import numpy as np
import datetime
from threading import Thread
import os
from edge_impulse_linux.image import ImageImpulseRunner
import requests
from twilio.rest import Client

# Define the Grove - Vision AI Module image descriptions.
WEBUSB_JPEG_MAGIC = 0x2B2D2B2D
WEBUSB_TEXT_MAGIC = 0x0F100E12
# Define the Grove - Vision AI Module vendor and product IDs.
VendorId = 0x2886
ProductId = 0x8060


class tree_disease_detection():
    def __init__(self, show_img, modelfile):
        # Define the required parameters for the Vision AI module.
        self.expect_size = 0
        self.buff = bytearray()
        self.show_img = show_img
        # Get data from the connected USB devices.
        self.context = usb1.USBContext()
        # Find the Vision AI module if connected.
        self.find_vision_ai(False)
        self.vision_ai_disconnect()
        # Initialize serial communication with Wio Terminal to get commands.
        self.wio = serial.Serial("/dev/ttyACM1", 115200, timeout=1000)
        # Define the Edge Impulse model settings.
        dir_path = os.path.dirname(os.path.realpath(__file__))
        self.modelfile = os.path.join(dir_path, modelfile)
        self.detection_result = ""
        # Define the required Twilio account settings.
        self.tw_account_sid = ''
        self.tw_auth_token = ''
        self.tw_messaging_service_sid = ''
        self.verified_number = '+'
        # Define the PHP web application (image logger) settings.
        self.server = "www.theamplituhedron.com"
        self.url_path = "https://" + self.server + "/tree_disease_detection_web/"

    def wio_commands(self):
        # Obtain commands from Wio Terminal via serial communication.
        command = self.wio.read(1).decode("utf-8")
        if(command.find("A") >= 0):
            self.vision_ai_save_sample()
        elif(command.find("B") >= 0):
            self.run_inference()

    def run_inference(self):
        # Run inference to detect potential tree diseases to prevent them from spreading.
        with ImageImpulseRunner(self.modelfile) as runner:
            try:
                # Print the information of the Edge Impulse model converted to a Linux x86_64 (64-bit) application (.eim).
                model_info = runner.init()
                print('Loaded runner for "' + model_info['project']['owner'] + ' / ' + model_info['project']['name'] + '"')
                labels = model_info['model_parameters']['labels']
                # Get the currently captured image with the Vision AI module, resize it depending on the given model, and run inference.
                test_img = Image.open(BytesIO(self.captured_img))
                test_img = np.array(test_img)
                features, cropped = runner.get_features_from_image(test_img)
                res = runner.classify(features)
                # Obtain the prediction (detection) results for each label (class).
                results = "Detections: "
                if "bounding_boxes" in res["result"].keys():
                    print('Found %d bounding boxes (%d ms.)' % (len(res["result"]["bounding_boxes"]), res['timing']['dsp'] + res['timing']['classification']))
                    for bb in res["result"]["bounding_boxes"]:
                        # Get the detected labels:
                        results+="\n"+bb['label']
                        print('\t%s (%.2f): x=%d y=%d w=%d h=%d' % (bb['label'], bb['value'], bb['x'], bb['y'], bb['width'], bb['height']))
                        cropped = cv2.rectangle(cropped, (bb['x'], bb['y']), (bb['x'] + bb['width'], bb['y'] + bb['height']), (255, 0, 0), 1)
                # Save the resized (modified) image to the computer by appending the current date & time to its filename.
                date = datetime.datetime.now().strftime("%Y-%m-%d_%H_%M_%S")
                filename = 'detections/{}.jpg'.format(date)
                cv2.imwrite(filename, cv2.cvtColor(cropped, cv2.COLOR_RGB2BGR))
                # Then, send the saved image to the web application.
                self.send_captured_image(filename)
                # After uploading the image to the given server via the web application,
                # send an MMS to the verified phone number via Twilio so as to inform the user of the detection results.
                if not results == "Detections: ":
                    self.detection_result = "\n" + results
                else:
                    self.detection_result = "\nNot Detected!"
                self.send_MMS_via_Twilio(self.detection_result, filename)

            # Stop the running inference.
            finally:
                if(runner):
                    runner.stop()

    def find_vision_ai(self, _open=True):
        print('*' * 50)
        print('Searching for Vision AI Module...')
        # Search all connected USB devices to find the Vision AI module.
        for device in self.context.getDeviceIterator(skip_on_error=True):
            product_id = device.getProductID()
            vendor_id = device.getVendorID()
            device_addr = device.getDeviceAddress()
            bus = '->'.join(str(x) for x in ['Bus %03i' % (device.getBusNumber(),)] + device.getPortNumberList())
            # If the device vendor and product IDs correspond to the Vision AI module vendor and product IDs, start communicating with the Vision AI module.
            if vendor_id == VendorId and product_id == ProductId:
                print('\r' + f'\033[4;31mID {vendor_id:04x}:{product_id:04x} {bus} Device {device_addr} \033[0m',
                      end='')
                if _open:
                    return device.open()
                else:
                    device.close()
                    print(
                        '\r' + f'\033[4;31mID {vendor_id:04x}:{product_id:04x} {bus} Device {device_addr} CLOSED\033[0m',
                        flush=True)
            else:
                print(f'ID {vendor_id:04x}:{product_id:04x} {bus} Device {device_addr}')

    def vision_ai_connect(self):
        # Connect to the Vision AI module if found successfully.
        self.handle = self.find_vision_ai(True)
        if self.handle is None:
            print('\rPlease plug in the Vision AI Module!')
            return False
        with self.handle.claimInterface(2):
            # Set up the default Vision AI module settings to read data (buffer).
            self.handle.setInterfaceAltSetting(2, 0)
            self.handle.controlRead(0x01 << 5, request=0x22, value=0x01, index=2, length=2048, timeout=1000)
            print('\nVision AI Module is connected!')
        return True

    def vision_ai_disconnect(self):
        # Disconnect from the Vision AI module by resetting the module.
        try:
            print('Resetting device...')
            with usb1.USBContext() as context:
                handle = context.getByVendorIDAndProductID(VendorId, ProductId,
                                                           skip_on_error=False).open()
                handle.controlRead(0x01 << 5, request=0x22, value=0x00, index=2, length=2048, timeout=1000)
                handle.close()
                print('Device has been reset!')
            return True
        except:
            return False

    def read_vision_ai_data(self):
        # Obtain the transferred data from the Vision AI module.
        with self.handle.claimInterface(2):
            # Utilize endpoints:
            self.handle.setInterfaceAltSetting(2, 0)
            self.handle.controlRead(0x01 << 5, request=0x22, value=0x01, index=2, length=2048, timeout=1000)
            # Save all transferred objects in a list so as to avoid any possible glitch.
            transfer_list = []
            for _ in range(1):
                transfer = self.handle.getTransfer()
                transfer.setBulk(usb1.ENDPOINT_IN | 2, 2048, callback=self.process_vision_ai_data, timeout=1000)
                transfer.submit()
                transfer_list.append(transfer)
            # Wait until one successful transfer.
            while any(x.isSubmitted() for x in transfer_list):
                self.context.handleEvents()

    def process_vision_ai_data(self, transfer):
        # If the Vision AI module transferred an object successfully, process the received data.
        if transfer.getStatus() != usb1.TRANSFER_COMPLETED:
            # transfer.close()
            return
        # Obtain the transferred data.
        data = transfer.getBuffer()[:transfer.getActualLength()]
        # Get the accurate buffer size.
        if len(data) == 8 and int.from_bytes(bytes(data[:4]), 'big') == WEBUSB_JPEG_MAGIC:
            self.expect_size = int.from_bytes(bytes(data[4:]), 'big')
            self.buff = bytearray()
        elif len(data) == 8 and int.from_bytes(bytes(data[:4]), 'big') == WEBUSB_TEXT_MAGIC:
            self.expect_size = int.from_bytes(bytes(data[4:]), 'big')
            self.buff = bytearray()
        else:
            self.buff = self.buff + data
        # If the obtained buffer size is equal to the actual buffer size, show the captured image on the screen.
        if self.expect_size == len(self.buff) and self.show_img:
            try:
                self.captured_img = self.buff
                img = Image.open(BytesIO(self.buff))
                img = np.array(img)
                cv2.imshow('Tree Disease Samples', cv2.cvtColor(img,cv2.COLOR_RGB2BGR))
                cv2.waitKey(1)
            except:
                self.buff = bytearray()
                return
        # Resubmit the transfer object after being processed.
        transfer.submit()

    def vision_ai_save_sample(self):
        date = datetime.datetime.now().strftime("%Y%m%d_%H%M%S")
        filename = './samples/IMG_{}.jpg'.format(date)
        # If requested, save the recently captured image as a sample.
        with open(filename, 'wb') as f:
            f.write(bytes(self.captured_img))
        print("\nSaved: " + filename)

    def send_captured_image(self, file_path):
        files = {'captured_image': open("./"+file_path, 'rb')}
        # Make an HTTP POST request to the given web application to send the captured image.
        request = requests.post(self.url_path, files=files)
        print("\nRecently Captured Image Transferred!")
        # Print the response from the server.
        print("\nServer: " + request.text + "\n")

    def send_MMS_via_Twilio(self, body, file_path):
        # Define the Twilio client object.
        tw_client = Client(self.tw_account_sid, self.tw_auth_token)
        # Send an MMS to the verified phone number via Twilio.
        media_url = self.url_path + file_path
        message = tw_client.messages.create(
                                  messaging_service_sid=self.tw_messaging_service_sid,
                                  body=body,
                                  media_url=media_url,
                                  to=self.verified_number
                              )
        print("\nTransferred Message ID:" + message.sid)
        print("Transferred Media URL:" + media_url)

# Define the detection object.
detection = tree_disease_detection(True, "model/tree-disease-identifier-linux-x86_64.eim")
detection.vision_ai_connect()

# Define and initialize threads.
def start_data_collection():
    while True:
        detection.read_vision_ai_data()

def activate_wio_commands():
    while True:
        detection.wio_commands()
        sleep(1)

Thread(target=start_data_collection).start()
Thread(target=activate_wio_commands).start()