For a long time, I have wanted to experiment with LoRa (short for long-range), which is a spread spectrum modulation technique derived from chirp spread spectrum (CSS) technology. Since I am fond of vintage walkie-talkies utilizing radio waves, I decided to create a walkie-talkie (two-way radio) with a LoRa module from scratch to transmit and receive short text messages.
After perusing different LoRa module datasheets, I decided to employ the RYLR998 LoRa (transceiver) module since I wanted to make this project as compact as possible. The RYLR998 LoRa module provides ultra-long range spread spectrum communication with high sensitivity and high interference immunity while minimizing current consumption. Also, this module has a built-in antenna and supports AT commands via serial communication. You can inspect the product datasheet from here.
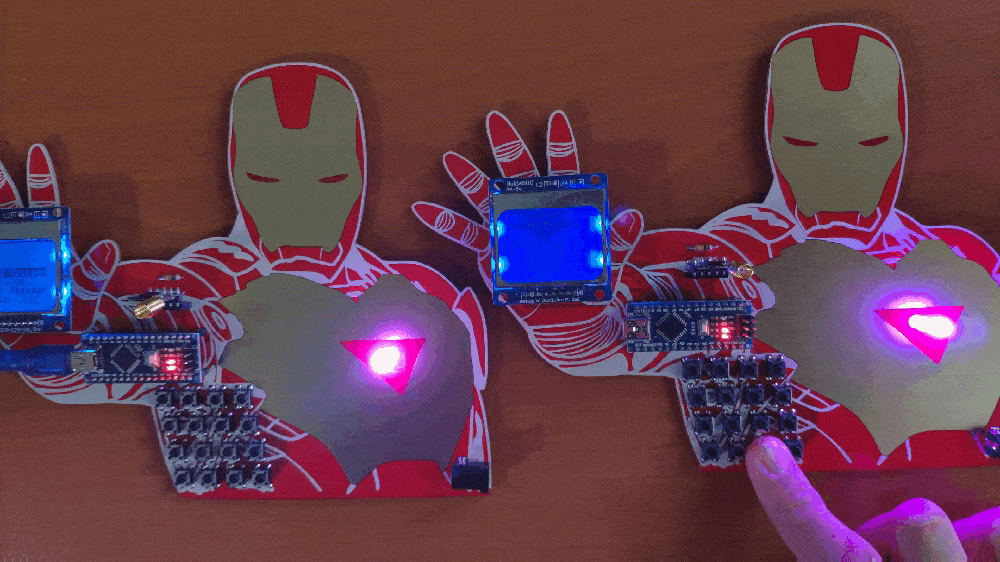
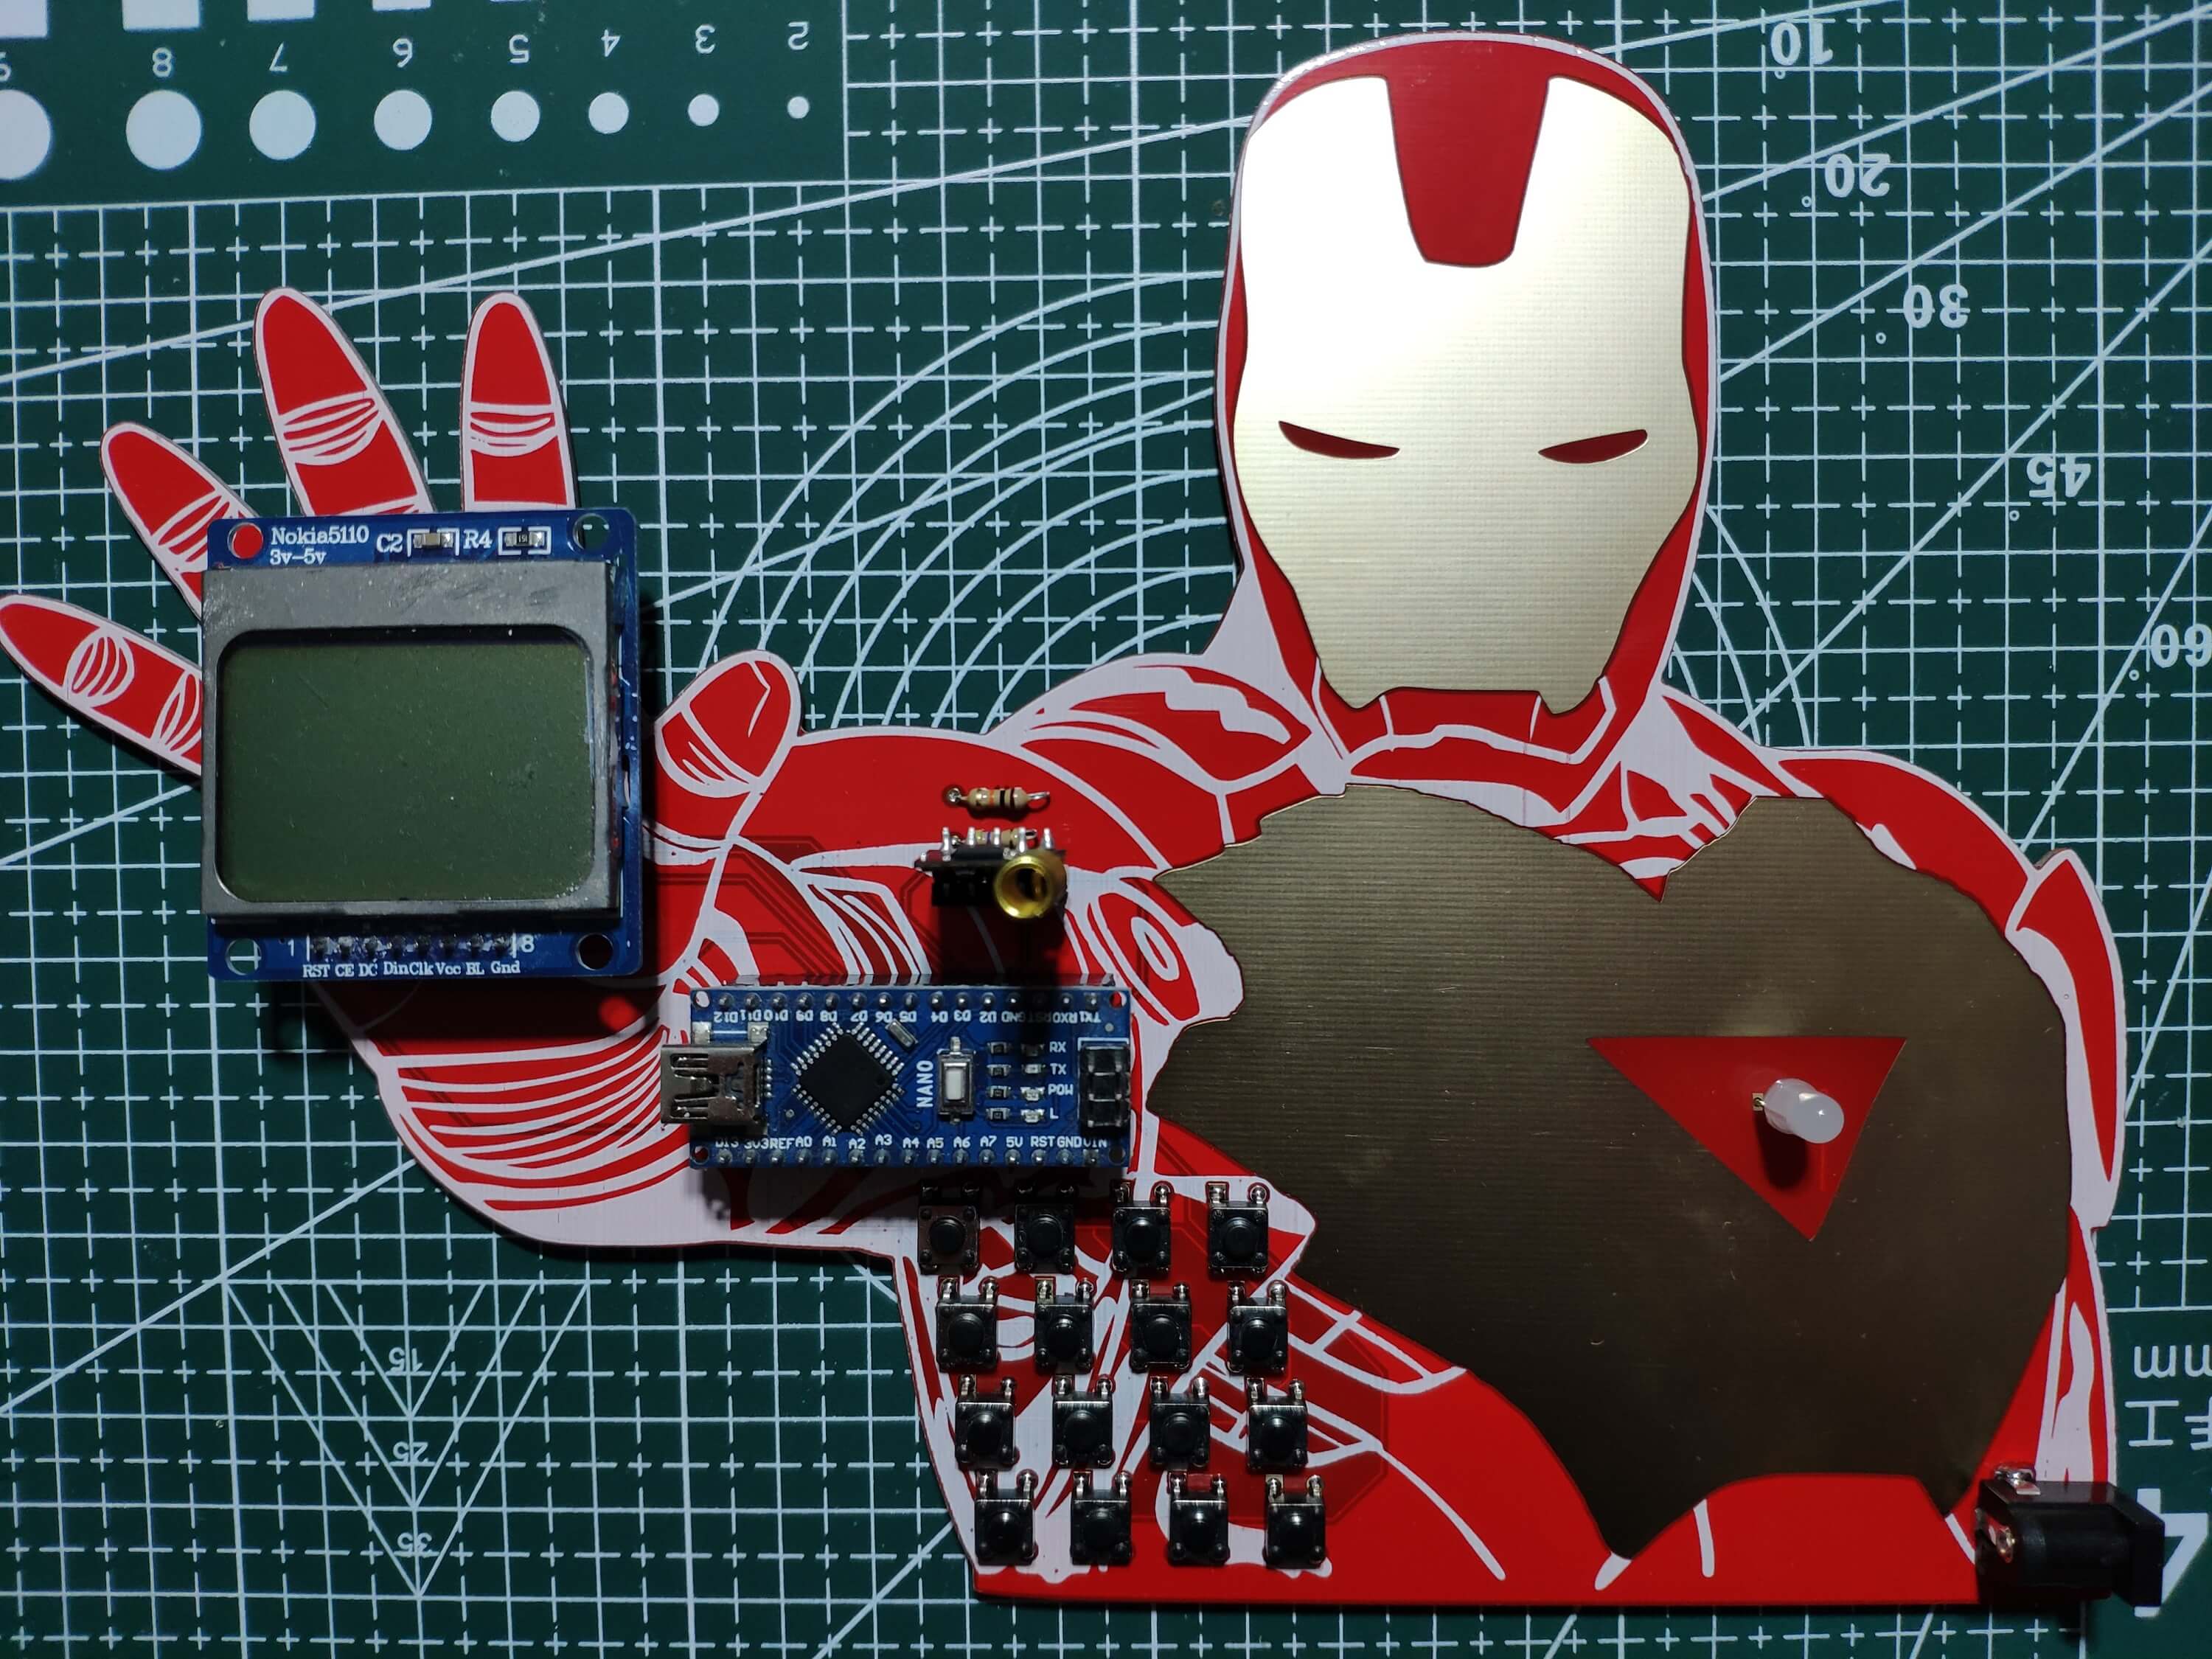
After connecting the RYLR998 module to the Arduino Nano, I utilized a Nokia 5110 screen and designed a custom 4x4 keypad with pushbuttons to obviate the need for sending and displaying text messages via the serial monitor. Finally, I added a 5mm common anode RGB LED to indicate different menu options and message notifications.
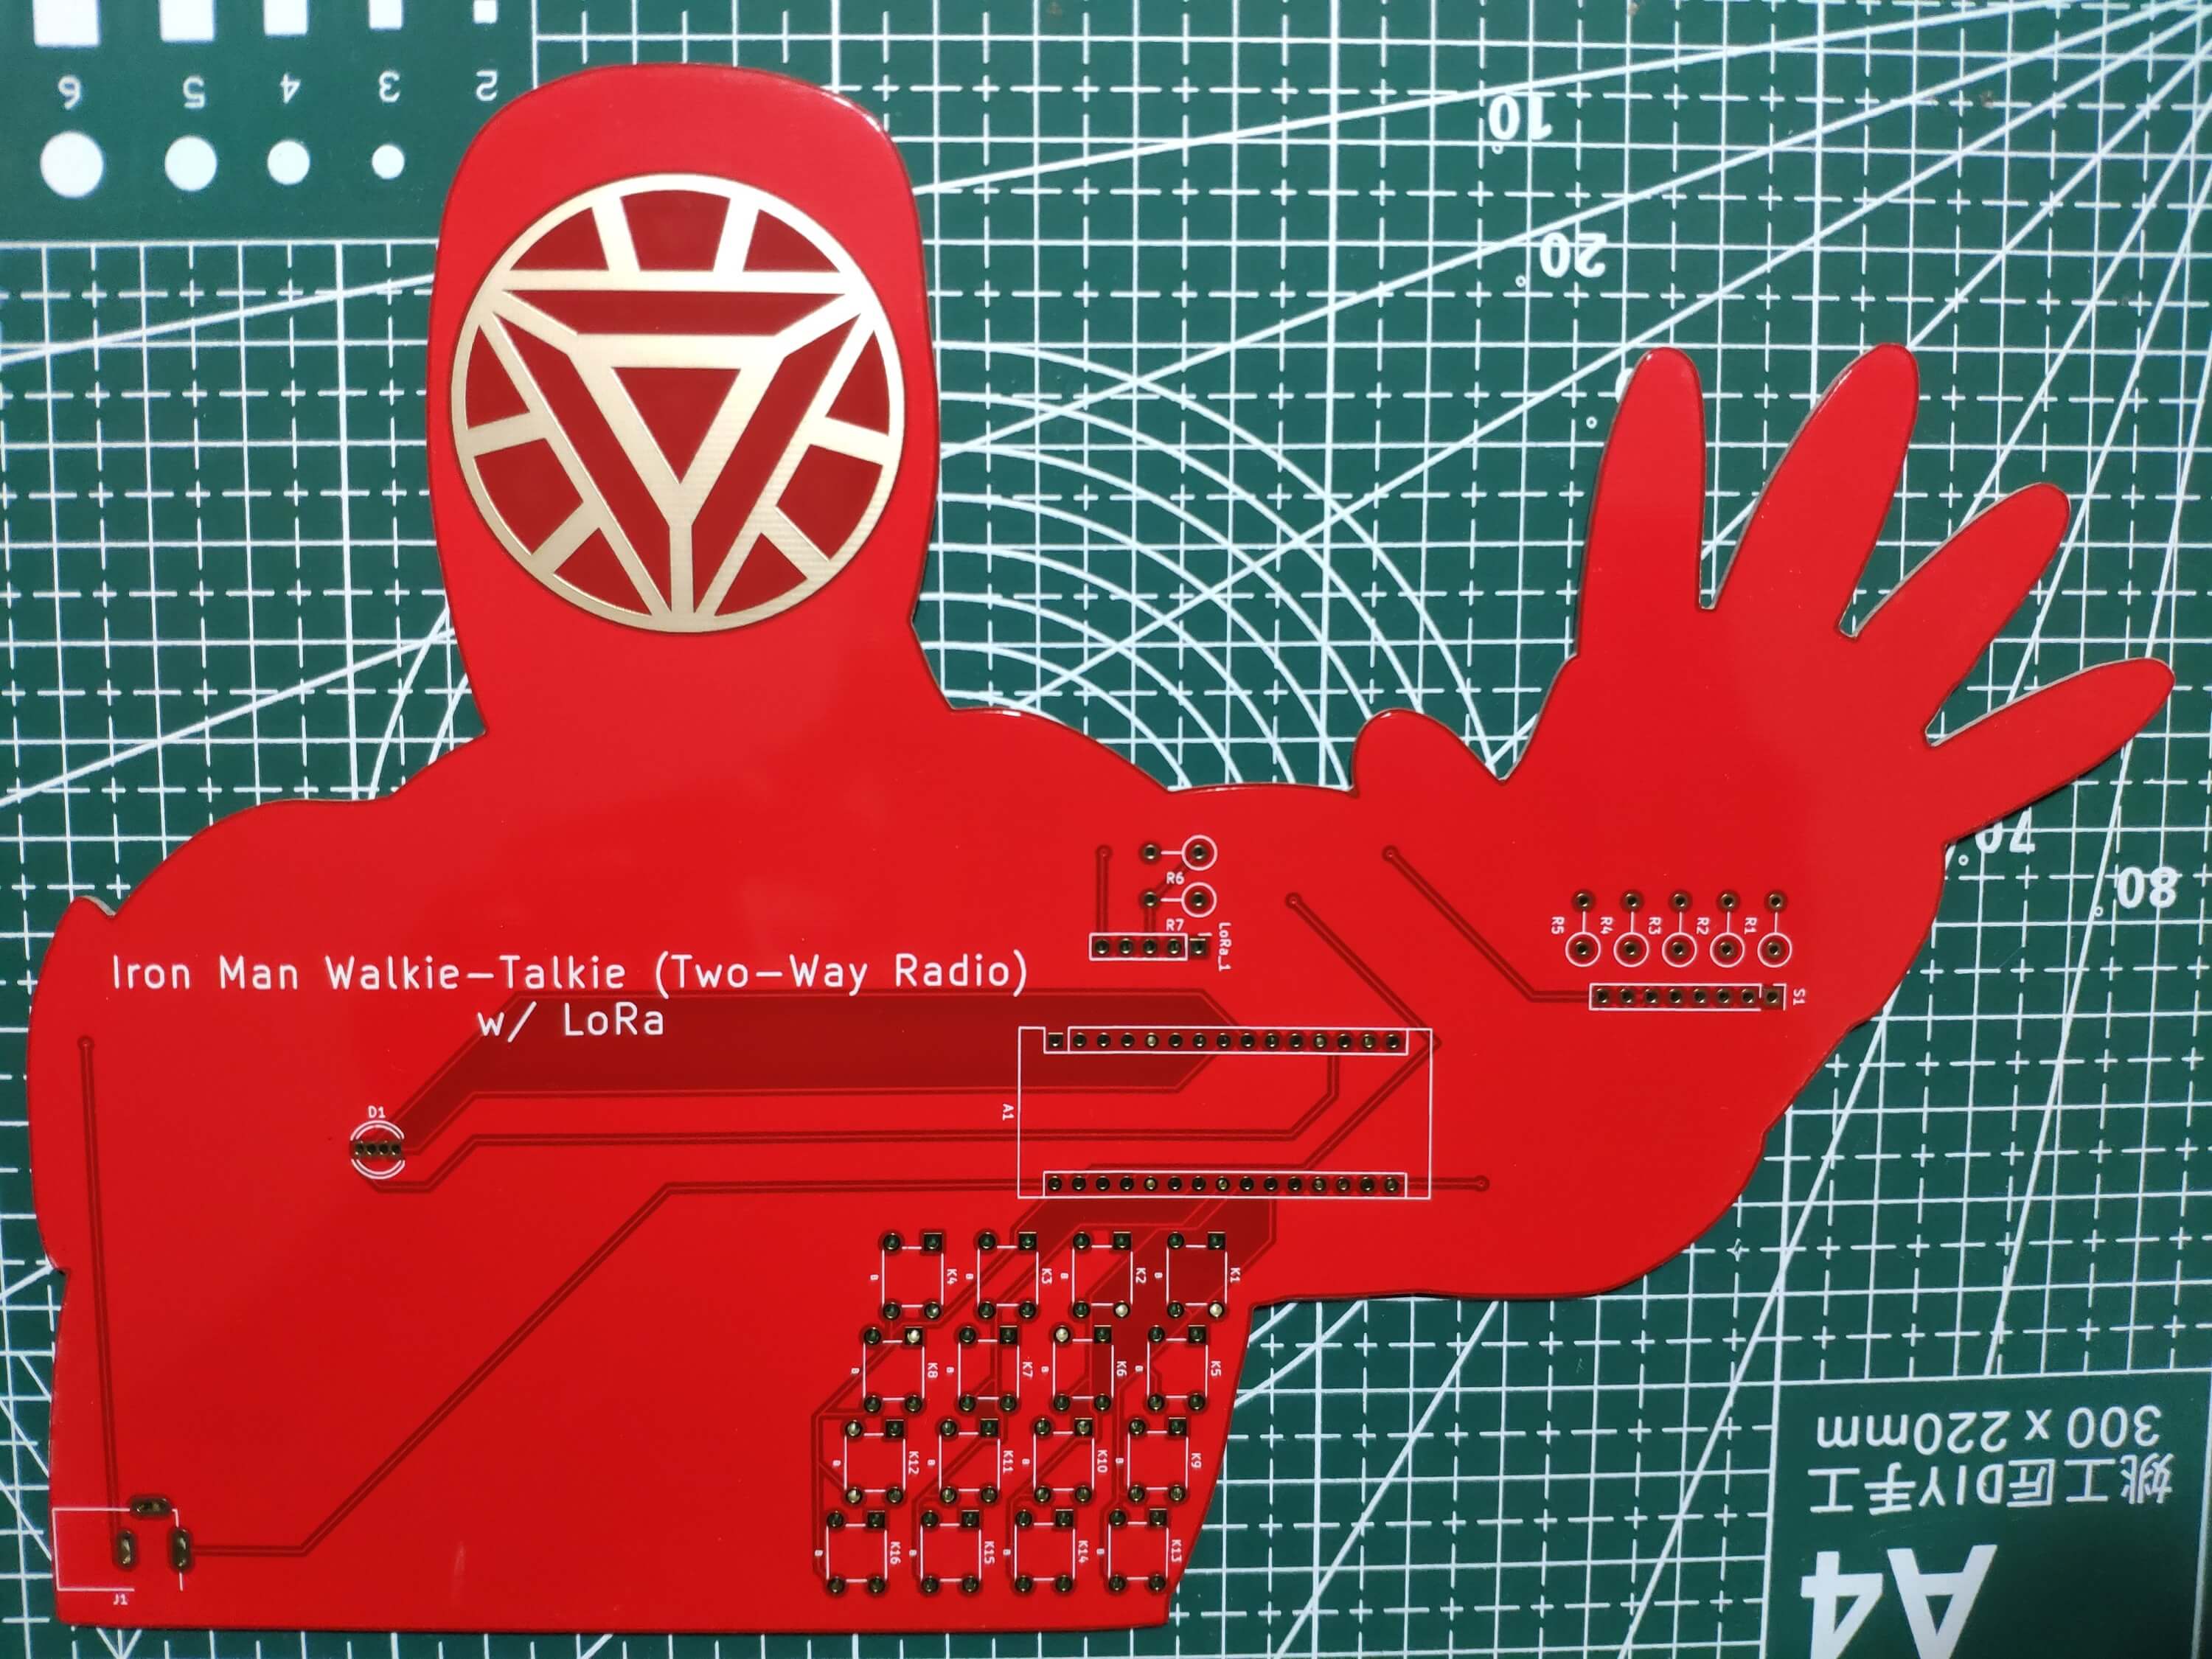
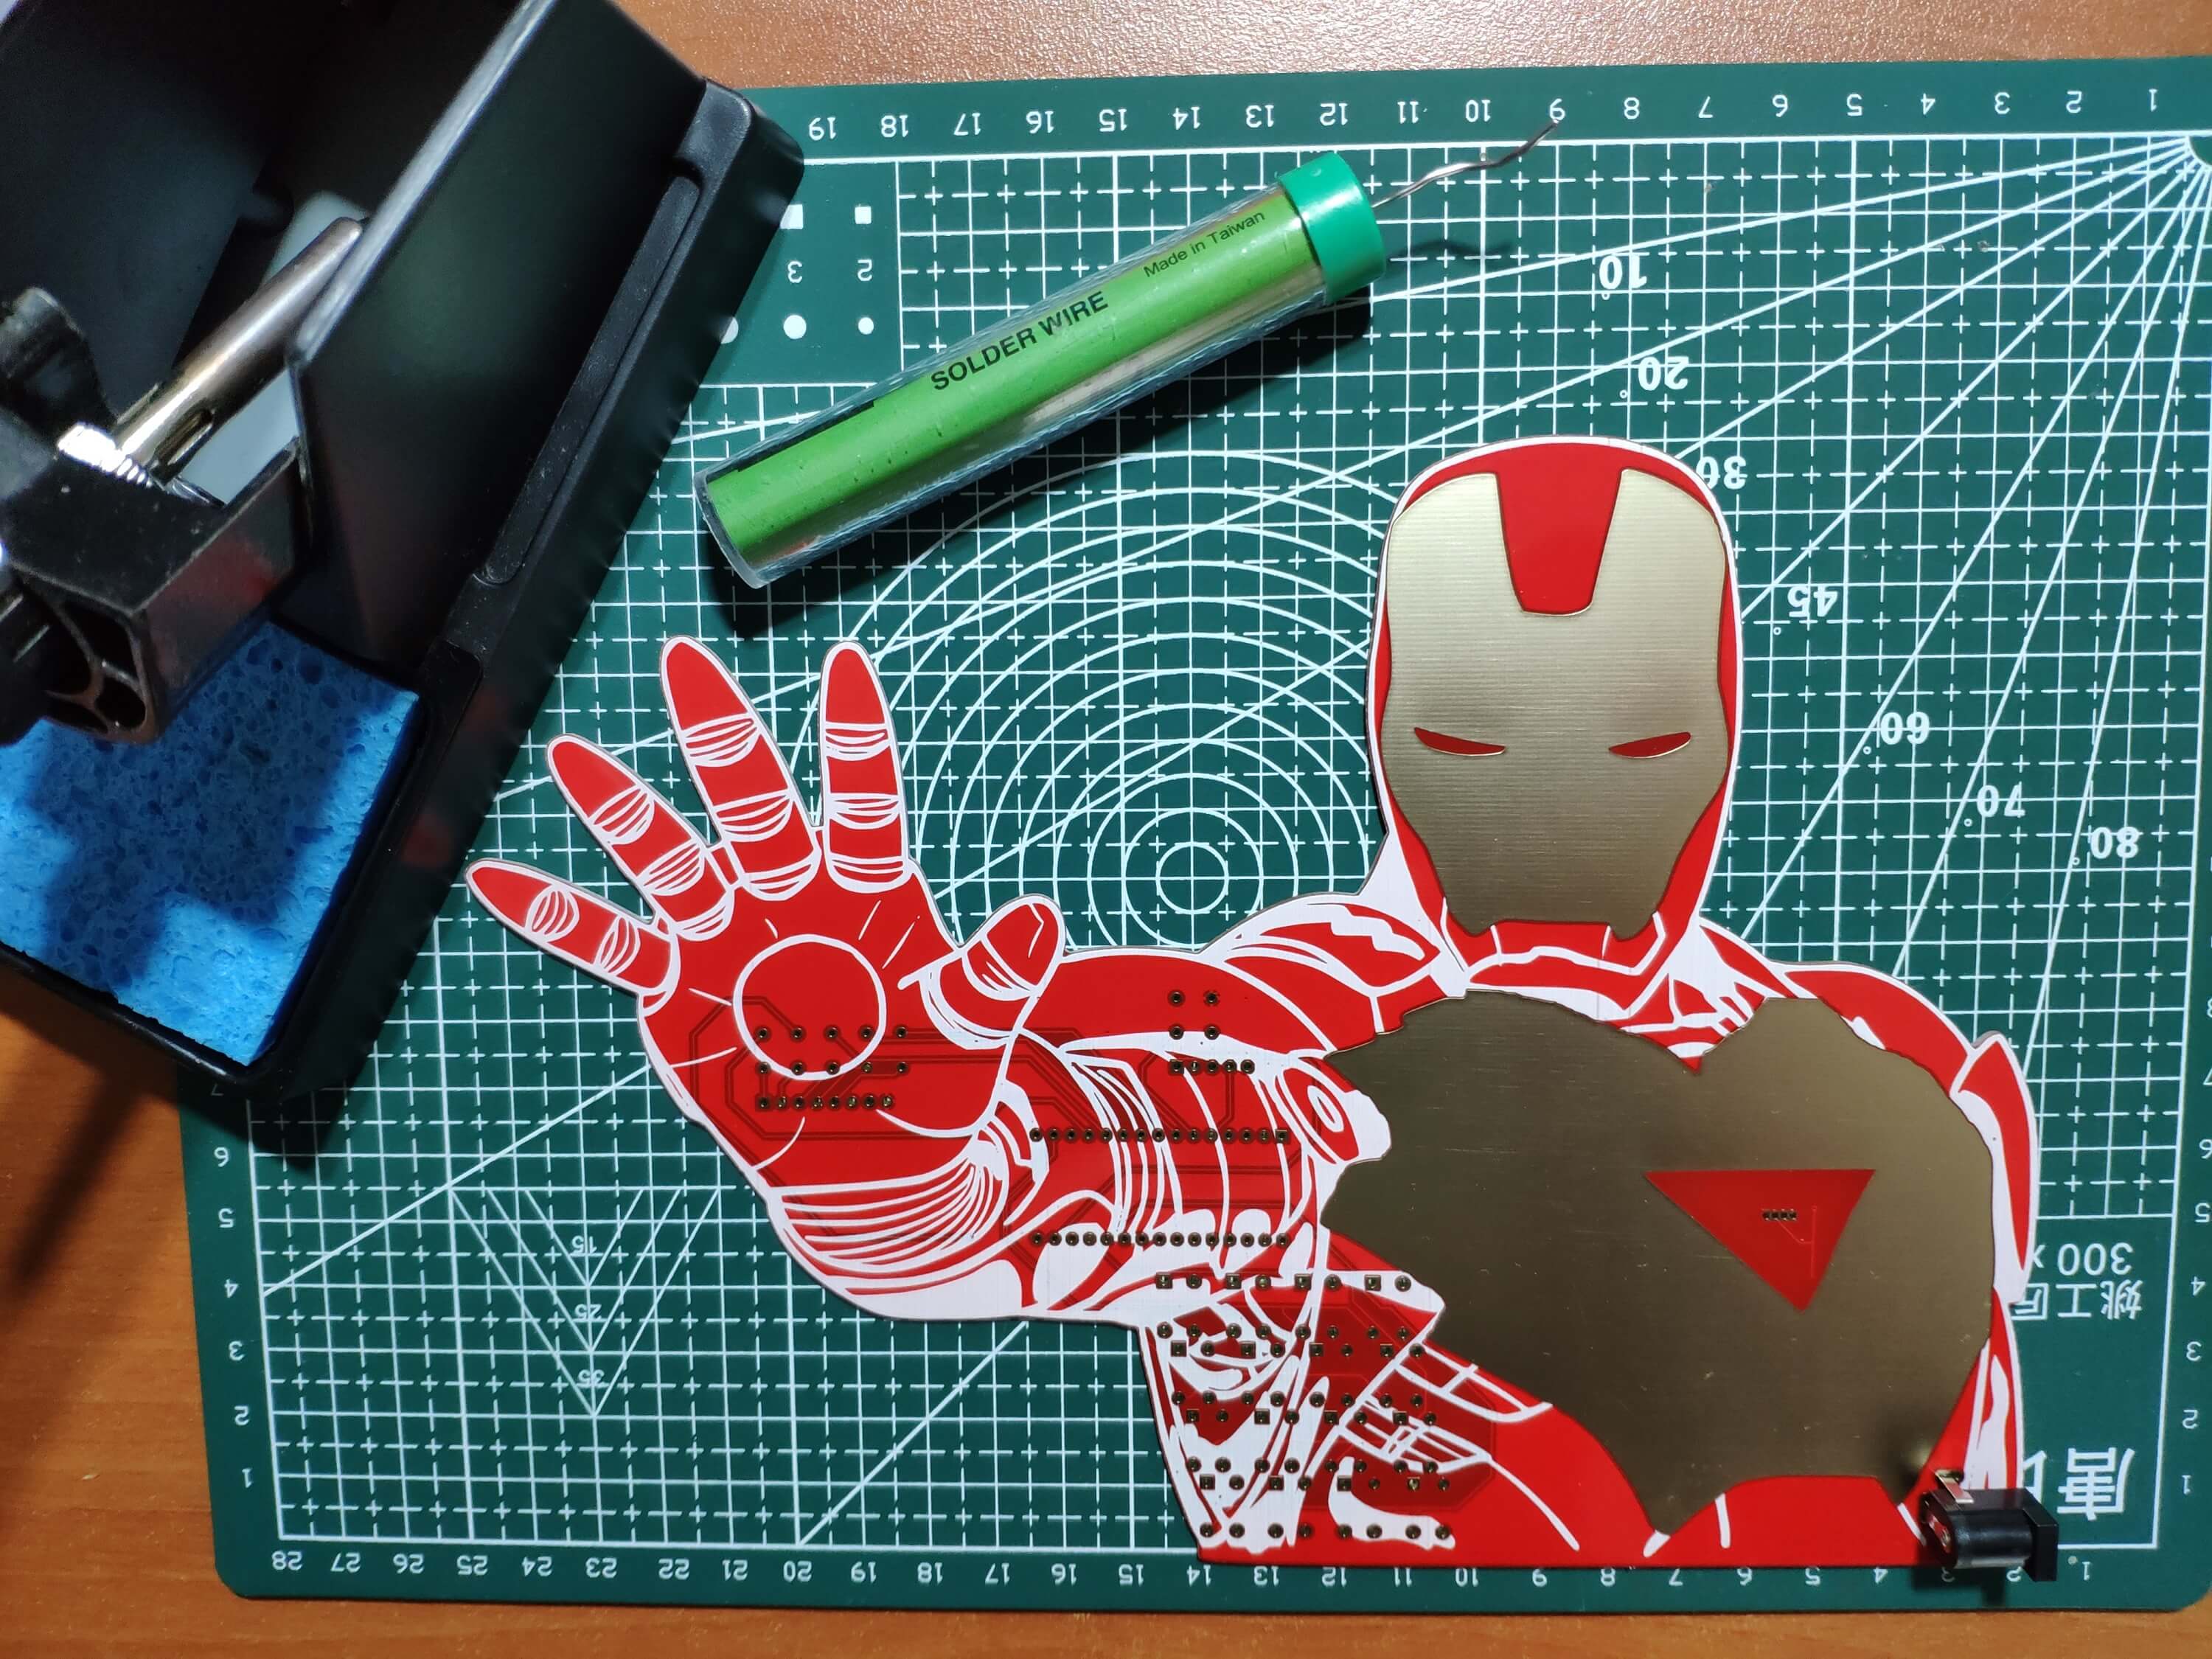
After completing wiring on a breadboard and testing the code for two LoRa-based walkie-talkies (two-way radios), I designed an Iron Man-inspired PCB for this project. I thought Iron Man was germane to my vintage walkie-talkie theme due to a scene from Iron Man 3 near the end of the movie, in which all remaining armors communicate with each other via radio waves covertly. Even though radio is seldom utilized by Iron Man in comics pages, I was inspired by the movie to design Iron Man-themed walkie-talkies (two-way radios) after recently rewatching it :)
Huge thanks to PCBWay for sponsoring this project.
Step 1: Designing and soldering the Iron Man Walkie-Talkie (Two-Way Radio) PCB
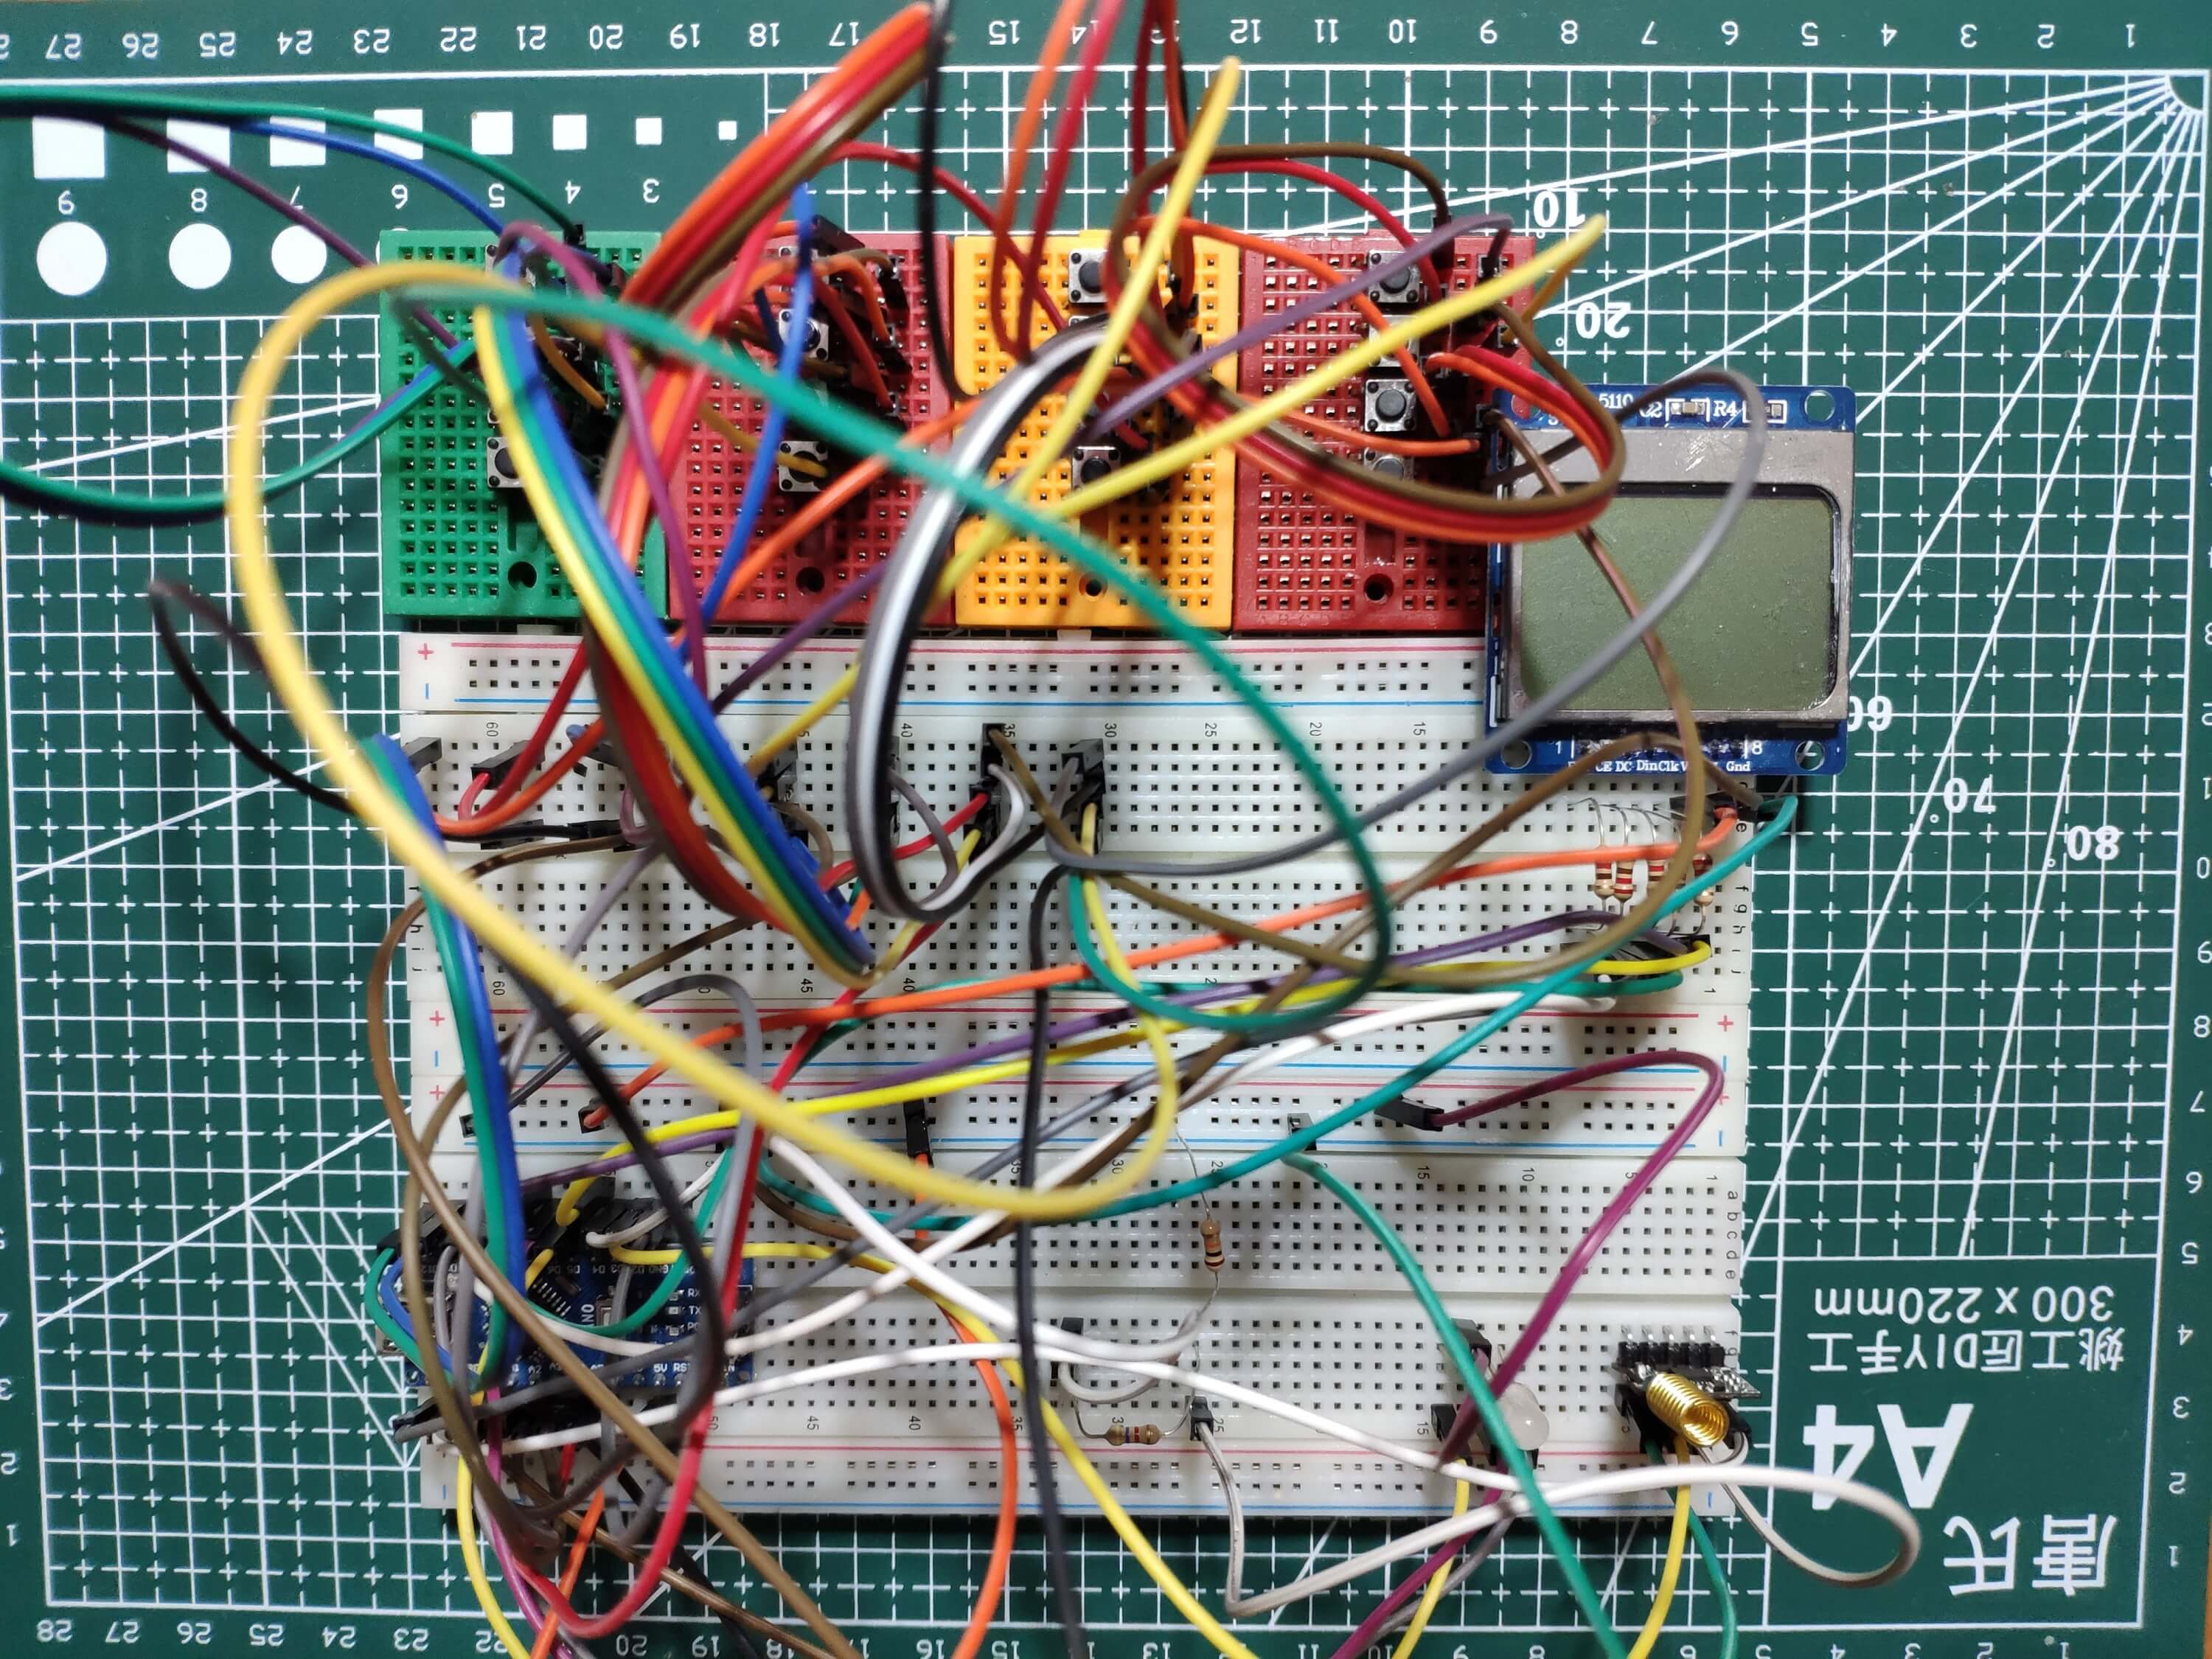
Before prototyping my Iron Man-themed PCB design, I tested all connections and wiring with the Arduino Nano and the RYLR998 LoRa module for two walkie-talkies (two-way radios).
Figure - 72.5
Figure - 72.6
Then, I designed the Iron Man Walkie-Talkie (Two-Way Radio) PCB by utilizing KiCad - inspired by the invincible and legendary Iron Man :) I attached the Gerber file of the PCB below. Therefore, if you want, you can order this PCB from PCBWay to create your LoRa-based walkie-talkies (two-way radios) so as to transmit and receive text messages.
Click here to inspect and order this PCB directly on PCBWay.
Figure - 72.7
Figure - 72.8
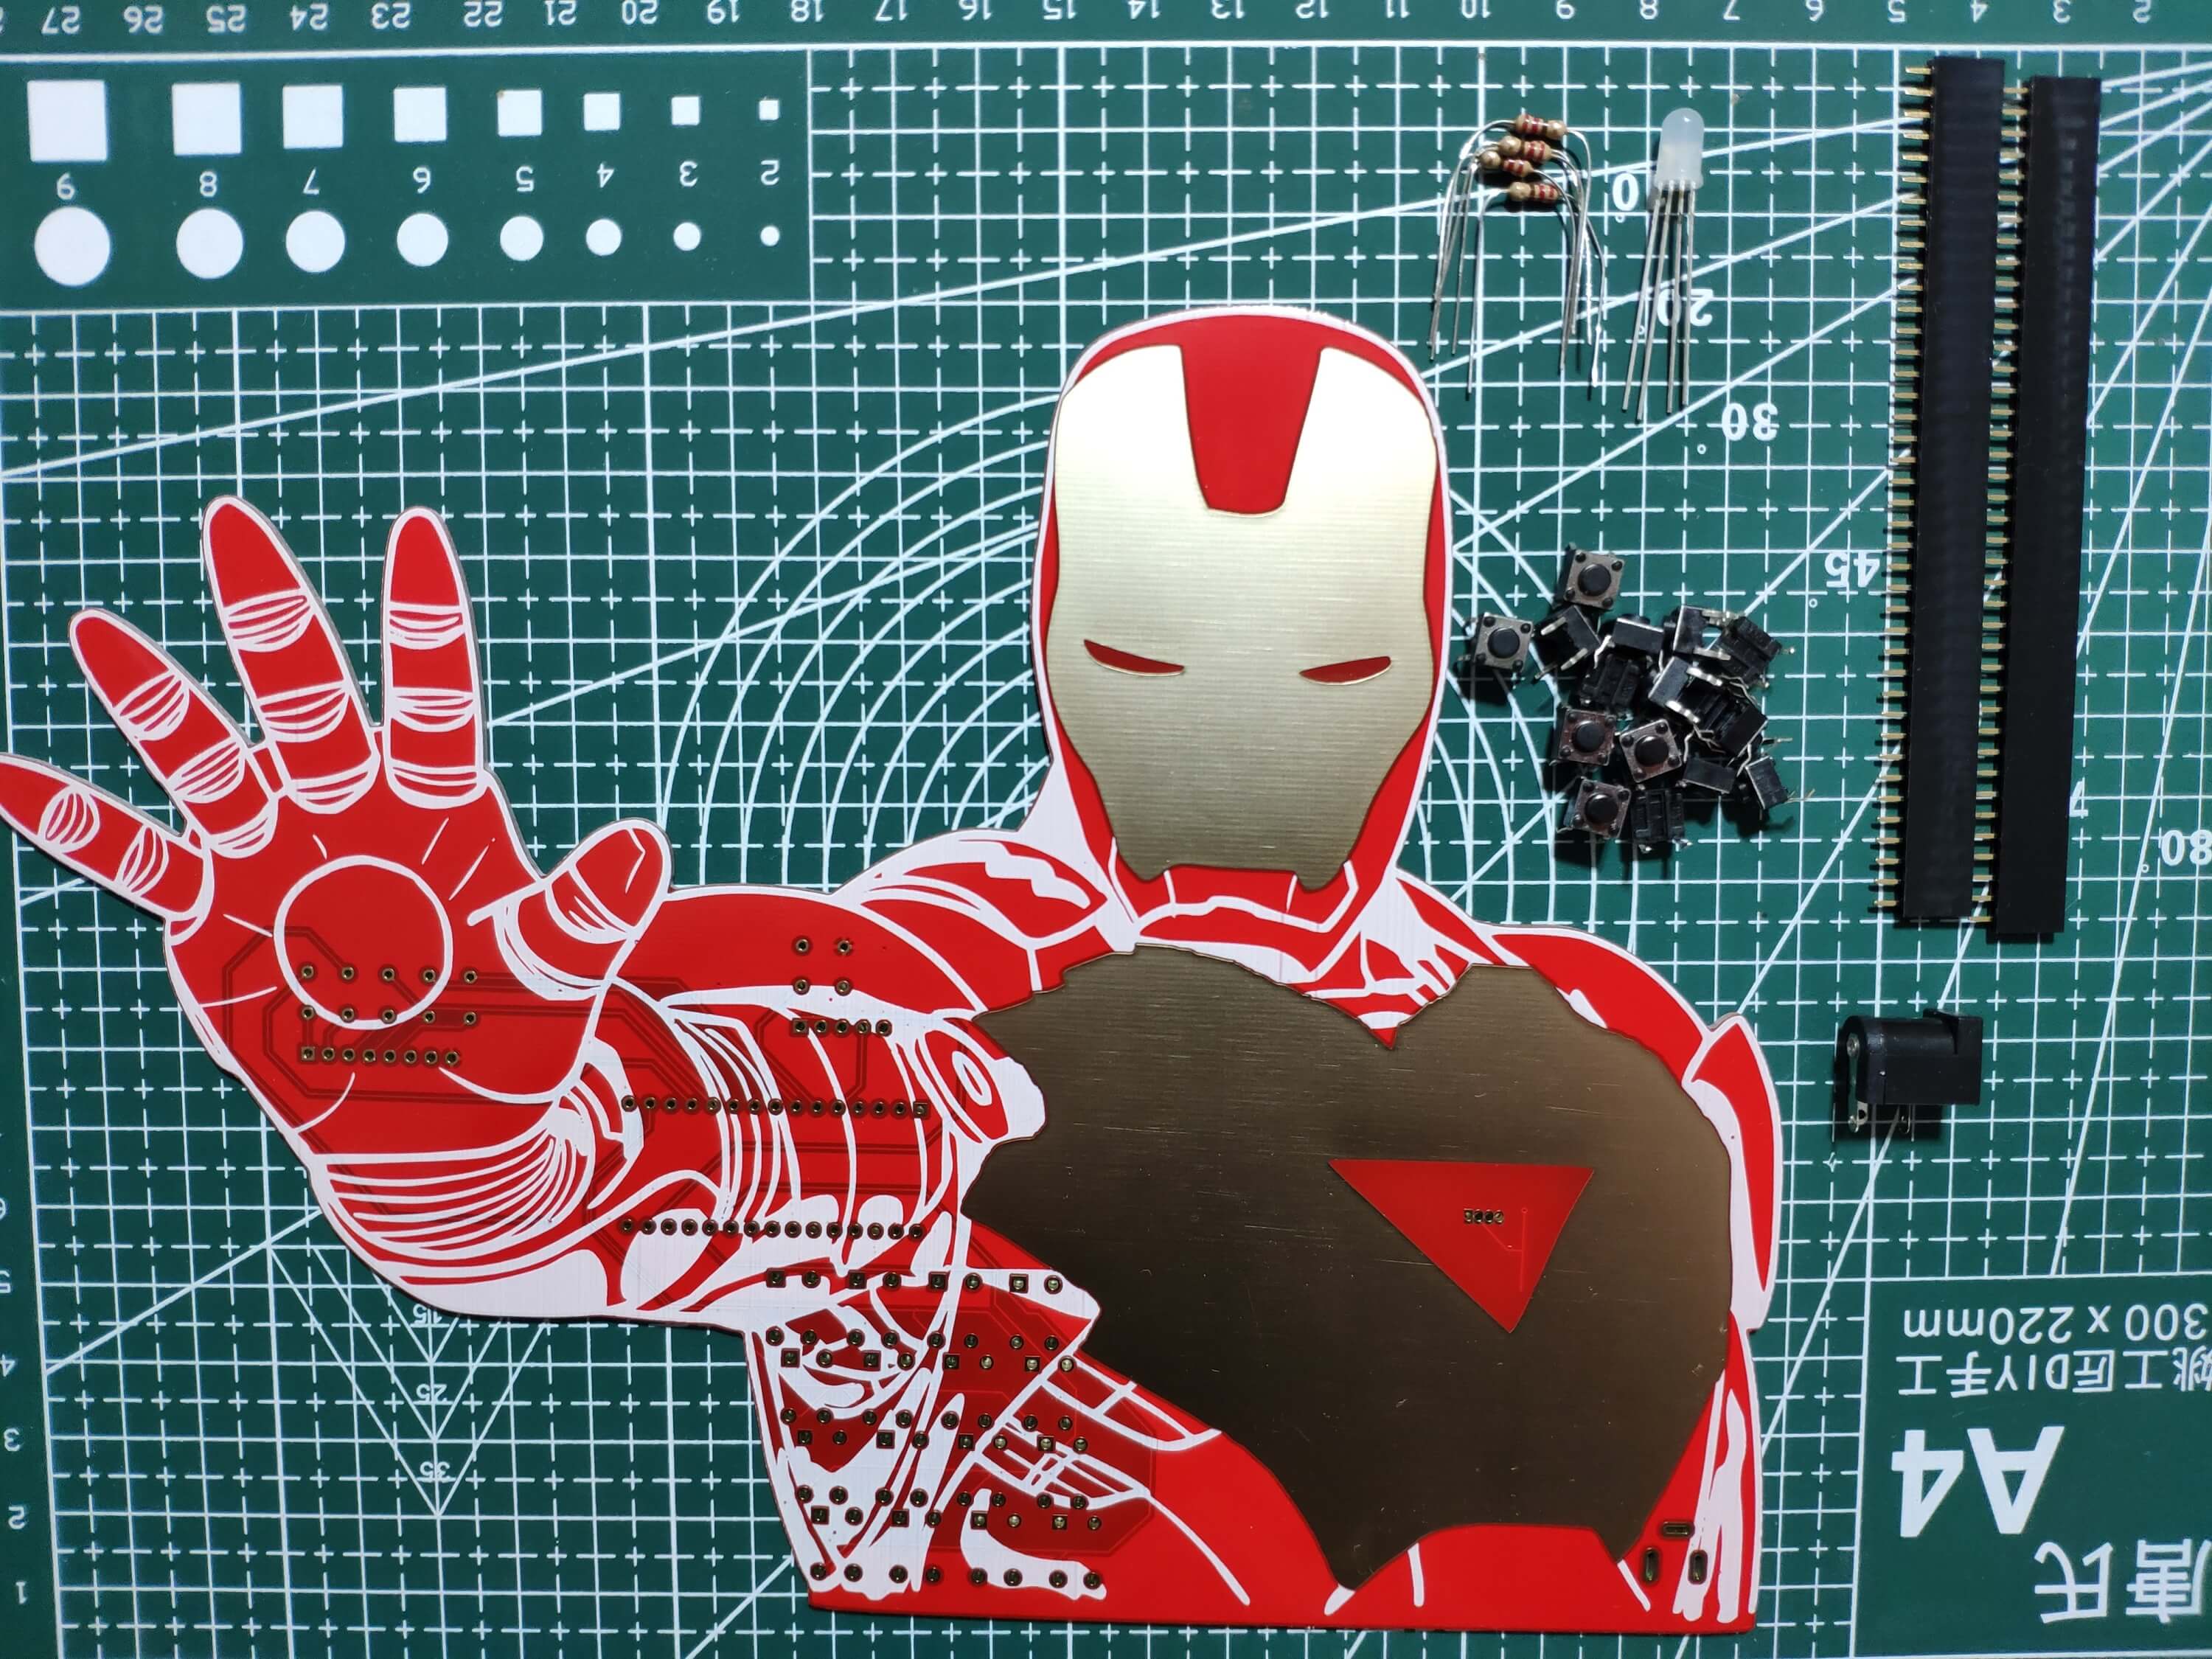
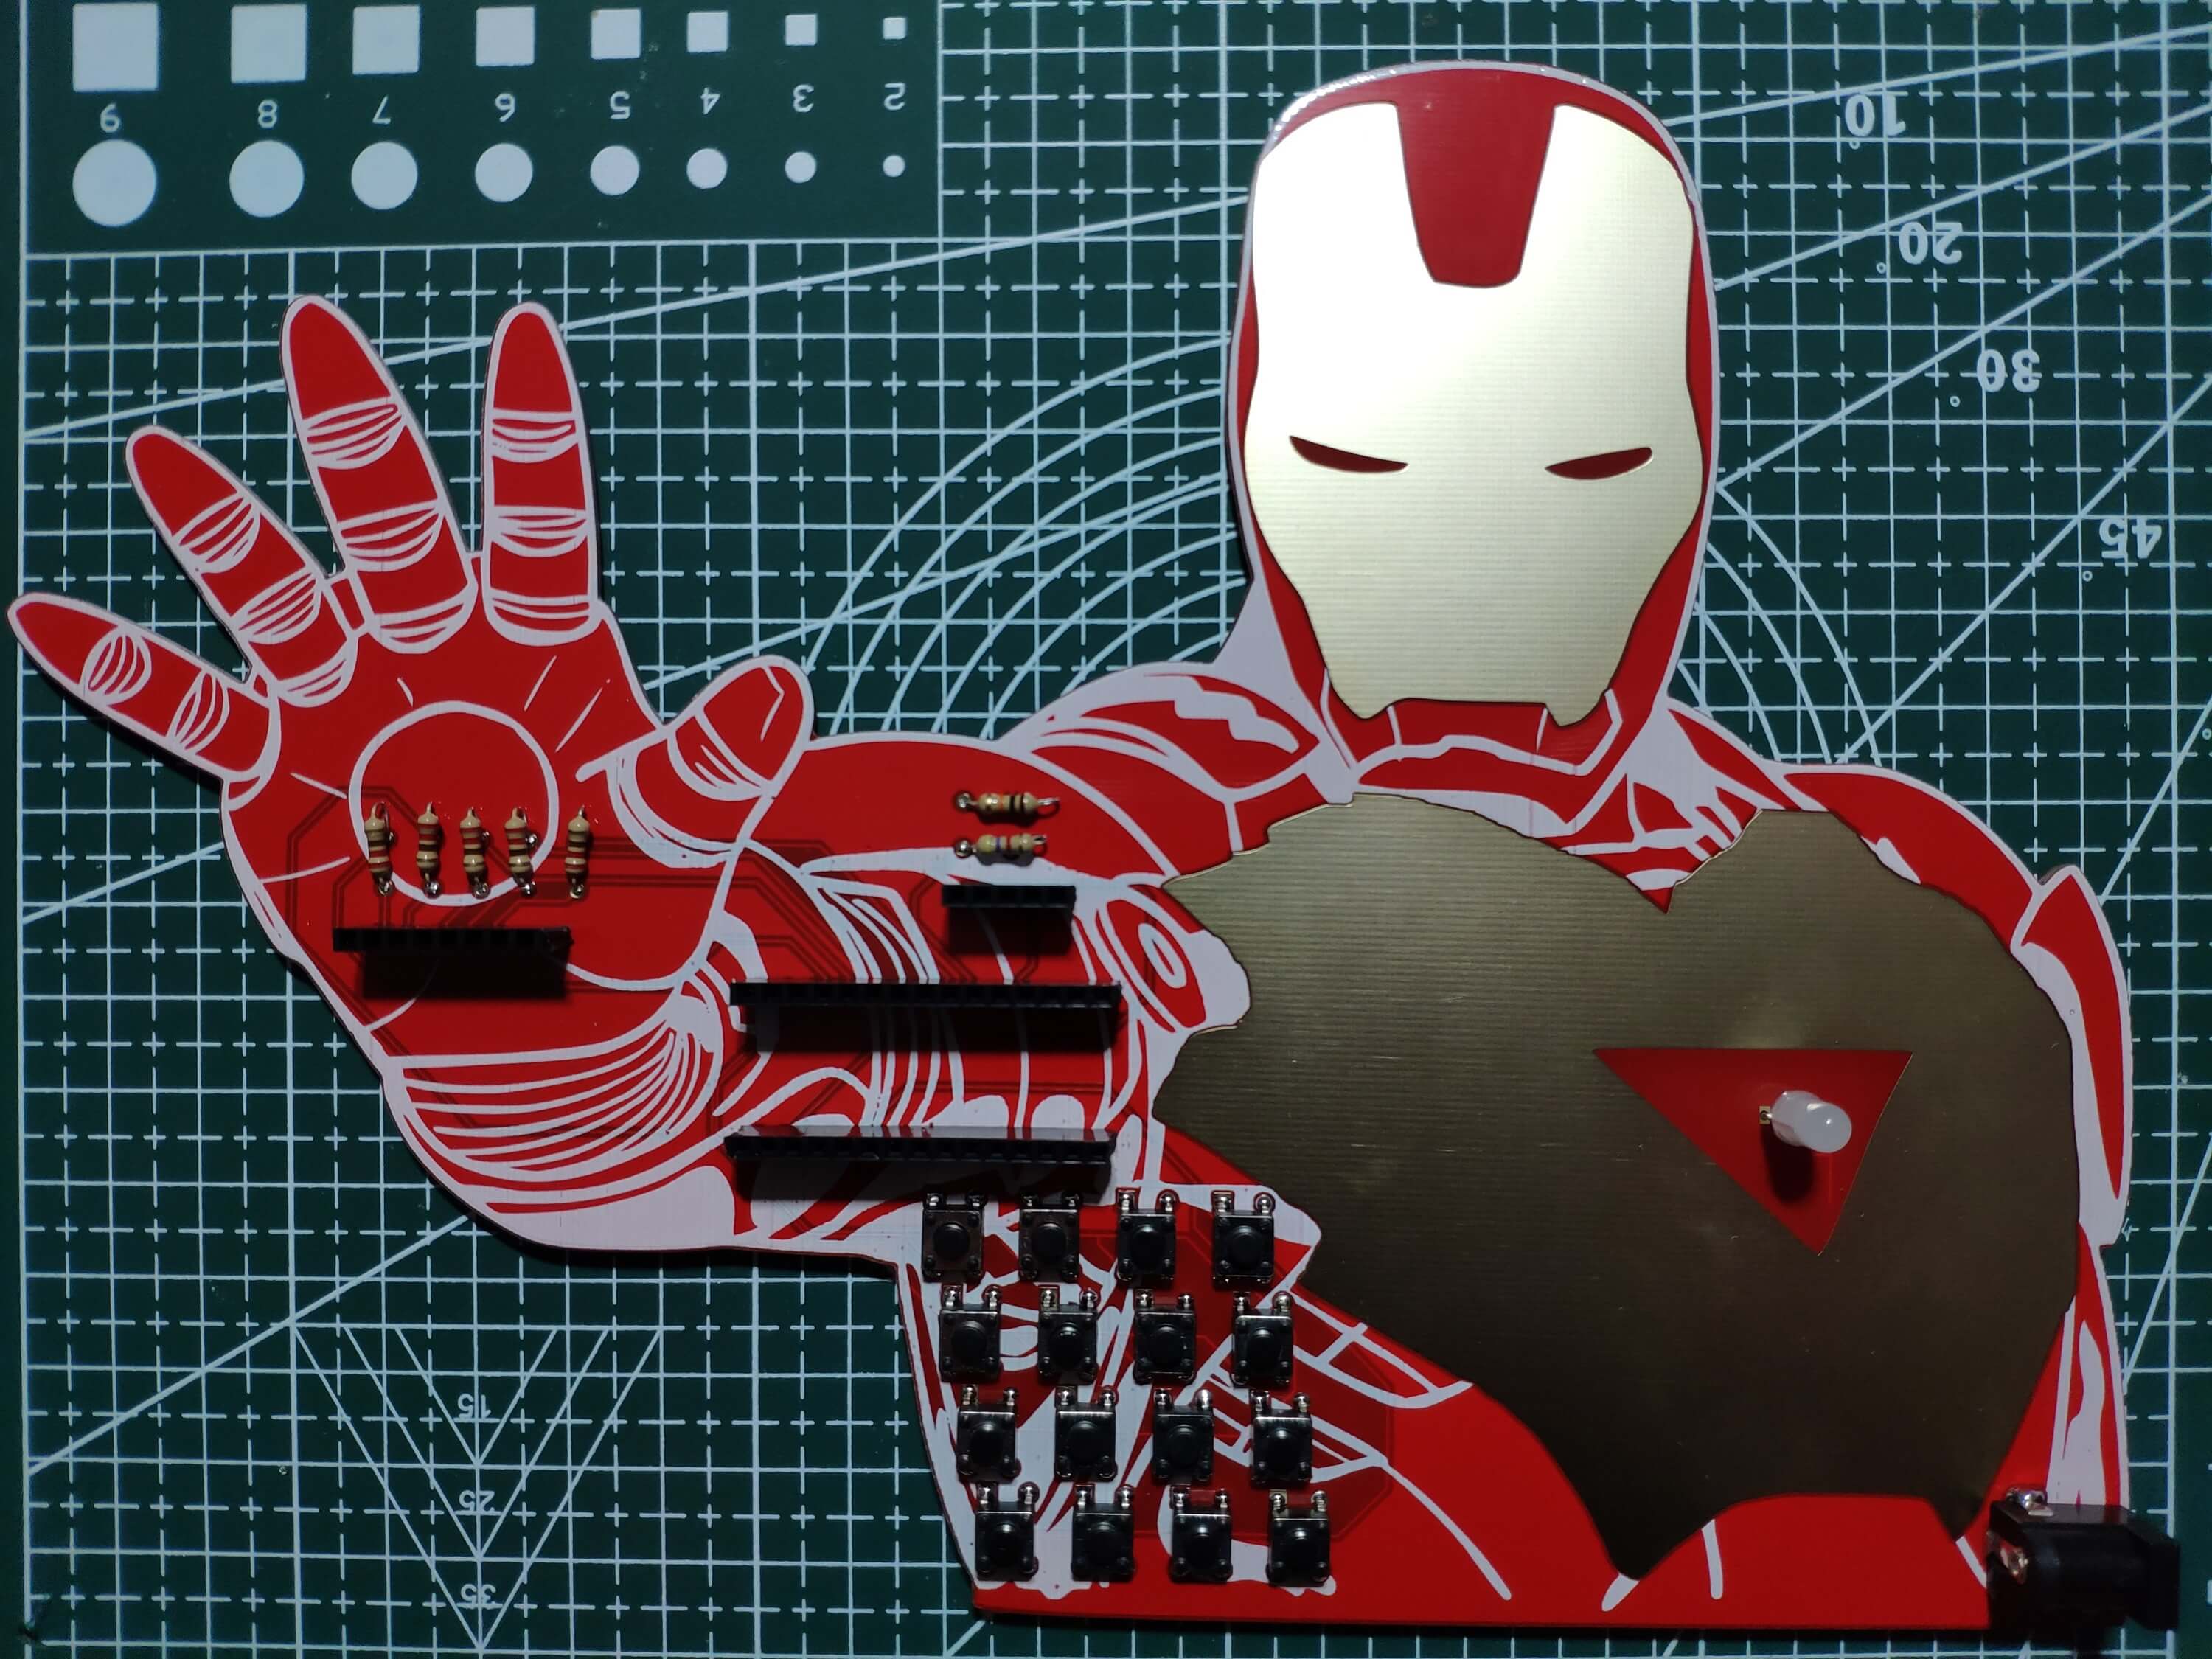
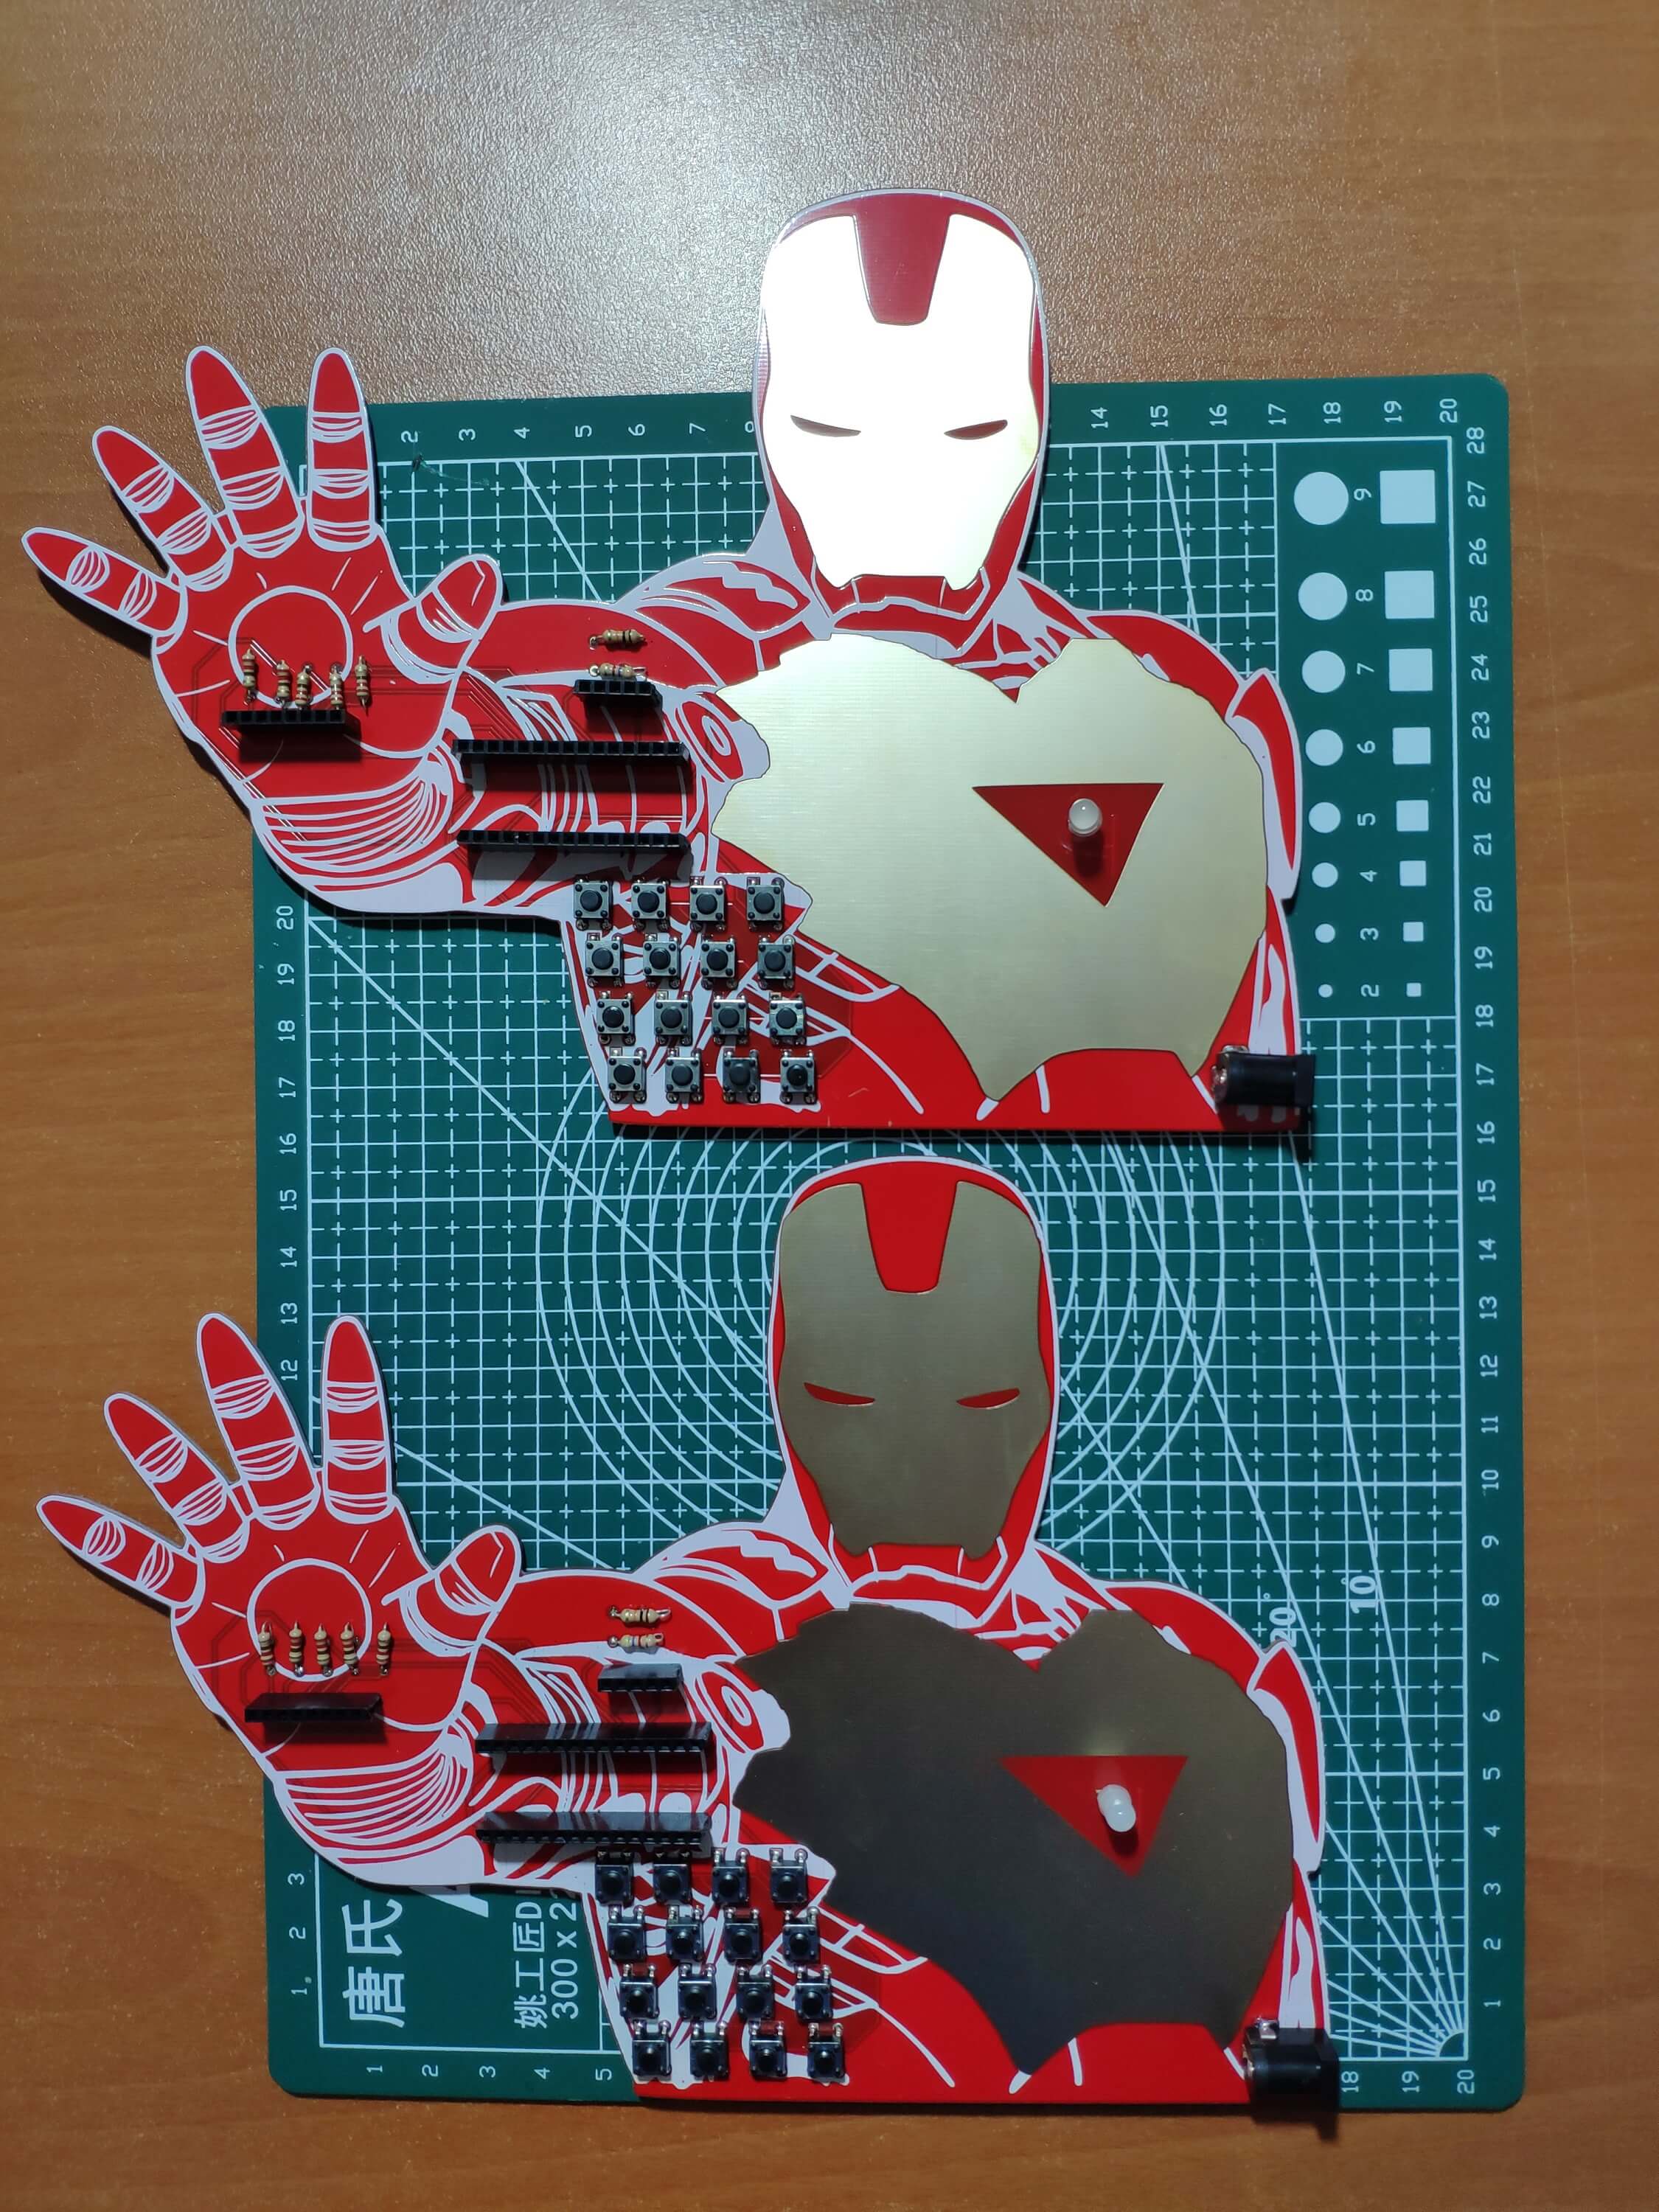
First of all, by utilizing a soldering iron, I attached headers (female), resistors (1K, 4.7K, 10K), pushbuttons (6x6), a 5mm common anode RGB LED, and a power jack.
Since I needed two Iron Man-themed walkie-talkies (two-way radios) so as to manage to transmit and receive text messages simultaneously, I soldered components to two PCBs.
Figure - 72.12
Step 2: Configuring and initializing the RYLR998 LoRa module
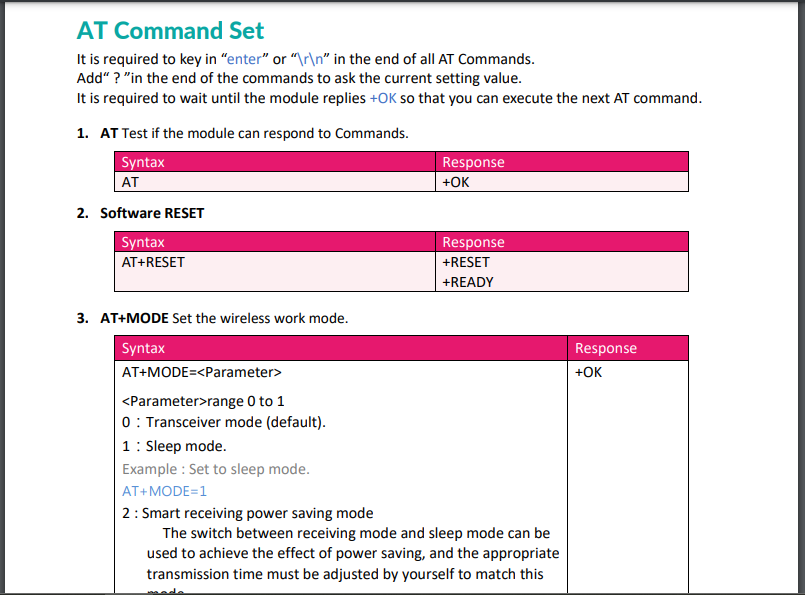
Since the RYLR998 LoRa (transceiver) module requires to be adjusted to transmit and receive text messages simultaneously, I needed to configure each RYLR998 LoRa module with specified settings and addresses. Fortunately, I was able to configure RYLR998 modules effortlessly with the supported AT command list via serial communication.
To configure the RYLR998 modules and send text messages, I utilized the AT commands as follows. You can inspect all available AT commands from here.
#️⃣ Use the AT+ADDRESS command to specify the RYLR998 LoRa module address while transmitting and receiving text messages.
AT+ADDRESS=<Address>
<Address>=0~65535 (default 0)
#️⃣ Use the AT+NETWORKID command to set the LoRa network ID of the RYLR998 module. Setting the correct LoRa network ID is crucial since only the RYLR998 modules with the same LoRa network ID can communicate with each other.
AT+NETWORKID=<Network ID>
<Network ID>=3~15, 18 (default 18)
#️⃣ Use the AT+BAND command to set the LoRa radio frequency (Hz) of the RYLR998 module. Two modules must have the same radio frequency to transmit and receive messages.
AT+BAND=<parameter>
<parameter>=
470000000: 470000000Hz
915000000: 915000000Hz (default)
#️⃣ Use the AT+PARAMETER command to set the LoRa communication parameters of the RYLR998 module. Two modules must have the same parameters to communicate with each other successfully:
#️⃣ The spreading factor (SF) implies the chirp rate and thus controls the speed of data transmission. Lower spreading factors mean faster chirps and higher data transmission rates. Conversely, higher spreading factors imply fewer chirps and high sensitivity with longer transmission time.
#️⃣ The bandwidth means channels: 125 kHz, 250 kHz, or 500 kHz. The sensitivity and the data transmission time are inversely proportional to the bandwidth.
#️⃣ The coding rate refers to the proportion of transmitted bits that actually carry information - 6/8, 4/8, etc.
#️⃣ The preamble is used to keep the receiver synchronized with the incoming data stream. The default is 12 symbol lengths.
When the LoRa network ID equals 18, the preamble value can be configured to 4~24. Otherwise, it can only be configured to 12.
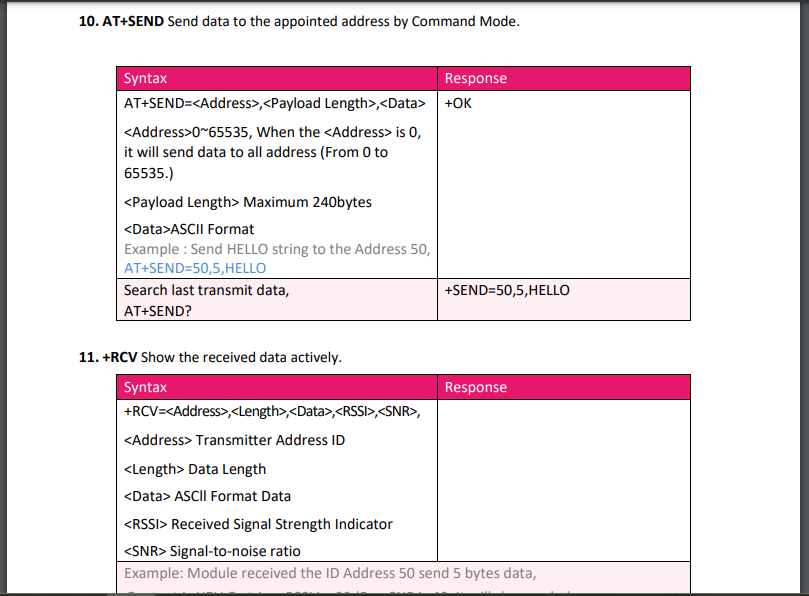
#️⃣ Use the AT+SEND command to transmit data (text messages) to the given RYLR998 LoRa module address. To evaluate the transmission time (airtime), employ LoRa calculator tools.
AT+SEND=<Address>, <Payload Length>, <Data>
<Address>=0~65535
When the receiver address is set as 0, the module transmits data to all available addresses.
<Payload Length> Maximum 240 bytes
<Data> ASCII Format
#️⃣ To send AT commands successfully to the RYLR998 module via serial communication, add \r\n to the end of all commands.
#️⃣ To obtain the current setting values of AT commands from the RYLR998 module via serial communication, add the question mark (?) to the end of them:
AT+ADDRESS?
AT+SEND?
To transmit and receive data (text messages) with my two RYLR998 LoRa modules successfully, I applied these settings:
📌 RYLR998 LoRa Module (1)
AT+ADDRESS=108
AT+NETWORKID=10
AT+BAND=470000000
AT+PARAMETER=10,8,1,12
AT+SEND=107, <Message Length>, <Message>
📌 RYLR998 LoRa Module (2)
AT+ADDRESS=107
AT+NETWORKID=10
AT+BAND=470000000
AT+PARAMETER=10,8,1,12
AT+SEND=108, <Message Length>, <Message>
Figure - 72.13
Figure - 72.14
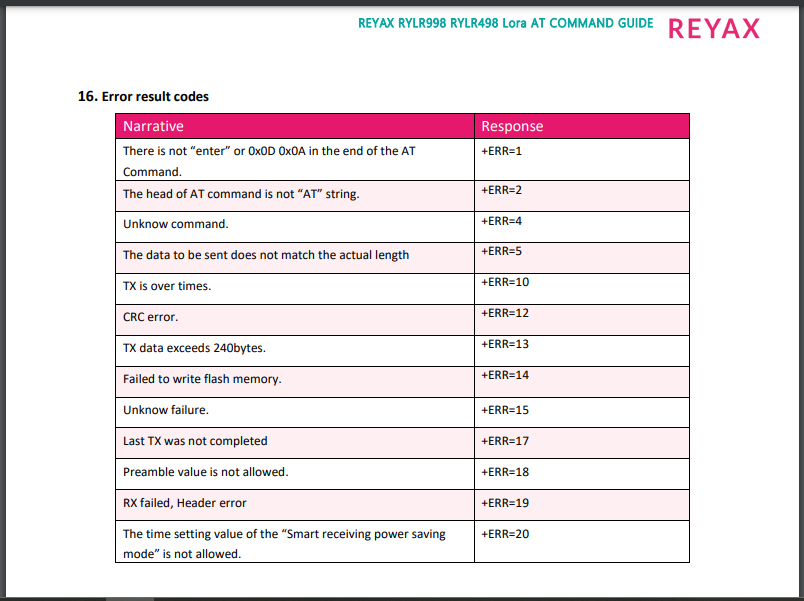
#️⃣ Check the error response codes if the module cannot be configured with AT commands successfully.
Figure - 72.15
Step 3: Programming the Arduino Nano
Download the required library to control the Nokia 5110 screen:
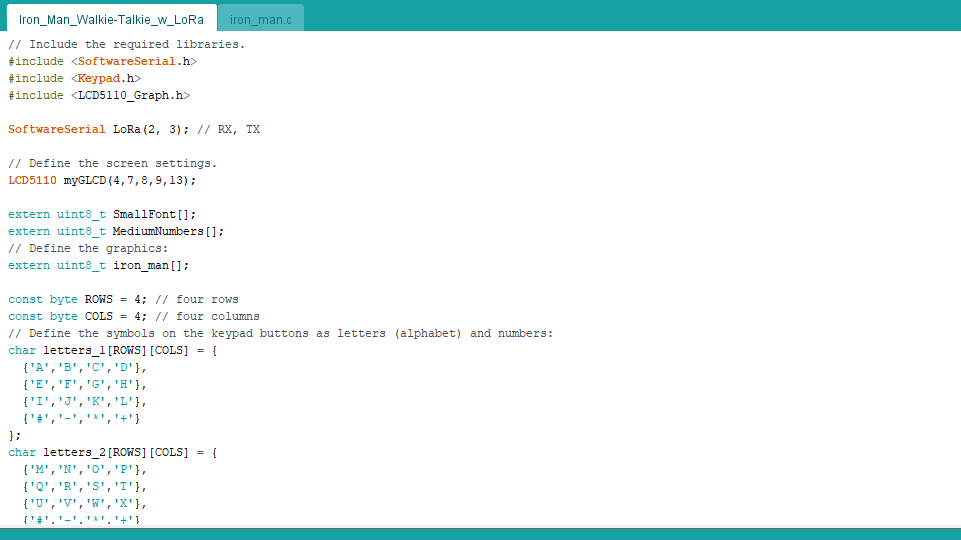
⭐ Define the symbols on the custom 4x4 keypad buttons as letters (alphabet) and numbers. Then, initialize instances of different keypad classes (k_letters_1, k_letters_2, and k_numbers).
const byte ROWS = 4; // four rows
const byte COLS = 4; // four columns
// Define the symbols on the keypad buttons as letters (alphabet) and numbers:
char letters_1[ROWS][COLS] = {
{'A','B','C','D'},
{'E','F','G','H'},
{'I','J','K','L'},
{'#','-','*','+'}
};
char letters_2[ROWS][COLS] = {
{'M','N','O','P'},
{'Q','R','S','T'},
{'U','V','W','X'},
{'#','-','*','+'}
};
char numbers[ROWS][COLS] = {
{'Y','Z','1','2'},
{'3','4','5','6'},
{'7','8','9','0'},
{'#','-','*','+'}
};
// Connect to the row pinouts of the keypad:
byte rowPins[ROWS] = {11,12,A0,A1};
// Connect to the column pinouts of the keypad:
byte colPins[COLS] = {A2,A3,A4,A5};
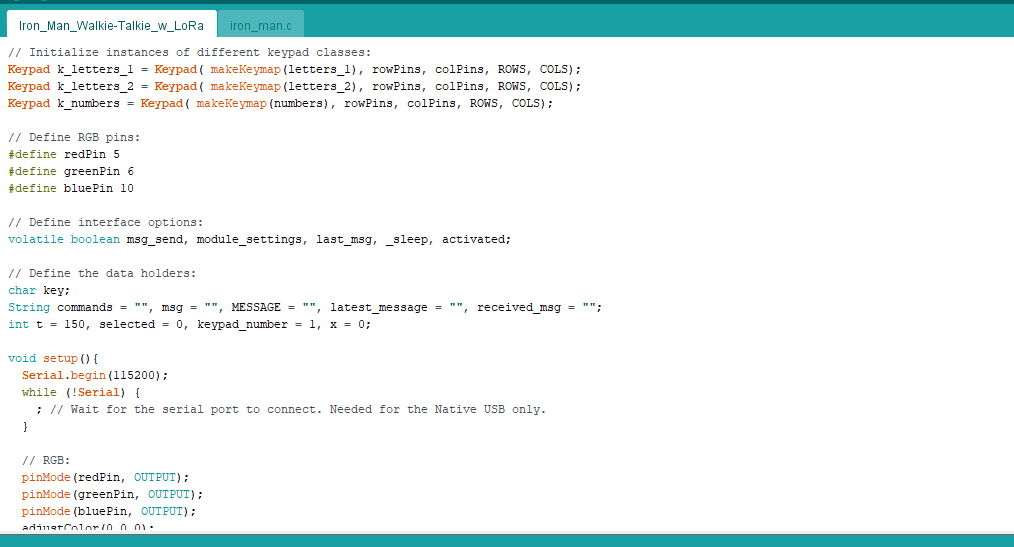
// Initialize instances of different keypad classes:
Keypad k_letters_1 = Keypad( makeKeymap(letters_1), rowPins, colPins, ROWS, COLS);
Keypad k_letters_2 = Keypad( makeKeymap(letters_2), rowPins, colPins, ROWS, COLS);
Keypad k_numbers = Keypad( makeKeymap(numbers), rowPins, colPins, ROWS, COLS);
⭐ Initiate the serial communication between the Arduino Nano and the RYLR998 LoRa module.
⭐ Initiate the Nokia 5110 screen.
  LoRa.begin(115200);

  // Initiate the screen.
  myGLCD.InitLCD();
  myGLCD.setFont(SmallFont);
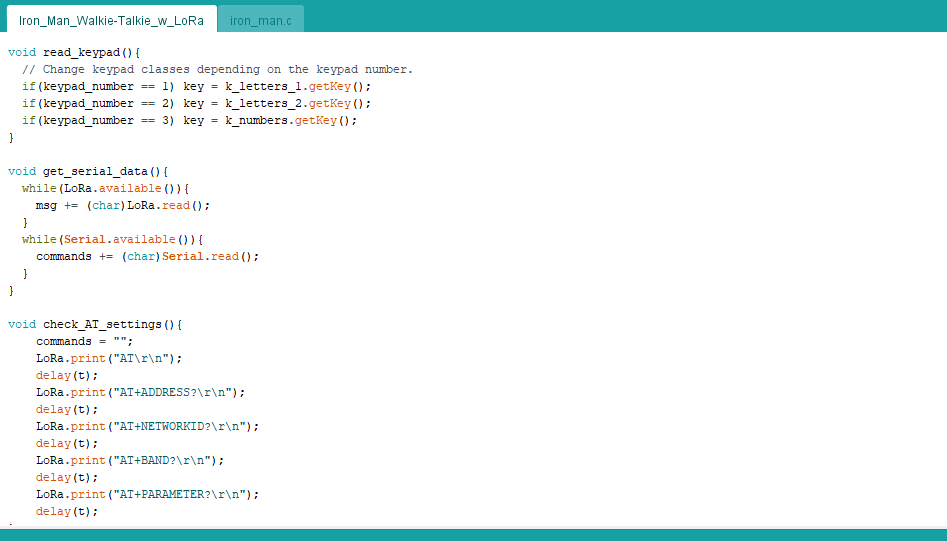
⭐ In the read_keypad function, obtain the recently pressed key on the 4x4 keypad and change keypad classes (k_letters_1, k_letters_2, and k_numbers) depending on the keypad number.
⭐ In the scrolling_text function, scroll the given text by using the '#' keypad button.
void scrolling_text(String text, int y){
  int len = text.length();
  // Scroll the given text using the keypad button (#).
  if(key == '#') x--;
  if(x<=-(len*6)) x = -(len*6);
  // Print.
  myGLCD.print(text, x, y);
  delay(25);
}
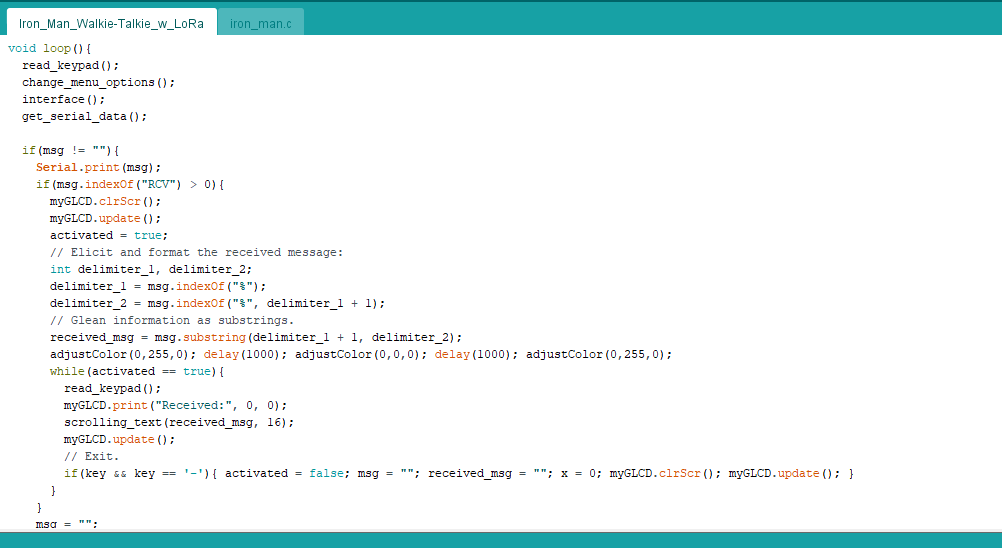
⭐ If there are incoming bytes from the transmitter RYLR998 LoRa module, elicit and format the received message by utilizing the given delimiter - the percent sign (%).
+RCV=108, 7, %HELLO%, -7, 11
⭐ Then, blink the RGB LED as green and print the recently received message on the screen.
⭐ Scroll the received message by pressing the '#' keypad button.
⭐ If the '-' keypad button is pressed, return to the interface.
After completing soldering and uploading the code, I attached all remaining components to the Iron Man-themed PCBs via headers - Arduino Nano boards, Nokia 5110 screens, and RYLR998 LoRa modules.
Figure - 72.21
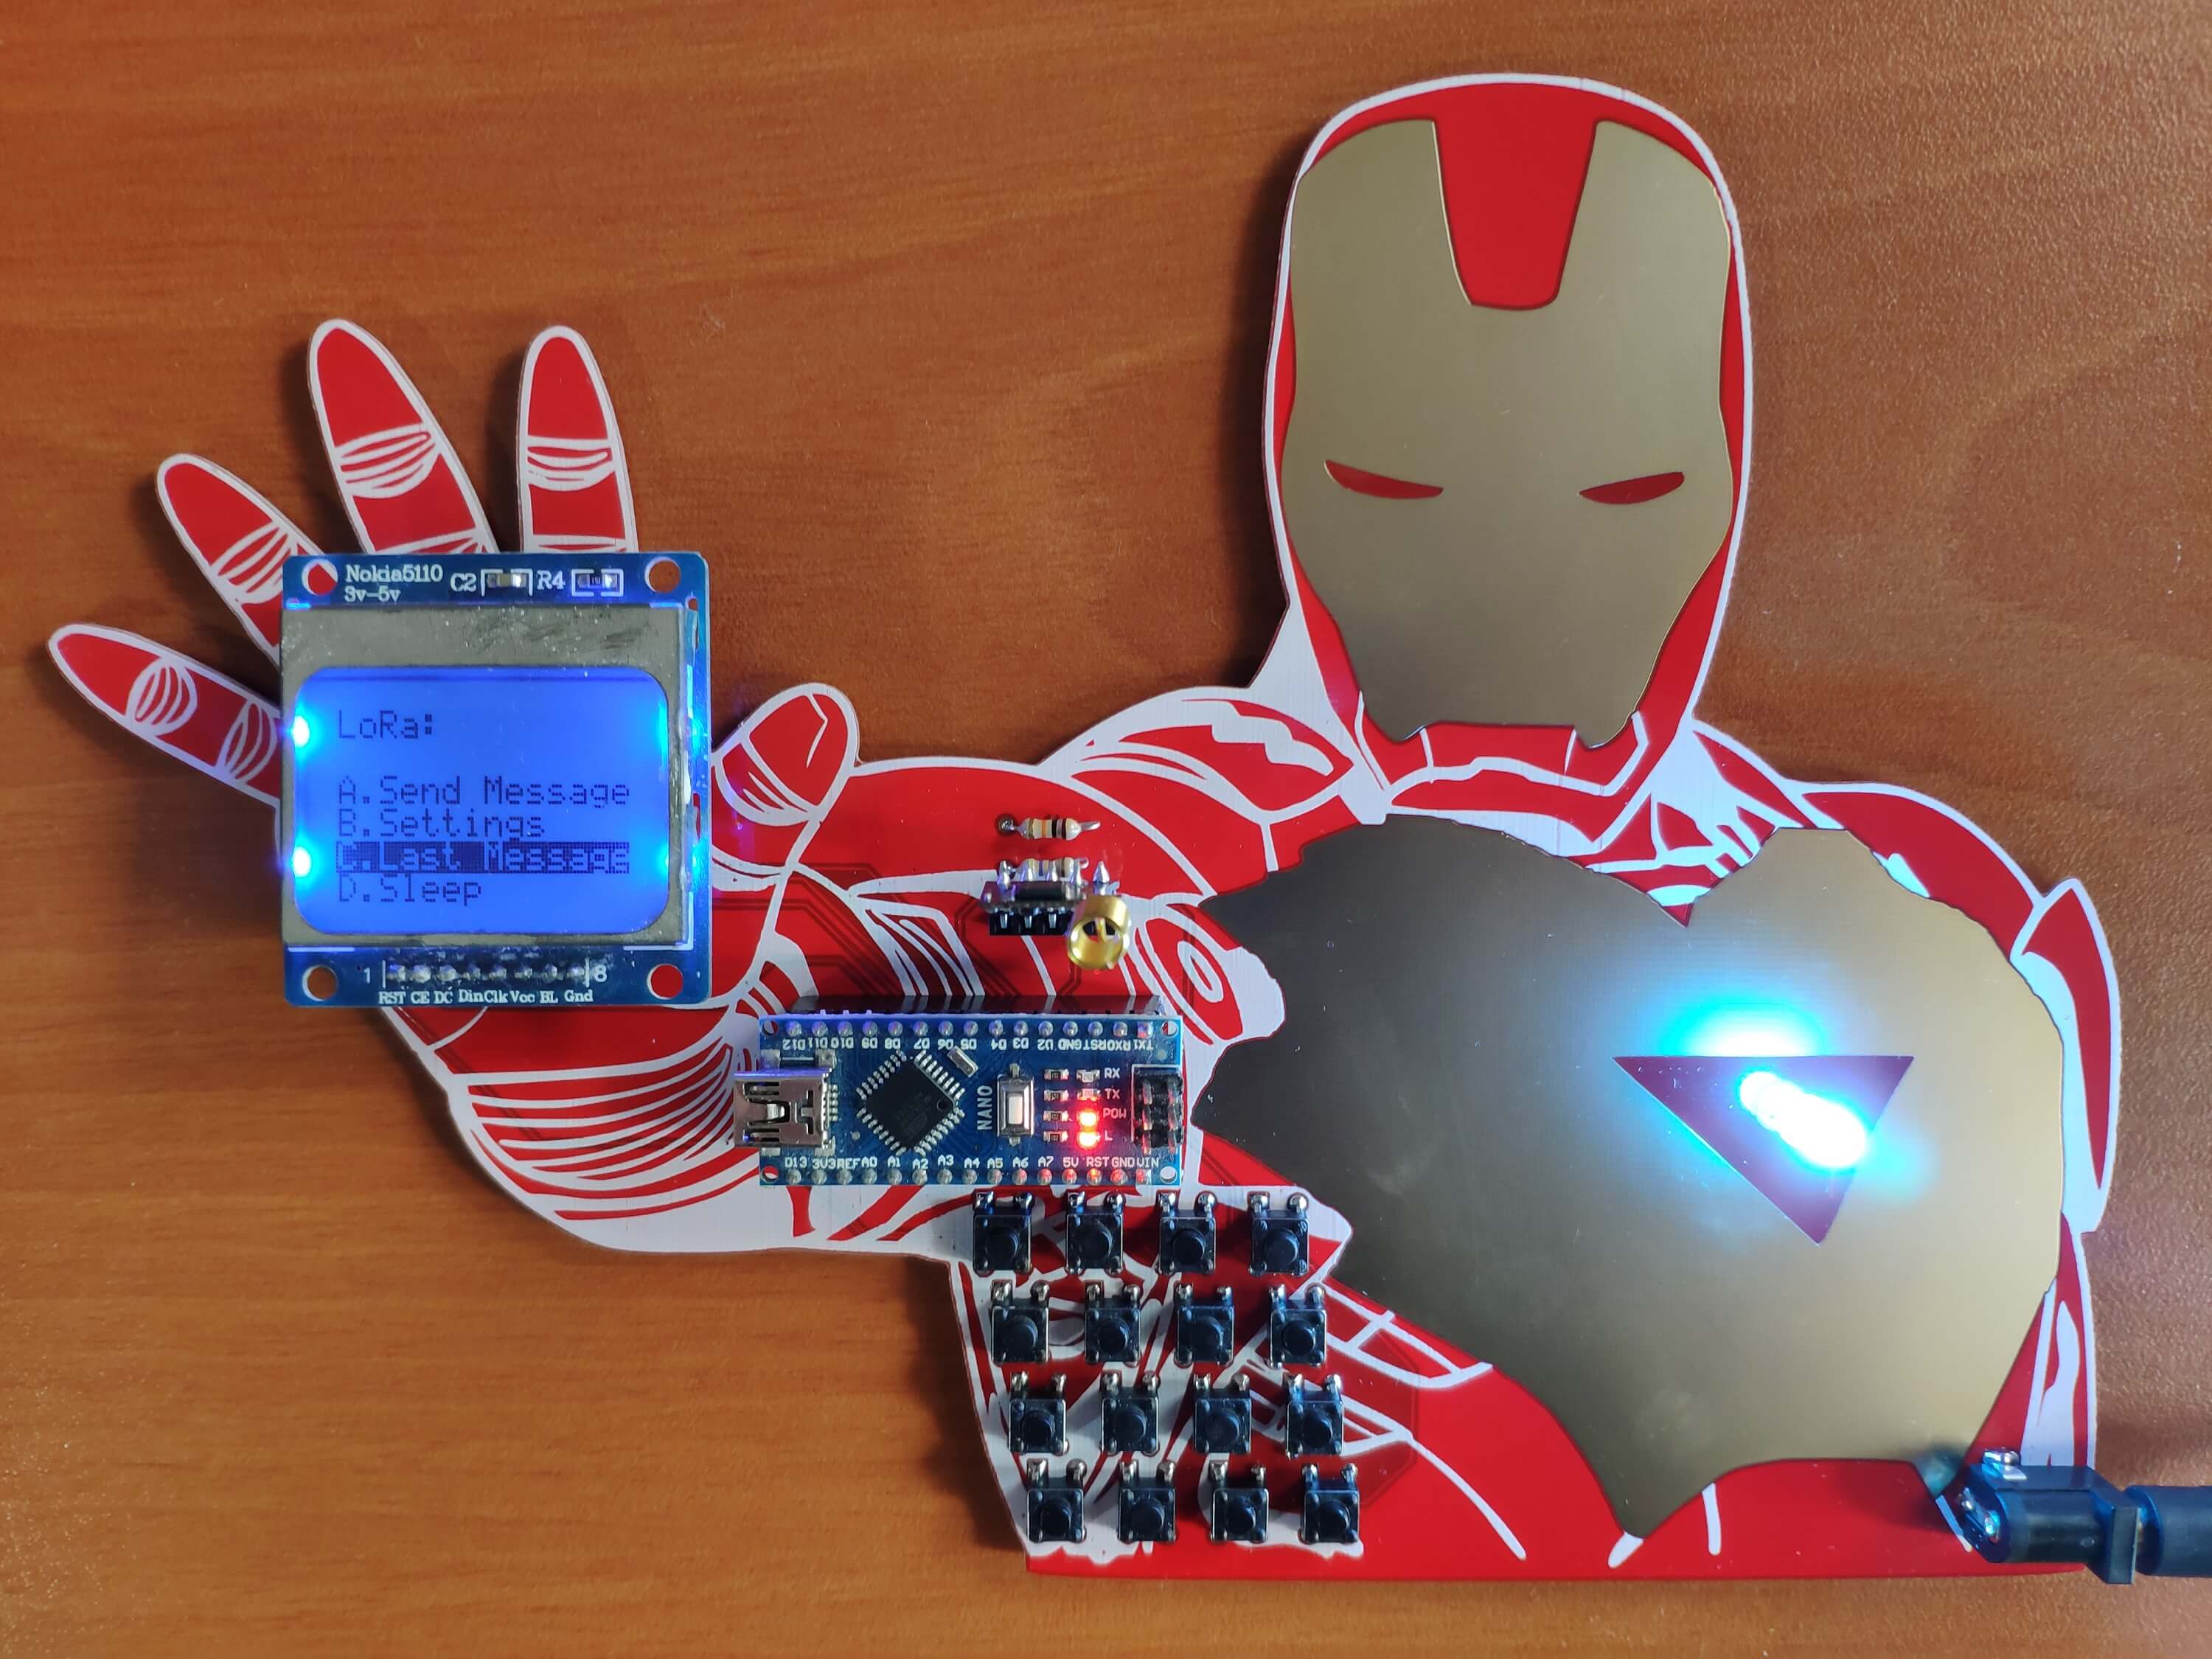
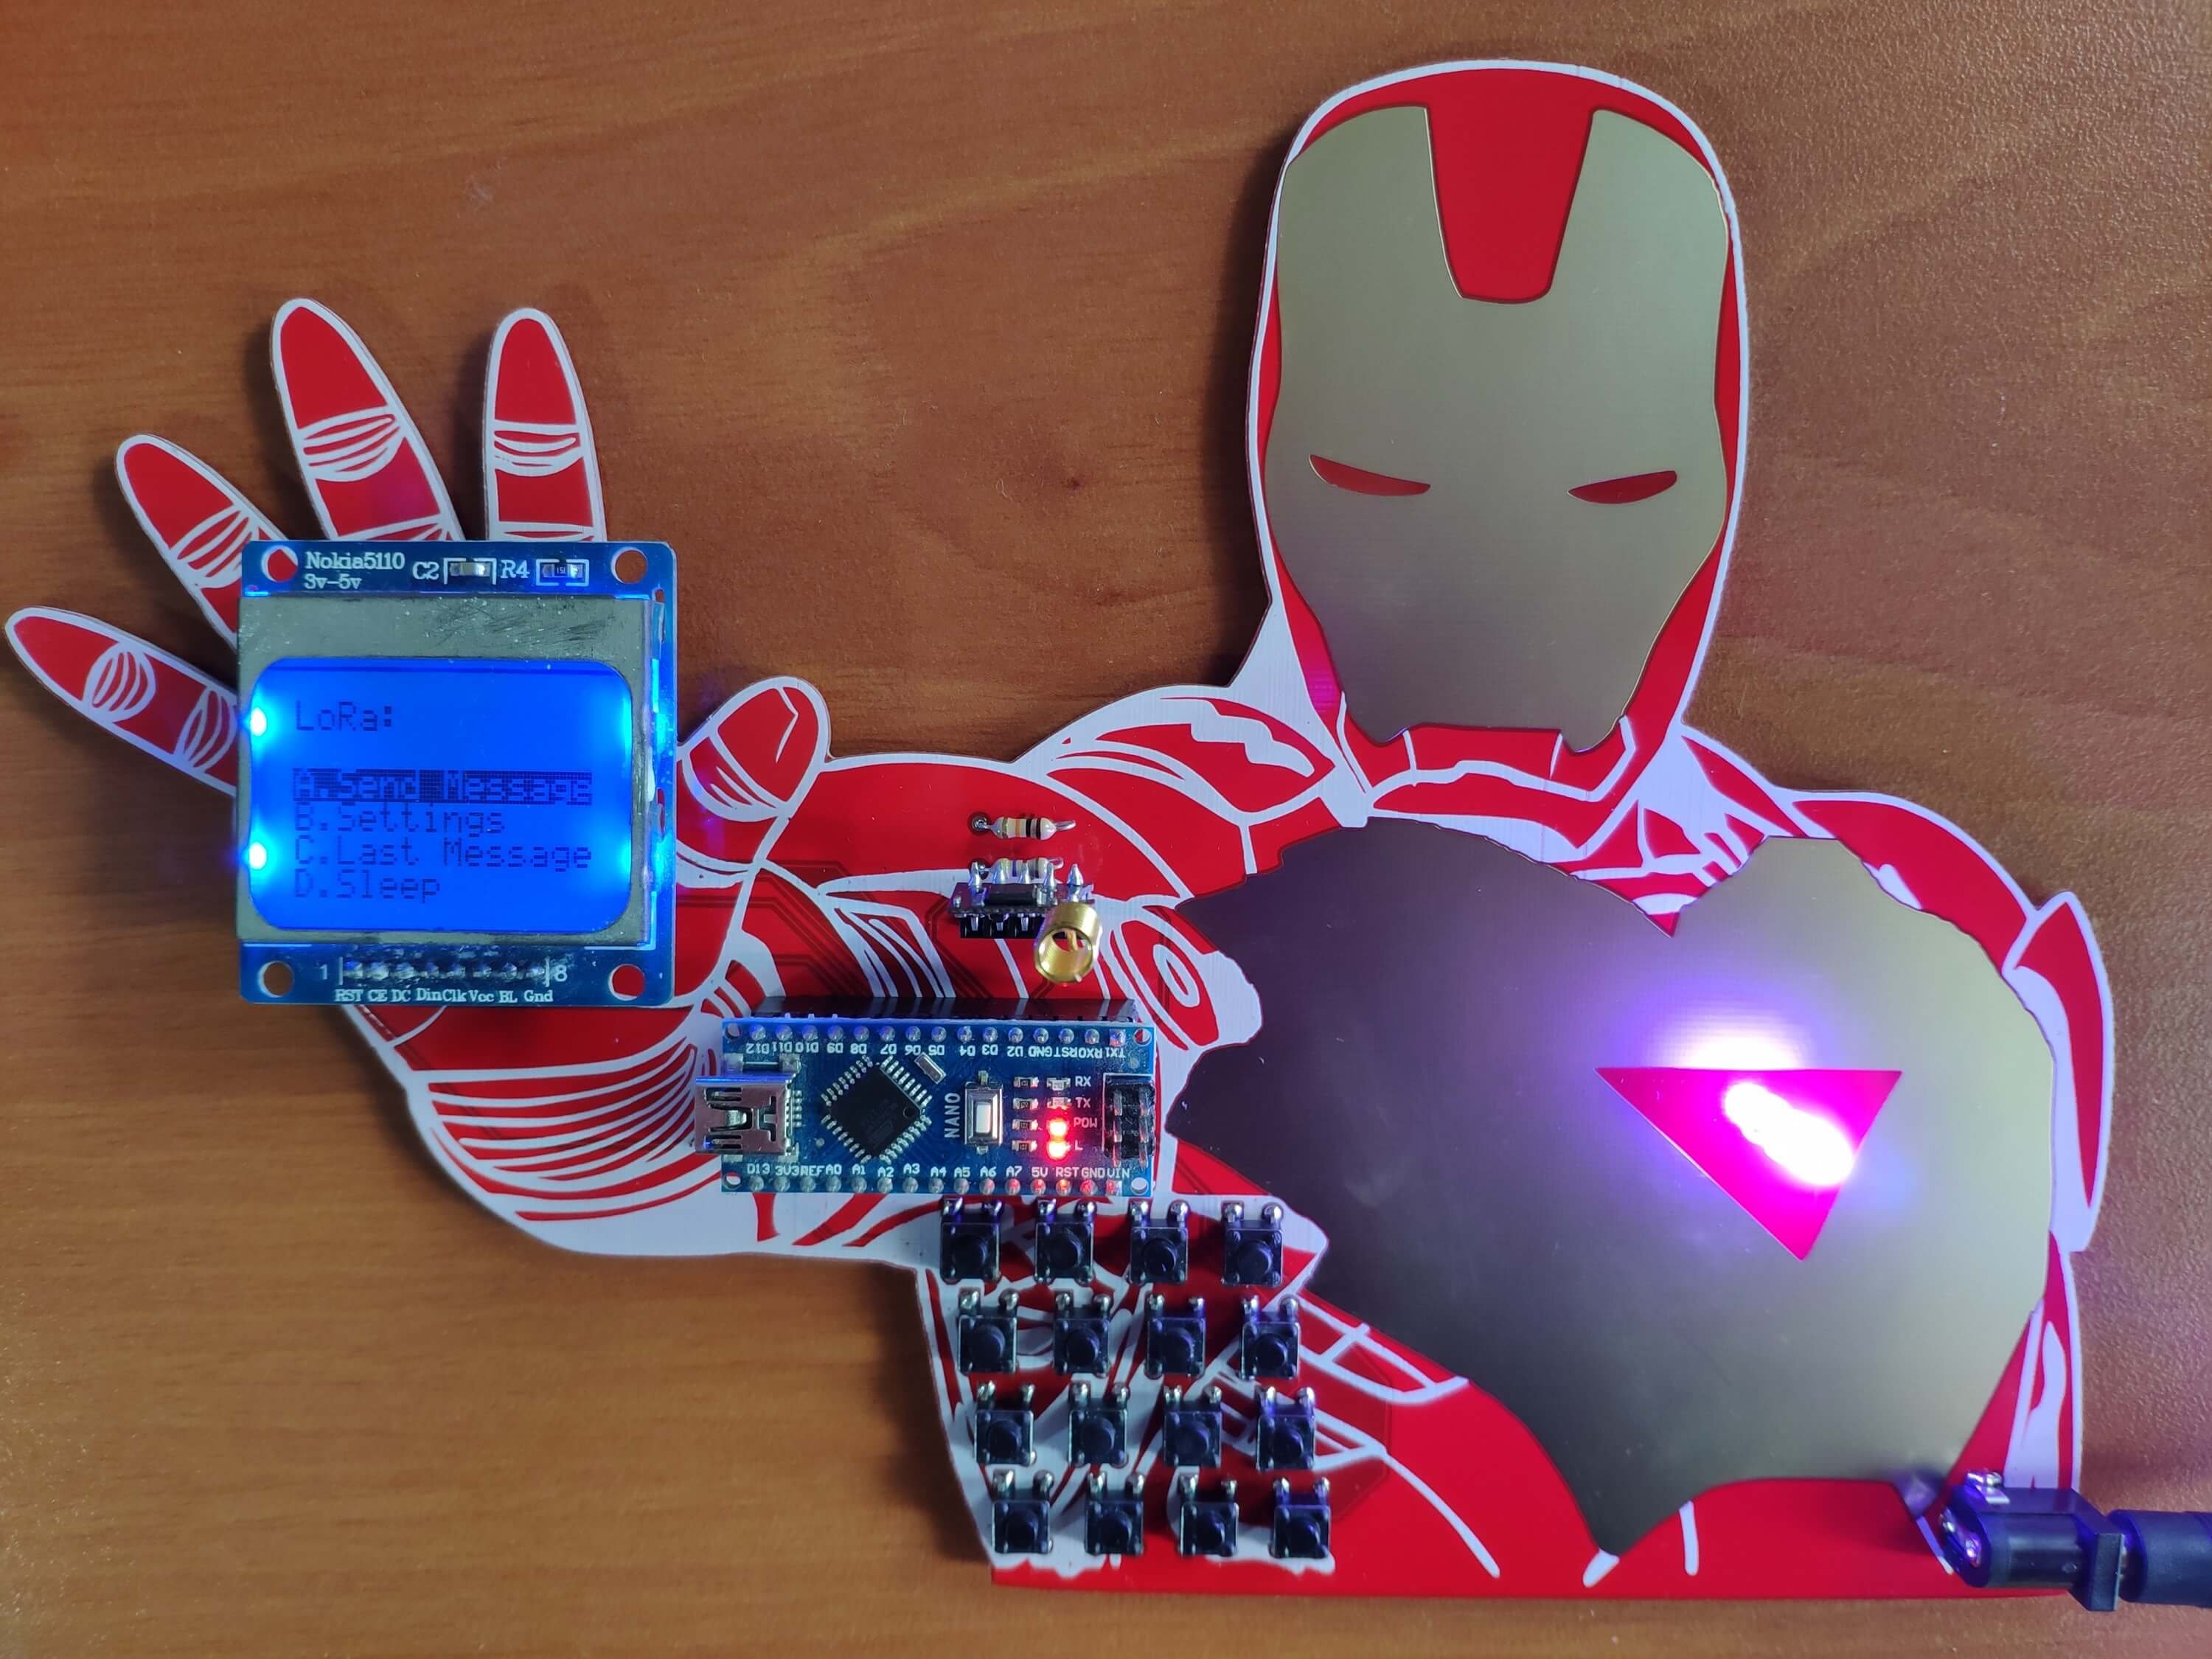
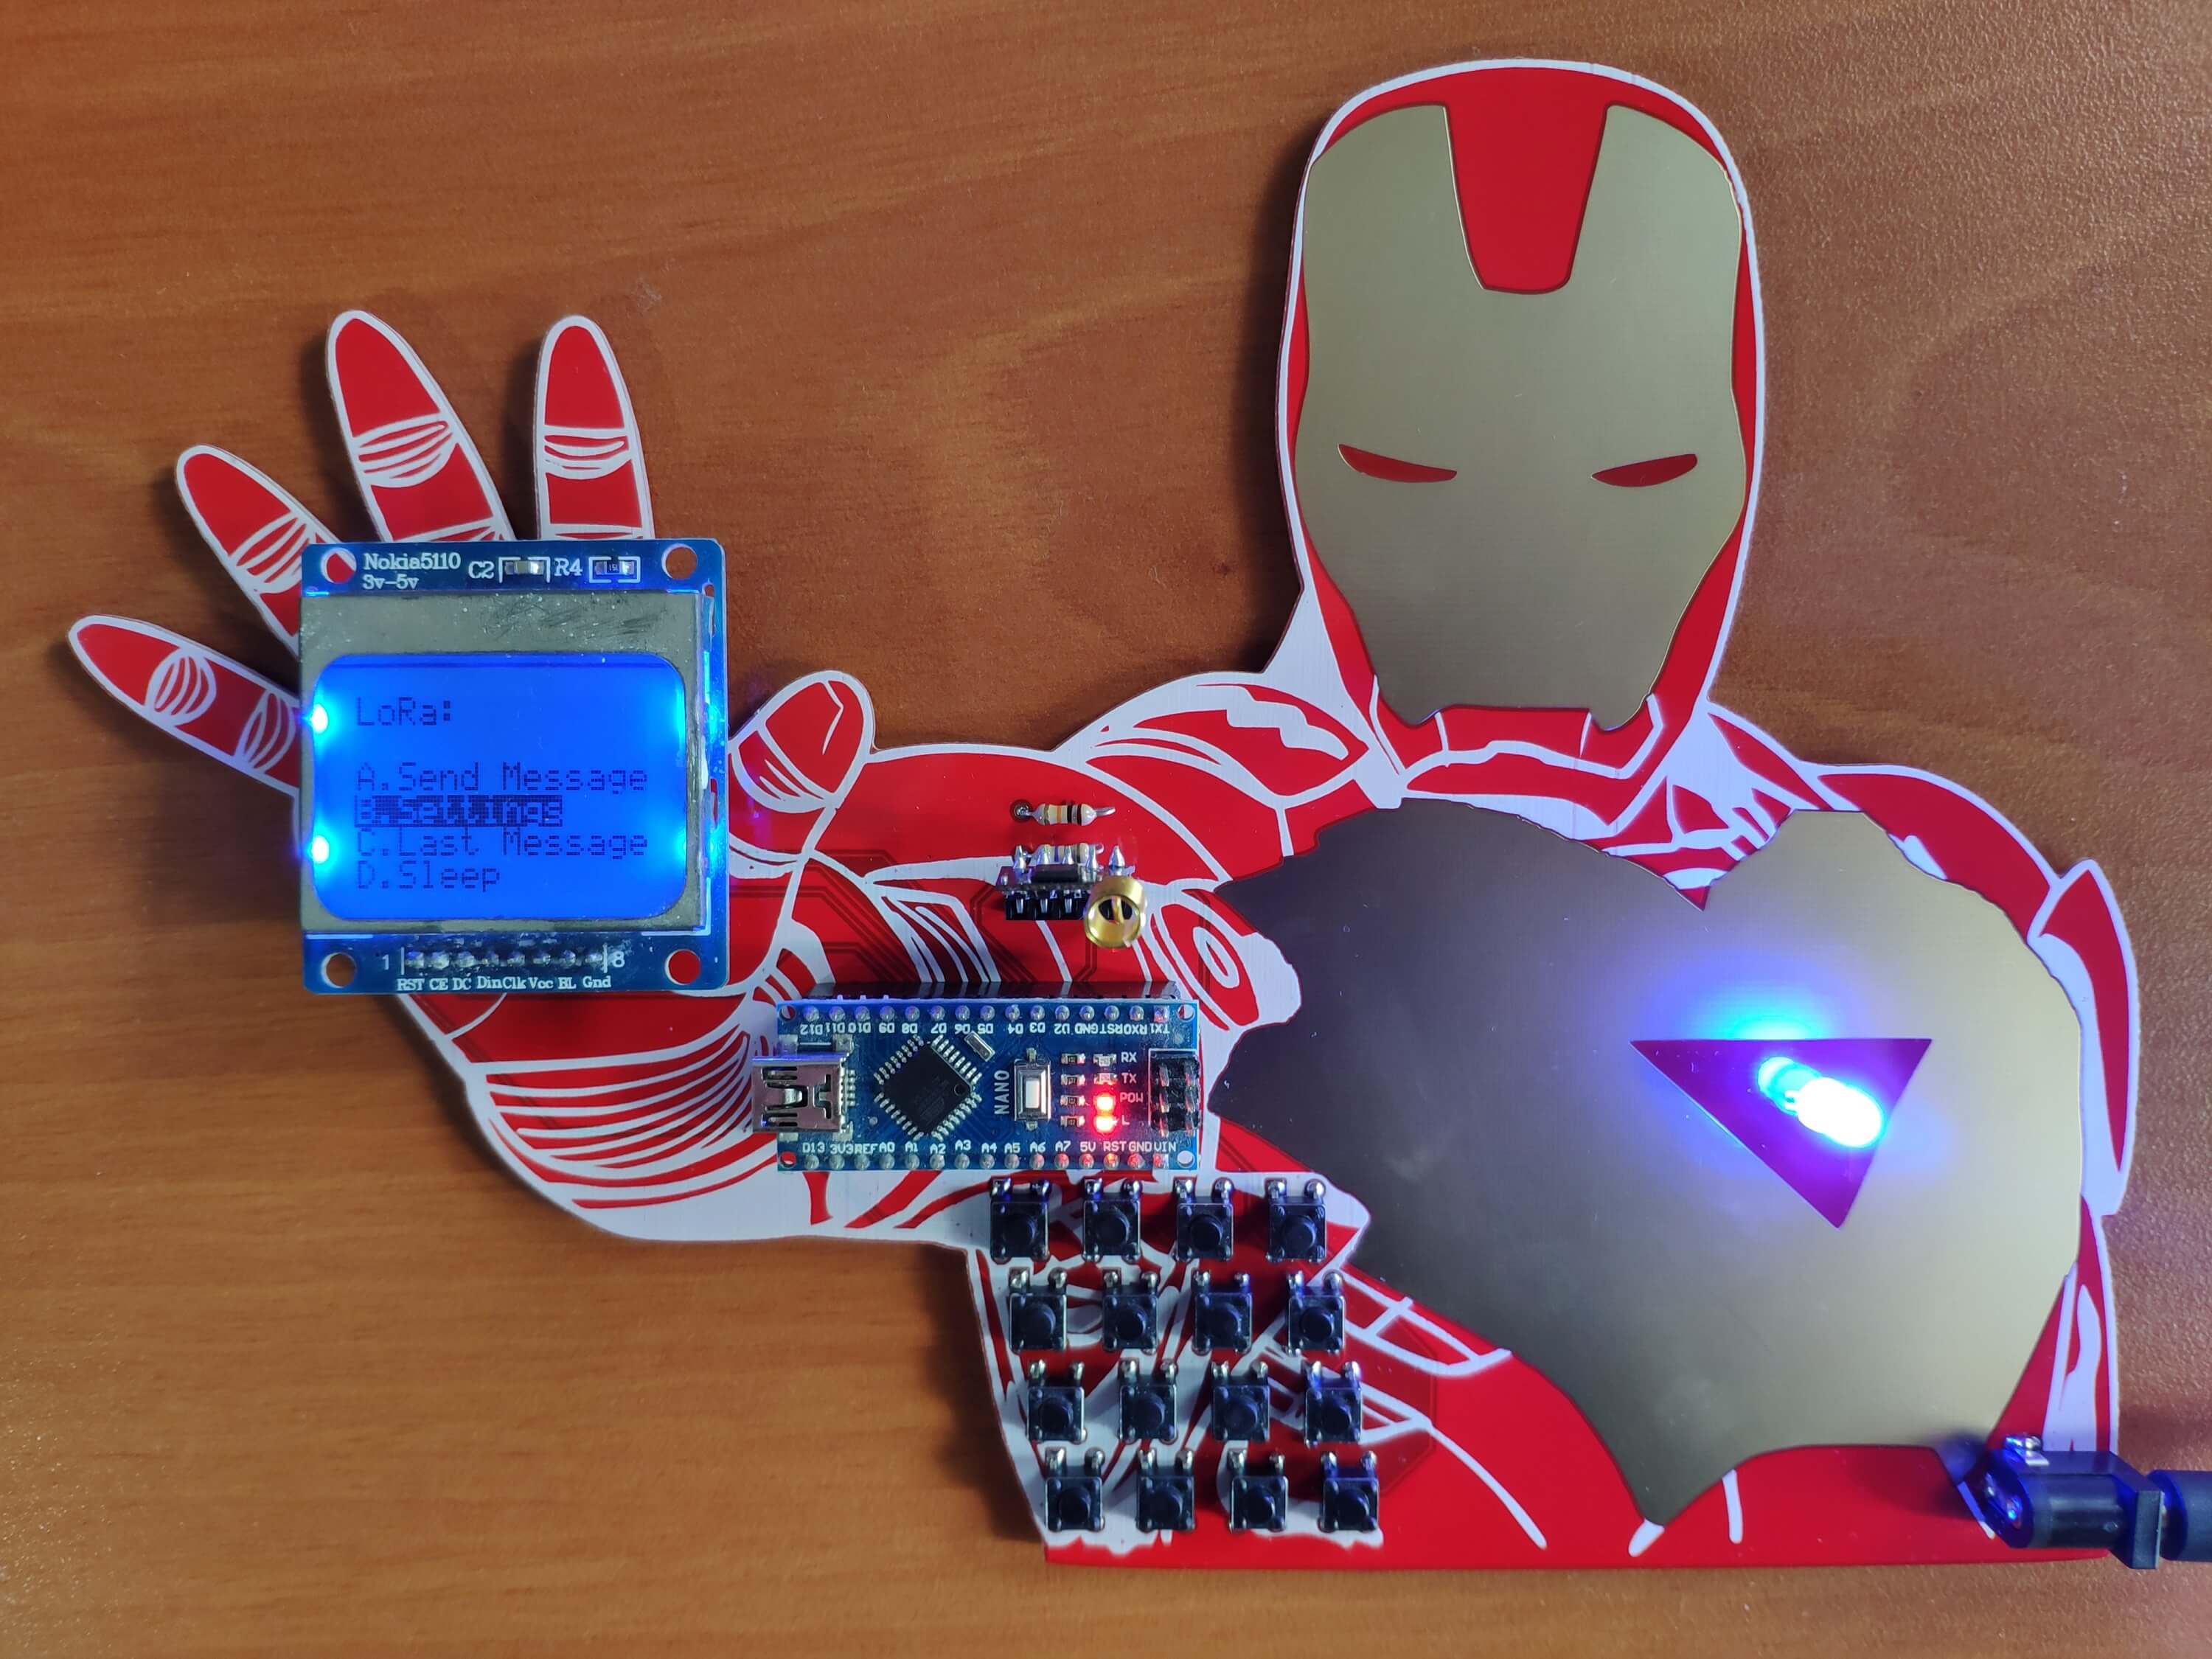
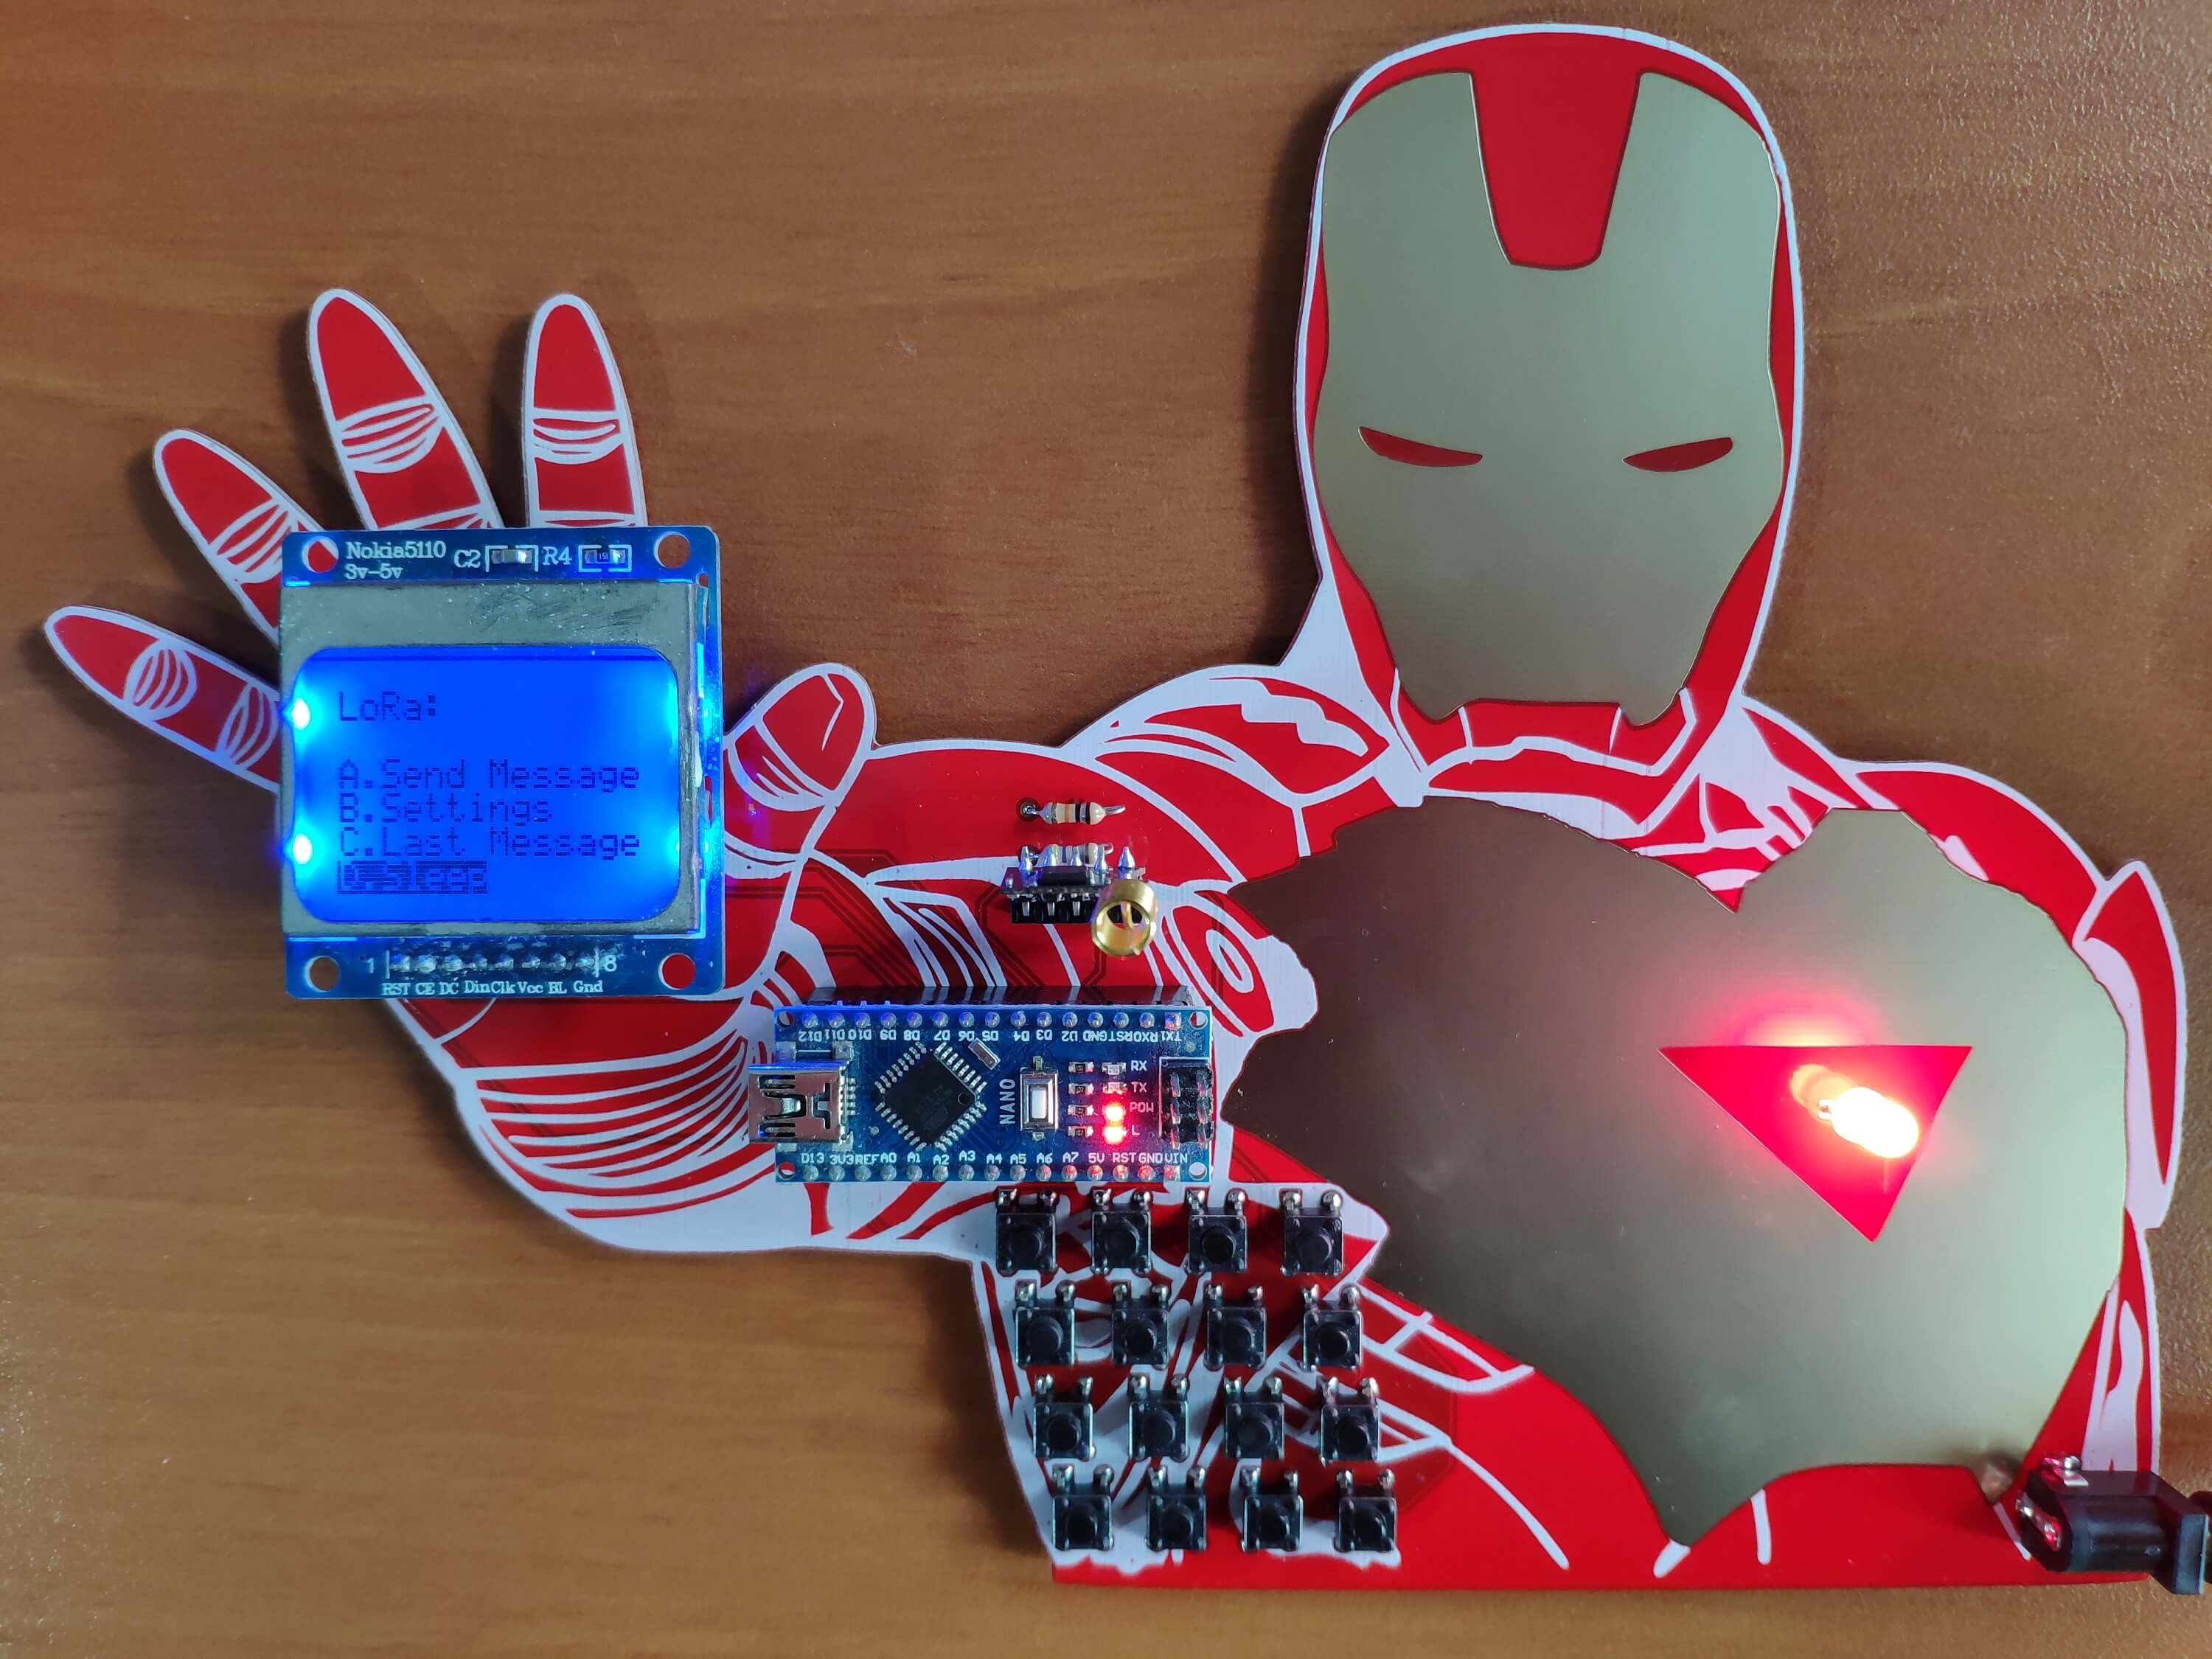
Modes and Features
📻📞 The device shows four different modes (menu options) on the interface:
A. Send Message
B. Settings
C. Last Message
D. Sleep
📻📞 The device allows the user to select a mode (option) on the interface via the '-', '+', and '*' keypad buttons:
'-' ➡ Go Up
'+' ➡ Go Down
'*' ➡ Activate
📻📞 While selecting among modes on the interface, the device turns the RGB LED to different colors for each mode:
Send Message ➡ Purple
Settings ➡ Blue
Last Message ➡ Cyan
Sleep ➡ Red
Figure - 72.22
📻📞 After activating any modes, the device lets the user return to the interface by pressing the '-' keypad button.
📌 Modes (Menu Options):
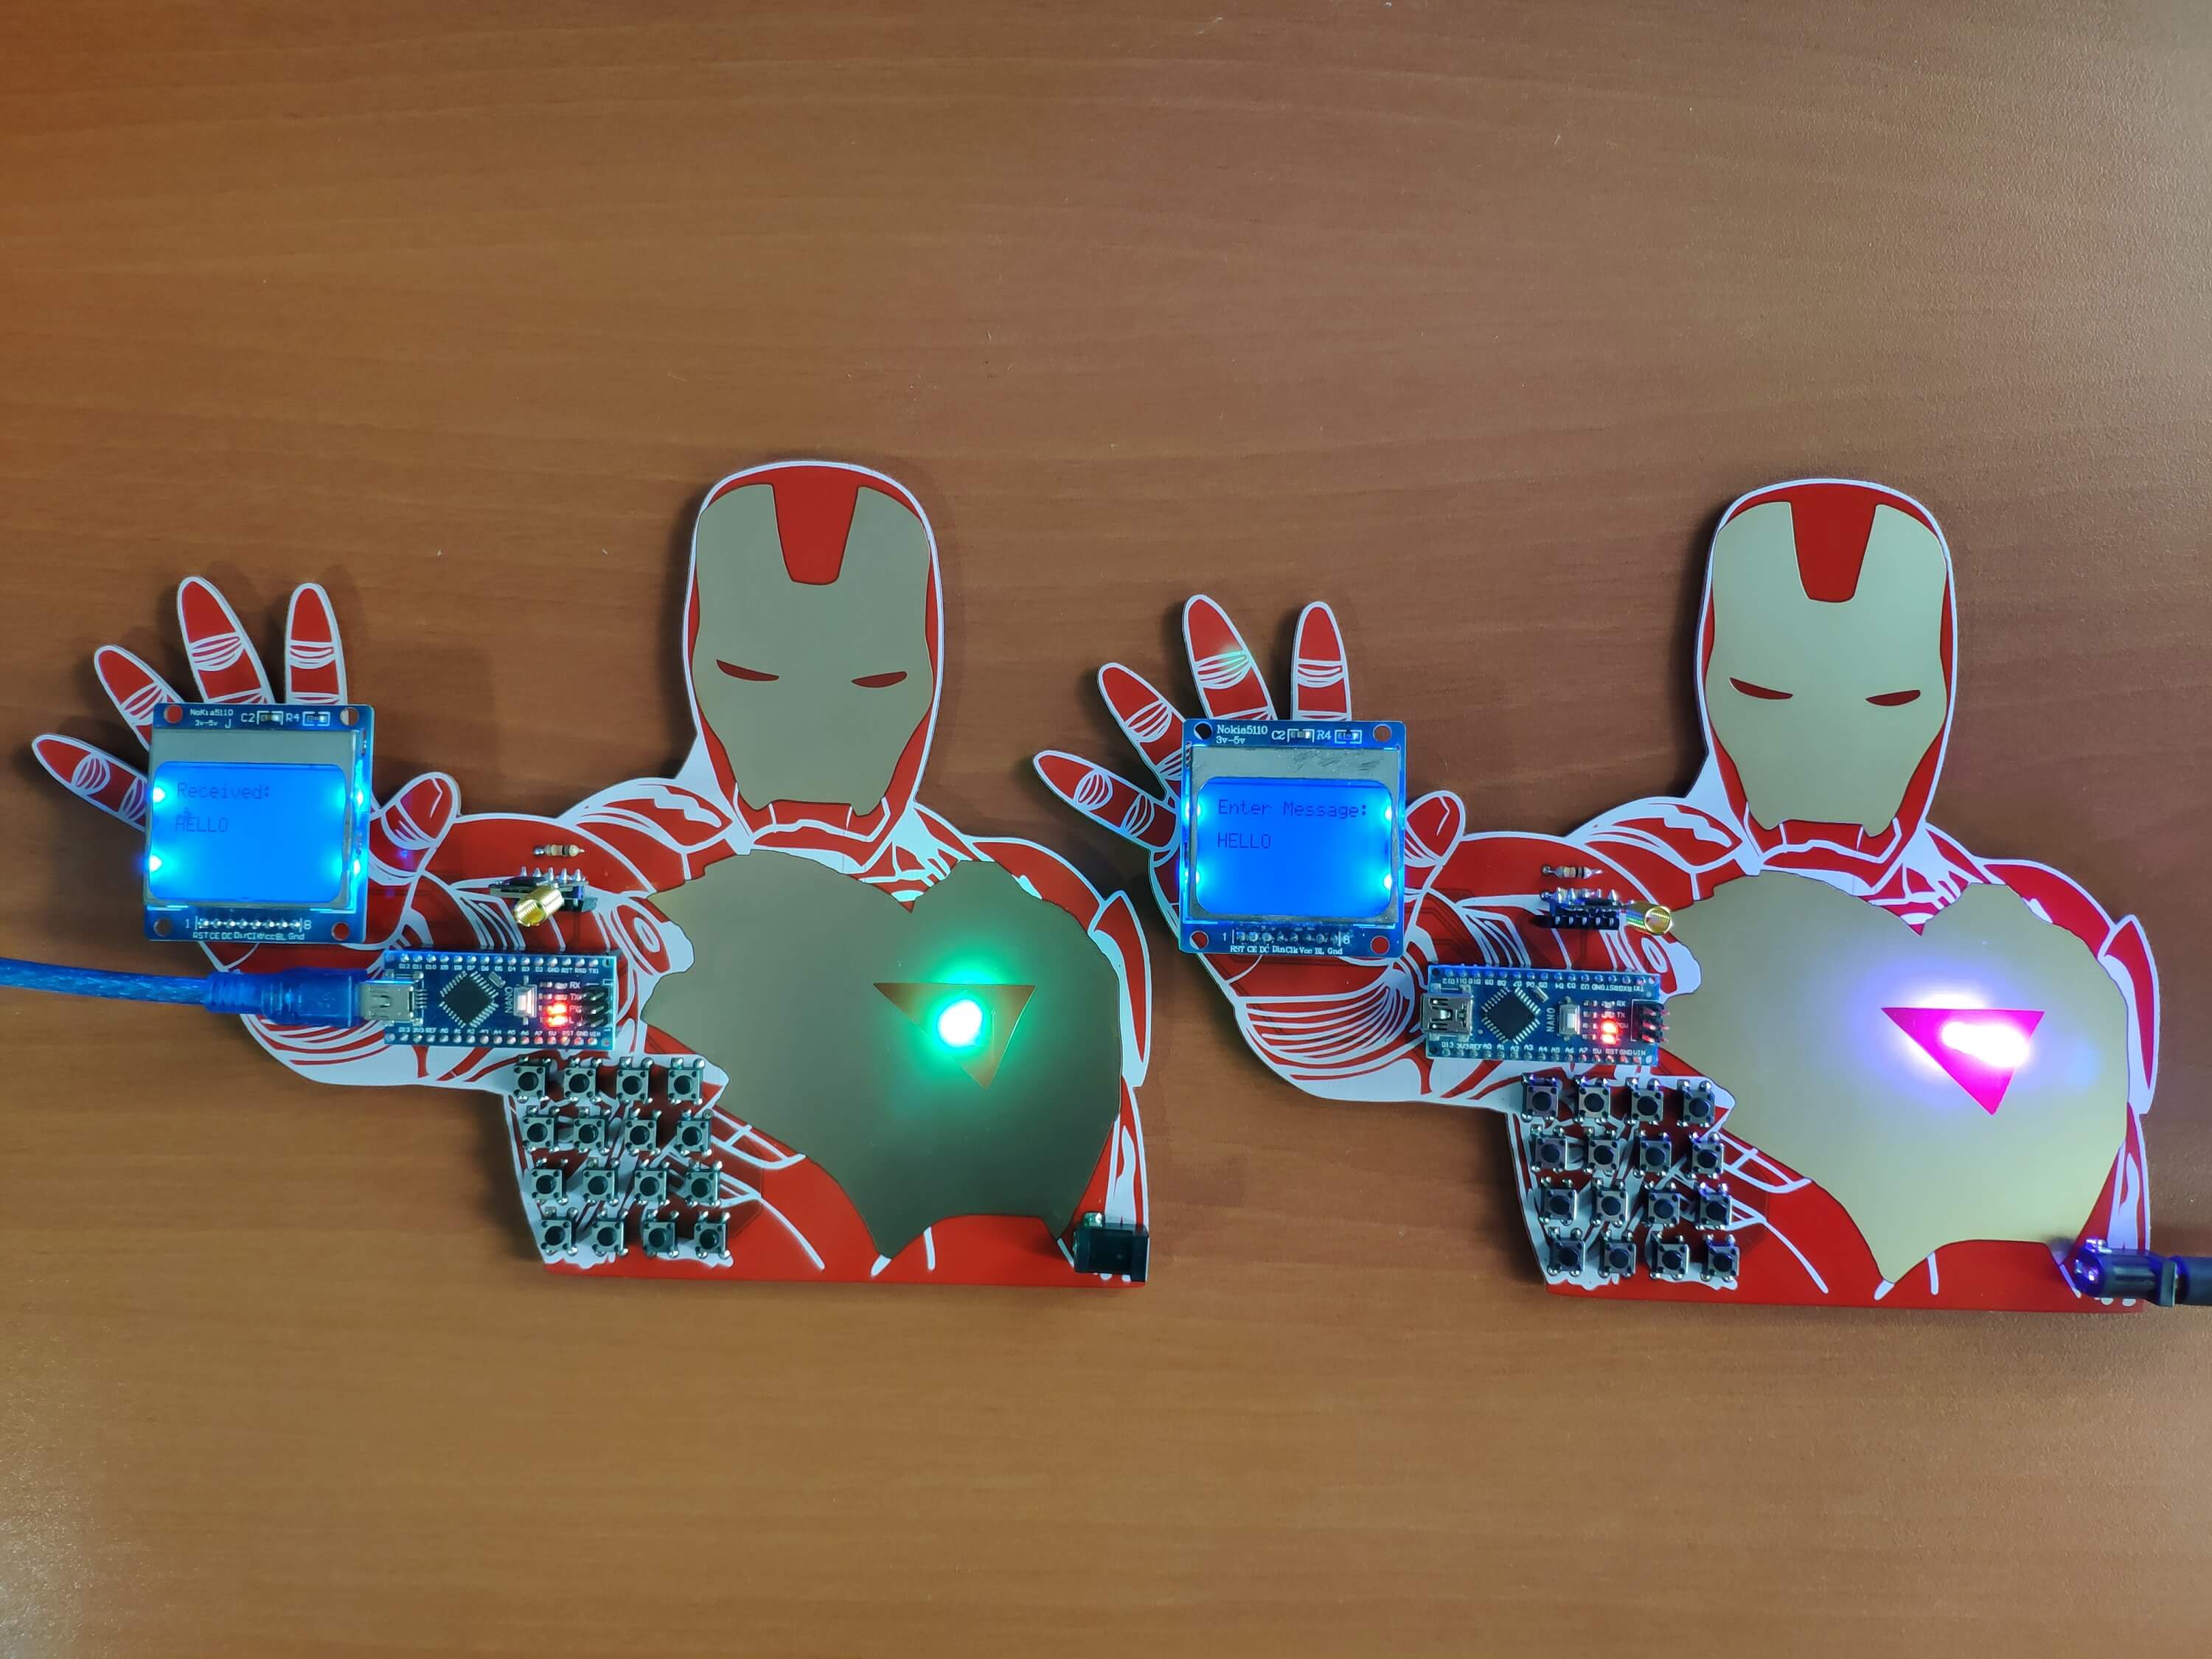
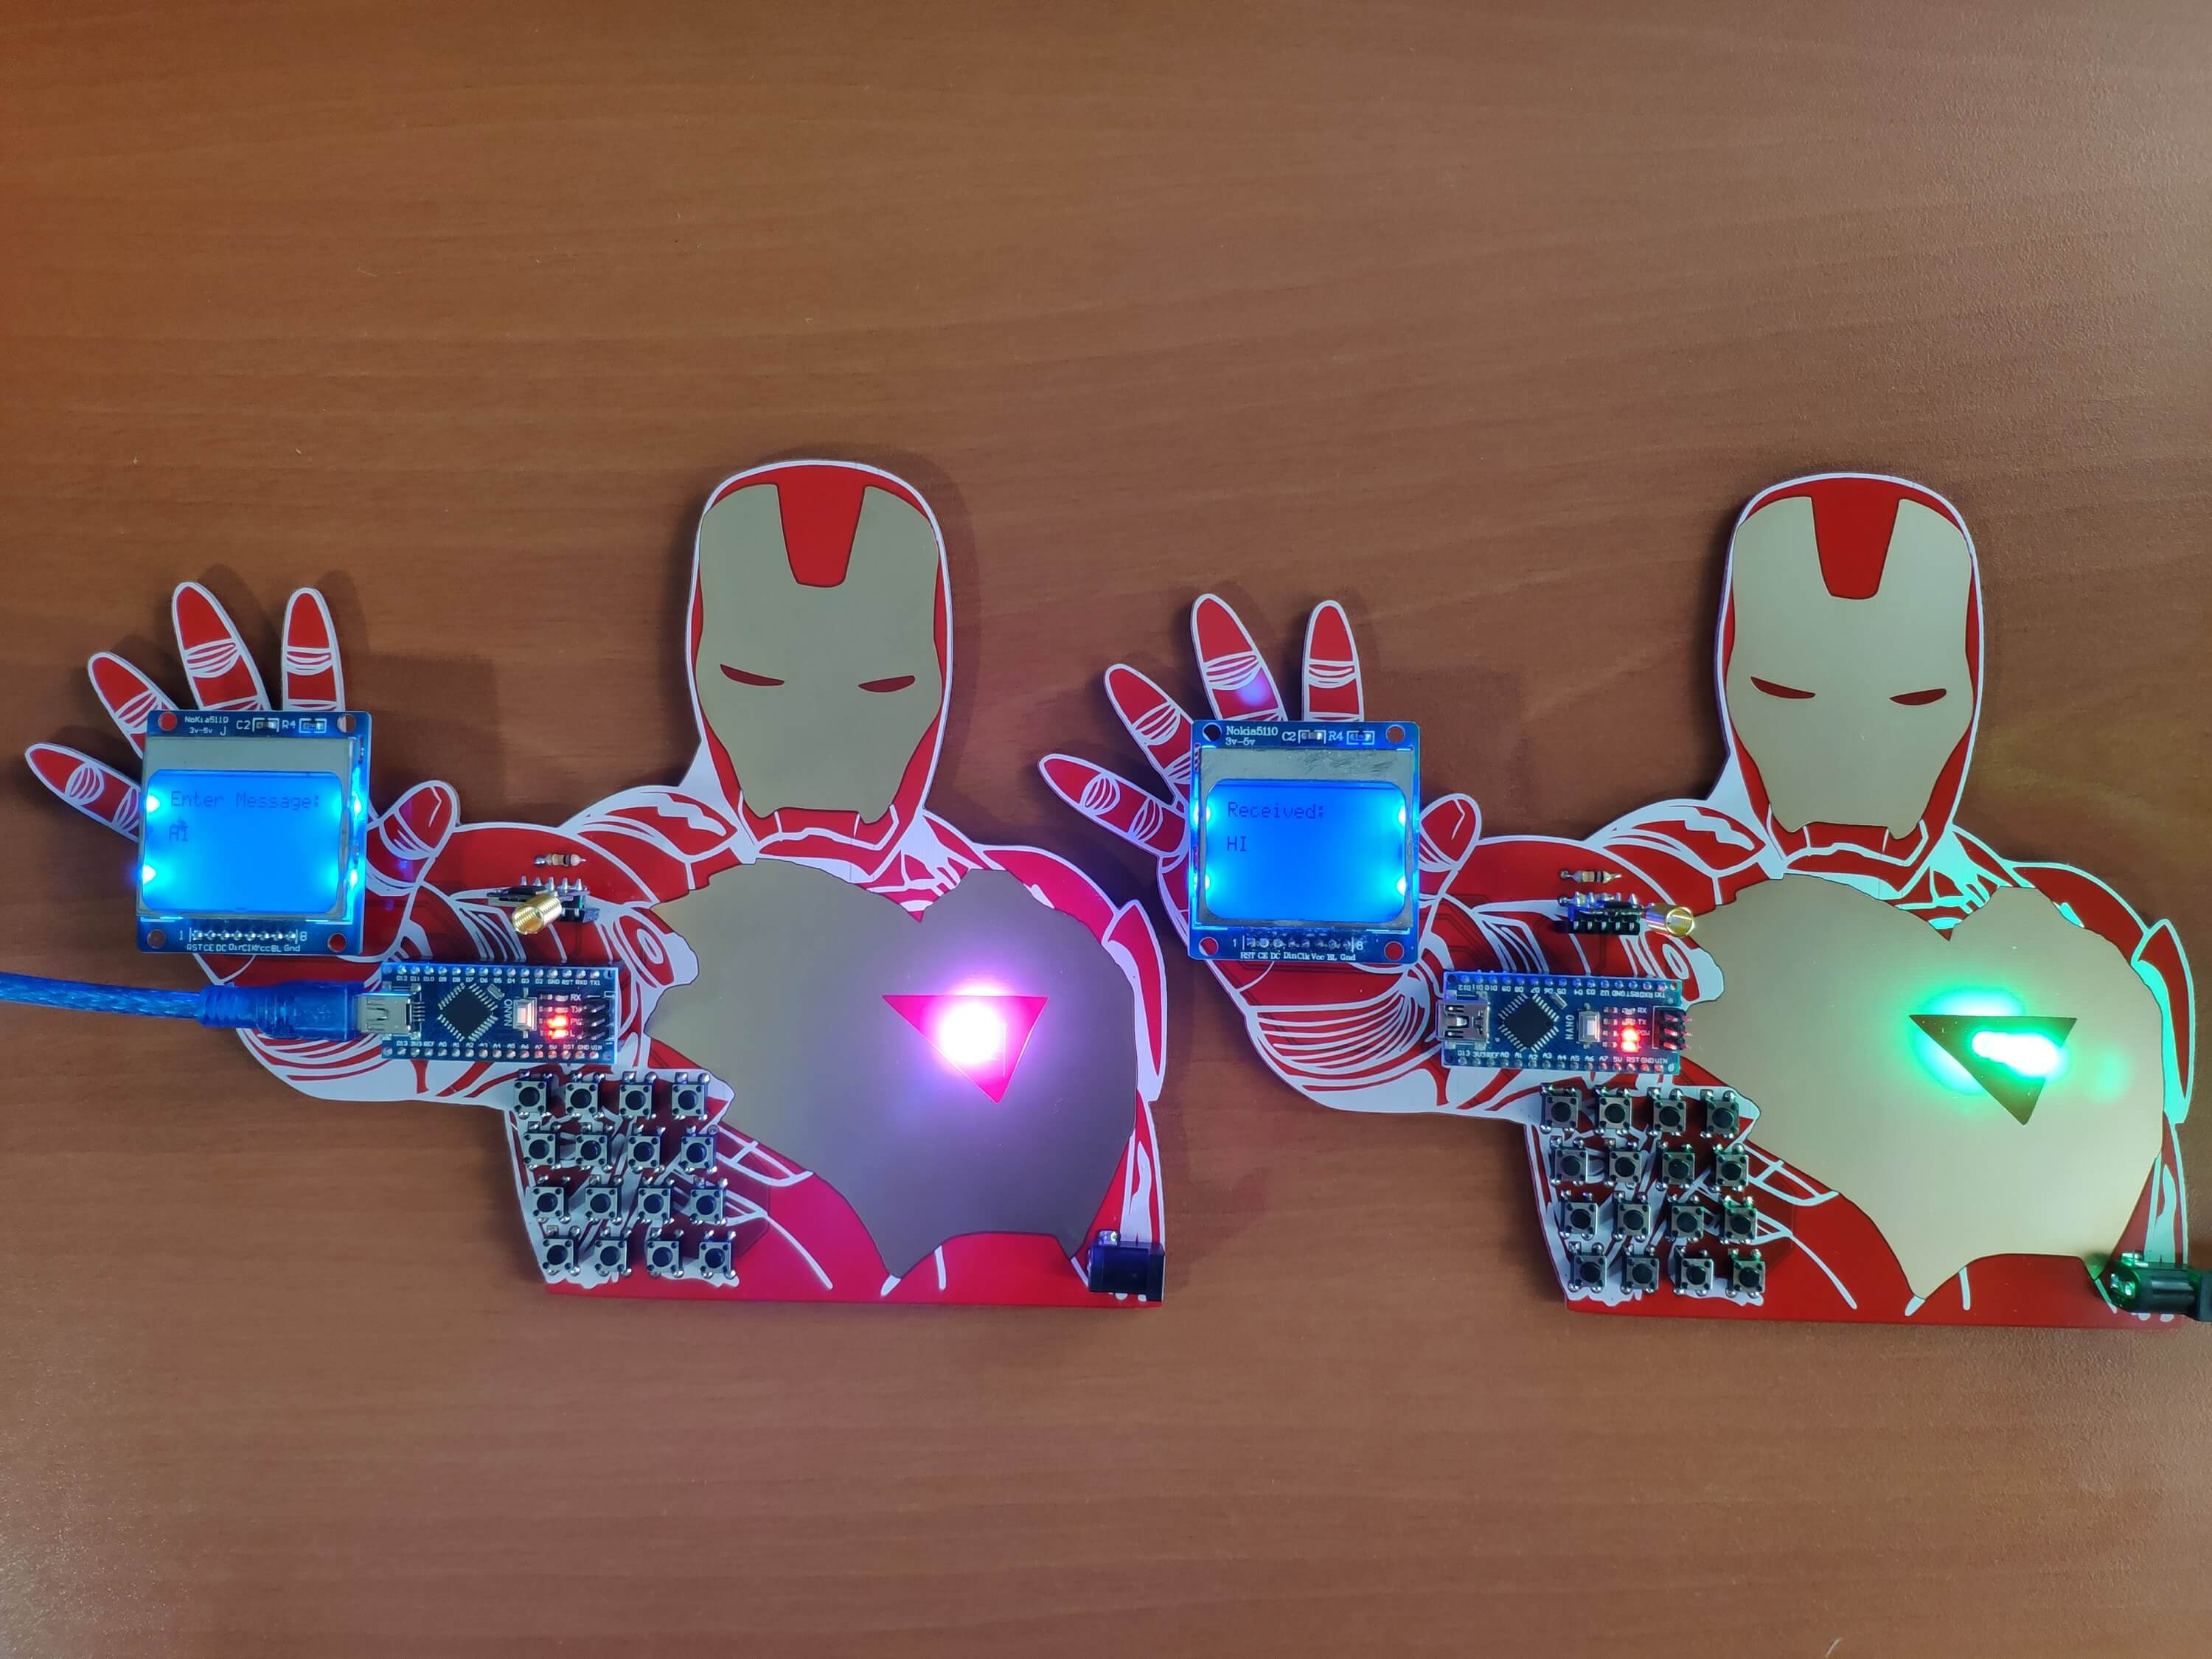
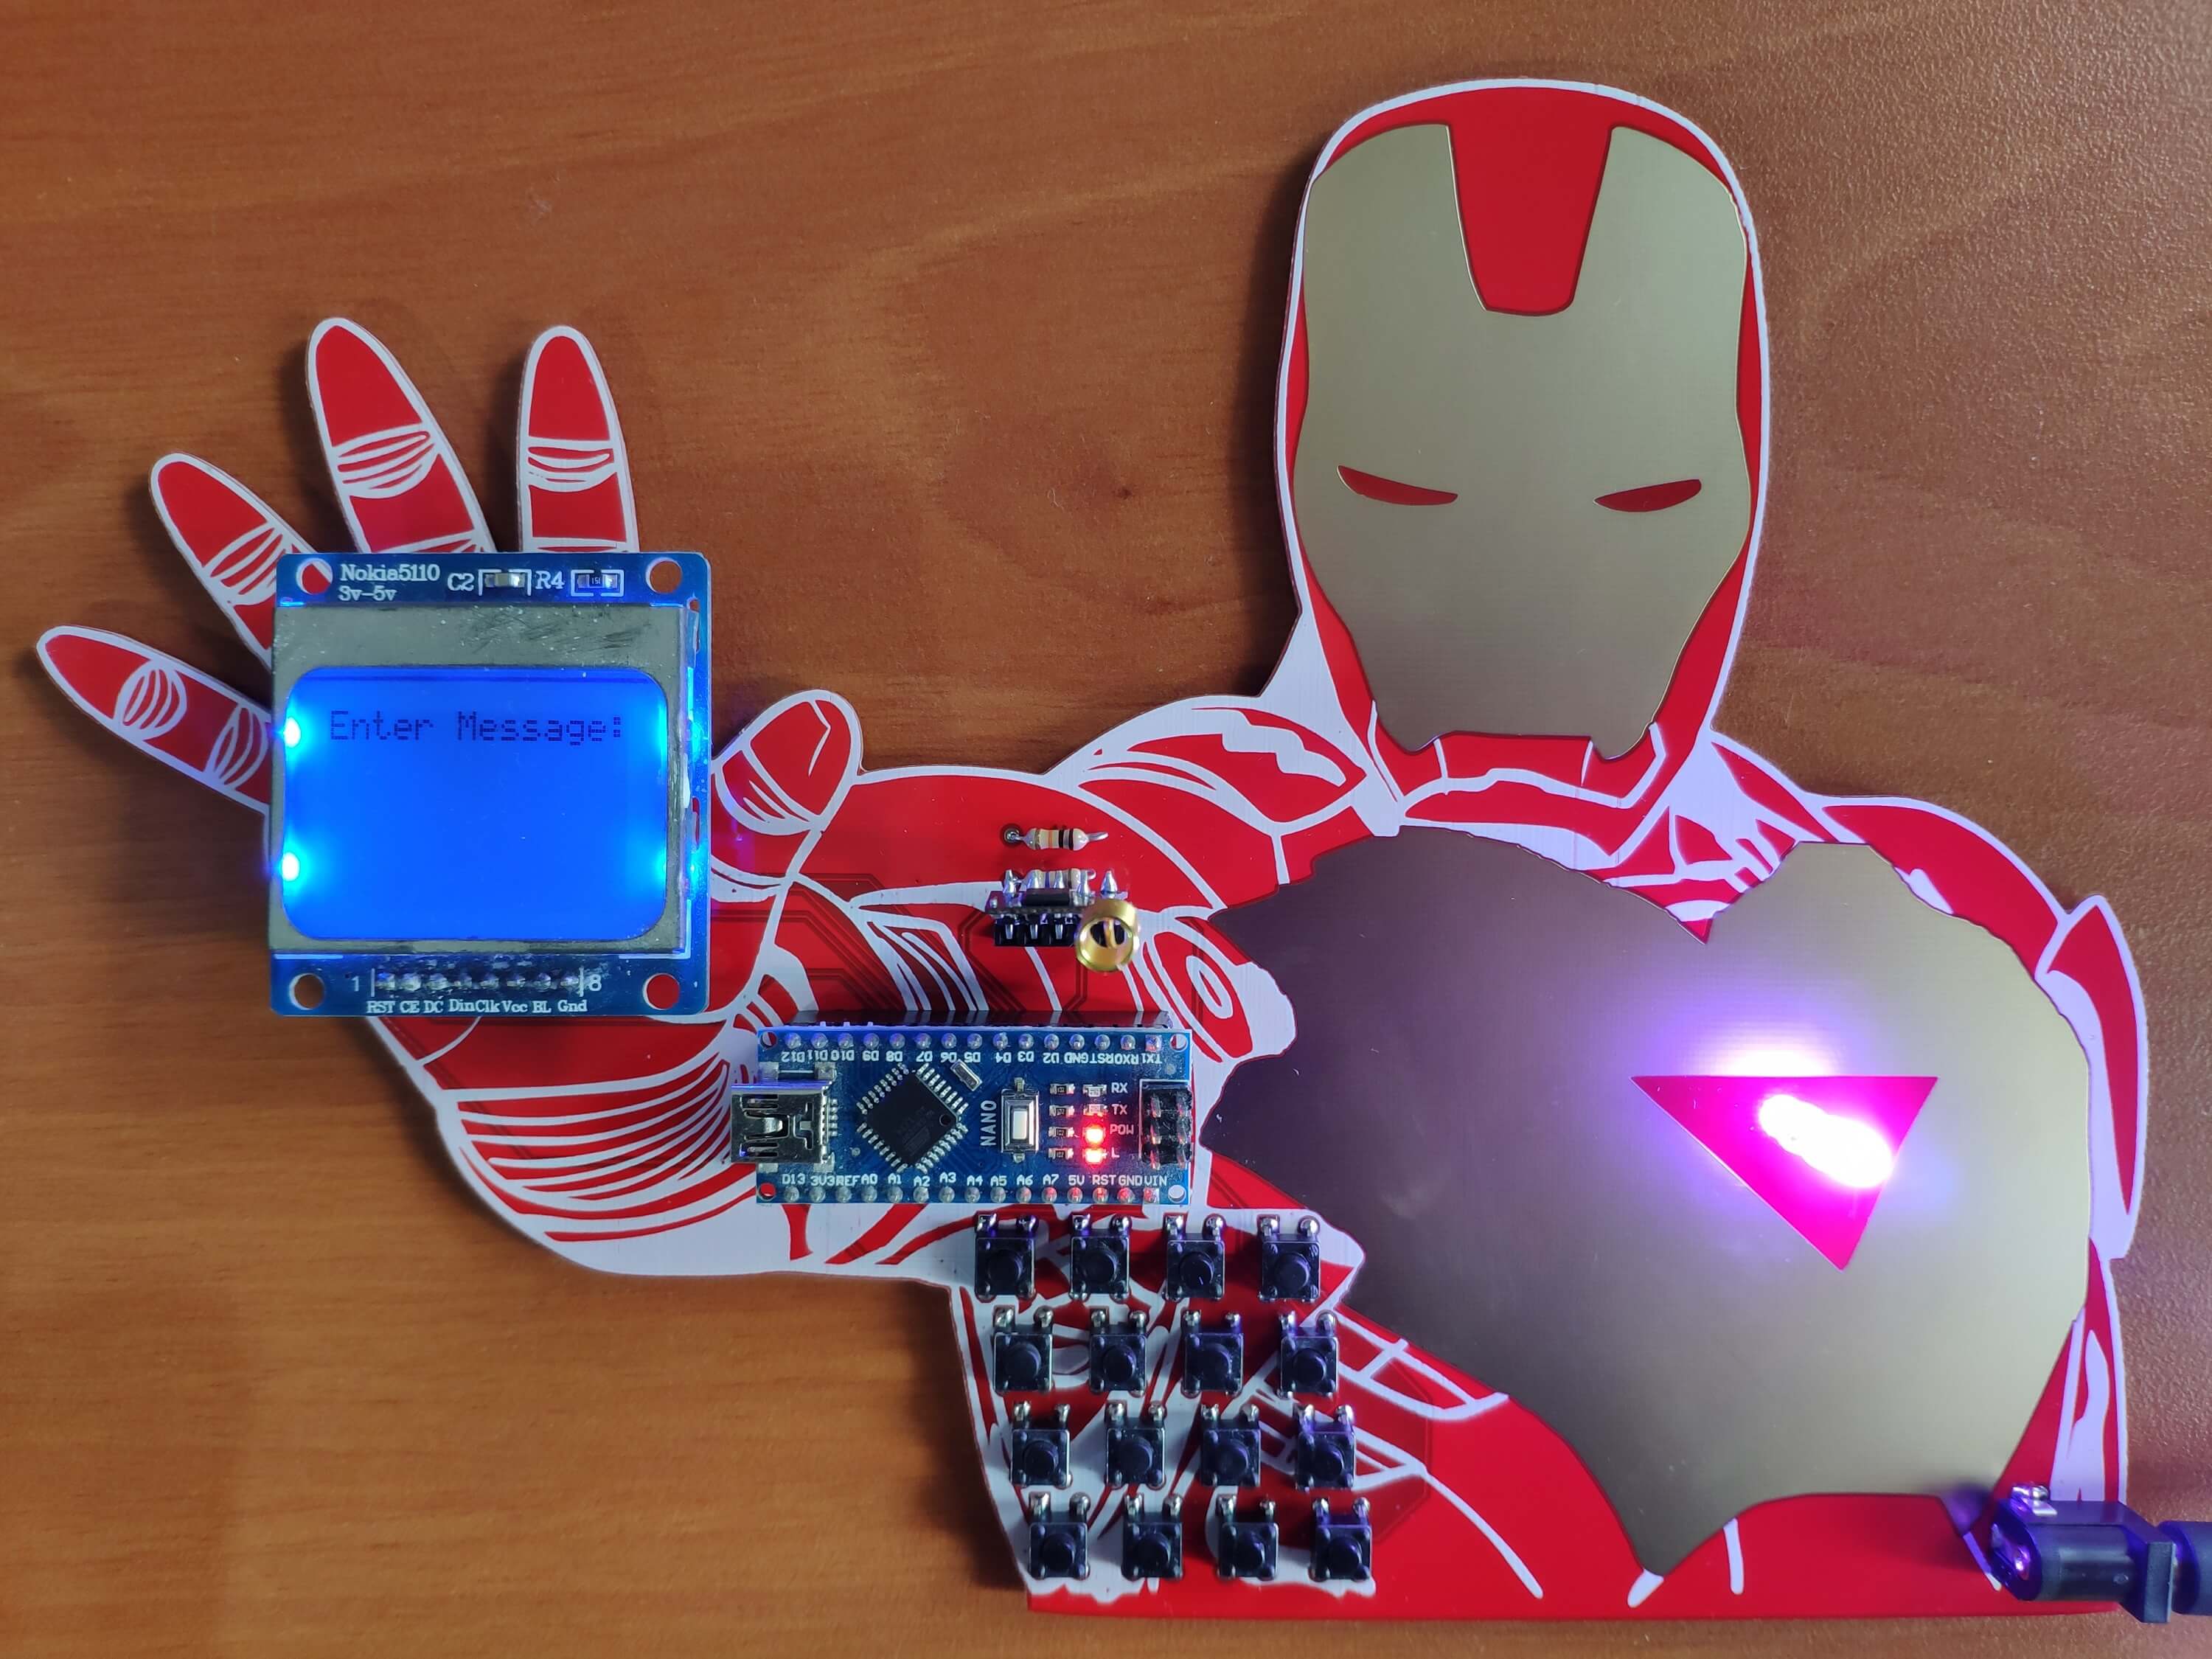
📌 A. Send Message
Figure - 72.23
📻📞 The device changes the 4x4 keypad pattern (symbols) with three different keymaps if the '+' keypad button is pressed:
🖥️ letters_1
'A','B','C','D'
'E','F','G','H'
'I','J','K','L'
'#','-','*','+'
🖥️ letters_2
'M','N','O','P'
'Q','R','S','T'
'U','V','W','X'
'#','-','*','+'
🖥️ numbers
'Y','Z','1','2'
'3','4','5','6'
'7','8','9','0'
'#','-','*','+'
Figure - 72.24
Figure - 72.25
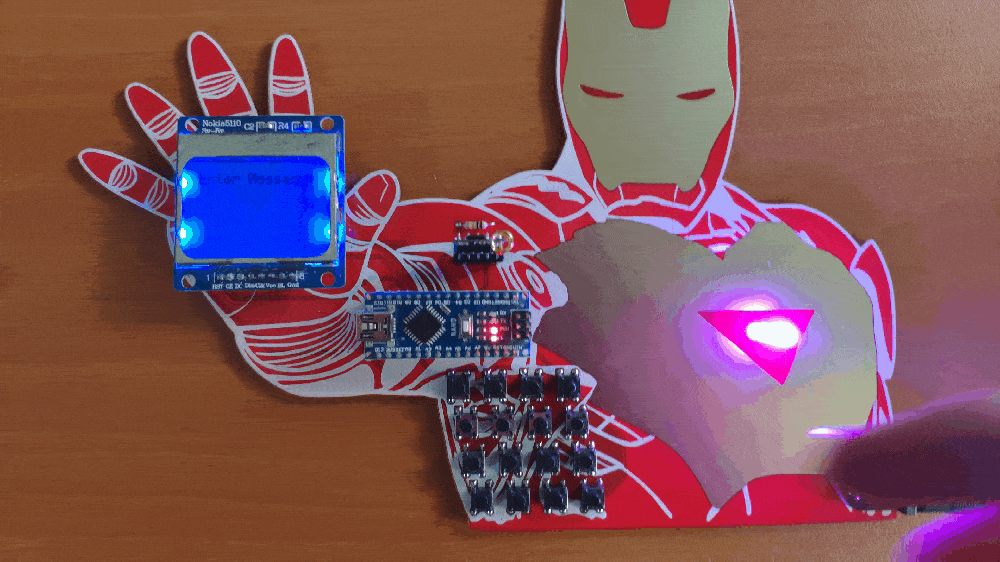
📻📞 After entering the message, the device lets the user scroll the entered message by pressing the '#' keypad button.
Figure - 72.26
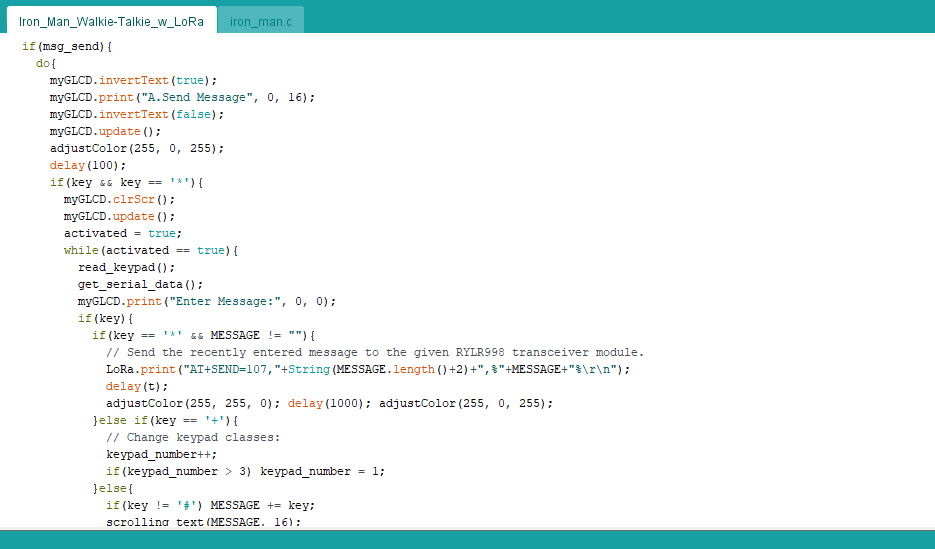
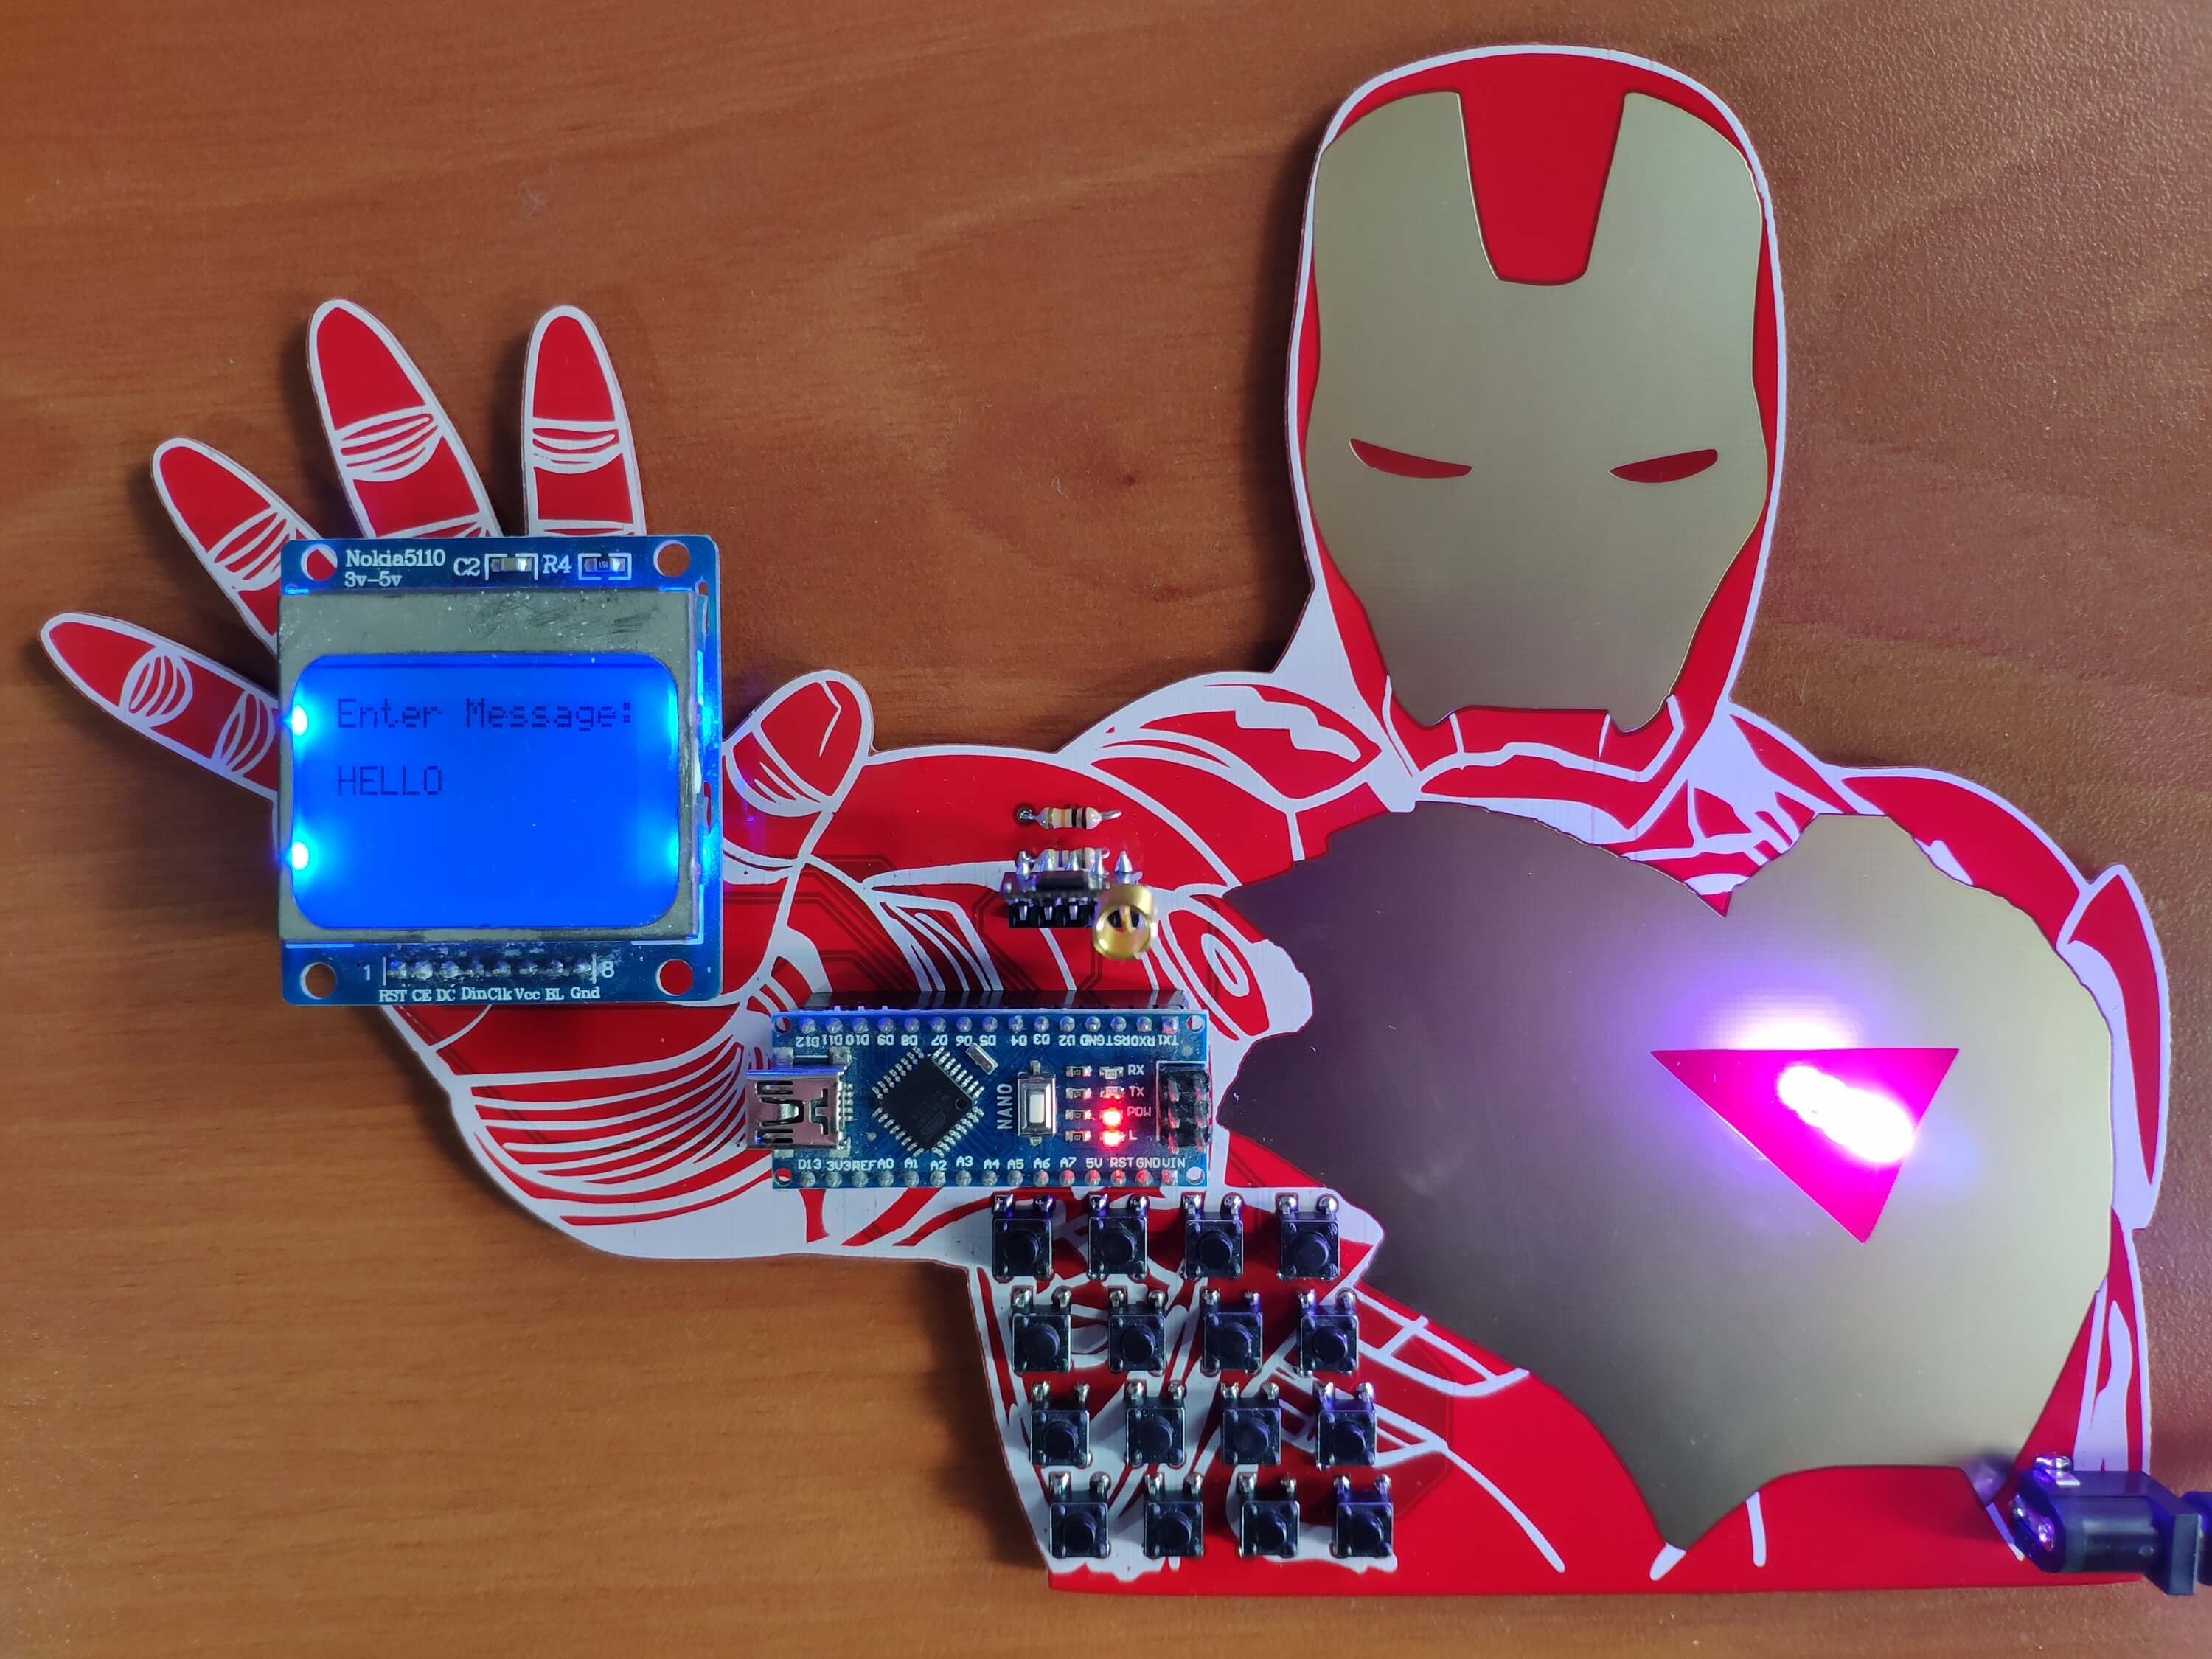
📻📞 The device transmits the recently entered message to the receiver Iron Man-themed walkie-talkie (two-way radio) if the '*' keypad button is pressed.
📻📞 If the given message is transmitted successfully to the receiver module, then the device makes the RGB LED blink yellow.
Figure - 72.27
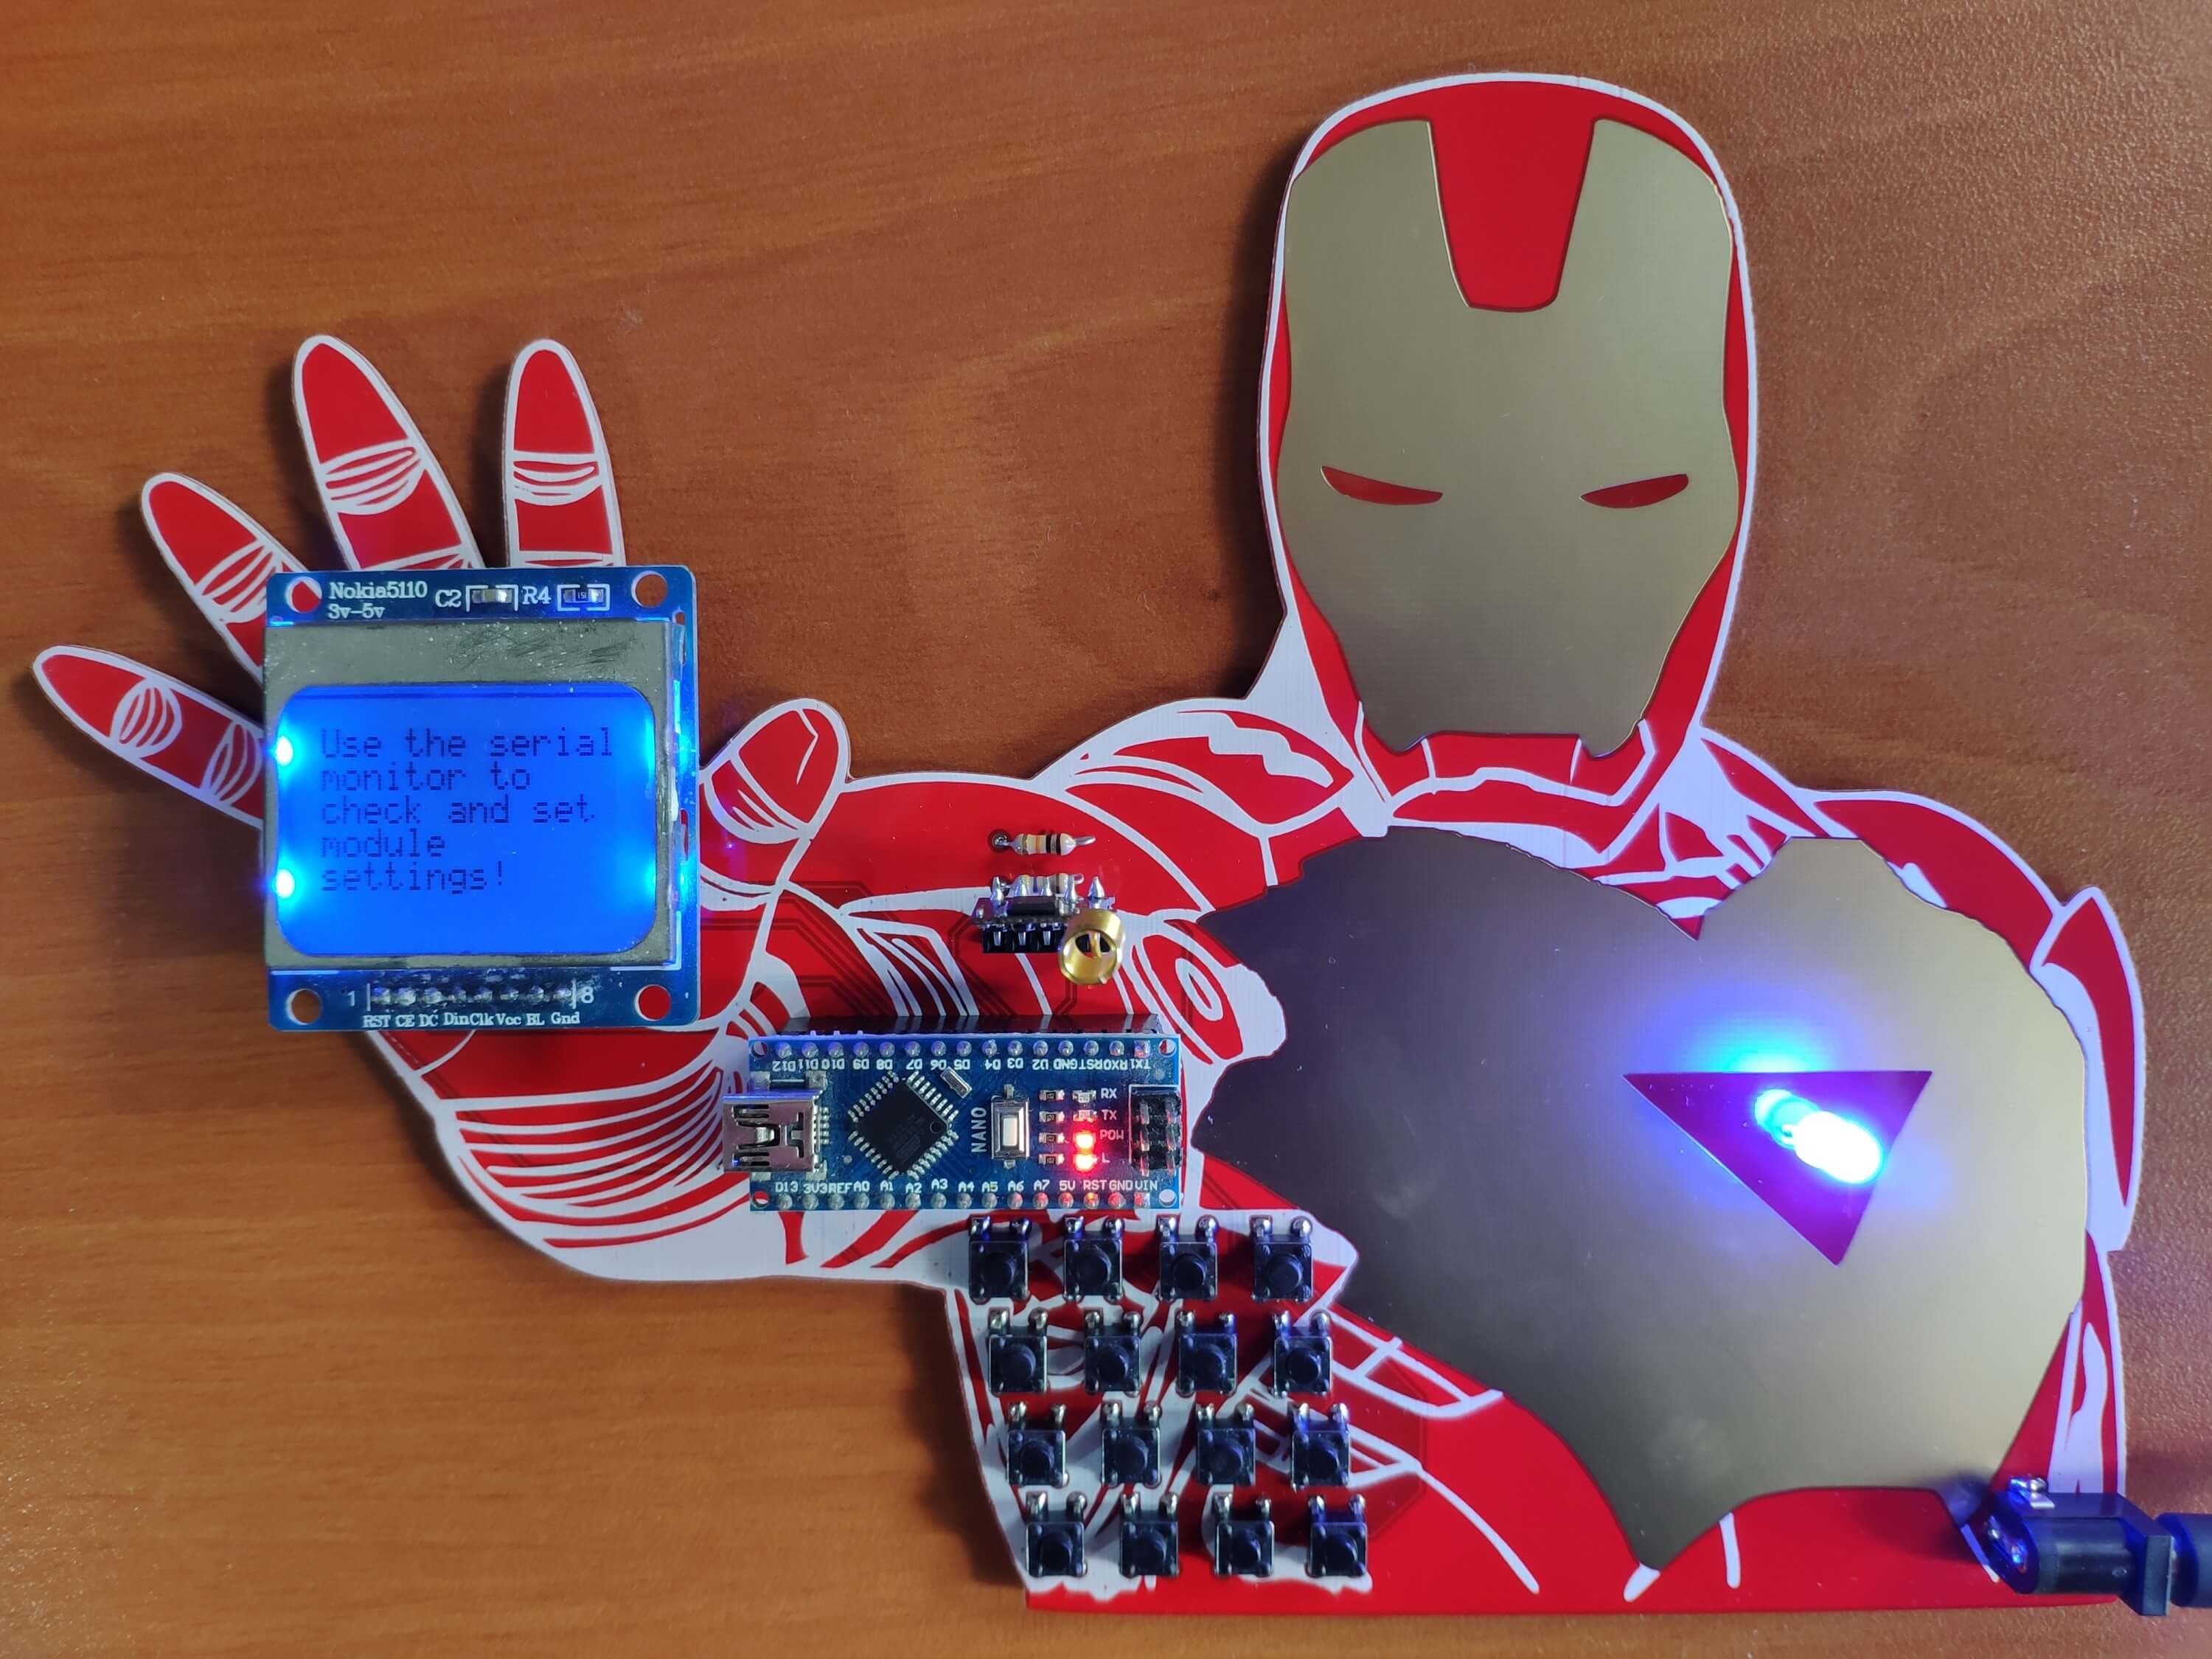
📌 B. Settings
Figure - 72.28
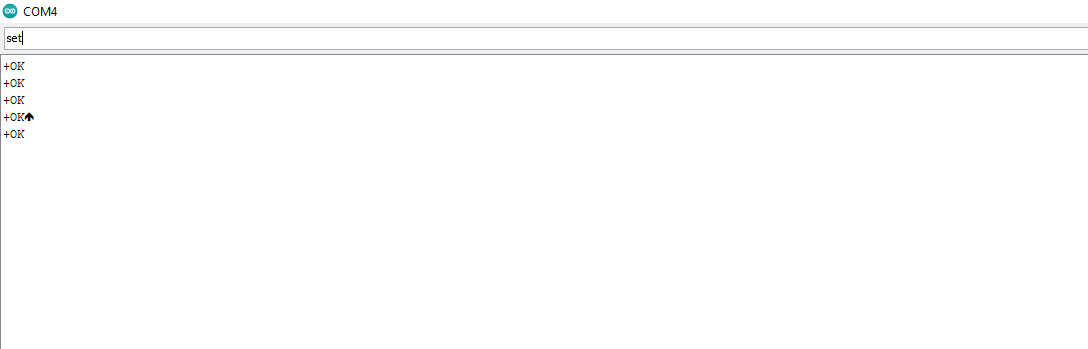
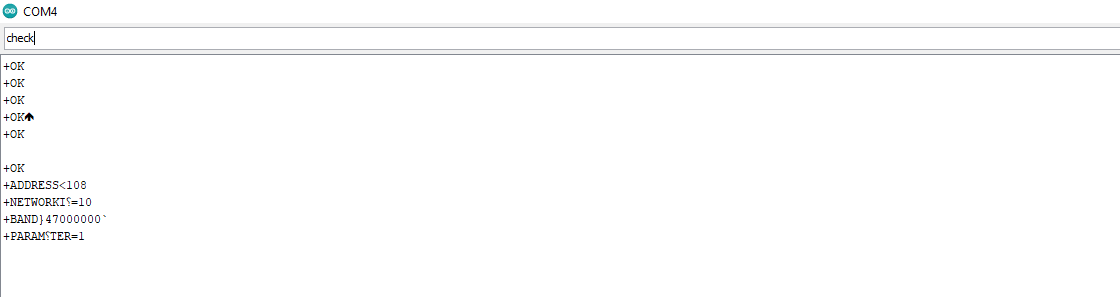
📻📞 The device allows the user to check and modify the RYLR998 LoRa module settings with AT commands on the serial monitor.
Figure - 72.29
Figure - 72.30
Figure - 72.31
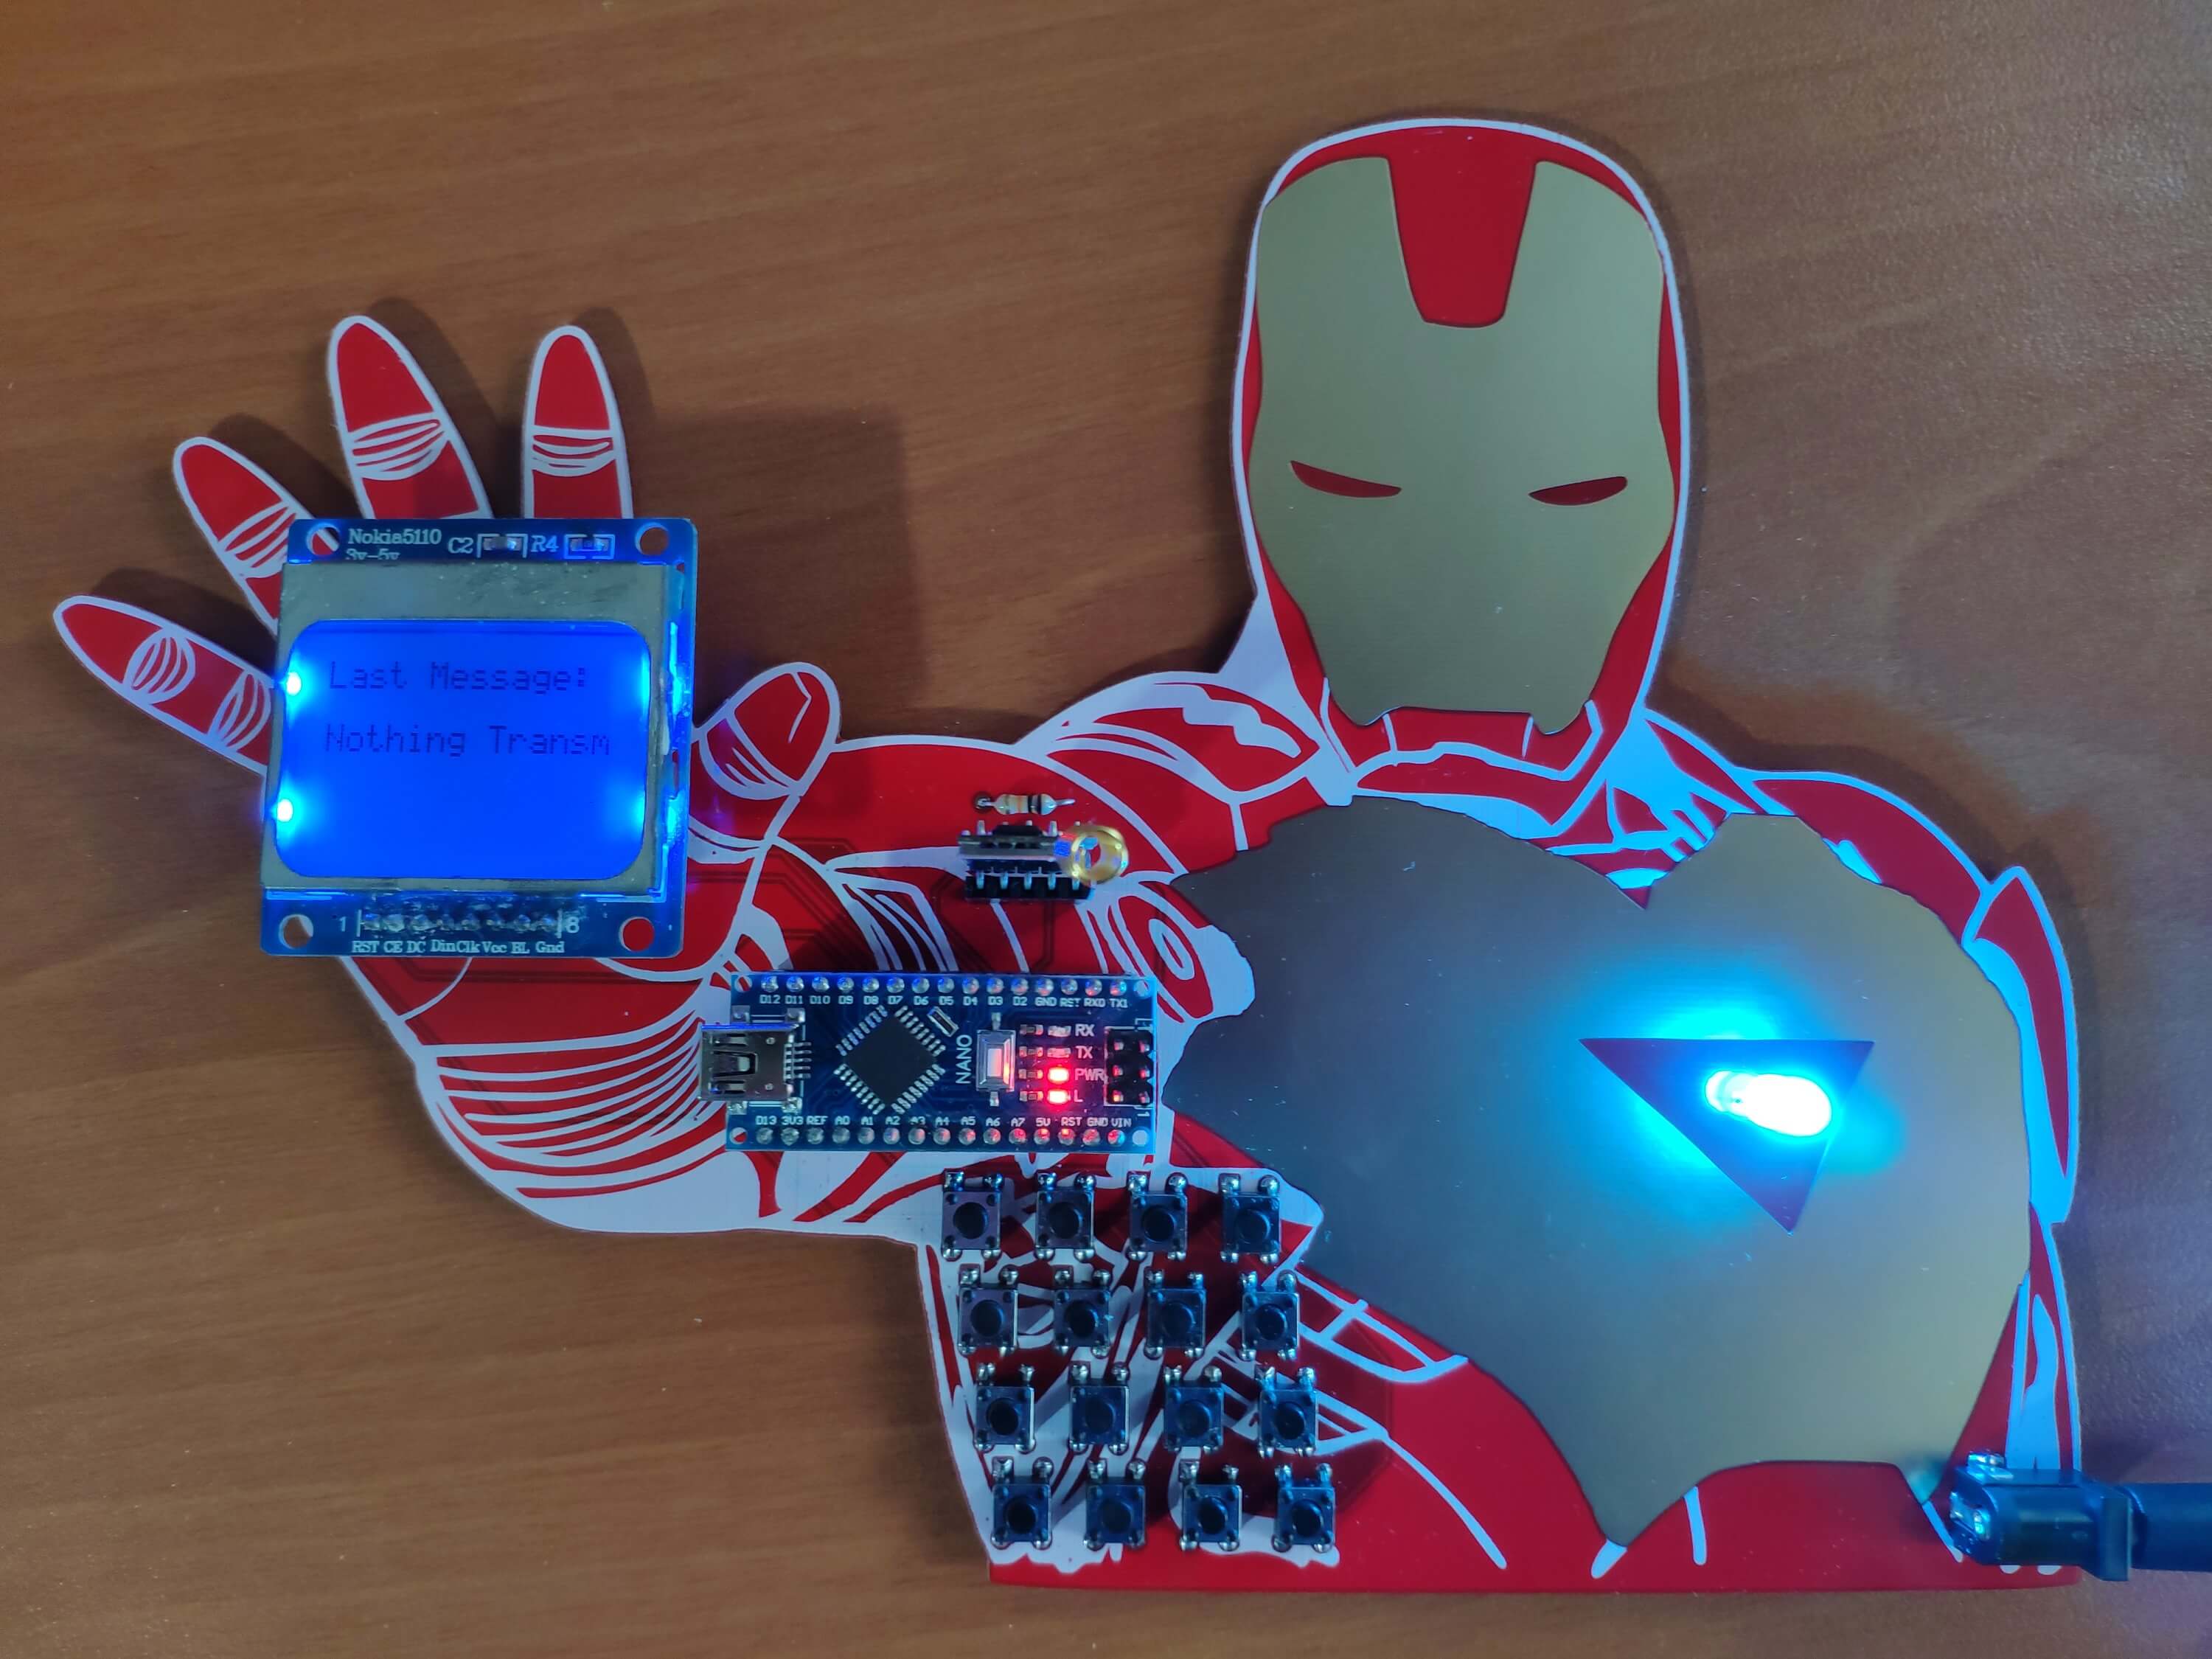
📌 C. Last Message
Figure - 72.32
📻📞 The device displays the latest message transmitted to the receiver module if the '*' keypad button is pressed.
📻📞 Also, the device lets the user scroll the latest transmitted message by pressing the '#' keypad button.
Figure - 72.33
📻📞 If there is no previously transmitted message saved in the LoRa module's memory, then the device shows Nothing Transmitted Yet! as the latest message.
Figure - 72.34
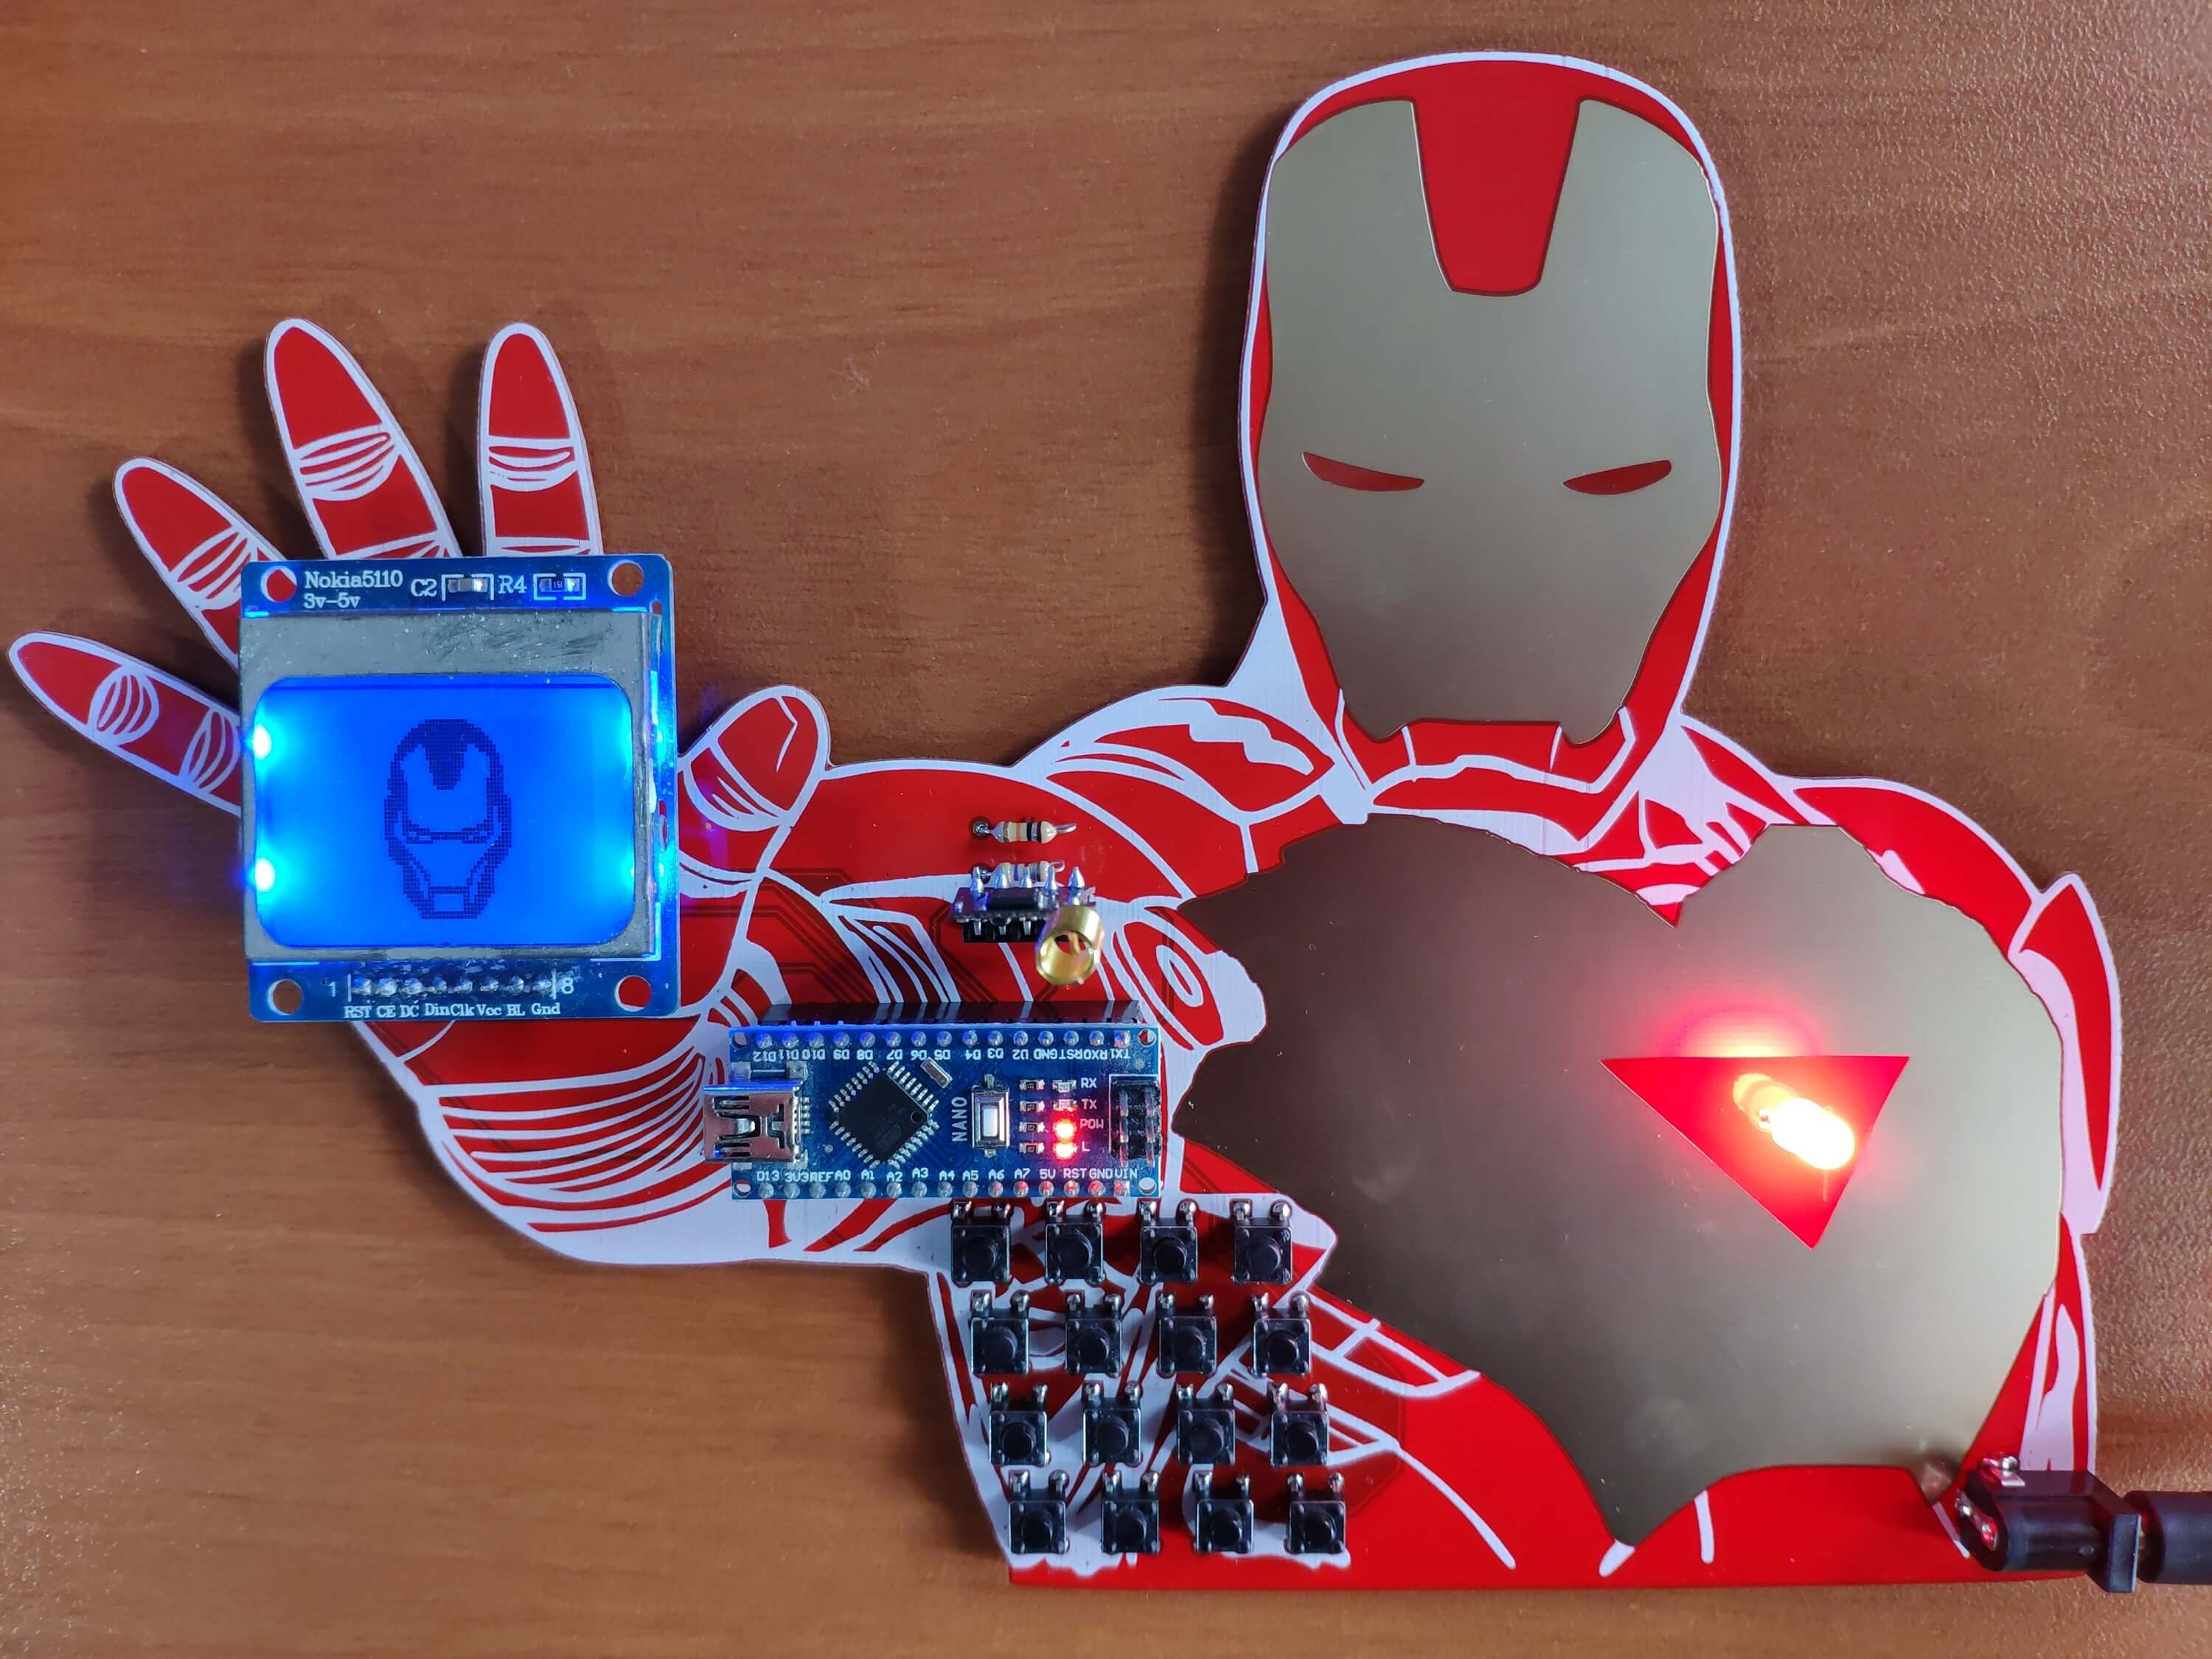
📌 D. Sleep
Figure - 72.35
📻📞 The device shows the Iron Man logo (monochrome image) as the screensaver while sleeping.
Figure - 72.36
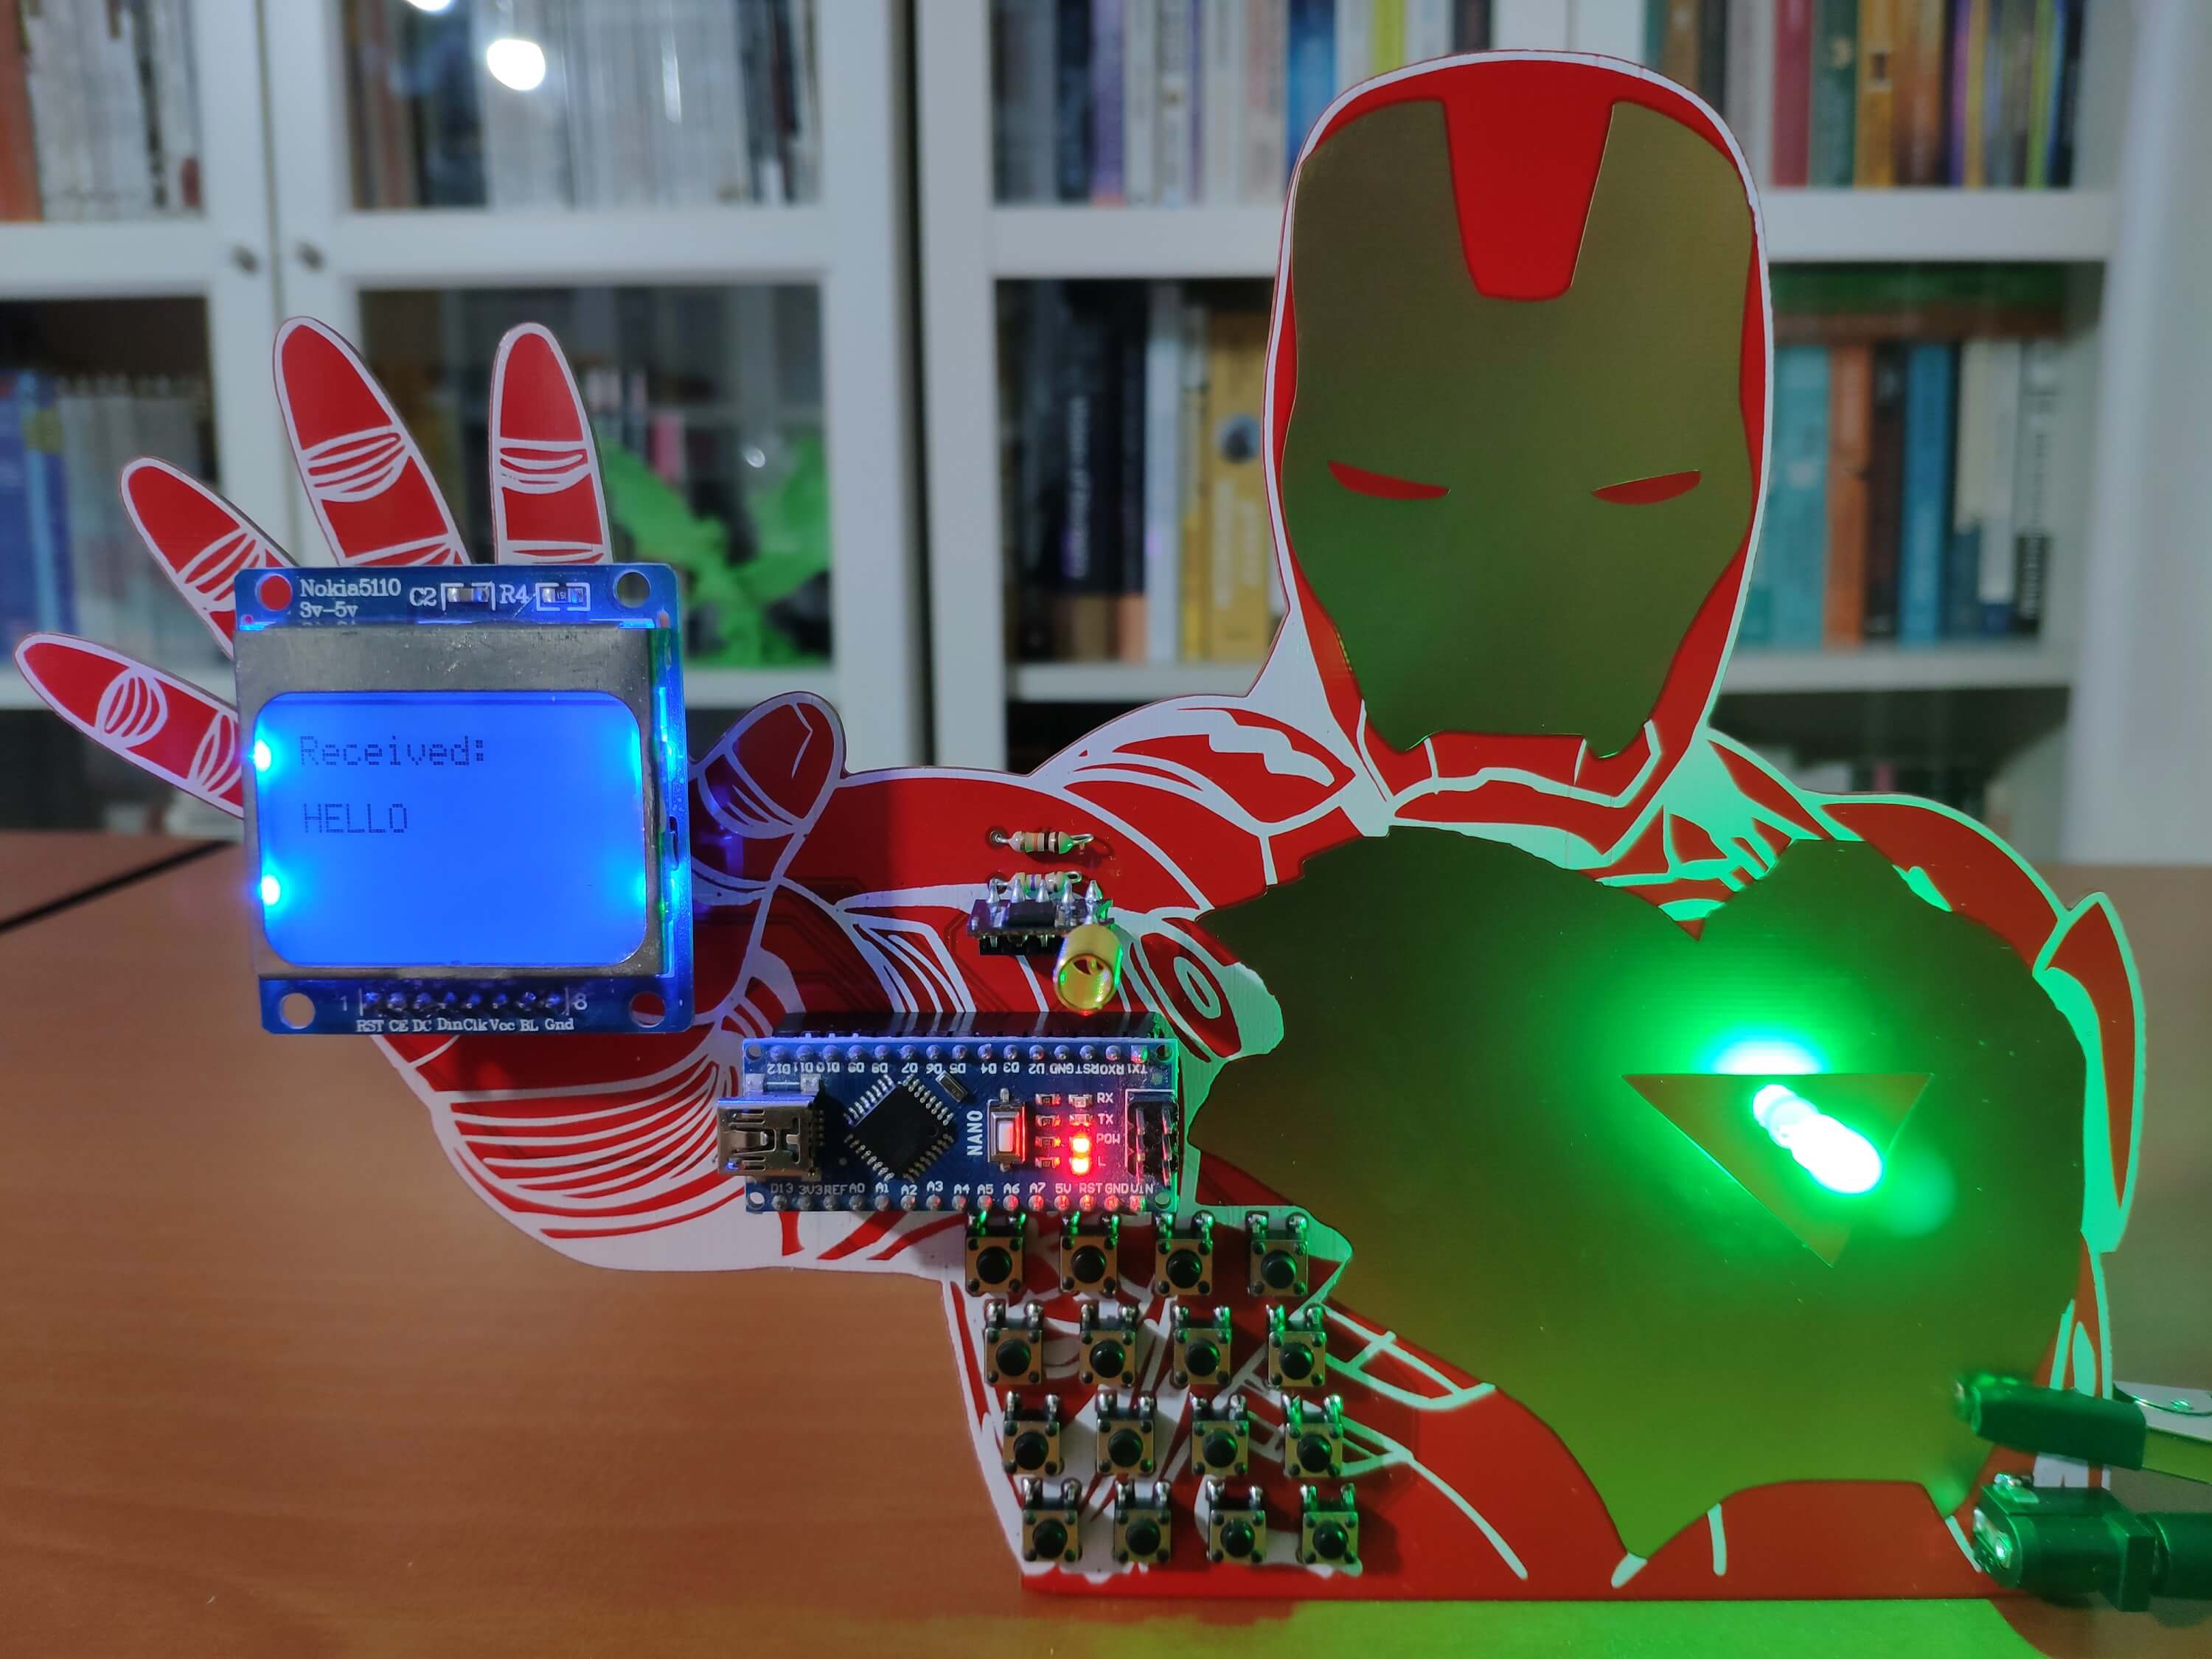
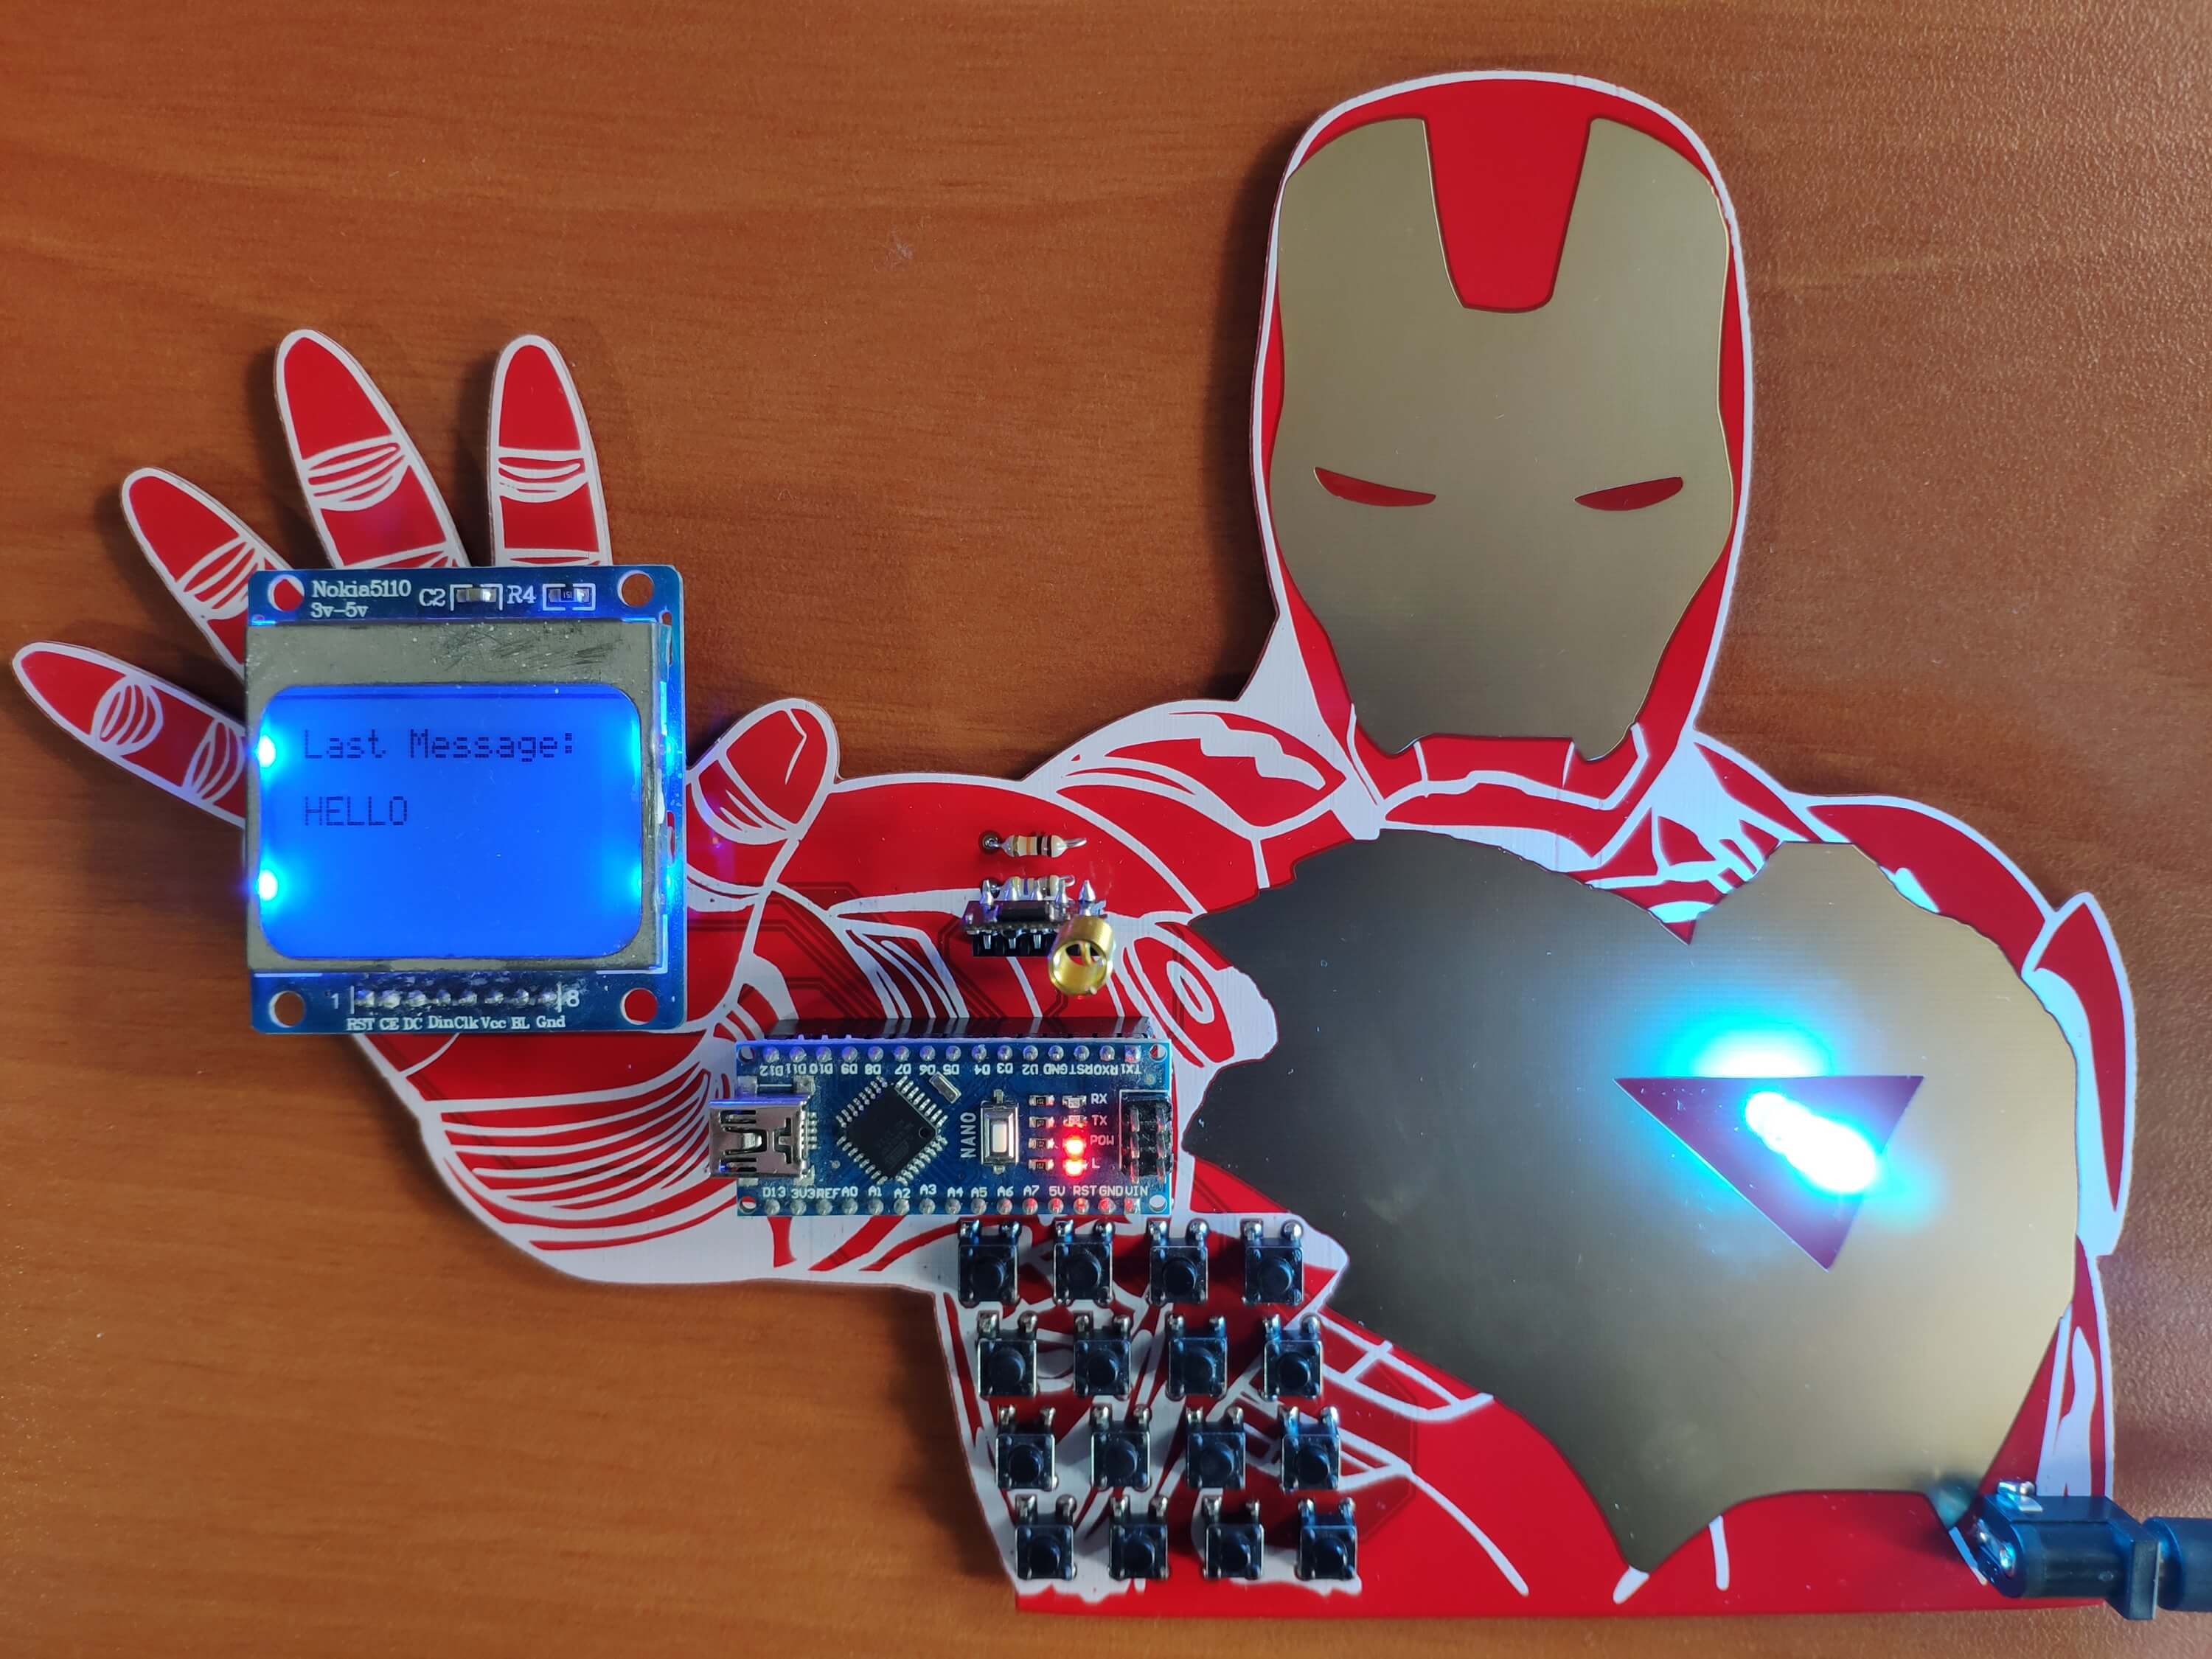
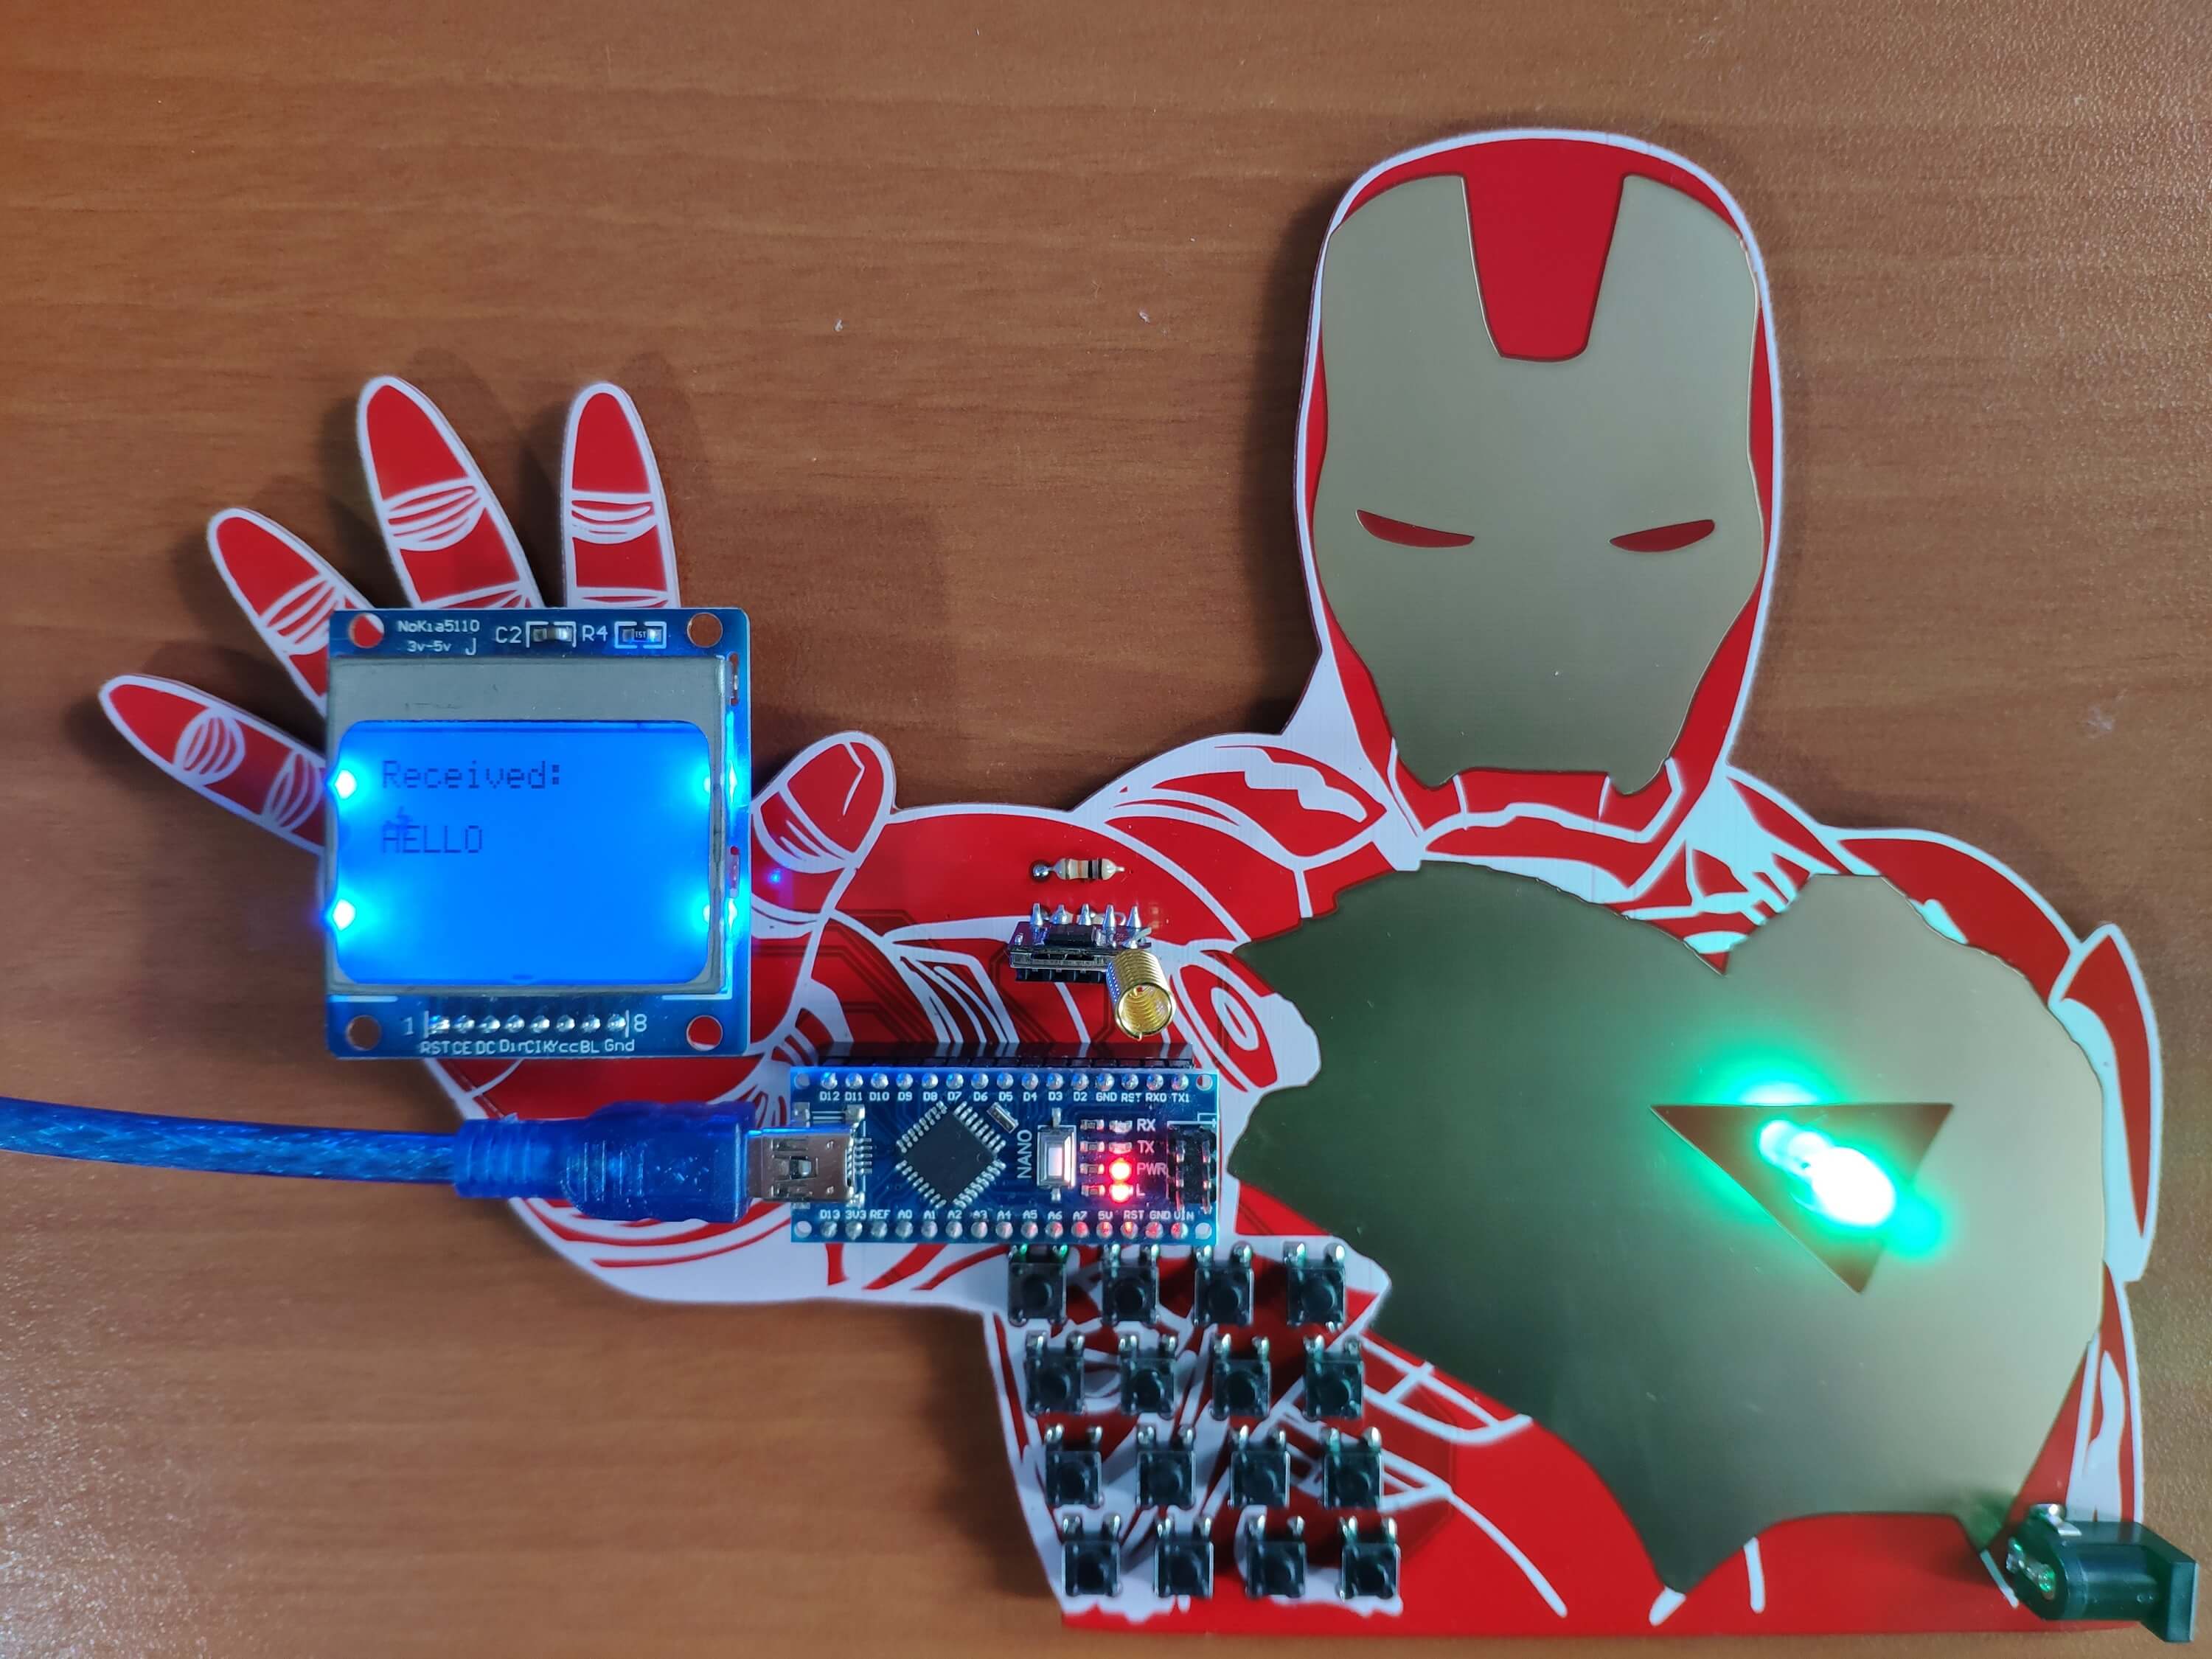
📌 Message Received
📻📞 The device shows the recently received message from the transmitter module. Then, it makes the RGB LED blink green.
📻📞 Also, the device lets the user scroll the received message by pressing the '#' keypad button.
📻📞 Until the '-' keypad button is pressed, the device shows the received message and keeps the RGB LED green.
Figure - 72.37
Figure - 72.38
Videos and Conclusion
After completing all steps above, I experimented with my Iron Man-themed walkie-talkies (two-way radios) to transmit and receive text messages. As far as my experiments go, I did not encounter any problems :)