Sitemap / Advertise

Introduction

Make an R2-D2 replica and control it by an app you programmed. Add a Nokia interface which gives you the Star Wars characters info.


Tags


Share

Make an Enhanced R2-D2 to Be Controlled by an Android App

Advertisement:


read_later

Read Later


read_later

Read Later

Introduction

Make an R2-D2 replica and control it by an app you programmed. Add a Nokia interface which gives you the Star Wars characters info.

Tags

Share


Advertisement

Advertisement


    Components :
  • Arduino Due[1]
  • Arduino Uno[2]
  • HC-06 Bluetooth Module[2]
  • Tower Pro SG90 RC Mini Servo Motor[4]
  • Feetech FS90R Continuously Rotary Micro Servo Motor[1]
  • DHT11 Temperature & Humidity Sensor [1]
  • LCD Screen (16,2)[1]
  • L298N Pair Motor Drivers [2]
  • Wheel and DC Motor Kits [4]
  • Ultrasonic Sensor - HC-SR04 [5]
  • Breadboard [1]
  • Mini Breadboard [2]
  • 74HC595 Shift Register [1]
  • 4-Way Relay [1]
  • Buzzer [1]
  • RGB [1]
  • Fan(which works with 220V) (optional) [1]
  • Plasma Globe(which works with 220V) (optional) [1]
  • Bulb (which works with 220V) (optional)[1]
  • Nokia 5110 LCD Screen [1]
  • Button [3]
  • LED [9]
  • 2 Axis Joystick Board [1]
  • Resistor 10k ohm [4]
  • Resistor 220 ohm [9]
  • 9V Battery [5]
  • 9V Battery Clip [2]
  • 9V Barrel Jack Connector [3]

Introduction

As if you live in Tatooine, make an R2-D2 replica which is capable of doing a lot of tasks you choose with only what you can find in your home such as old toys, old trash box or 3D-printed parts. Control it by an app you programmed and add it a Nokia interface which gives you the info about Star Wars characters.

Making the Structure

While I was watching Star Wars movies, I had thought about making an R2-D2 replica as many Star Wars fan did. And if you search on Google, you can find magnificent jobs but I wanted to do it with what I had in my home like Anakin in the first prequel movie. So, I used an old trash box, cardboard and an old plastic bowl for structure. Absolutely, it is not as same as real R2-D2 at the view, but my real aim is to make an R2-D2 replica controlled by an app and to create its structure with only things what I found so if you want a better structure than mine, you can buy an R2-D2 replica or fabric it with 3D-printer.

Creating an App

MIT App Inventor is the easiest IDE for programming an app because using MIT App Inventor makes programming as solving a puzzle. I added two screens (Commands and Functions) to the app and you can connect on each of them to the related Arduino Board with Bluetooth buttons. When the app is initialized, notifications help you what happens at the next move and when you scroll the screen from one to another, some R2-D2 voices occurs (I found them from here: http://www.r2d2translator.com). When a button is clicked, it sends a unique char for a unique task, for instance, 'd' is for activating the robot arm to turn right.

project-image-slide project-image-slide
Slide


    Commands screen

When Bluetooth module is connected, the connected button turns green.

Go to Functions screen with Functions button.

    Functions screen

When the Bluetooth module is connected, the connected button turns green.

And this display shows the project page on Hackster.io.

Connecting Components to Arduino

    Commands

First of all, you have to change the first HC-06 module name to "Commands" with AT commands for proceeding app with accurate data. After doing that, you can wire up all components to Arduino Due. Details are clarified in R2-D2 Commands code at Code part. 9V battery (Indeed, lithium ion batteries can be used) is adequate for all components on board. And two 9V batteries are required to operate DC motors.

project-image-slide project-image-slide project-image-slide project-image-slide project-image-slide project-image-slide project-image-slide project-image-slide
Slide


    Functions

First of all, you have to change the second HC-06 module name to "Functions" with AT commands for proceeding app with accurate data. After doing that, you can wire up all components to the second Arduino Uno. Details are clarified in R2-D2 Functions code at Code part. A 9V battery (indeed, lithium ion batteries can be used) is adequate for all components on board.

project-image-slide project-image-slide project-image-slide project-image-slide project-image-slide project-image-slide project-image-slide project-image-slide project-image-slide project-image-slide
Slide


    Nokia interface

This part of the project gives your replica an interactive screen that has three display you can choose. Screen 1 is initialized with pushing button 1 after that it shows Sleeping Mode display. Screen 2 is initialized with pushing button 2 after that it shows Pictures Section display and starts unsleeping mode on Nokia 5110 screen. Screen 3 is initialized with pushing button 3 after that it shows Info display. On Screen 3, you can select characters by joysticks movements and when joysticks buttons are clicked, comes up a scrolling text about the selected character. Furthermore, if you choose master Yoda on Info display, the green LED which is on top of the buttons is activated until another character is selected. Details are explained in R2-D2 Functions code at Codes part.

project-image-slide project-image-slide project-image-slide project-image-slide project-image-slide project-image-slide project-image-slide
Slide


Putting Together All the Parts

The way of setting up the R2-D2 replica depends on what you have, I used a soldering iron and jumper wires for Arduino connections. And for the R2-D2 replica connections, I used a silicone gun.

According to the size of your structure, you can set up the replica whatever way you want. I set up it like this:

project-image-slide project-image-slide project-image-slide project-image-slide project-image-slide project-image-slide project-image-slide project-image-slide project-image-slide project-image-slide project-image-slide
Slide


Schematics

R2-D2 Commands

Download


R2-D2 Functions

Download


R2-D2 Nokia Interface

Download


Downloads

R2-D2 APK

Download


R2-D2 aia

Download


Spider-man (Bitmap)

Download


Batman (Bitmap)

Download


Chewbacca (Bitmap)

Download


R2-D2 (Bitmap)

Download


Star Wars Logo (Bitmap)

Download


Star Trek Logo (Bitmap)

Download


Darth Vader (Bitmap)

Download


App Voice

Download


App Icon

Download


Codes

R2-D2 Commands.ino

Download


	// R2-D2 Commands
// This part of the project is about to receive data accurately from an app which provides collaboration between an Android phone and Arduino Uno is called R2-D2.
// Each of choices on Commands Screen which is the first screen on the app transmits a char from Android phone to a compatible Bluetooth module with Arduino such as HC-O6.
// Using the volatile boolean system makes it easy while transmitting data for controlling R2-D2 replica.
//
// Requirements for this:
// Arduino Due
// A HC-06 Bluetooth module
// Four Servo motors(one of them has to be a continuous Servo)
// A DHT11 module
// A LCD screen(16,2)
// Two L298N Pair Motor Drivers
// Four Wheel and DC Motor Kits
// Two 9V batteries
// Five HC-SR04 Ultrasonic Distance Sensors
// A mini breadboard
// Learning Servo library
// Learning LiquidCrystal library
// Learning DHT library
//
//
// First of all, you have to change HC-06 module name to "Commands" with AT commands for proceeding app with accurate data.
// And Arduino Due has three extra TX-RX pins so HC-06 module can be used with them instead of SoftwareSerial libary. 
//
// DHT11 module is for getting the value of temperature and humidity. My searching shows me that DHT11 library is the best option for this module, you can download it on here:
// https://github.com/markruys/arduino-DHT.git
//
// LCD screen is for seeing data which comes from DHT11 module and it can be used as R2-D2 eye.
// If you want, you can change the LCD pins on Arduino Due and create different marks to use lcd.createChar() with bytes.
//
// L298N Pair Motor Driver allows working two DC motor which are controlled by Arduino pins seperately at the same time and controlling which way each of motors turns through data you choose.
//
// 9V battery is enough to operate motors which work with up to 24V.
//
// Wheel and DC Motor Kit is easy to use while operating motors by L298N Pair Motor Driver because they are compatible each other.
//
// HC-SR04 Ultrasonic Distance Sensor works based on the range of wavelength of sound waves as a radar. However the compelling thing at this process is that module needs time to understand 
// where is the obstacle so that giving the right delay time to module is necessary.
// When HC-SR04 Ultrasonic Distance Sensors are set up with the right delay time, the project has a basic obstacle recognition system. I set up each of HC-SR04 Ultrasonic Distance Sensors
// to react 40cm for any obstacles. Using five HC-SR04 Ultrasonic Distance Sensor is adequate for seeing all obstacles by R2-D2 replica.
//
// I designed a robot arm which includes two joints(you can increase the number of joints but if you did this, you would have to add another external battery on your project because of the
// insufficiency of Arduino Due)for the project. Each of the joints consists of a servo motor and a component which is compatible with Servo such as 3D printing parts, old toys parts etc.
// If you have already had a robot arm, you can change my design with it.
//
// Two joints require two Servo motors(I have used SG90 9G Servo Motors for a long time but you can use a different sort of Servo). Using a continuous Servo(like Feetech FS90R 
// Continuously Rotary Micro Servo) at the end of the robot arm gives you a multi-functional turning part like I used.
//
// And the fourth Servo Motor is for giving the rotary motion to R2-D2 replica head.
//
// Connections:
//                                Arduino Due

// HC-06 Bluetooth module
// RX                             -  TX3- Pin 14
// TX                             -  RX3- Pin 15
// VCC                            -  5V
// GND                            -  GND   
// Servo armr                     -  Pin 10
// Servo arml                     -  Pin 11
// Servo arm(continuous Servo)    -  Pin 3
// Servo head                     -  Pin 9
// DHT11 module
// Pin 1                          -  5V
// Pin 2                          -  Pin 38 and 5V with 10K resistor
// Pin 3                          -  empty
// Pin 4                          -  GND
// LCD screen(16,2)
//                                -  5V
//                                -  GND
// RS pin                         -  Pin 32
// Enable                         -  Pin 33
// D4 pin                         -  Pin 34
// D5 pin                         -  Pin 35
// D6 pin                         -  Pin 36
// D7 pin                         -  Pin 37
// R/W                            -  GND
//                                -  5V
// L298N Pair Motor Driver1
// In1                            -  Pin 40
// In2                            -  Pin 41
// In3                            -  Pin 42
// In4                            -  Pin43
// OUT1                           -  DC Motor (+)
// OUT2                           -  DC Motor (-)
// OUT3                           -  DC Motor (+)
// OUT4                           -  DC Motor (-)
// GND                            -  9V battery (-) and GND(Arduino)
// 12V                            -  9V battery (+)
// L298N Pair Motor Driver2
// In1                            -  Pin 44
// In2                            -  Pin 45
// In3                            -  Pin 46
// In4                            -  Pin47
// OUT1                           -  DC Motor (+)
// OUT2                           -  DC Motor (-)
// OUT3                           -  DC Motor (+)
// OUT4                           -  DC Motor (-)
// GND                            -  9V battery (-) and GND(Arduino)
// 12V                            -  9V battery (+)
// HC-SR04 Ultrasonic Distance Sensors
// Sensor1
// GND                            -  GND
// Trig                           -  Pin 22
// Echo                           -  Pin 23
// VCC                            -  5V
// Sensor2
// GND                            -  GND
// Trig                           -  Pin 24
// Echo                           -  Pin 25
// VCC                            -  5V
// Sensor3
// GND                            -  GND
// Trig                           -  Pin 26
// Echo                           -  Pin 27
// VCC                            -  5V
// Sensor4
// GND                            -  GND
// Trig                           -  Pin 28
// Echo                           -  Pin 29
// VCC                            -  5V
// Sensor5
// GND                            -  GND
// Trig                           -  Pin 30
// Echo                           -  Pin 31
// VCC                            -  5V


#define Commands Serial3 
#include 
#include 
#include "DHT.h"

LiquidCrystal lcd(32,33,34,35,36,37);

DHT dht;

Servo arm;
Servo head;
Servo armr;
Servo arml;

const int in1=40;
const int in2=41;
const int in3=42;
const int in4=43;
const int in1_1=44;
const int in2_1=45;
const int in3_1=46;
const int in4_1=47;


const int sensor_1_trig =22;
const int sensor_1_echo=23;
const int sensor_2_trig =24;
const int sensor_2_echo =25;
const int sensor_3_trig =26;
const int sensor_3_echo =27;
const int sensor_4_trig =28;
const int sensor_4_echo =29;
const int sensor_5_trig =30;
const int sensor_5_echo=31;

long duration_1; 
long distance_1;
long duration_2; 
long distance_2;
long duration_3; 
long distance_3;
long duration_4; 
long distance_4;
long duration_5; 
long distance_5;

char c;

volatile boolean Arm_on=false;
volatile boolean Arm_off=false;
volatile boolean Right=false;
volatile boolean Left=false;
volatile boolean F_1=false;
volatile boolean B_1=false;
volatile boolean Auto=false;
volatile boolean Stop=false;
volatile boolean F_2=false;
volatile boolean B_2=false;
volatile boolean Arm_R=false;
volatile boolean Arm_L=false;

byte normal[8] = {
  0b10000,
  0b10000,
  0b10000,
  0b11110,
  0b11100,
  0b11110,
  0b11100,
  0b11110,
};
byte danger[8] = {
  0b10001,
  0b01010,
  0b00100,
  0b01010,
  0b10001,
  0b11111,
  0b11111,
  0b11111,
};

void setup() {
  Serial.begin(9600);
  Commands.begin(9600);
  lcd.createChar(1,normal);
  lcd.createChar(2,danger);
  lcd.begin(16, 2);  
  dht.setup(38);
  arm.attach(3);
  head.attach(9);
  armr.attach(10);
  arml.attach(11);
   pinMode(sensor_1_trig,OUTPUT);
   pinMode(sensor_1_echo,INPUT);
   pinMode(sensor_2_trig,OUTPUT);
   pinMode(sensor_2_echo,INPUT);
   pinMode(sensor_3_trig,OUTPUT);
   pinMode(sensor_3_echo,INPUT);
   pinMode(sensor_4_trig,OUTPUT);
   pinMode(sensor_4_echo,INPUT);
   pinMode(sensor_5_trig,OUTPUT);
   pinMode(sensor_5_echo,INPUT);
   
   pinMode(in1,OUTPUT);
   pinMode(in2,OUTPUT);
   pinMode(in3,OUTPUT);
   pinMode(in4,OUTPUT);
   pinMode(in1_1,OUTPUT);
   pinMode(in2_1,OUTPUT);
   pinMode(in3_1,OUTPUT);
   pinMode(in4_1,OUTPUT);


}

void loop() {
   
 
 get_and_write_data_DHT();
 Commands_Getting_Data_and_Controlling_System();
   
 
}
void get_and_write_data_DHT(){
 delay(dht.getMinimumSamplingPeriod());
 float humidity = dht.getHumidity();
 float temperature = dht.getTemperature();
 lcd.setCursor(0,0);
 lcd.print("Celsius=");
 lcd.setCursor(10,0);
 lcd.print( temperature );
 lcd.setCursor(0,1);
 lcd.print("Humidity=" );
 lcd.setCursor(10,1);
 lcd.print(humidity );
 if(temperature>35&&humidity<30){
  lcd.clear();
  lcd.write(1);
 }
 if(temperature<20&&humidity<58){

  for(int i=0;i<1000;i++){
  lcd.clear();
  lcd.write(2);
  }
 }
}
void get_distance_toHC_sr04_for_AutoMode(){

digitalWrite(sensor_1_trig,LOW);
  delay(2);
  digitalWrite(sensor_1_trig,HIGH);
  delay(10);
  digitalWrite(sensor_1_trig,LOW);
  duration_1 = pulseIn(sensor_1_echo,HIGH);
  distance_1= duration_1/29.1;

Serial.println(distance_1);

  digitalWrite(sensor_2_trig,LOW);
  delay(2);
  digitalWrite(sensor_2_trig,HIGH);
  delay(10);
  digitalWrite(sensor_2_trig,LOW);
  duration_2 = pulseIn(sensor_2_echo,HIGH);
  distance_2= duration_2/29.1;


  digitalWrite(sensor_3_trig,LOW);
  delay(2);
  digitalWrite(sensor_3_trig,HIGH);
  delay(10);
  digitalWrite(sensor_3_trig,LOW);
  duration_3 = pulseIn(sensor_3_echo,HIGH);
  distance_3= duration_3/29.1;


  digitalWrite(sensor_4_trig,LOW);
  delay(2);
  digitalWrite(sensor_4_trig,HIGH);
  delay(10);
  digitalWrite(sensor_4_trig,LOW);
  duration_4 = pulseIn(sensor_4_echo,HIGH);
  distance_4= duration_4/29.1;


  digitalWrite(sensor_5_trig,LOW);
  delay(2);
  digitalWrite(sensor_5_trig,HIGH);
  delay(10);
  digitalWrite(sensor_5_trig,LOW);
  duration_5 = pulseIn(sensor_5_echo,HIGH);
  distance_5= duration_5/29.1;


 if(distance_1<40){
digitalWrite(in1,LOW);
digitalWrite(in2,HIGH);
digitalWrite(in3,LOW);
digitalWrite(in4,HIGH);
digitalWrite(in1_1,LOW);
digitalWrite(in2_1,HIGH);
digitalWrite(in3_1,LOW);
digitalWrite(in4_1,HIGH);
  }
   if(distance_1>45){
digitalWrite(in1,HIGH);
digitalWrite(in2,LOW);
digitalWrite(in3,HIGH);
digitalWrite(in4,LOW);
digitalWrite(in1_1,HIGH);
digitalWrite(in2_1,LOW);
digitalWrite(in3_1,HIGH);
digitalWrite(in4_1,LOW);
  }

    if(distance_2<40){
digitalWrite(in1,LOW);
digitalWrite(in2,HIGH);
digitalWrite(in3,LOW);
digitalWrite(in4,HIGH);
digitalWrite(in1_1,LOW);
digitalWrite(in2_1,LOW);
digitalWrite(in3_1,LOW);
digitalWrite(in4_1,LOW);
  }

    if(distance_3<40){
digitalWrite(in1,HIGH);
digitalWrite(in2,LOW);
digitalWrite(in3,HIGH);
digitalWrite(in4,LOW);
digitalWrite(in1_1,LOW);
digitalWrite(in2_1,LOW);
digitalWrite(in3_1,LOW);
digitalWrite(in4_1,LOW);
  }

    if(distance_4<40){
digitalWrite(in1,LOW);
digitalWrite(in2,LOW);
digitalWrite(in3,LOW);
digitalWrite(in4,LOW);
digitalWrite(in1_1,LOW);
digitalWrite(in2_1,HIGH);
digitalWrite(in3_1,LOW);
digitalWrite(in4_1,HIGH);
  }

    if(distance_5<40){
digitalWrite(in1,LOW);
digitalWrite(in2,LOW);
digitalWrite(in3,LOW);
digitalWrite(in4,LOW);
digitalWrite(in1_1,HIGH);
digitalWrite(in2_1,LOW);
digitalWrite(in3_1,HIGH);
digitalWrite(in4_1,LOW);
  }

    if(distance_2<40&&distance_4<40){
digitalWrite(in1,LOW);
digitalWrite(in2,HIGH);
digitalWrite(in3,LOW);
digitalWrite(in4,HIGH);
digitalWrite(in1_1,LOW);
digitalWrite(in2_1,HIGH);
digitalWrite(in3_1,LOW);
digitalWrite(in4_1,HIGH);
  }

    if(distance_3<40&&distance_5<40){
digitalWrite(in1,HIGH);
digitalWrite(in2,LOW);
digitalWrite(in3,HIGH);
digitalWrite(in4,LOW);
digitalWrite(in1_1,HIGH);
digitalWrite(in2_1,LOW);
digitalWrite(in3_1,HIGH);
digitalWrite(in4_1,LOW);
  }

  
}
void Commands_Getting_Data_and_Controlling_System(){
   
   if(Commands.available()){
   c= Commands.read();
  
   
   if (c=='2'){
    
 Arm_on=true;
 Arm_off=false;
 Right=false;
 Left=false;
 F_1=false;
 B_1=false;
 Auto=false;
 Stop=false;
 F_2=false;
 B_2=false;
 Arm_R=false;
 Arm_L=false;
  
   }
   else if (c=='3'){
    
 Arm_on=false;
 Arm_off=true;
 Right=false;
 Left=false;
 F_1=false;
 B_1=false;
 Auto=false;
 Stop=false;
 F_2=false;
 B_2=false;
 Arm_R=false;
 Arm_L=false;
 
   }
    else   if (c=='4'){
    
 Arm_on=false;
 Arm_off=false;
 Right=true;
 Left=false;
 F_1=false;
 B_1=false;
 Auto=false;
 Stop=false;
 F_2=false;
 B_2=false;
 Arm_R=false;
 Arm_L=false;

   }
     else  if (c=='5'){
    
 Arm_on=false;
 Arm_off=false;
 Right=false;
 Left=true;
 F_1=false;
 B_1=false;
 Auto=false;
 Stop=false;
 F_2=false;
 B_2=false;
 Arm_R=false;
 Arm_L=false;
   }
   
   else  if (c=='6'){
    
 Arm_on=false;
 Arm_off=false;
 Right=false;
 Left=false;
 F_1=true;
 B_1=false;
 Auto=false;
 Stop=false;
 F_2=false;
 B_2=false;
 Arm_R=false;
 Arm_L=false;
   }
   else   if (c=='7'){
    
 Arm_on=false;
 Arm_off=false;
 Right=false;
 Left=false;
 F_1=false;
 B_1=true;
 Auto=false;
 Stop=false;
 F_2=false;
 B_2=false;
 Arm_R=false;
 Arm_L=false;
   }
   else  if (c=='8'){
    
 Arm_on=false;
 Arm_off=false;
 Right=false;
 Left=false;
 F_1=false;
 B_1=false;
 Auto=true;
 Stop=false;
 F_2=false;
 B_2=false;
 Arm_R=false;
 Arm_L=false;
   }
 else   if (c=='9'){
    
 Arm_on=false;
 Arm_off=false;
 Right=false;
 Left=false;
 F_1=false;
 B_1=false;
 Auto=false;
 Stop=true;
 F_2=false;
 B_2=false;
 Arm_R=false;
 Arm_L=false;
   }
  else   if (c=='a'){
    
 Arm_on=false;
 Arm_off=false;
 Right=false;
 Left=false;
 F_1=false;
 B_1=false;
 Auto=false;
 Stop=false;
 F_2=true;
 B_2=false;
 Arm_R=false;
 Arm_L=false;
   }
  else   if (c=='b'){
    
 Arm_on=false;
 Arm_off=false;
 Right=false;
 Left=false;
 F_1=false;
 B_1=false;
 Auto=false;
 Stop=false;
 F_2=false;
 B_2=true;
 Arm_R=false;
 Arm_L=false;
   }
 else if (c=='d'){
    
 Arm_on=false;
 Arm_off=false;
 Right=false;
 Left=false;
 F_1=false;
 B_1=false;
 Auto=false;
 Stop=false;
 F_2=false;
 B_2=false;
 Arm_R=true;
 Arm_L=false;
   }
   else if (c=='e'){
    
 Arm_on=false;
 Arm_off=false;
 Right=false;
 Left=false;
 F_1=false;
 B_1=false;
 Auto=false;
 Stop=false;
 F_2=false;
 B_2=false;
 Arm_R=false;
 Arm_L=true;
   }
    if(Arm_on==true){ 
       do {arm.write(180);
       delay(2000);
       arm.write(90);
       }while (Arm_on==false);
   }
  
    if(Arm_off==true){ 
       do { arm.write(0);
       delay(2000);
       arm.write(90);
       }while(Arm_off==false);
   }
  
    if(Right==true){
    do { head.write(0);
    delay(50);
    head.write(45);
    delay(50);
    head.write(90);
    delay(50);
    }while(Right==false);
  }

      if(Left==true){
   do{ head.write(90);
    delay(50);
    head.write(135);
    delay(50);
    head.write(180);
    delay(50);
   }while(Left==false);
  }

   if(F_1==true){
do{
digitalWrite(in1_1,HIGH);
digitalWrite(in2_1,LOW);
digitalWrite(in3_1,HIGH);
digitalWrite(in4_1,LOW);
}while(F_1==false);
  }

  if(B_1==true){
 do {digitalWrite(in1_1,LOW);
digitalWrite(in2_1,HIGH);
digitalWrite(in3_1,LOW);
digitalWrite(in4_1,HIGH);
 }while(B_1==false);
  }
 
   if(Auto==true){
  for(int i=0;i<4000;i++){
     get_distance_toHC_sr04_for_AutoMode();
  }
  }
   if(Stop==true){
    do {
digitalWrite(in1,LOW);
digitalWrite(in2,LOW);
digitalWrite(in3,LOW);
digitalWrite(in4,LOW);
digitalWrite(in1_1,LOW);
digitalWrite(in2_1,LOW);
digitalWrite(in3_1,LOW);
digitalWrite(in4_1,LOW);
    }while(Stop==false);
  }

    if(F_2==true){
do {digitalWrite(in1,HIGH);
digitalWrite(in2,LOW);
digitalWrite(in3,HIGH);
digitalWrite(in4,LOW);
   }while(F_2==false);
  }
  

    if(B_2==true){
 do {digitalWrite(in1,LOW);
digitalWrite(in2,HIGH);
digitalWrite(in3,LOW);
digitalWrite(in4,HIGH); 
}while(B_2==false);
  }


    if(Arm_R==true){ 
   do { 
    arml.write(90);
    delay(50);
    armr.write(180);
    delay(50);
   
   }while(Arm_R==false);
   }

     if(Arm_L==true){ 
   do { 
    arml.write(0);
    delay(50);
    armr.write(90);
    delay(50);
  
   }while(Arm_L==false);
   }
  
 
   }
}


R2-D2 Functions.ino

Download


	// R2-D2 Functions 
// This part of the project is about to receive data accurately from an app which provides collaboration between an Android phone and Arduino Uno is called R2-D2.
// Each of choices on Functions Screen which is the second screen on the app transmits a char from Android phone to a compatible Bluetooth module with Arduino such as HC-O6.
// Using the volatile boolean system makes it easy while transmitting data for controlling R2-D2 replica.
// 
// Requirements for this:
//
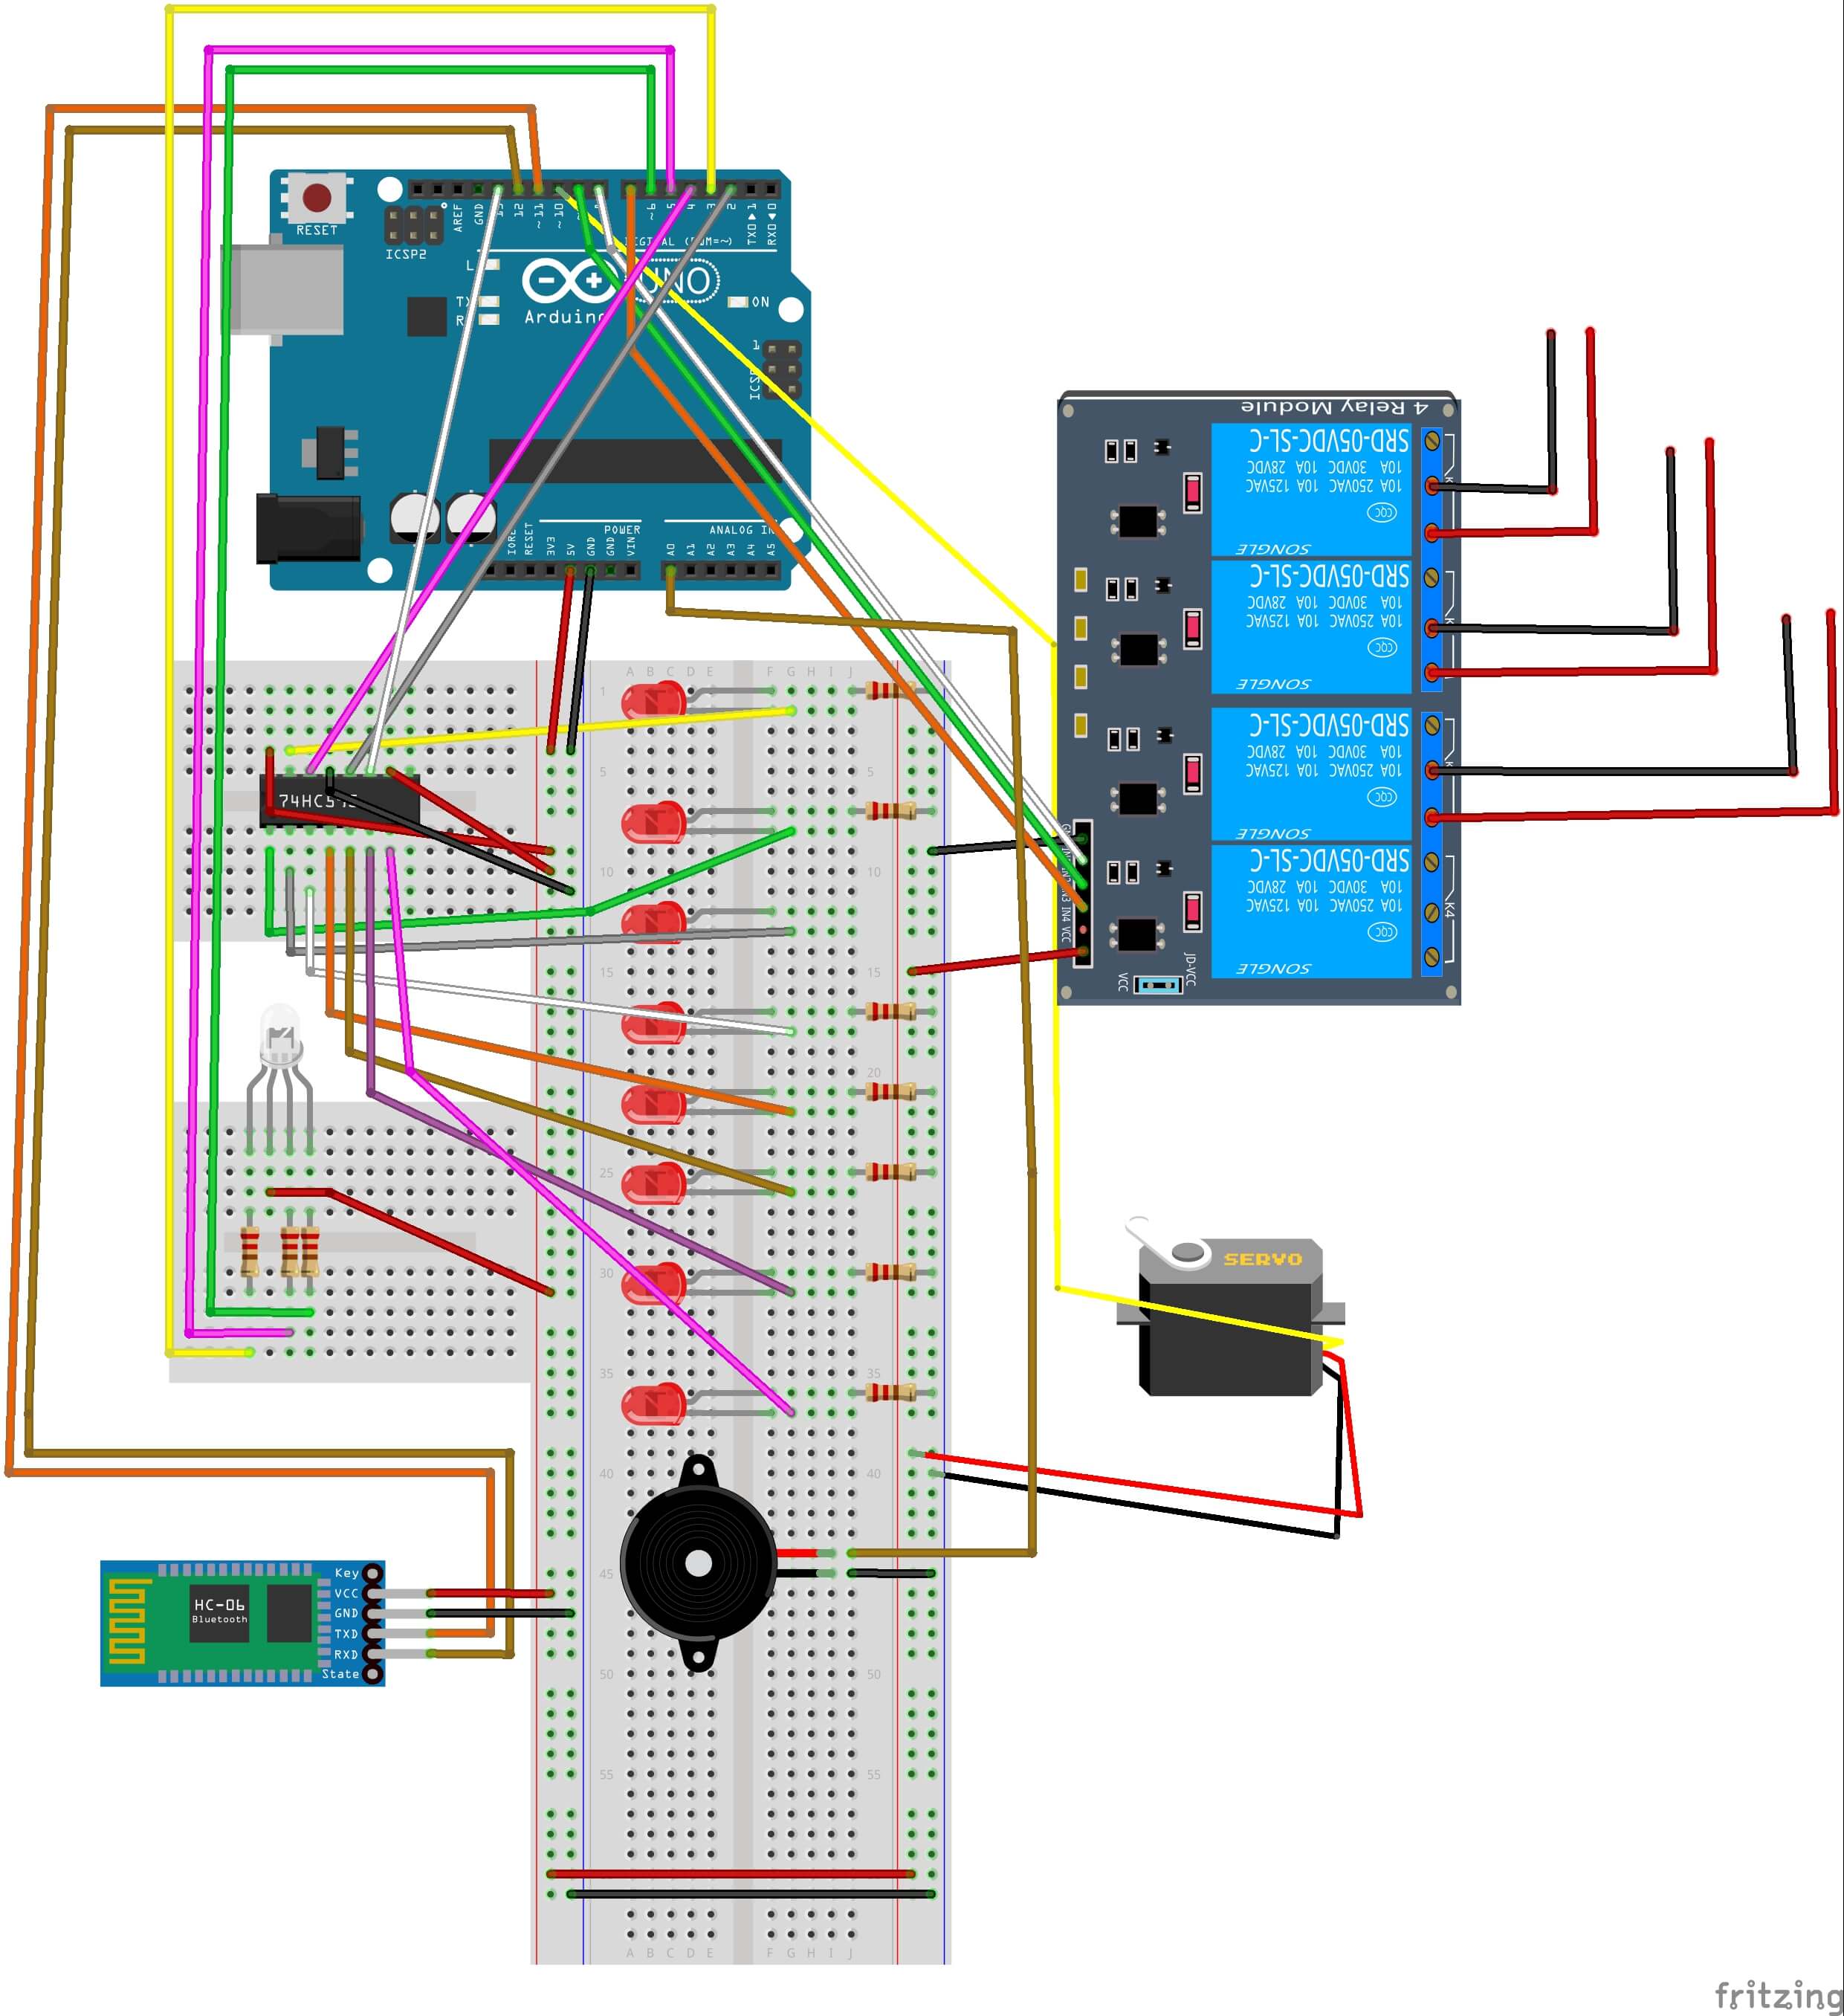
// A breadboard and a mini breadboard
// Arduino Uno
// A HC-06 bluetooth module(or HC-05)
// A 74HC595 shift register
// A 4 way relay
// A buzzer
// A RGB Led(common anode)
// A MG996R Servo Motor(or any Servo Motor)
// Learning Servo library
// Learning SoftwareSerial library
// Optional;
// A Fan(which works with 220V)
// A Plasma Globe(which works with 220V)
// A Bulb(which works with 220V)   
//
//
// 
// First of all, you have to change HC-06 module name to "Functions" with AT commands for proceeding app with accurate data.
//
// 74HC595 shift register gives you 8 output for 8 leds with 3 pins which controlled with "shiftOut()" and allows you obtain each of led with bytes.
// You can learn connections and pin names if you do not know on here:
// https://learn.adafruit.com/adafruit-arduino-lesson-4-eight-leds/the-74hc595-shift-register
//   
// Every note has a unique frequency value and through the range of buzzer frequency you can play whatever song you want.
// My searching suggests that Tone() and noTone() are the best choices for this project.
// Letter notes frequency list:
// A = 440;
// A_=466;
// B =494;
// C=523;
// C_=554;
// D = 622;
// D_=622;
// E = 659;
// F = 698;
// F_=740;
// G = 784;
// G_=830;
// I added Imperial March and Star Wars Main Theme. If you want to change them, you can find another song you like  easily on here:
// http://www.letternoteplayer.com/
// 
// 4 way relay is used for controlling with Arduino pins up to 4 object. Choosing object deoend on your replica's sizes.
// 
// RGB LED is an adjustable LED with PWM(pulse width modulation) pins to change color is chosen. Blue, red and green are options I used in my replica.
//
// MG996R Servo Motor is for giving the rotary motion to bulb.
//
// Connections:
//
//                         Arduino Uno
// HC-06 module
// RX               -  Pin 12
// TX               -  Pin 11
// VCC              -  5V
// GND              -  GND    
// 74HC595 Shift Register
// LatchPin         -  Pin 2
// DataPin          -  Pin 4
// ClockPin         -  Pin 13
// RGB Led     
//                  -  Pin 3(pwm)
//                  -  5V  
//                  -  Pin 5(pwm)
//                  -  Pin 6(pwm)
// BuzzerPin        -  Analog Pin 0
// 4 Way relay 
// In1              -  Pin 8
// In2              -  Pin 9
// In3              -  Pin 7
// Servo
// ServoPin         -  Pin 10   

#include 
#include 
SoftwareSerial Functions(11,12);// RX | TX
Servo bulb;

volatile boolean Active=false;
volatile boolean Inactive=false;
volatile boolean Blue=false;
volatile boolean Green=false;
volatile boolean Red=false;
volatile boolean Buzzer=false;
volatile boolean Bulb=false;
volatile boolean Plasma_Globe=false;
volatile boolean Fan=false;
volatile boolean Off=false;
volatile boolean Bulb_R=false;
volatile boolean Bulb_L=false;

char c;

const int latch=2;
const int data=4;
const int clocK=13;

const int rgb1=3;
const int rgb2=5;
const int rgb3=6;

const int in1=8;
const int in2=9;
const int in3=7;

const int buzzerPin = A0;
const int Imperial_notes = 60;
const int Main_notes=60;

const int A = 440;
const int A_=466;
const int B =494;
const int C=523;
const int C_=554;
const int D = 622;
const int D_=622;
const int E = 659;
const int F = 698;
const int F_=740;
const int G = 784;
const int G_=830;

byte leds=0;
 
int Imperial_March[] = {A,A,A,F,C,A,F,C,A,
E,E,E,F,C,G_, F,C,A,
A,A,A,A,G_,G,F_,F,F_,
A_,D_,D,C_,C,B,C,
F,G_,F_,G,C,A,C,E,
A,A,A,A,G_,G,F_,F,F_,
A_,D_,D,C_,C,B,C,
F,G_,F_,C,A,F,C,A};
int Main_theme[]={G ,D ,C ,B ,A ,D ,C ,B,A, D,
C, B, C, A, D, D, G, D,
C, B, A, D ,C, B, A, D, C, B, C, A, D, D, E,
E, E, C, B, A, G, G, A, B, A, E, F_, D, D, E,
E, C, B, A, G, D, A, D, D};

void setup() {
 bulb.attach(10);
 Serial.begin(9600);
 Functions.begin(9600);
 
  pinMode(buzzerPin, OUTPUT);
  pinMode(latch, OUTPUT);
  pinMode(data, OUTPUT);  
  pinMode(clocK, OUTPUT);
  pinMode(rgb1, OUTPUT);
  pinMode(rgb2, OUTPUT);  
  pinMode(rgb3, OUTPUT);
  pinMode(in1, OUTPUT);
  pinMode(in2, OUTPUT);  
  pinMode(in3, OUTPUT);
   digitalWrite(in1,HIGH);
   digitalWrite(in2,HIGH);
   digitalWrite(in3,HIGH); 
}

void loop() {
Functions_Control();
}


void Functions_Control(){
  if(Functions.available()){
     c=Functions.read();
    Serial.print(c);
    
if(c=='2'){
Active=true;
Inactive=false;
Blue=false;
Green=false;
Red=false;
Buzzer=false;
Bulb=false;
Plasma_Globe=false;
Fan=false;
Off=false;
Bulb_R=false;
Bulb_L=false;
     }
else if(c=='3'){
Active=false;
Inactive=true;
Blue=false;
Green=false;
Red=false;
Buzzer=false;
Bulb=false;
Plasma_Globe=false;
Fan=false;
Off=false;
Bulb_R=false;
Bulb_L=false;
     }
else if(c=='4'){
Active=false;
Inactive=false;
Blue=true;
Green=false;
Red=false;
Buzzer=false;
Bulb=false;
Plasma_Globe=false;
Fan=false;
Off=false;
Bulb_R=false;
Bulb_L=false;
     }
else if(c=='5'){
Active=false;
Inactive=false;
Blue=false;
Green=true;
Red=false;
Buzzer=false;
Bulb=false;
Plasma_Globe=false;
Fan=false;
Off=false;
Bulb_R=false;
Bulb_L=false;     
}
else if(c=='6'){
Active=false;
Inactive=false;
Blue=false;
Green=false;
Red=true;
Buzzer=false;
Bulb=false;
Plasma_Globe=false;
Fan=false;
Off=false;
Bulb_R=false;
Bulb_L=false;
     }
else if(c=='7'){
Active=false;
Inactive=false;
Blue=false;
Green=false;
Red=false;
Buzzer=true;
Bulb=false;
Plasma_Globe=false;
Fan=false;
Off=false;
Bulb_R=false;
Bulb_L=false;
     }
else if(c=='8'){
Active=false;
Inactive=false;
Blue=false;
Green=false;
Red=false;
Buzzer=false;
Bulb=true;
Plasma_Globe=false;
Fan=false;
Off=false;
Bulb_R=false;
Bulb_L=false;
     }
else if(c=='9'){
Active=false;
Inactive=false;
Blue=false;
Green=false;
Red=false;
Buzzer=false;
Bulb=false;
Plasma_Globe=true;
Fan=false;
Off=false;
Bulb_R=false;
Bulb_L=false;
     }
else if(c=='a'){
Active=false;
Inactive=false;
Blue=false;
Green=false;
Red=false;
Buzzer=false;
Bulb=false;
Plasma_Globe=false;
Fan=true;
Off=false;
Bulb_R=false;
Bulb_L=false;
     }
else if(c=='b'){
Active=false;
Inactive=false;
Blue=false;
Green=false;
Red=false;
Buzzer=false;
Bulb=false;
Plasma_Globe=false;
Fan=false;
Off=true;
Bulb_R=false;
Bulb_L=false;
     }
else if(c=='d'){
 Active=false;
 Inactive=false;
 Blue=false;
 Green=false;
 Red=false;
 Buzzer=false;
 Bulb=false;
 Plasma_Globe=false;
 Fan=false;
 Off=false;
 Bulb_R=true;
 Bulb_L=false;
     }
else if(c=='e'){
 Active=false;
 Inactive=false;
 Blue=false;
 Green=false;
 Red=false;
 Buzzer=false;
 Bulb=false;
 Plasma_Globe=false;
 Fan=false;
 Off=false;
 Bulb_R=false;
 Bulb_L=true;
     }
     if(Active==true){
  knightr();
     }
     
      if(Inactive==true){
   knightl();
     }
     if(Buzzer==true){
       play();
     }
     if(Blue==true){
       analogWrite(rgb1, 255);
       analogWrite(rgb2, 255);
       analogWrite(rgb3, 0);
      
     }
     if(Green==true){
       analogWrite(rgb1, 255);
       analogWrite(rgb2 ,0);
       analogWrite(rgb3, 255);
      
     }
     if(Red==true){
       analogWrite(rgb1, 0);
       analogWrite(rgb2, 255);
       analogWrite(rgb3, 255);
     }
     if(Bulb==true){
      digitalWrite(in1,LOW);
     }
       if(Plasma_Globe==true){
      digitalWrite(in2,LOW);
     }
       if(Fan==true){
      digitalWrite(in3,LOW);
     }
       if(Off==true){
      digitalWrite(in1,HIGH);
      digitalWrite(in2,HIGH);
      digitalWrite(in3,HIGH); 
      analogWrite(rgb1, 255);
      analogWrite(rgb2, 255);
      analogWrite(rgb3, 255);
     }
     if(Bulb_R==true){
    do { bulb.write(0);
    delay(50);
    bulb.write(45);
    delay(50);
    bulb.write(90);
    delay(50);}while(Bulb_R==false);
     }
     if(Bulb_L==true){
    do { bulb.write(90);
    delay(50);
    bulb.write(135);
    delay(50);
    bulb.write(180);
    delay(50);}while(Bulb_L==false);
     }


}
}
void knightr(){
  for (int i = 0; i < 8; i++)
  {
    bitSet(leds, i);
    digitalWrite(latch, LOW);
   shiftOut(data, clocK, LSBFIRST, leds);
   digitalWrite(latch, HIGH);
    delay(50);
  }
  for (int i = 8; i >= 0; i--)
{
    bitClear(leds, i);
    digitalWrite(latch, LOW);
   shiftOut(data, clocK, MSBFIRST, leds);
   digitalWrite(latch, HIGH);
    delay(50);
  }
}
void knightl(){
  for (int i = 0; i < 8; i++)
  {
    bitSet(leds, i);
    digitalWrite(latch, LOW);
   shiftOut(data, clocK, MSBFIRST, leds);
   digitalWrite(latch, HIGH);
    delay(50);
  }
  for (int i = 8; i >= 0; i--)
{
    bitClear(leds, i);
    digitalWrite(latch, LOW);
   shiftOut(data, clocK, LSBFIRST, leds);
   digitalWrite(latch, HIGH);
    delay(50);
  }
}

void play(){
  for (int i = 0; i < Imperial_notes; i++)
  {
    tone(buzzerPin, Imperial_March[i]);
    delay(500);
    noTone(buzzerPin);
    delay(20);
  }
  noTone(buzzerPin);
     
      for (int i = 0; i < Main_notes; i++)
  {
    tone(buzzerPin, Main_theme[i]);
    delay(500);
    noTone(buzzerPin);
    delay(20);
  }
  noTone(buzzerPin);
}


R2- D2 Nokia interface.ino

Download


	// R2-D2 Nokia interface 
//
// Following code gives you a menu has three screen and each of screens can be changed with buttons.
//
// Requirements for this:
// Arduino Uno
// A Nokia 5110 LCD Screen                              
// Three buttons                                        
// Two joysticks (or a joystick shield  if you have one)
// A green LED (it is optional and just for fun)      
// Learning LCD5110_Graph.h library (Indeed LCD5110_Basic.h library can be useful as LCD5110_Graph.h library if you do not want to scroll info text)
//
// If the first screen is chosen with pushing the first button, it activates sleeping mode for Nokia 5110 LCD when the counter stops.
// If the second screen is chosen with pushing the second button, it sets up a picture section that occurs pictures you choose.
// If the third screen is chosen with pushing the third button, it gets a menu full of Star Wars characters you choose and allows you to choose each of them with joysticks movements. Then if 
// you want to get info to these characters, you can push joysticks buttons when character has a mark on itself.
// 
// If master Yoda has been chosen on third screen in my interface, a green led is activated until another character or screen is chosen.
//
// All characters and pictures are optional, you can change or add any character and picture you want.
//
// LCD5110_Graph.h library is very useful and easy, you can download it here:
// http://www.rinkydinkelectronics.com/library.php?id=47
//
// And it is for converting your pictures:
// http://www.rinkydinkelectronics.com/t_imageconverter_mono.php
//
// The menu is made with using the volatile boolean system and you can create different combinations by changing the value of joysticks, for instance, using three joysticks or dividing
// screen three parts.
// 
// Connections:
//
//                     Arduino Uno 
//    Nokia 5110 LCD         
//                     -  5V
//                     -  GND
//    SCK              -  Pin 2
//    MOSI             -  Pin 3
//    DC               -  Pin 4
//    RST              -  Pin 5
//    CS               -  Pin 6 
// 
//    Led              -  Pin 10 
//
//    Joystick1 x axis -  Analog Pin 0        
//    Joystick1 y axis -  Analog Pin 1
//    Joystick2 x axis -  Analog Pin 2
//    Joystick2 y axis -  Analog Pin 3
//    Joystick1 SW     -  Pin 7
//    Joystick2 SW     -  Pin 8
//
//    Button1          -  Pin 9 (for opening Screen1)
//    Button2          -  Pin 11(for opening Screen2)
//    Button3          -  Pin 12(for opening Screen3)


#include 
LCD5110 myGLCD(2,3,4,5,6);
const int X_axis1 = A0;
const int Y_axis1 =A1;
const int X_axis2 =A2;
const int Y_axis2 =A3;
const int SW_1 =7;
const int SW_2 =8;
const int screen_1=9;
const int screen_2=11;
const int screen_3=12;
int led=10;
extern uint8_t SmallFont[];
extern uint8_t MediunmFont[];
extern uint8_t BigFont[];
extern uint8_t Batman[];
extern uint8_t Spiderman[];
extern uint8_t starwars[];
extern uint8_t vader[];
extern uint8_t r2_d2[];
extern uint8_t chew[];
extern uint8_t trek[];
volatile boolean up = false;
volatile boolean down = false;
volatile boolean right = false;
volatile boolean left = false;
volatile boolean up_1 = false;
volatile boolean down_1 = false;
volatile boolean right_1 = false;
volatile boolean left_1 = false;


void setup() {

myGLCD.InitLCD();
randomSeed(analogRead(4));
pinMode(screen_1, INPUT);
digitalWrite(screen_1, HIGH);
pinMode(screen_2, INPUT);
digitalWrite(screen_2, HIGH);
pinMode(screen_3, INPUT);
digitalWrite(screen_3, HIGH);
pinMode(SW_1, INPUT);
digitalWrite(SW_1, HIGH);
pinMode(SW_2, INPUT);
digitalWrite(SW_2, HIGH);
pinMode(led, OUTPUT);
}

void loop() {
if(digitalRead(screen_1)==1){
myGLCD.disableSleep();
interface();
joystick1_control();
joystick2_control();
}
if(digitalRead(screen_2)==1){
myGLCD.disableSleep();
pictures_interface();
}
if(digitalRead(screen_3)==1){
sleepingMode();
}
}
void interface(){
  
myGLCD.setFont(SmallFont);
myGLCD.print("Characters :",0,0);
myGLCD.print("Yoda",0,8);
myGLCD.print("Obiwan",0,16);
myGLCD.print("Sidious",0,24);
myGLCD.print("Vader",0,32);
myGLCD.print("Luke",40,8);
myGLCD.print("Leia",40,16);
myGLCD.print("Anakin",40,24);
myGLCD.print("Dooku",40,32);

}
void joystick1_control(){
int x1 = analogRead( X_axis1);
int y1 = analogRead( Y_axis1);
int button1=digitalRead(SW_1);
  
if(x1<300){
  right=true;
  left=false;
  down_1=false;
  up_1=false;
}
else if(x1>600){
  right=false;
  left=true;
  down_1=false;
  up_1=false;
}
 if(left==true){
   if(y1<400){
     down=true;
     up=false;
      }
    else if(y1>600){
     down=false;
     up=true;
      }

        if(up ==true){
          do{
          myGLCD.invertText(true);
          myGLCD.print("Yoda",0,8);
          myGLCD.invertText(false);
          delay(50);
          }while(up==false);
        if(button1==0){
         digitalWrite(led,HIGH);
         ScrollingText_Character("Yoda was the oldest living character  in canon");
        }
        else{
          digitalWrite(led,LOW);
        }
        }
         if(down ==true){
          do{
          myGLCD.invertText(true);
          myGLCD.print("Obiwan",0,16);
          myGLCD.invertText(false);
          delay(50);
          }while(down==false);
        if(button1==0){
         ScrollingText_Character("a mentor to whom he introduces thewaysoftheJedi");
        }
  }
 }
 if(right==true){
    if(y1<400){
    down=true;
    up=false;
    }
    else if(y1>600){
    down=false;
    up=true;
  }

      if(up ==true){
       do{
       myGLCD.invertText(true);
       myGLCD.print("Luke",40,8);
       myGLCD.invertText(false);
       delay(50);
       }while(up==false);
           if(button1==0){
         ScrollingText_Character("The son of fallen Jedi Anakin and Padmé");
        }
      }
        if(down ==true){
         do{
         myGLCD.invertText(true);
         myGLCD.print("Leia",40,16);
         myGLCD.invertText(false);
         delay(50);
         }while(down==false);
          if(button1==0){
         ScrollingText_Character("The daughter of fallen Jedi Anakin and Padmé");
        }
      
      }

     }
  

}

void joystick2_control(){
  int x2 = analogRead( X_axis2);
  int y2 = analogRead( Y_axis2);
  int button2=digitalRead(SW_2);
 if(x2<300){
  right_1=true;
  left_1=false;
  down=false;
  up=false;
  }
  else if(x2>600){
  right_1=false;
  left_1=true;  
  down=false;
  up=false;
  }
   if(left_1==true){
   if(y2<400){
   down_1=true;
   up_1=false;
   down=false;
   up=false;
   }
   else if(y2>600){
   down_1=false;
   up_1=true;
   down=false;
   up=false;
  }

if(up_1 ==true){
     do{
      myGLCD.invertText(true);
      myGLCD.print("Sidious",0,24);
      myGLCD.invertText(false);
      delay(50);
      }while(up_1==false);
         if(button2==0){
         ScrollingText_Character("Outwardly appearing to be supporter of democracy prior");
        }
      
        }
   
if(down_1 ==true){
      do{
       myGLCD.invertText(true);
       myGLCD.print("Vader",0,32);
       myGLCD.invertText(false);
       delay(50);
       }while(down_1==false);
       if(button2==0){
         ScrollingText_Character("The chosen Sith and The fallenJedi,Master,Father");
        }
       
    }
 }
 if(right_1==true){
  if(y2<400){
   down_1=true;
   up_1=false;
 }
  else if(y2>600){
    down_1=false;
    up_1=true;
  }

if(up_1 ==true){
     do{
      myGLCD.invertText(true);
      myGLCD.print("Anakin",40,24);
      myGLCD.invertText(false);
      delay(50);
      }while(up_1==false);
     if(button2==0){
         ScrollingText_Character("The chosen  Jedi,Master,Father");
        }
       
}
   
if(down_1 ==true){
     do{
        myGLCD.invertText(true);
       myGLCD.print("Dooku",40,32);
      myGLCD.invertText(false);
      delay(50);
      }while(down_1==false);
    if(button2==0){
         ScrollingText_Character("Once a respected Jedi Master until he falls ");
        }
      
    }
    }
  
}
void pictures_interface(){
 myGLCD.clrScr();
 myGLCD.drawBitmap(0,0,Spiderman,40,40);
 myGLCD.setFont(SmallFont);
  myGLCD.print("SPIDER",40,0);
  myGLCD.print("MAN",45,8);
  myGLCD.update();
  for (int i=0; i<2; i++)
  {
    myGLCD.invert(true);
    delay(500);
    myGLCD.invert(false);
    delay(500);
  }
   myGLCD.clrScr();
   myGLCD.drawBitmap(0,0,Batman,40,20);
  
 myGLCD.setFont(SmallFont);
  myGLCD.print("BATMAN",40,0);
  myGLCD.update();
  for (int i=0; i<2; i++)
  {
    myGLCD.invert(true);
    delay(500);
    myGLCD.invert(false);
    delay(500);
  }
  myGLCD.clrScr();
  myGLCD.drawBitmap(0,0,starwars,40,24);
  myGLCD.update();
 
  for (int i=0; i<2; i++)
  {
    myGLCD.invert(true);
    delay(500);
    myGLCD.invert(false);
    delay(500);
  }
   myGLCD.clrScr();
    myGLCD.drawBitmap(0,0 ,vader,60,61);
    myGLCD.update();
      for (int i=0; i<2; i++)
  {
    myGLCD.invert(true);
    delay(500);
    myGLCD.invert(false);
    delay(500);
}
 myGLCD.clrScr();
  myGLCD.drawBitmap(0,0,r2_d2,60,60);
  myGLCD.update();
  for (int i=0; i<2; i++)
  {
    myGLCD.invert(true);
    delay(500);
    myGLCD.invert(false);
    delay(500);
  }
   myGLCD.clrScr();
    myGLCD.drawBitmap(0,0,chew,60,60);
    myGLCD.update();
  for (int i=0; i<2; i++)
  {
    myGLCD.invert(true);
    delay(500);
    myGLCD.invert(false);
    delay(500);
  }
   myGLCD.clrScr();
   myGLCD.drawBitmap(0,0,trek,64,60);
   myGLCD.update();
  for (int i=0; i<2; i++)
  {
    myGLCD.invert(true);
    delay(500);
    myGLCD.invert(false);
    delay(500);
  }
   myGLCD.clrScr();
}
void sleepingMode(){
   myGLCD.clrScr();
    myGLCD.setFont(SmallFont);
    myGLCD.print("initializing",0,0);
     myGLCD.print("sleeping mode :",0,8);
      for(int i=0;i<100;i++){
        myGLCD.setFont(SmallFont);
      myGLCD.printNumF(i,CENTER,16,24,"-");
 
    delay(50);
    if(i==99){
      myGLCD.enableSleep();
    }
         myGLCD.update();
      }
}
void ScrollingText_Character(String info){
   myGLCD.clrScr();
  int y = random(0, 0);
  for (int i=84; i>=-(34*6); i--)
  {
   
    myGLCD.print(info, i, y);
    myGLCD.update();
    delay(50);
  }
   myGLCD.clrScr();
}