During these unprecedented times, the COVID-19 pandemic, preserving and supporting our immune system is one of the most crucial precautions of protecting ourselves from the severe effects of the coronavirus, as for any other disease caused by viruses or bacteria. Although there are complex elements and processes which are keeping our immune system healthy, I wanted to focus on a dangerous and ubiquitous problem that causes immunodeficiency worldwide - water pollution. But how does water pollution (bad water quality) cause immunodeficiency?
First of all, water pollution harms animals, plants, and the environment. In that regard, it causes immunodeficiency indirectly by devastating food sources, and therefore nutrients: "Historical accounts and recent epidemiologic studies have suggested a mutually aggravating relationship between malnutrition and infection. In protein-energy malnutrition, there is a significant impairment of several aspects of immunity, including cell-mediated immune responses, secretory immunoglobulin A antibody production, phagocyte function, complement system, antibody affinity, and cytokine production. Several micronutrients play a crucial role in the maintenance of optimum immune responses(1)."
Also, contaminated water sources may instigate defects with immunomodulation (regulatory adjustment of the immune system) by effecting the beneficial commensal bacteria in the human body. "Commensal bacteria, in particular, are key participants in the digestion of food, and are responsible for the extraction and synthesis of nutrients and other metabolites that are essential for the maintenance of mammalian health. Many of these nutrients and metabolites derived from commensal bacteria have been implicated in the development, homeostasis and function of the immune system, suggesting that commensal bacteria may influence host immunity via nutrient- and metabolite-dependent mechanisms(2)."
Aside from obliterating the benefits of nutrients and commensal bacteria, unreliable drinking water sources with bad quality can infect the human body with microorganisms causing immunodeficiency: "Recent evidence suggests that many improved drinking water supplies suffer from poor reliability. A Quantitative Microbiological Risk Assessment was conducted on the impact of interruptions in water supplies that forced people to revert to drinking raw water. Data from the literature were used to construct models on three waterborne pathogens common in Africa: Rotavirus, Cryptosporidium and Enterotoxigenic E. coli. Risk of infection by the target pathogens is substantially greater on days that people revert to raw water consumption. Over the course of a few days raw water consumption, the annual health benefits attributed to consumption of water from an improved supply will be almost all lost. Furthermore, risk of illness on days drinking raw water will fall substantially on very young children who have the highest risk of death following infection(3)."
Considering the possibilities, detecting water quality to prevent water pollution from hurting our immune system is of great importance, especially during a pandemic. And, it is salient to determine polluted water sources correctly after detecting water quality. As WHO says, "In order to determine which constituents are, indeed, of concern, it will be necessary to undertake a drinking-water quality assessment. It is important to identify what types of drinking-water systems are in place in the country (e.g., piped water supplies, non-piped water supplies, vended water) and the quality of drinking-water sources and supplies. Additional information that should be considered in the assessment includes catchment type (protected, unprotected), wastewater discharges, geology, topography, agricultural land use, industrial activities, sanitary surveys, records of previous monitoring, inspections and local and community knowledge. The wider the range of data sources used, the more useful the results of the process will be(4)."
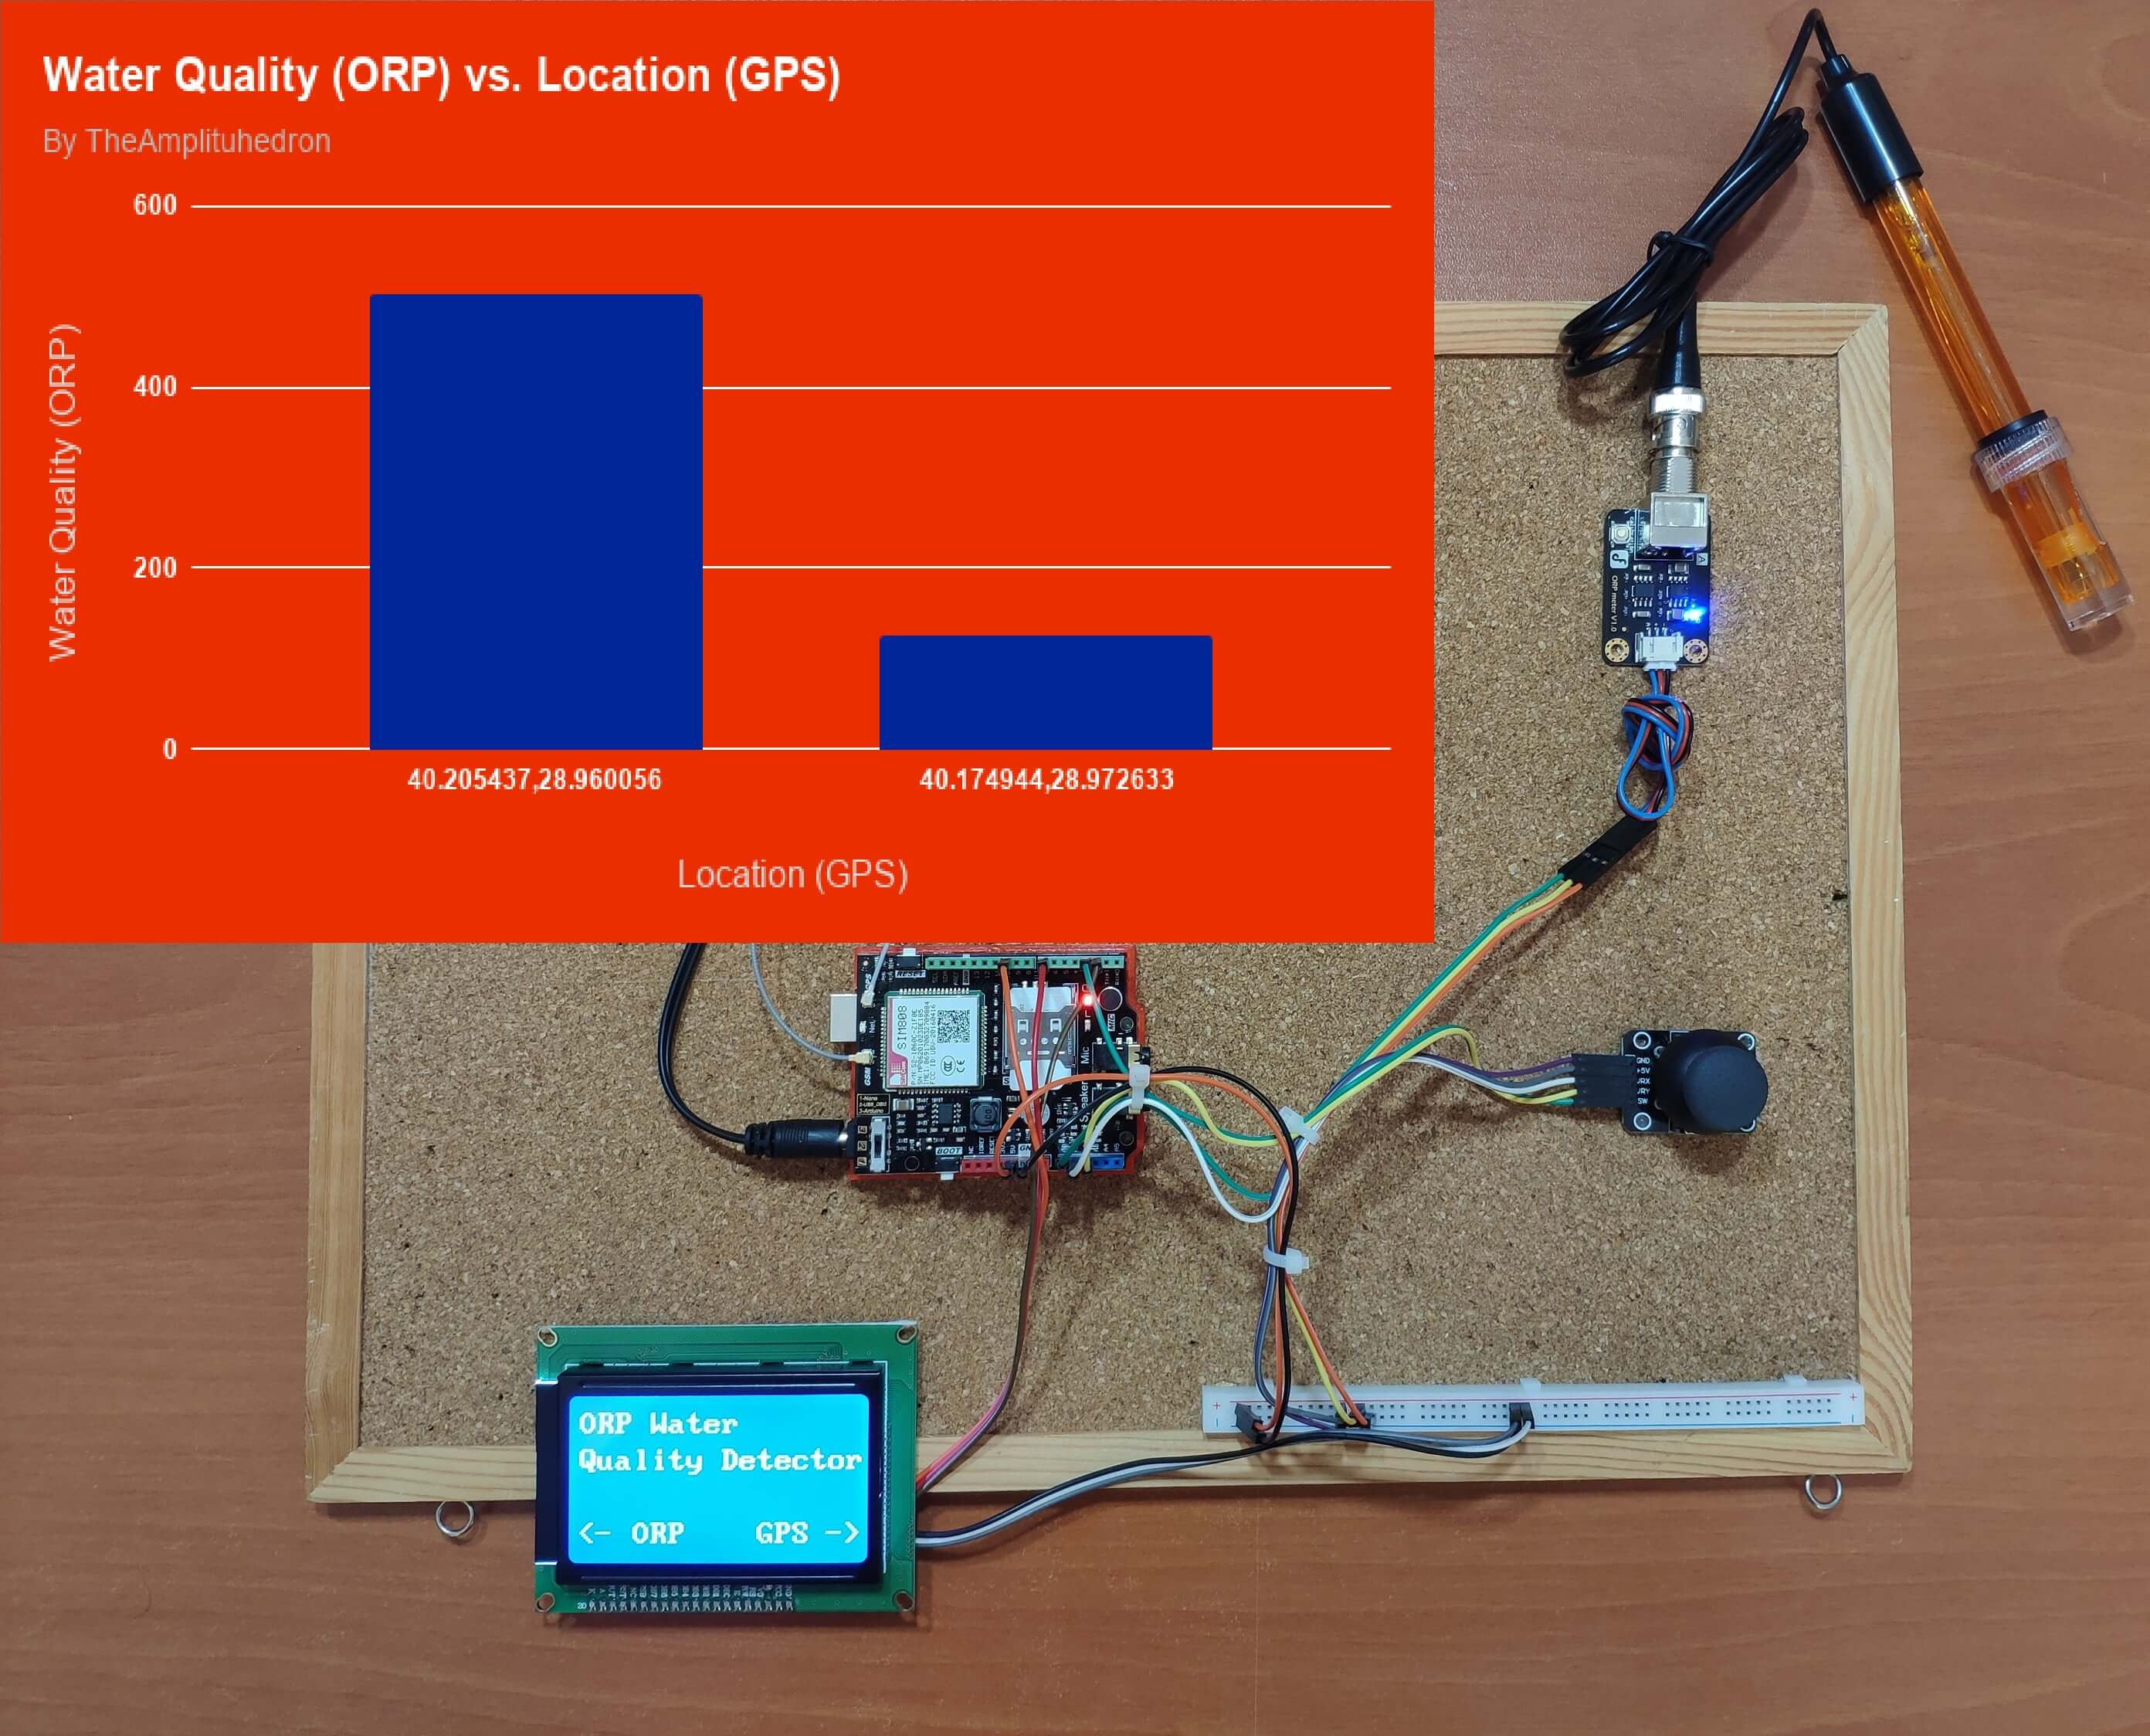
Especially for developing and third-world countries, tracking the water quality to detect the contaminated and polluted water sources is remaining as a big problem due to the high-cost detectors and lack of consistent data. And thus, I contemplated this project as a low-cost water quality detector sending data (water quality) to Google Sheets to create data charts (spreadsheets) by location (GPS), available working in any field as long as GSM network provided and enabled.
To detect the water quality, I chose to use an ORP sensor sponsored by DFRobot. ORP (Oxidation-Reduction Potential) is a measure of the ability of oxidation and reduction of an aqueous solution, which the relative degree of oxidizing or reducing. The unit is mV. If the oxidation-reduction potential is high, then chemical oxidation is strong. But if the potential is low, then oxidation is weaker. The positive potential indicates that the solution shows a certain degree of oxidation: while the negative potential means that solution shows a certain degree of reduction. Oxidation-reduction potential (ORP) can be used to detect water contamination with the benefit of a single-value measure of the disinfection potential, showing the activity of the disinfectant rather than the applied dose. For example, E. coli, Salmonella, Listeria, and other pathogens have survival times of under 30 seconds when the ORP is above 665 mV, compared against 300 seconds when it is below 485 mV(5).
To elicit the GSM information and send data over GPRS, I used a SIM808 GSM/GPS/GPRS Shield sponsored by DFRobot. If the GSM network is provided and enabled, the SIM808 is able to send data by making a GET or POST request to a server in any field. In that regard, the water quality detector lets the user collect data (water quality) even outdoors.
And lastly, I developed a webhook, which will be explained later, in PHP to create a spreadsheet and corroborating data chart in the Google Sheets in the hope of detecting unreliable water sources with consistent water quality dataset by location.
- Gravity: Analog ORP Sensor Meter For Arduino | Inspect
- SIM808 GPS/GPRS/GSM Shield For Arduino | Inspect
Figure - 46.1
Figure - 46.2
Step 1: Get credentials to use the Google Sheets API
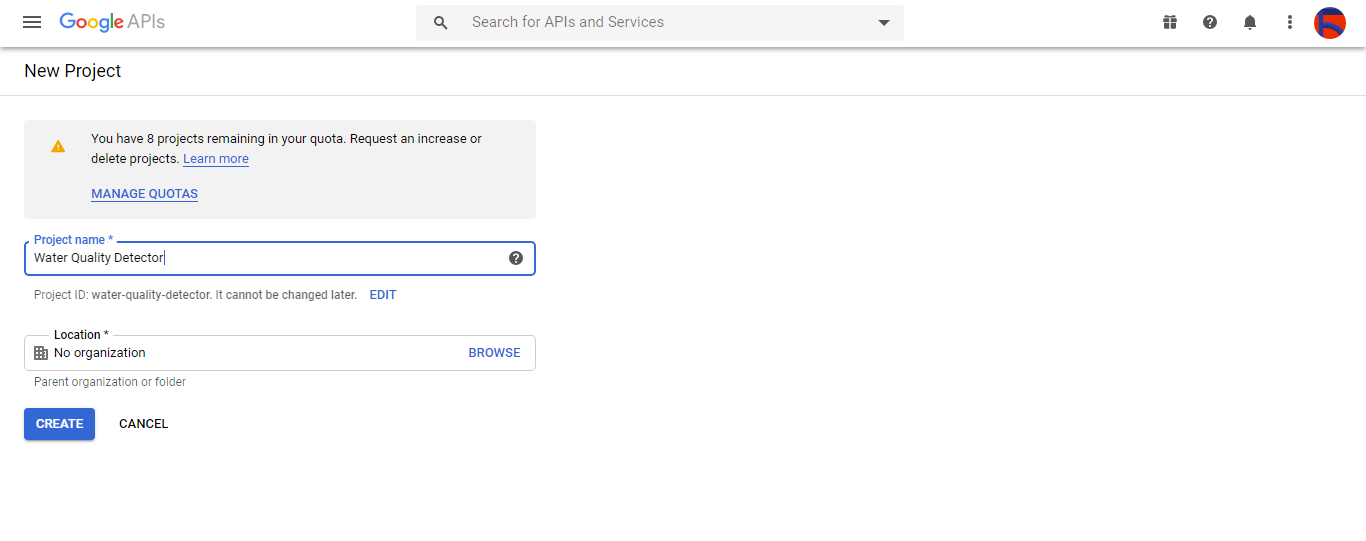
To be able to send information to a spreadsheet in the Google Sheets in PHP, you need to create a new application in the Google Developer Console and get verification credentials to activate the Google Sheets API. If you are a novice in developing applications with the Google Developer Console, follow the instructions.
- Go to the Google Developer Console and click the 'NEW PROJECT' button. Enter the project name (Water Quality Detector).
Figure - 46.3
- Go to the API library and enable the Google Sheets API.
Figure - 46.4
Figure - 46.5
- Open the Google Sheets API and go to the Credentials.
Figure - 46.6
- Click to the 'CREATE CREDENTIALS' button and create a new OAuth client ID named 'Client' and select the application type as 'Desktop app'.
Figure - 46.7
- Download the credentials and name the file as credentials.json to call it in the webhook.
Figure - 46.8
- If necessary, add further information to the application on the OAuth consent screen.
Figure - 46.9
Step 2: Developing the webhook in PHP to append data to a spreadsheet in the Google Sheets with SIM808
This webhook gets information transferred by the SIM808 via an HTTP Get request and sends that information to a given spreadsheet (by ID) in the Google Sheets with verified credentials and token. In the spreadsheet, the information is converted into a data chart by the Google Sheets.
To send data to a spreadsheet in the Google Sheets by using the Google Client library in PHP, you need to verify your console application and get the verification token. To create and activate the webhook, follow the instructions.
Note: You can find more detailed information about the code of the webhook in Code Explanation.
- First of all, to save information to a spreadsheet with its ID, you have to create one in the Google Sheets.
- Download the webhook.php and save it to the sheets folder. If more convenient, you can change its name to index.php as I did.
- Download the account_verification_token.php and save it to the sheets folder.
- Save the credentials.json - covered in the previous step - to the sheets folder.
- Enter the spreadsheet ID in the webhook.php.
- Then, to get the verification code, open the webhook.php in a browser.
your_server/sheets/webhook.php
Figure - 46.14
- Go to the authorization link generated by the application.
Figure - 46.15
- Click to Go to Water Quality Detector (unsafe).
Figure - 46.16
- Grant the application with the required permissions.
Figure - 46.17
- Now, copy the verification code and paste it to the account_verification_token.php.
Figure - 46.18
- Open the webhook.php again and refresh the page if it throws the confirmation message.
Figure - 46.19
- After the webhook uses the verification code to get the verification token, it saves the token in a file named as token.json in the sheets folder. Thus, you do not need to verify your application again until the verification token is expired.
Figure - 46.20
- To test whether the webhook is appending new data to the spreadsheet accurately, go to the link below:
To create the webhook making requests to the Google Sheets API in PHP, I modified the sample code provided in the PHP Quickstart guide.
To append data after a table of data in a sheet, I implemented the sample code, explained in this Google Sheets API guide, on the webhook.
- Include the Google Client API.
- Get the verification code from the account_verification_token.php.
- Get the variables transferred by an HTTP Get request (location and water quality).
- Return the authorized Google client object.
- Define the console application with the credentials.json.
- Load previously authorized token from a file, if it exists.
- The file token.json stores the user's access and refresh tokens, and is created automatically when the authorization flow completes for the first time.
- If there is no previous token or it's expired, then refresh the token if possible, else fetch a new one.
- Request authorization from the user.
- Exchange authorization code for an access token.
- Save the token to a file named token.json.
- Get the API client and construct the service object.
- Define the spreadsheet ID.
- Enter the range (the first row) under which new values will be appended.
- Append recent findings (location and water quality) to the spreadsheet.
Figure - 46.23
Figure - 46.24
Figure - 46.25
Step 3: Programming Arduino Uno
Before uploading the code to Arduino Uno, do not forget to change the server name and the web_hook (webhook path) if necessary.
Note: You can inspect the algorithm I used to generate ORP values from here.
- Include the required libraries.
- Define the sim808 object.
- Define the joystick pins to control the interface.
- Define the default settings of the ORP sensor.
- Define interface menu options - GPS_Screen and ORP_Screen.
- Initiate the SPI LCD Screen with the given pins (2, 7, 10).
- Continue if the SIM808 Module is working accurately.
- Display a notification message depending on the status of the GPS.
- In the interface() function, print the interface and select a menu option depending on the X-axis value of the joystick.
- If the GPS_Screen is true, print the data generated by the GPS.
- In the get_GPS_Data() function, convert the GPS data from strings to unsigned char arrays to be able to print them on the SPI LCD Screen.
- If the ORP_Screen is true, print the ORP value generated by the ORP sensor.
- If the joystick button is pressed, send the ORP value and the GPS data (location) to the webhook.
- In the send_data_to_Google_Sheets() function, connect to the server via the GSM network and send a GET request to the webhook with the data - location and water quality.
- In the read_ORP_Sensor() function, convert the analog value to the ORP value by this equation:
Note: D0, D1, D12 pins are occupied by the SIM808 GPS/GPRS/GSM Shield.
Connect an external battery (7-23V) for the SIM808 module to work properly.
Attach the GPS antenna and the GSM antenna to the SIM808 shield.
Insert a SIM card into the SIM slot on the SIM808 shield.
Before uploading the code, set the function switch on the shield to None (1).
Upload the code.
Then, set the function switch to Arduino (3).
Press the Boot button on the shield until seeing the Net indicator LED flashing every 1 second and wait for the SIM card to register the network - the Net indicator LED will slowly flash every 3 seconds.
Click here to get more information about the SIM808 GSM/GPS/GPRS Shield.
Figure - 46.33
Connect the 3-wire Serial LCD Module to the Arduino Uno.
To switch to the 3-Wire mode, set the PSB_ON switch to SPI.
Click here to get more information about the 3-wire Serial LCD Module.
Figure - 46.34
Figure - 46.35
Connect the joystick module to the Arduino Uno.
Figure - 46.36
Connect the ORP probe circuit board to the Arduino Uno.
If needed, to calibrate the ORP sensor, press the calibration button on the board and keep it pressed until seeing a small ORP value printed on the serial monitor. Then according to this value, modify the offset in the code. For instance, if it generates 8mV, then change the offset (OFFSET) from 0 to 8 in the code.
Do not calibrate the sensor while the ORP probe (BNC connector) is connected to the ORP electrode.
Click here to get more information about the Gravity: Analog ORP Sensor Meter.
Figure - 46.37
Lastly, I fastened all components on a corkboard because of its mobility and flexibility - makes it easy to work with the device in the field :)
Figure - 46.38
Features
As explained above, I developed this apparatus in the hope of abating the spread of the disease (COVID-19) by helping people to track water pollution (contamination) by location to protect their immune systems in impoverished areas because viruses cannot harm and flourish under the attack of a healthy immune system. In that regard, I pondered the features below.
1) The device throws an error message (Init Error) until the SIM808 connects to the GSM network.
Figure - 46.39
2) When the SIM808 connects to the GSM network and works properly, the device shows a confirmation message (Init Success).
Figure - 46.40
3) If the power supply is sustainable for GPS, the device shows a confirmation message (GPS Success).
Figure - 46.41
4) After checking functions and modules, the device displays the interface with menu options - GPS and ORP.
- Move the joystick to the up to return to the interface (home screen) after selecting a menu option.
Figure - 46.42
5) Move the joystick to the right to activate the GPS mode.
- In the GPS mode, the device displays information generated by the GPS module - date, time, latitude, and longitude.
Figure - 46.43
6) Move the joystick to the left to activate the ORP mode.
- In the ORP mode, the device displays the real-time ORP value generated by the ORP sensor in mV.
Figure - 46.44
7) In the ORP mode, press the switch button of the joystick module to make a GET request to the webhook in order to append data (ORP value and location) to the spreadsheet defined by its ID in the Google Sheets via the Google Sheets API.
Figure - 46.45
Figure - 46.46
- After appending data to the spreadsheet, you can view the data chart generated automatically by the Google Sheets as a consistent dataset in tracking water pollution (contamination).
Figure - 46.47
Figure - 46.48
Videos and Conclusion
After completing the apparatus, I went to different water sources as many as possible to conduct experiments in the field, considering data variety and veracity.
Figure - 46.49
Figure - 46.50
Figure - 46.51
Figure - 46.52
Figure - 46.53
Figure - 46.54
Figure - 46.55
I recorded one of my experiments conducted in a water source (stream) near to a village. And, in a separate video, I showed how I collected specimen for the experiment.
Also, I conducted experiments with drinking water supplies considered as reliable at home.
Figure - 46.56
Figure - 46.57
According to the water quality data (ORP) I collated by location, I tracked the possible water pollution (contamination) areas. ORP can be very useful in the single-value assessment of the disinfection potential of water: "Oxidation-reduction potential is the potential (voltage) at which oxidation occurs at the anode (positive), and reduction occurs at the cathode (negative) of an electrochemical cell. In simple terms, from a microbial perspective, an oxidizing chemical pulls electrons away from the cell membrane, causing it to become destabilized and leaky. Destroying the integrity of the cell membrane leads to rapid death. Operationally much like a digital thermometer or pH probe, ORP sensors allow easy monitoring and tracking of critical disinfectant levels in water systems(5)."
Figure - 46.58
References
(1) Ranjit Kumar Chandra, Sobha Kumari, "Nutrition and Immunity: An Overview", The Journal of Nutrition, Volume 124, Issue suppl_8, August 1994, Pages 1433S–1435S, https://doi.org/10.1093/jn/124.suppl_8.1433S
(2) Brestoff, J., Artis, D. "Commensal bacteria at the interface of host metabolism and the immune system". Nat Immunol 14, 676–684 (2013). https://doi.org/10.1038/ni.2640
(3) Paul R. Hunter, Denis Zmirou-Navier, Philippe Hartemann, "Estimating the impact on health of poor reliability of drinking water interventions in developing countries", Science of The Total Environment, Volume 407, Issue 8, 1 April 2009, Pages 2621-2624, https://doi.org/10.1016/j.scitotenv.2009.01.018
(4) WHO Global, "Undertaking a drinking-water quality assessment", Guidelines for Drinking-water Quality, Fourth edition, 17 July 2017, Page 28, https://www.who.int/publications/i/item/guidelines-for-drinking-water-quality
(5) Trevor V. Suslow, 2004. Oxidation-Reduction Potential for Water Disinfection Monitoring, Control, and Documentation, University of California Davis, http://ucce.ucdavis.edu/files/datastore/234-406.pdf
<?php
require_once $_SERVER['DOCUMENT_ROOT']."google-api-php-client-2.4.1/vendor/autoload.php"; // Google Client API v2.0
require_once "account_verification_token.php"; // Get the verification code.

// Get the variables (location and water quality).
$variables_from_module;
if(isset($_GET['location']) && isset($_GET['water_quality'])){
	$variables_from_module = [
	  "location" => $_GET['location'],
	  "water_quality" => (int)$_GET['water_quality']
    ];
}else{
    $variables_from_module = [
	  "location" => "ERROR",
	  "water_quality" => 0
    ];
}


/**
 * Returns an authorized API client.
 * @return Google_Client the authorized client object
 */
function getClient()
{
    $client = new Google_Client();
    $client->setApplicationName('Water Quality Detector'); // Enter your application name.
    $client->setScopes('https://www.googleapis.com/auth/spreadsheets');
    $client->setAuthConfig('credentials.json');
    $client->setAccessType('offline');
    $client->setPrompt('select_account consent');

    // Load previously authorized token from a file, if it exists.
    // The file token.json stores the user's access and refresh tokens, and is
    // created automatically when the authorization flow completes for the first
    // time.
    $tokenPath = 'token.json';
    if (file_exists($tokenPath)) {
        $accessToken = json_decode(file_get_contents($tokenPath), true);
        $client->setAccessToken($accessToken);
		print("Token Found!");
    }

    // If there is no previous token or it's expired.
    if ($client->isAccessTokenExpired()) {
        // Refresh the token if possible, else fetch a new one.
        if ($client->getRefreshToken()) {
            $client->fetchAccessTokenWithRefreshToken($client->getRefreshToken());
        } else {
            // Request authorization from the user.
            $authUrl = $client->createAuthUrl();
			// Do not forget to refresh the page after getting the verification code and entering it to the account_verification_token.php.
            printf("Open the following link in your browser:<br><br>%s<br><br>", $authUrl); // <= Comment
            print 'Do not forget to refresh the page after getting the verification code and entering it to the account_verification_token.php.<br><br>Set the verification code in the account_verification_token.php file.'; // <= Comment
            // Set the verification code to create the token.json.
			$authCode = trim($GLOBALS['account_verification_token']);

            // Exchange authorization code for an access token.
            $accessToken = $client->fetchAccessTokenWithAuthCode($authCode);
            $client->setAccessToken($accessToken);

            // Check to see if there was an error.
            if (array_key_exists('error', $accessToken)) {
                throw new Exception(join(', ', $accessToken));
            }else{
				print("Successful! Refresh the page.");
			}
        }
        // Save the token to a file.
        if (!file_exists(dirname($tokenPath))) {
            mkdir(dirname($tokenPath), 0700, true);
        }
        file_put_contents($tokenPath, json_encode($client->getAccessToken()));
    }
    return $client;
}


// Get the API client and construct the service object.
$client = getClient();
$service = new Google_Service_Sheets($client);

// Enter your spreadsheetId:
$spreadsheetId = '[Spreadsheet_ID]';
// Enter the range (the first row) under which new values will be appended:
$range = 'A1:B1';
// Append recent findings (location and water quality) to the spreadsheet.
$values = [
    [$variables_from_module["location"], $variables_from_module["water_quality"]]
];
$body = new Google_Service_Sheets_ValueRange([
    'values' => $values
]);
$params = [
    'valueInputOption' => "RAW"
];
// Append if only requested!
if(isset($_GET['location'])){
    $result = $service->spreadsheets_values->append($spreadsheetId, $range, $body, $params);
    printf("<br><br>%d cells appended.", $result->getUpdates()->getUpdatedCells());
}