Set the feeding time and feed your birds without considering the time by using a DS3231 module. Display date, time and temperature as well.
Advertisement:
Read Later
Set the feeding time and feed your birds without considering the time by using a DS3231 module. Display date, time and temperature as well.
Components :
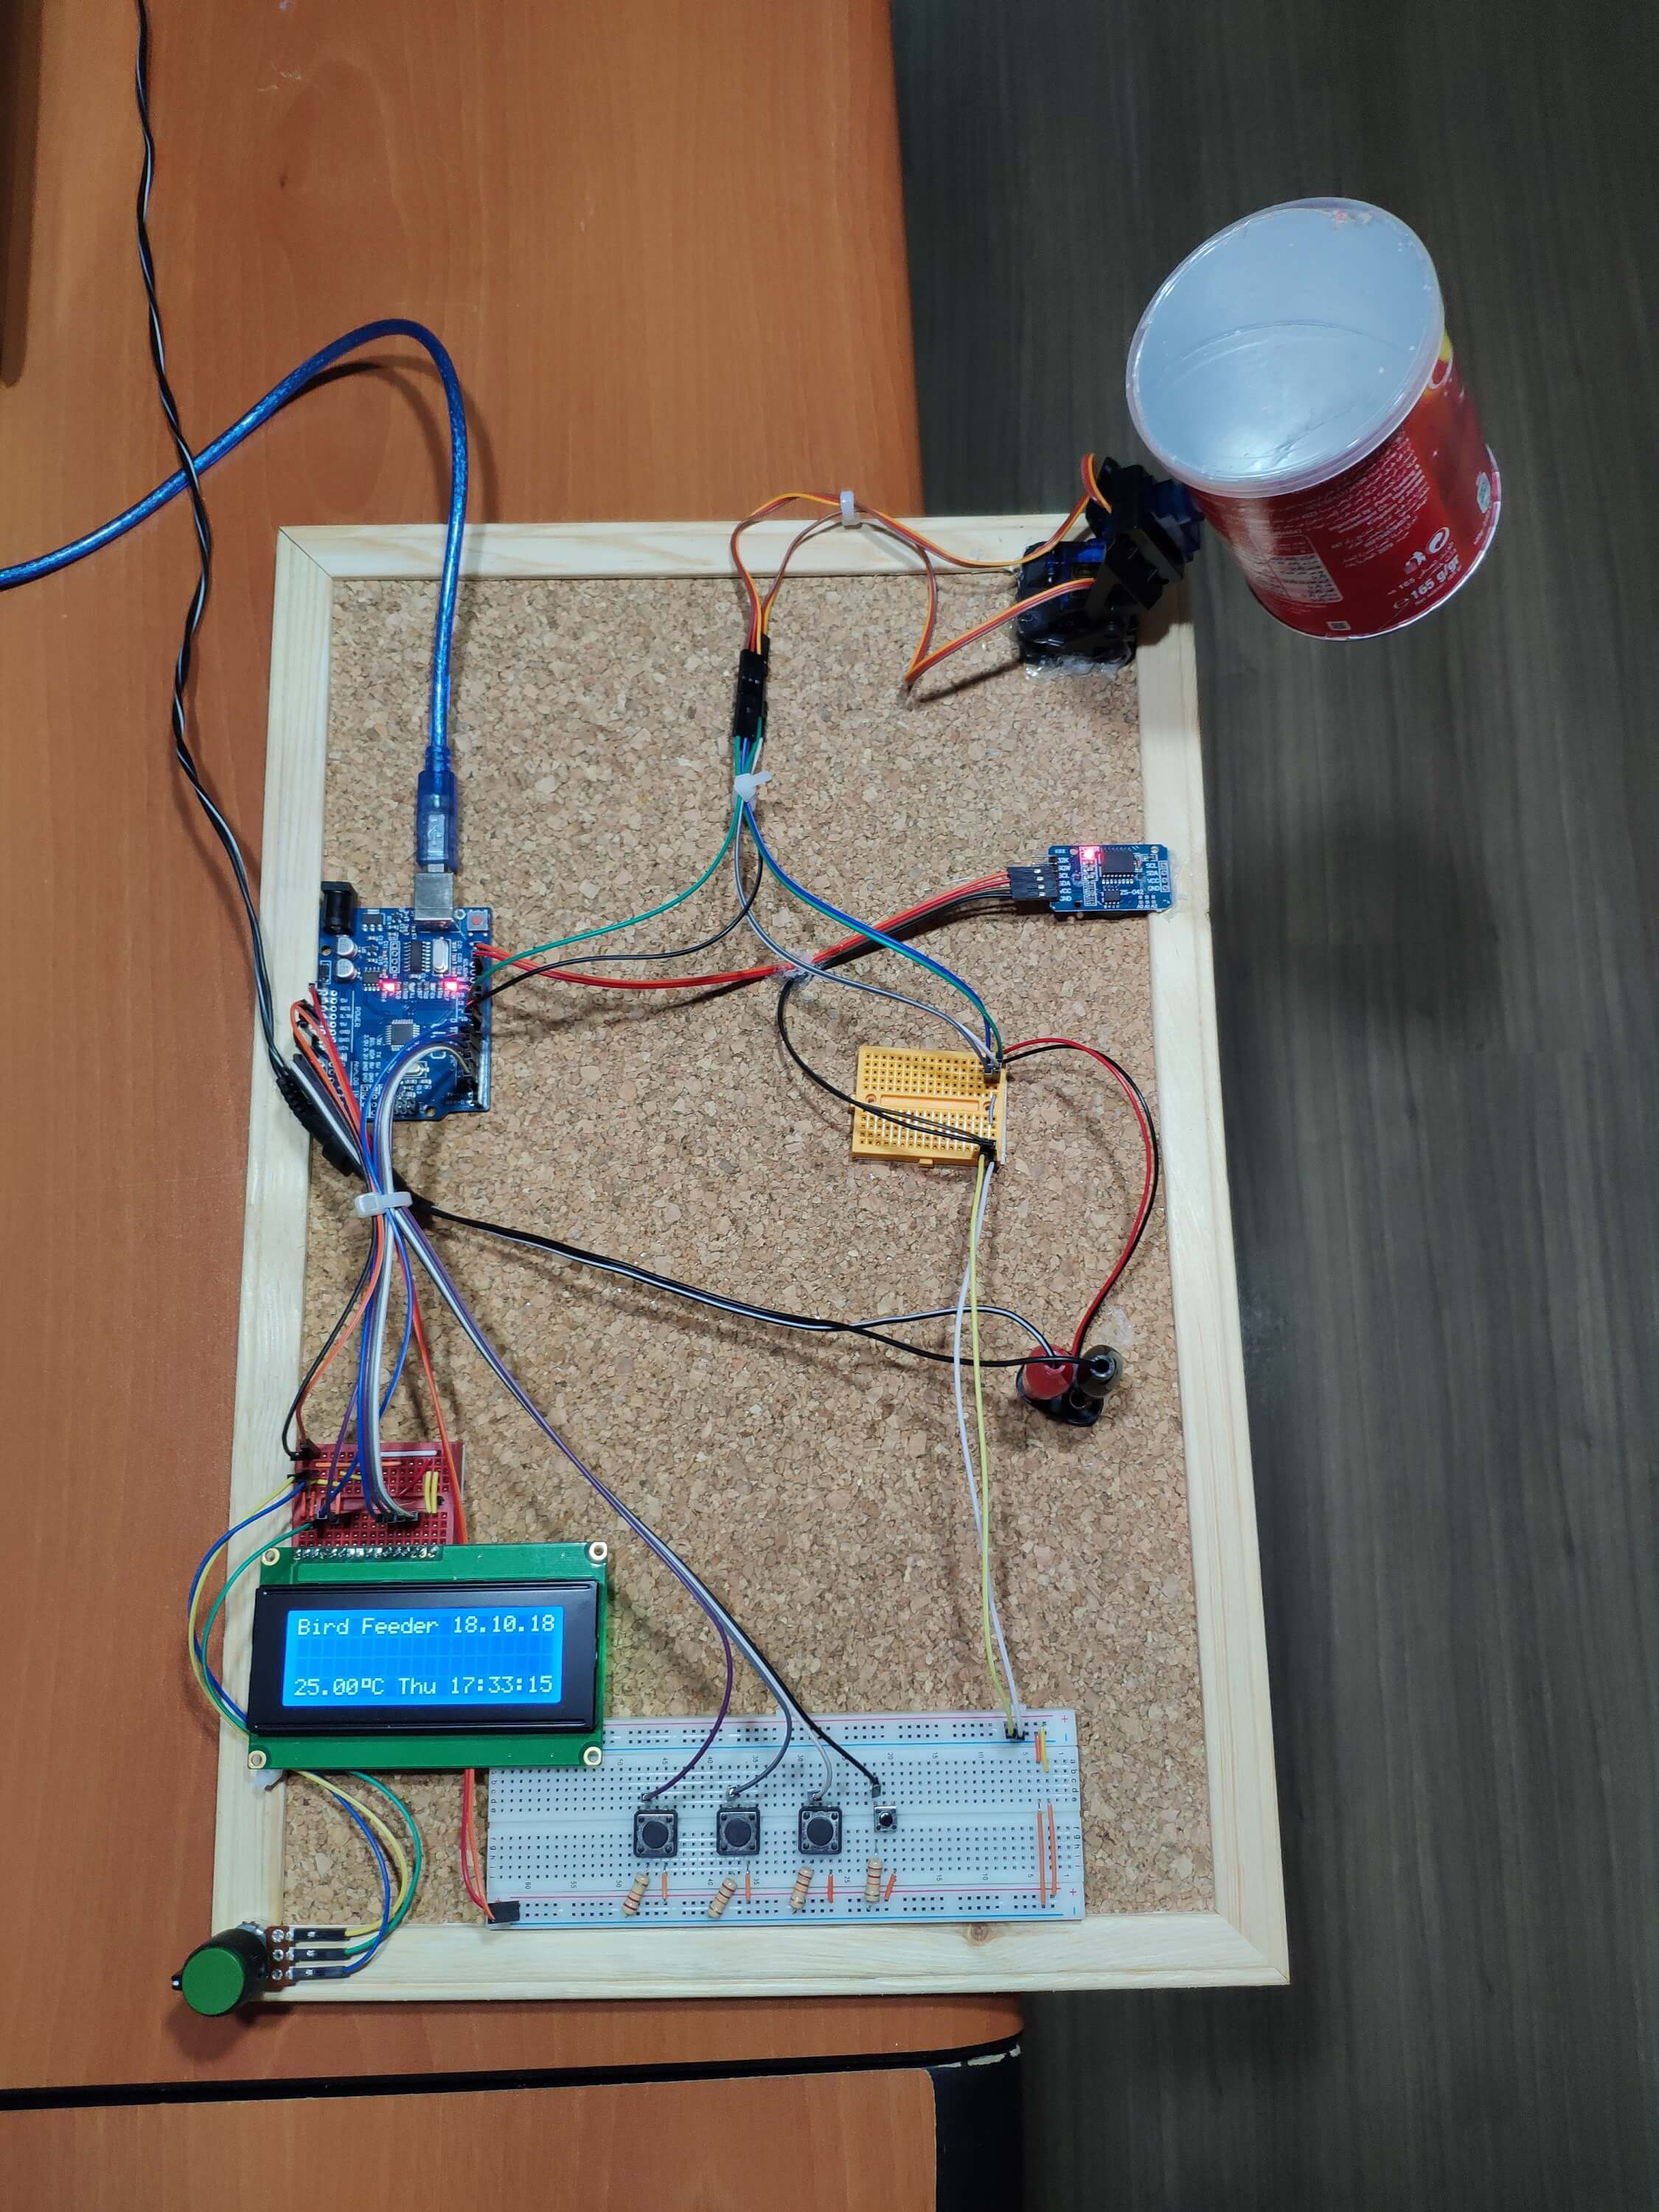
Arduino Uno[1]LCD Screen - 20x4 [1]DS3231 RTC module [1]Mini pan tilt kit [1]Servo(SG-90) [2]Mini Breadboard [2]Breadboard [1]9V Battery Clip [1]Pushbutton [4]Resistor 1K [4]Potentiometer [1]Jumper wires [1]I am keeping quails at my balcony but it, sometimes, was getting hard to feed them every day at the same time for conditioning them to lay eggs at the same time every morning and also it is a healthier way to increase egg production by changing the laying circle and the hatching process.For solving this problem, I made a bird feeder using a DS3231 module to get date,time and temperature variables properly. It displays four different screens to manage controls – the home screen, the feeding time set screen, the remaining time get screen and the status check screen – explained below. To give movement and rotation angle to the feeding system, I used a mini pan tilt with two mini servo motors(SG-90) and an external power supply to power them. After all these steps, I attached a cut in half Pringles cup containing quail food.
1) Solder male pins to the lcd screen(20x4) by using soldering iron.


2) Connect buttons and potentiometer wires to the breadboard.


3) Connect the DS3231 rtc module to the second mini breadboard.


4) Assembly the mini pan tilt kit and servo motors.


5) Sturdier connections using a hot glue gun.


Pin connections between Arduino and components is well explained with a detailed description at the code below.

After making connections, attach a cup to the mini pan tilt, containing quail food. I used a cut in half Pringles cup :)


Now, it is ready to execute the code below.

It is also the opening screen of RTC Bird Feeder.
Features:
Display date, time and temperature variables by DS3231 module along with the project name - Bird Feeder.


While Left is HIGH, it turns the home screen to the get remaining time screen.
Features:
Get the remaining time for the feeding time when it is activated.


While OK is HIGH, it turns the home screen to the feeding time set screen.
Features:
Adjust the feeding time by either increasing or decreasing feedHour and feedMin variables described at the code below using Left and Right.


While Right is HIGH, it turns the home screen to the status check screen.
Features:
Check whether the system is activated or not.


Demonstration
How it works
RTC Bird Feeder.ino
Download
         /////////////////////////////////////////////
        //           RTC Bird Feeder               //
       //                                         //
      //             ---------------             //
     //              (Arduino Uno)              //
    //             by Kutluhan Aktar           //
   //                                         //
  /////////////////////////////////////////////

// Set the feeding time and feed your birds without considering the time by using a DS3231 module. Display date, time and temperature as well.
// By using buttons on the breadboard you can set the feeding time, defined as Left, Right, OK and END buttons.
// There are four different screens as menu options you switch using buttons:
// HomeScreen
// It is the interface of RTC Bird Feeder that shows date, time and temperature values.
// The Feeding Time Set Screen
// Set the feeding time in 24hr format.
// The Remaining Time Get Screen
// Get remaining time to the feeding time when it is activated.
// Status Check Screen
// It chacks whether the system is activated or not by using OK button.
//
// Connections
// Arduino Uno(CH340) :
//                                20x4 LCD Screen
// D7  --------------------------- rs
// D6  --------------------------- en
// D5  --------------------------- D4
// D4  --------------------------- D5
// D3  --------------------------- D6
// D2  --------------------------- D7
//                                Servo SG-90 (Joint_1)
// D9  ---------------------------
//                                Servo SG-90 (Joint_2)
// D10 ---------------------------
//                                DS3231
// SDA(or A4 )-------------------- SDA
// SCL(or A5) -------------------- SCL
//                                Left Button
// A0  ---------------------------
//                                OK Button
// A1  ---------------------------
//                                Right Button
// A2  ---------------------------
//                                End Button
// A3  ---------------------------


// Include this library for DS3231 RTC module and init the DS3231 using SDA and SCL pins.
#include
DS3231  rtc(SDA, SCL);

// Define lcd screen pins(rs, en , D4, D5, D6, D7).
#include
LiquidCrystal lcd(7,6,5,4,3,2);

// Include servo library and define their names.
#include
Servo Joint_1;
Servo Joint_2;

// Create lcd characters from bytes.
byte clocK[8] = {
0b01010,
0b01010,
0b11011,
0b10001,
0b10101,
0b10101,
0b10001,
0b11111,
};

byte X[8] = {
0b00000,
0b10001,
0b01010,
0b00100,
0b01010,
0b10001,
0b00000,
0b00000,
};

byte smile[8] = {
0b00000,
0b01010,
0b00000,
0b00100,
0b10001,
0b10001,
0b10001,
0b11111,
};

byte celcius[8] = {
0b01111,
0b01001,
0b01001,
0b01111,
0b00000,
0b00000,
0b00000,
0b00000,
};

// Define button pins.
#define Left_B A0
#define OK_B A1
#define Right_B A2
#define END A3

// Define button values.
int Left;
int OK;
int Right;
int End;

// Define menu options and variables to adjust the feeding time.
boolean Set_Feed_Time;
boolean Get_Remaining_Time;
boolean Status_Check;
// Check and test the feeding system.
boolean Activated = false;

// Define a time variable to get data from DS3231 properly.
Time t;

// Define feed hour and minute.
int feedHour;
int feedMin;

void setup(){
// Initial lcd library for a 20 to 4 lcd screen.
lcd.begin(20, 4);

// Initialize the rtc object
rtc.begin();

// Attach servo motors to pwm pins.
Joint_1.attach(10);
Joint_2.attach(9);

// Start pimMode();
  pinMode(Left_B, INPUT);
  pinMode(OK_B, INPUT);
  pinMode(Right_B, INPUT);

// The following lines can be uncommented to set the date and time
//  rtc.setDOW(WEDNESDAY);     // Set Day-of-Week to Wednesday
//  rtc.setTime(12, 0, 0);     // Set the time to 12:00:00 (24hr format)
//  rtc.setDate(17, 10, 2018);   // Set the date to October 17st, 2018

}

void loop(){
// Get the current hour and minute from DS3231. t.hour; and t.min;
t = rtc.getTime();

// Start servo motors.
Joint_1.write(0);
Joint_2.write(0);

 createLCD();

 ReadButtons();

 HomeScreen();

 Set_Feeding_Time(); // OK Button at the homescreen.

 Get_Remaining_Time_(); // Left Button at the homescreen.

 Status_Check_(); // Right Button at the homescreen.

 Feeding_Time();

}

void ReadButtons(){
  // Read button with anolog pins.
   Left = digitalRead(Left_B);
   OK = digitalRead(OK_B);
   Right = digitalRead(Right_B);
   End = digitalRead(END);
  }

void createLCD(){
  // Create lcd characters at the beginning of the code above.
  lcd.createChar(1, clocK);
  lcd.createChar(2, X);
  lcd.createChar(3, smile);
  lcd.createChar(4, celcius);
  }

 void HomeScreen(){
  // Code a homescreen for RTC Bird Feeder.
  lcd.setCursor(0, 0);
  lcd.print("Bird Feeder");
  // Write Dow
  lcd.setCursor(8, 3);
  lcd.print(rtc.getDOWStr(FORMAT_SHORT));
  // Write Date
  lcd.setCursor(12, 0);
  lcd.print(rtc.getDateStr(FORMAT_SHORT));
  // Write Time
  lcd.setCursor(12, 3);
  lcd.print(rtc.getTimeStr());
  // Write Temperature
  lcd.setCursor(0, 3);
  lcd.print(rtc.getTemp());
  lcd.write(4);
  lcd.print("C");
  }

 void Set_Feeding_Time(){
 if(OK == HIGH){
  Set_Feed_Time = true;
  // While OK is HIGH, it turns the homescreen to the feeding time set screen.
  if(Set_Feed_Time == true){
    lcd.clear();
    // Activate the feeding system.
    Activated = true;
    while(Set_Feed_Time == true){
      // Adjust the feeding time by either increasing or decreasing variables through the feeding time set screen.
      ReadButtons();
      lcd.setCursor(0, 0);
      lcd.print("Set Feeding Time");
      lcd.setCursor(0, 2);
      lcd.print("Left");
      lcd.setCursor(0, 3);
      lcd.print("F_Hour:");
      lcd.print(feedHour);
      lcd.setCursor(10, 2);
      lcd.print("Right");
      lcd.setCursor(10, 3);
      lcd.print("F_Min:");
      lcd.print(feedMin);

      // Change feedHour and feedMin bu using left and right buttons.
      if(Right == HIGH){
        feedMin++;
        delay(100);
          if(feedMin > 59){
          // It has to be bewtween 0 and 59 in 60 minutes.
          feedMin = 0;
          lcd.clear();
          }
        }
      if(Left == HIGH){
        feedHour++;
        delay(100);
        if(feedHour > 23){
          // It has to be bewtween 0 and 23 in 24hr format.
          feedHour = 0;
          lcd.clear();
          }
        }
      // Control OK button to turn the feeding time set screen to the homescreen.
      if(End == HIGH){
        // End task and turn back the homscreen.
        Set_Feed_Time = false;
        lcd.clear();
        }
      }
    }
  }
  }

 void Get_Remaining_Time_(){
  if(Left == HIGH){
    Get_Remaining_Time = true;
    // While Left is HIGH, it turns the homescreen to the get remaining time screen.
    if(Get_Remaining_Time == true){
      lcd.clear();
      while(Get_Remaining_Time == true){
        ReadButtons();
        // Get the remaining time for the feeding time.
        lcd.setCursor(0, 0);
        lcd.print("Remaining Time to ");
        lcd.write(1);
        lcd.setCursor(0, 2);
        if(Activated == false){
           lcd.print("Not Activated - ");
           lcd.write(2);
          }else if(Activated == true){
            if(t.hour > feedHour){
             lcd.print(24 - (t.hour - feedHour));
             }else if(t.hour <= feedHour){
              lcd.print(abs(t.hour - feedHour));
              }
          lcd.print(" hours ");
          if(t.min > feedMin){
            lcd.print(60 - (t.min - feedMin));
            }else if(t.min <= feedMin){
              lcd.print(abs(t.min - feedMin));
              }
          lcd.print(" minutes ");
         }

        // Control OK button to turn the feeding time set screen to the homescreen.
        if(End == HIGH){
         // End task and turn back the homscreen.
         Get_Remaining_Time = false;
         lcd.clear();
         }
        }
      }
    }
  }

  void Status_Check_(){
    if(Right == HIGH){
      Status_Check = true;
      //  While Right is HIGH, it turns the homescreen to the status check screen.
      if(Status_Check == true){
        lcd.clear();
        while(Status_Check == true){
          ReadButtons();
          // Check the system whether it is activated or not.
          lcd.setCursor(0, 0);
          lcd.print("Status Check :");
          lcd.setCursor(0, 2);
          if(Activated == false){
            lcd.print("Not Activated - ");
            lcd.write(2);
            }else if(Activated == true){
              lcd.print("Running - ");
              lcd.write(3);
              }

          // Control OK button to turn the feeding time set screen to the homescreen.
          if(End == HIGH){
           // End task and turn back the homscreen.
           Status_Check = false;
           lcd.clear();
          }
          }
        }
      }
    }

  void Feeding_Time(){
    // Check whether the feeding time is set or not.
    if(Activated == true){
      if(t.hour == feedHour && t.min == feedMin){
        // Activate the feeding systems by adjusting servos.
        Joint_1.write(0);
        Joint_2.write(180);
        delay(300);
        // Return system values after activation.
        Activated = false;
        }
      }

    }

Fritzing File
Download
1 ) Arduino Uno R3
2 ) 20x4 LCD Screen
3 ) DS3231 AT24C32 IIC High Precision Real Time Clock Module For Arduino
4 ) Pan Tilt 2 Axis For SG90 Servo Motor
5 ) SG-90 Mini Servo Motor
6 ) Breadboard
7 ) Mini Breadboard
8 ) Rotary Potentiometer
9 ) Resistor Kit for Arduino
10 ) Switch Push Button Kit For Arduino
11 ) Plastic For Rotary Taper Potentiometer Hole 6mm Knob