Read Later
Develop a GUI to display current air quality values as per the MQ-135 position precisely and control a mini pan-tilt kit with the background color of the apparatus.
Advertisement:
Read Later
Read Later
Develop a GUI to display current air quality values as per the MQ-135 position precisely and control a mini pan-tilt kit with the background color of the apparatus.
Components :
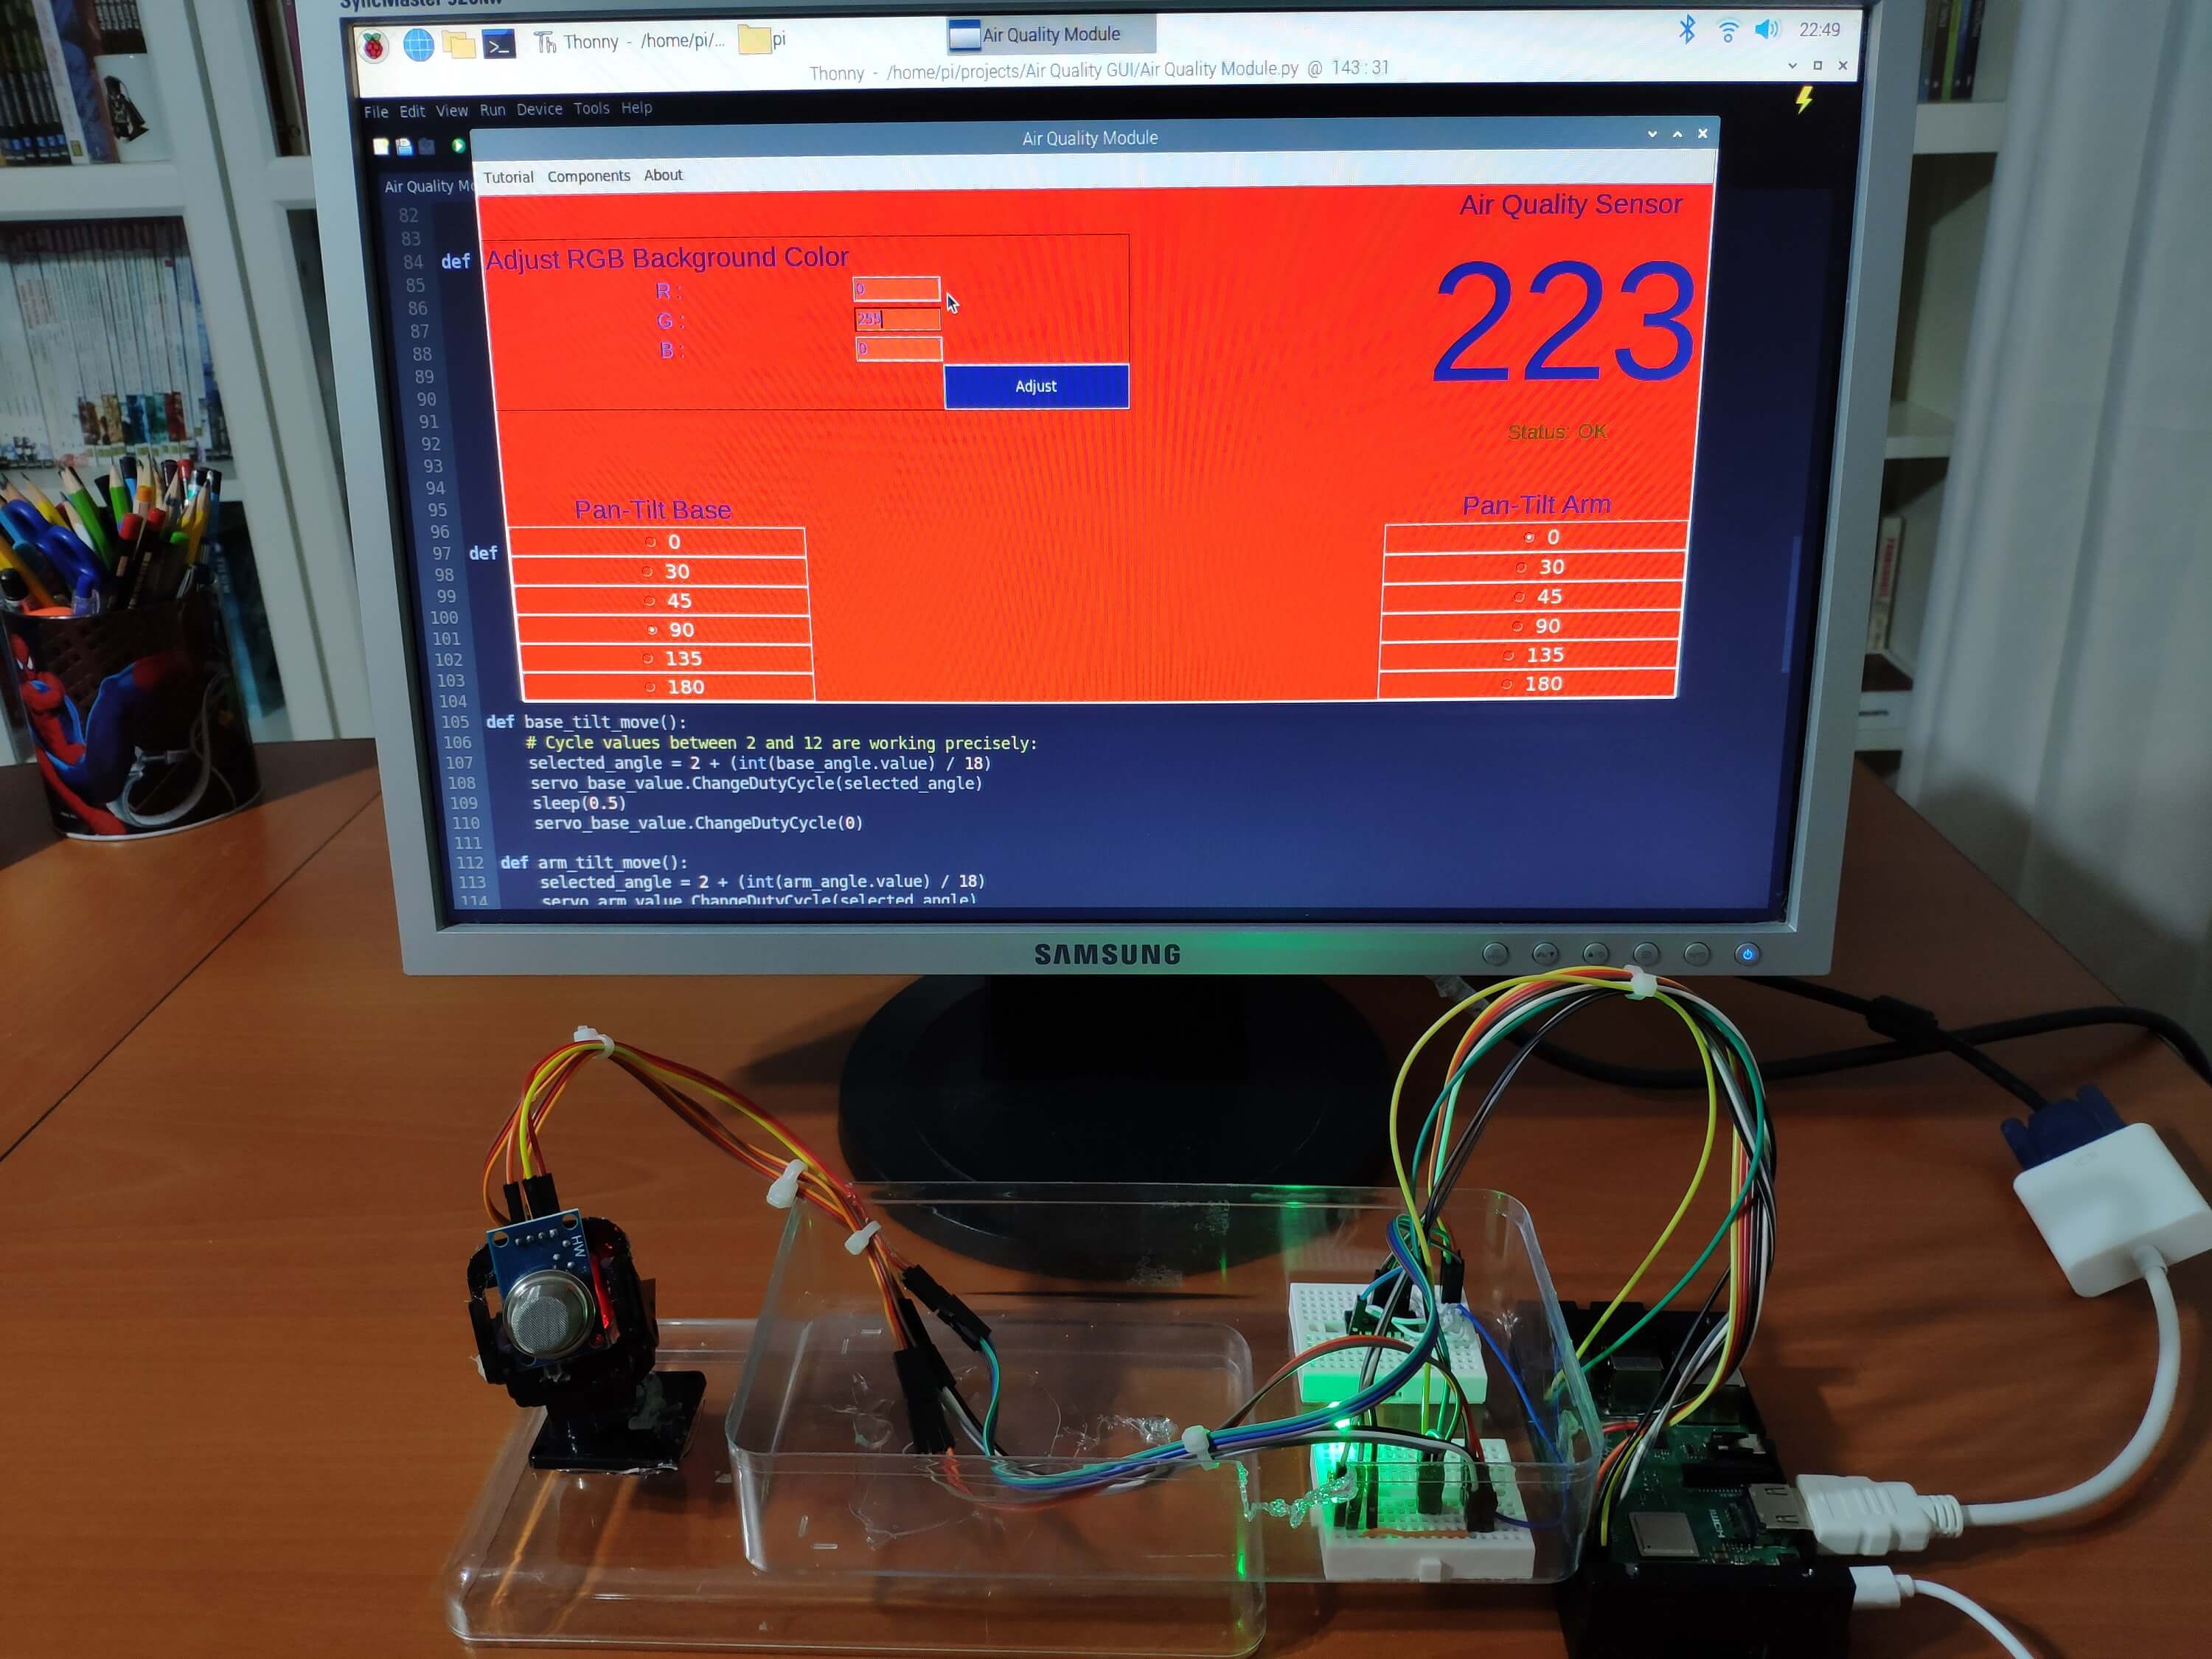
[1]Raspberry Pi 3 Model B+[1]Raspberry Pi 3 Board Case 3B[1]SD Card 32GB[1]MCP3008[1]MQ-135 Air Quality Sensor[1]Mini Pan-Tilt Kit[2]SG-90 Servo Motor[1]RGB LED[2]Mini Breadboard[3]220 ohm resistor[+]Jumper WiresI had been working on a project with which I could collate air quality information from an MQ-135 Air Quality Sensor to detect the occurrence of the deteriorating air quality in my workplace. However, the positioning of the MQ-135 Air Quality Sensor has gigantic importance while collecting pristine information from the sensor. Therefore, I decided to make a moveable sensor base via selected angles by developing a user-friendly interface. To achieve that goal and add a few corroborating features such as adjustable background light, I developed a GUI using the guizero module in Python for my Raspberry Pi, named Air Quality Module.
Via Air Quality Module, you can control two servo motors attached to the mini pan-tilt kit by choosing one of the given angles - 0, 30, 45, 90, 135, 180 - and adjust the background light in RGB format - 255, 255, 255. And, most importantly, you can monitor the current air quality range generated by the MQ-135 sensor: the GUI notifies you with a warning message if the air quality is deteriorating.
Some of the mentioned products and components in this project are sponsored by digitspace:
- Raspberry Pi 3 Board Case 3B | Inspect
- Raspberry Pi 4B/3B+ SD Card 32GB | Inspect
- Raspberry Pi 3B Micro-HDMI VGA Converter Cables | Inspect


- How to control servo motors using angles with Raspberry Pi
- How to adjust the color of RGB LEDs with Raspberry Pi
- How to read analog sensors with MCP3008 and Raspberry Pi
- How to develop a GUI using the guizero module
- How to program a range function to arrange values like the map function in Arduino
Unfortunately, Raspberry Pi does not have a built-in ADC (analog-to-digital converter) by which we can collect information from analog sensors easily as opposed to Arduino. Hence, we need to implement an external ADC in our circuit to collate data from analog sensors like the MQ-135 Air Quality Sensor. I used an MCP3008 8-channel ADC due to its efficiency and simple usage.
I used the Adafruit CircuitPython MCP3xxx library on Raspberry Pi to read analog sensors with MCP3008.
But, you will need to install the Adafruit_Blinka library that provides the CircuitPython support in Python to use the mentioned library.
sudo pip3 install adafruit-blinka

If it is needed, you have to enable the SPI on Raspberry Pi Configuration Settings before executing the command.
Once that's done, from your command line run the following command to install the Adafruit CircuitPython MCP3xxx library.
sudo pip3 install adafruit-circuitpython-mcp3xxx
Then, make the pin connections as follows. Even though the pin connections are well-explained on the project schematic and in the code, I'll leave the following pin connection schematic for MCP3008 besides them.
- MCP3008 CLK to Pi SCLK
- MCP3008 DOUT to Pi MISO
- MCP3008 DIN to Pi MOSI
- MCP3008 CS to Pi D5
- MCP3008 VDD to Pi 3.3V
- MCP3008 VREF to Pi 3.3V
- MCP3008 AGND to Pi GND
- MCP3008 DGND to Pi GND
- MCP3008 CH0 to Analog Sensor's Signal Pin
CH0 refers to the first input pin on the MCP3008 - from 0 to 7.

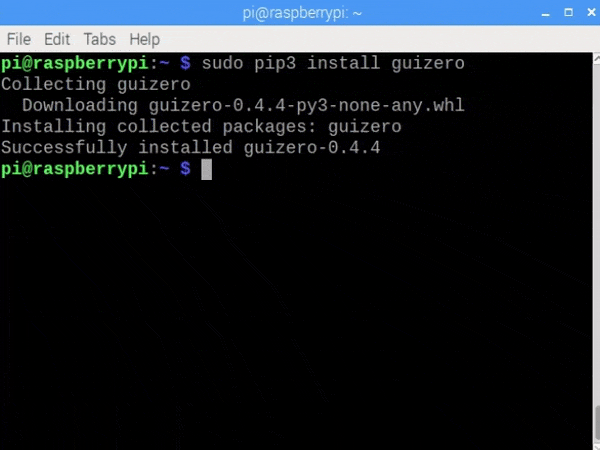
To be able to create a GUI in Python, you need to install the guizero module on Raspberry Pi. Then, you can use all the provided widgets and events by the module.
From your command line run the following command to install the guizero module.
sudo pip3 install guizero
You can inspect all instructions and widget settings from here.
- Import the required libraries and modules.
- Do not forget to include all GUI widgets - App, Box, Text, TextBox, PushButton, ButtonGroup, MenuBar, info, yesno, warn.
- Create the SPI bus, the cs (chip select), and the mcp object.
- Create analog input channels connected to the input pins on the MCP3008 - I used only the channel 0.
- Define GPIO pin settings - GPIO.setmode(GPIO.BCM).
- Define RGB pins and set PWM frequencies - 100.
- Start RGB PWM pins at 100 - OFF.
- Define servo motor pins and set PWM frequencies - 50.
- Start servo base and arm pins at 0 - OFF.
- Define menu bar option commands (functions):
- In the Tutorial() function, open a yesno message to go to the project tutorial page if requested.
- In the Components() function, open an info message to display components.
- In the About() function, open an info message to display the elevator pitch.
- Define the widget commands and features:
- In the _range() function, replicate the Arduino map function to arrange values in a given range in Python.
- In the evaluateSensorValue() function, get the air quality value from the MQ-135 Air Quality in the tested range - from 0-60000 to 0-1023.
- Test your module, then define the value range in this case between 0 and 60000.
- If the threshold (300) is exceeded, notify with a warning message - Air Quality Deteriorating - and change the Status to DANGER.
- In the adjust_color() function, adjust the color of the RGB LED by changing PWM frequencies - between 0 and 100 - using ChangeDutyCycle(). Arrange the entered color values from 0-255 to 0-100.
- In base_tilt_move() and arm_tilt_move() functions, control the servo motors by the selected angles - 0, 30, 45, 90, 135, 180 - running ChangeDutyCycle(selected_angle). Cycle values between 2 and 12 are working precisely for the angles between 0 and 180.
- Do not forget to execute the following line after adjusting servo motor positions to turn off the servo PWM pins.
- ChangeDutyCycle(0)
- Create the GUI application named Air Quality Module.
- Define menu bar options - Tutorial, Components, About.
- Design the interface using the box widget:
RGB Color Interface
- Align parts using layout grid.
- Assign the related command (function) to the Adjust pushbutton - adjust_color.
Air Quality Interface
- Define the sensor and status text variables.
- Update the sensor value generated by the MQ-135 Air Quality Sensor every second by using the repeat() function.
Note: While loops are not working while executing the app.display() function.
Mini Pan-Tilt Base Interface
- Define the angles in the buttongroup widget - 0, 30, 45, 90, 135, 180.
- Assign the related command (function) - base_tilt_move.
Mini Pan-Tilt Arm Interface
- Define the angles in the buttongroup widget - 0, 30, 45, 90, 135, 180.
- Assign the related command (function) - arm_tilt_move.
- Start the loop- app.display().


1) Change the background color of the apparatus (RGB).


2) Adjust the position of the servo motors on the mini pan-tilt kit by selecting amidst angles - 0, 30, 45, 90, 135, 180.


3) Get notified when the sensor (MQ-135) detects the occurrence of the air quality deterioration - Status: DANGER.

On Menu Bar:
4) Go to the tutorial page.


5) Inspect the components.

6) Display the elevator pitch.

Pin connections are well-explained in the code and on the project schematic below.
Connect Raspberry Pi to the screen.

Attach MCP3008 and RGB LED to the mini breadboards. I used a potentiometer to test the value range before connecting the MCP3008 to Raspberry Pi.


Assemble the mini pan-tilt kit and glue the MQ-135 Air Quality Sensor on the mini pan-tilt kit (arm).

After completing all the steps, I affix all parts on an old plastic box and position the apparatus on my desk to collect air quality data and adjust its background color using Air Quality Module (GUI) on my Raspberry Pi :)
Demonstration
Air Quality Module.py
Download
# Raspberry Pi Adjustable Air Quality Detector Controlled via GUI
#
# Raspberry Pi 3B+
#
# By Kutluhan Aktar
#
# Learn how to develop a GUI, named Air Quality Module, to control a mini pan-tilt kit and get information from an MQ-135 Air Quality Sensor.
# Also, you can change the background light (RGB) via the GUI.
#
# Get more information on the project page:
# https://theamplituhedron.com/projects/Raspberry-Pi-Adjustable-Air-Quality-Detector-Controlled-via-GUI/


from guizero import App, Box, Text, TextBox, PushButton, ButtonGroup, MenuBar, info, yesno, warn
from time import sleep
from subprocess import call
import RPi.GPIO as GPIO
import busio
import digitalio
import board
import adafruit_mcp3xxx.mcp3008 as MCP
from adafruit_mcp3xxx.analog_in import AnalogIn


# Create the SPI bus
spi = busio.SPI(clock=board.SCK, MISO=board.MISO, MOSI=board.MOSI)

# Create the cs (chip select)
cs = digitalio.DigitalInOut(board.D5)

# Create the mcp object
mcp = MCP.MCP3008(spi, cs)

# Create analog inputs connected to the input pins on the MCP3008.
channel_0 = AnalogIn(mcp, MCP.P0)

# Define RGB pins settings and PWM frequencies
GPIO.setmode(GPIO.BCM)
red_pin = 2
green_pin = 3
blue_pin = 4
GPIO.setup(red_pin, GPIO.OUT)
GPIO.setup(green_pin, GPIO.OUT)
GPIO.setup(blue_pin, GPIO.OUT)
red_value = GPIO.PWM(red_pin, 100)
blue_value = GPIO.PWM(blue_pin, 100)
green_value = GPIO.PWM(green_pin, 100)
red_value.start(100)
blue_value.start(100)
green_value.start(100)

# Define servo motor pin settings and PWM frequencies
servo_base_pin = 20
servo_arm_pin = 21
GPIO.setup(servo_base_pin, GPIO.OUT)
GPIO.setup(servo_arm_pin, GPIO.OUT)
servo_base_value = GPIO.PWM(servo_base_pin, 50)
servo_arm_value = GPIO.PWM(servo_arm_pin, 50)
servo_base_value.start(0)
servo_arm_value.start(0)


# Define menu bar options' commands (functions).
def Tutorial():
    # Open the project page if requested.
    go_to_tutorial = yesno("Open Tutorial", "Get more information about the project!")
    if go_to_tutorial == True:
        command = "chromium-browser https://theamplituhedron.com/projects/"
        call([command], shell=True)
        print("Project Tutorial!")
    else:
        warn("Close", "Return to the application!")

def Components():
    info("Components", "Raspberry Pi 3B+\nMQ-135 Sensor\nMini Pan-Tilt Kit\n2 x Servo Motor\nRGB LED\n2 x Mini Breadboard\nMCP3008")

def About():
    info("About", "Develop a GUI, named Air Quality Module, to control a mini pan-tilt kit and get information from an MQ-135 Air Quality Sensor. Also, you can change the background light (RGB) on the GUI.")

#  Define application commands and features:
def _range(x, in_min, in_max, out_min, out_max):
    return int((x - in_min) * (out_max - out_min) / (in_max - in_min) + out_min)

def evaluateSensorValue():
    # Test your module, then define the value range - in this case between 0 and 60000.
    sensorValue = _range(channel_0.value, 0, 60000, 0, 1023)
    sensor_value.value = sensorValue
    # Threshold
    if(sensorValue > 300):
        status_text.value = "Status: DANGER"
        status_text.text_color = "yellow"
        warn("!!!DANGER!!!", "Air Quality Deteriorating!")
    else:
        status_text.value = "Status: OK"
        status_text.text_color = "green"

def adjust_color():
    red = _range(int(r_input.value), 0, 255, 1, 100)
    green = _range(int(g_input.value), 0, 255, 1, 100)
    blue = _range(int(b_input.value), 0, 255, 1, 100)
    red_value.ChangeDutyCycle(101 - red)
    blue_value.ChangeDutyCycle(101 - blue)
    green_value.ChangeDutyCycle(101 - green)

def base_tilt_move():
    # Cycle values between 2 and 12 are working precisely:
    selected_angle = 2 + (int(base_angle.value) / 18)
    servo_base_value.ChangeDutyCycle(selected_angle)
    sleep(0.5)
    servo_base_value.ChangeDutyCycle(0)

def arm_tilt_move():
    selected_angle = 2 + (int(arm_angle.value) / 18)
    servo_arm_value.ChangeDutyCycle(selected_angle)
    sleep(0.5)
    servo_arm_value.ChangeDutyCycle(0)

# Create the GUI application.
appWidth = 1200
appHeight = 500
app = App(title="Air Quality Module", bg="#eb2e00", width=appWidth, height=appHeight)
# Define menu bar options.
menubar = MenuBar(app, toplevel=["Tutorial", "Components", "About"],
                  options=[
                      [ ["View", Tutorial] ],
                      [ ["Inspect", Components ] ],
                      [ ["About", About] ]
                  ])
# Design the interface using the box widget.
top = Box(app, width="fill", height=appHeight / 2, align="top")
bottom = Box(app, width="fill", height=appHeight / 2, align="bottom")
color_interface = Box(top, width=appWidth / 2, align="left", layout="grid", border=True)
quality_interface = Box(top, width=appWidth / 2, align="right")
base_interface = Box(bottom, width=appWidth / 2, align="left")
arm_interface = Box(bottom, width=appWidth / 2, align="right")

# RGB Color Interface
color_header = Text(color_interface, text="Adjust RGB Background Color", color="#002699", size=20, grid=[0,0])
r_label = Text(color_interface, text="R :", color="#1a53ff", size=15, grid=[0,1])
r_input = TextBox(color_interface, grid=[1,1])
r_input.bg = "#ff5c33"
r_input.text_color = "#1a53ff"
g_label = Text(color_interface, text="G :", color="#1a53ff", size=15, grid=[0,2])
g_input = TextBox(color_interface, grid=[1,2])
g_input.bg = "#ff5c33"
g_input.text_color = "#1a53ff"
b_label = Text(color_interface, text="B :", color="#1a53ff", size=15, grid=[0,3])
b_input = TextBox(color_interface, grid=[1,3])
b_input.bg = "#ff5c33"
b_input.text_color = "#1a53ff"
adjust_button = PushButton(color_interface, grid=[2,4], width="20", text="Adjust", command=adjust_color)
adjust_button.bg = "#002699"
adjust_button.text_color = "white"

# Air Quality Interface
quality_header = Text(quality_interface, text="Air Quality Sensor", color="#002699", size=20, align="top")
sensor_value = Text(quality_interface, text="TEST", color="#002699", size=120)
status_text = Text(quality_interface, text="Status: OK", color="green", size=15, align="bottom")
# Update the sensor value.
sensor_value.repeat(1000, evaluateSensorValue)

# Mini Pan-Tilt Base Interface
base_header = Text(base_interface, text="Pan-Tilt Base", color="#002699", size=20)
base_angle = ButtonGroup(base_interface, options=["0", "30", "45", "90", "135", "180"], selected="0", width=20, command=base_tilt_move)
base_angle.text_size = 15
base_angle.text_color = "white"

# Mini Pan-Tilt Arm Interface
arm_header = Text(arm_interface, text="Pan-Tilt Arm", color="#002699", size=20)
arm_angle = ButtonGroup(arm_interface, options=["0", "30", "45", "90", "135", "180"], selected="0", width=20, command=arm_tilt_move)
arm_angle.text_size = 15
arm_angle.text_color = "white"

# Start the loop.
app.display()

Fritzing File
Download