How to make a lamp controlled by TV remote control.
Advertisement:
Read Later
How to make a lamp controlled by TV remote control.
Components :
Arduino Mega 2560[1]Led[10]RGB[1]Breadboard[1]Mini Breadboard[1]2-Way Relay[1]Flame Sensor[1]LCD Screen(16,2)[1]Light Bulb[2]DC Motor [2]Dual H-Bridge motor drivers L298N[1]3-Way Gang Mains Socket[1]Resistor 220 ohm[13]IR receiver[1]9V Battery[1]9V Battery Clip[1]Use IRrecvDemo example file in IRremote library (https://github.com
/z3t0/Arduino-IRremote) for getting your TV remote control push buttons IR codes. After that, you have to copy these codes to Remote Lamb.ino as #define 0xIRremote.

// Arduino
//                           RGB LED
// Pin 2                     1
// 5V                        2
// Pin 3                     3
// Pin 4                     4
//
//                           Flame Sensor
// Pin 22                    1
// 5V                        5V
// GND                       GND
//
//                           Potentiometer
// 5V                        1
//
// GND                       3
//
//                           LCD Display (16,2)
// GND                       1
// 5V                        2
//                           Potentiometer Analog Pin
// Pin 23                    rs
// GND                       6
// Pin 24                    en
// Pin 25                    D4
// Pin 26                    D5
// Pin 27                    D6
// Pin 28                    D7
// 5V
// GND
//
// Pin 22                    Flame LED
// Pin 29                    LED1
// Pin 30                    LED2
// Pin 31                    LED3
// Pin 32                    LED4
// Pin 33                    LED5
// Pin 34                    LED6
// Pin 35                    LED7
// Pin 36                    LED8
// Pin 37                    LED9
//
//                           L298N Motor Driver
// 12V                       9V Battery (+)
// GND                       9V Battery (-)
// Pin 38                    İNT1
// Pin 39                    İNT2
// Pin 40                    İNT3
// Pin 41                    İNT4
//
//                           2-Way Relay
// 5V                        5V
// Pin 42                    İNT1
// Pin 43                    İNT2
// GND                       GND
//
//                           IR Receiver Module
// Pin 44                    DO
// 5V                        5V
// GND                       GND
If Button1 is pushed, LED1 opens and "LED1 is OPEN" command is activated.
If Button2 is pushed, LED2 opens and "LED2 is OPEN" command is activated.
If Button3 is pushed, LED3 opens and "LED3 is OPEN" command is activated.
If Button4 is pushed, LED4 opens and "LED4 is OPEN" command is activated.
If Button5 is pushed, LED5 opens and "LED5 is OPEN" command is activated.
If Button6 is pushed, LED6 opens and "LED6 is OPEN" command is activated.
If Button7 is pushed, LED7 opens and "LED7 is OPEN" command is activated.
If Button8 is pushed, LED8 opens and "LED8 is OPEN" command is activated.
If Button9 is pushed, LED9 opens and "LED9 is OPEN" command is activated.
If ButtonA is pushed, RGB LED is red and "RED" command is activated.
If ButtonB is pushed, RGB LED is green and "GREEN" command is activated.
If ButtonC is pushed, RGB LED is yellow and "YELLOW" command is activated.
If ButtonD is pushed, RGB LED is blue and "BLUE" command is activated.
If Button0 is pushed, all LED is off.
If Button+ is pushed, Light1 is open and "Light1 is OPEN" command is activated.
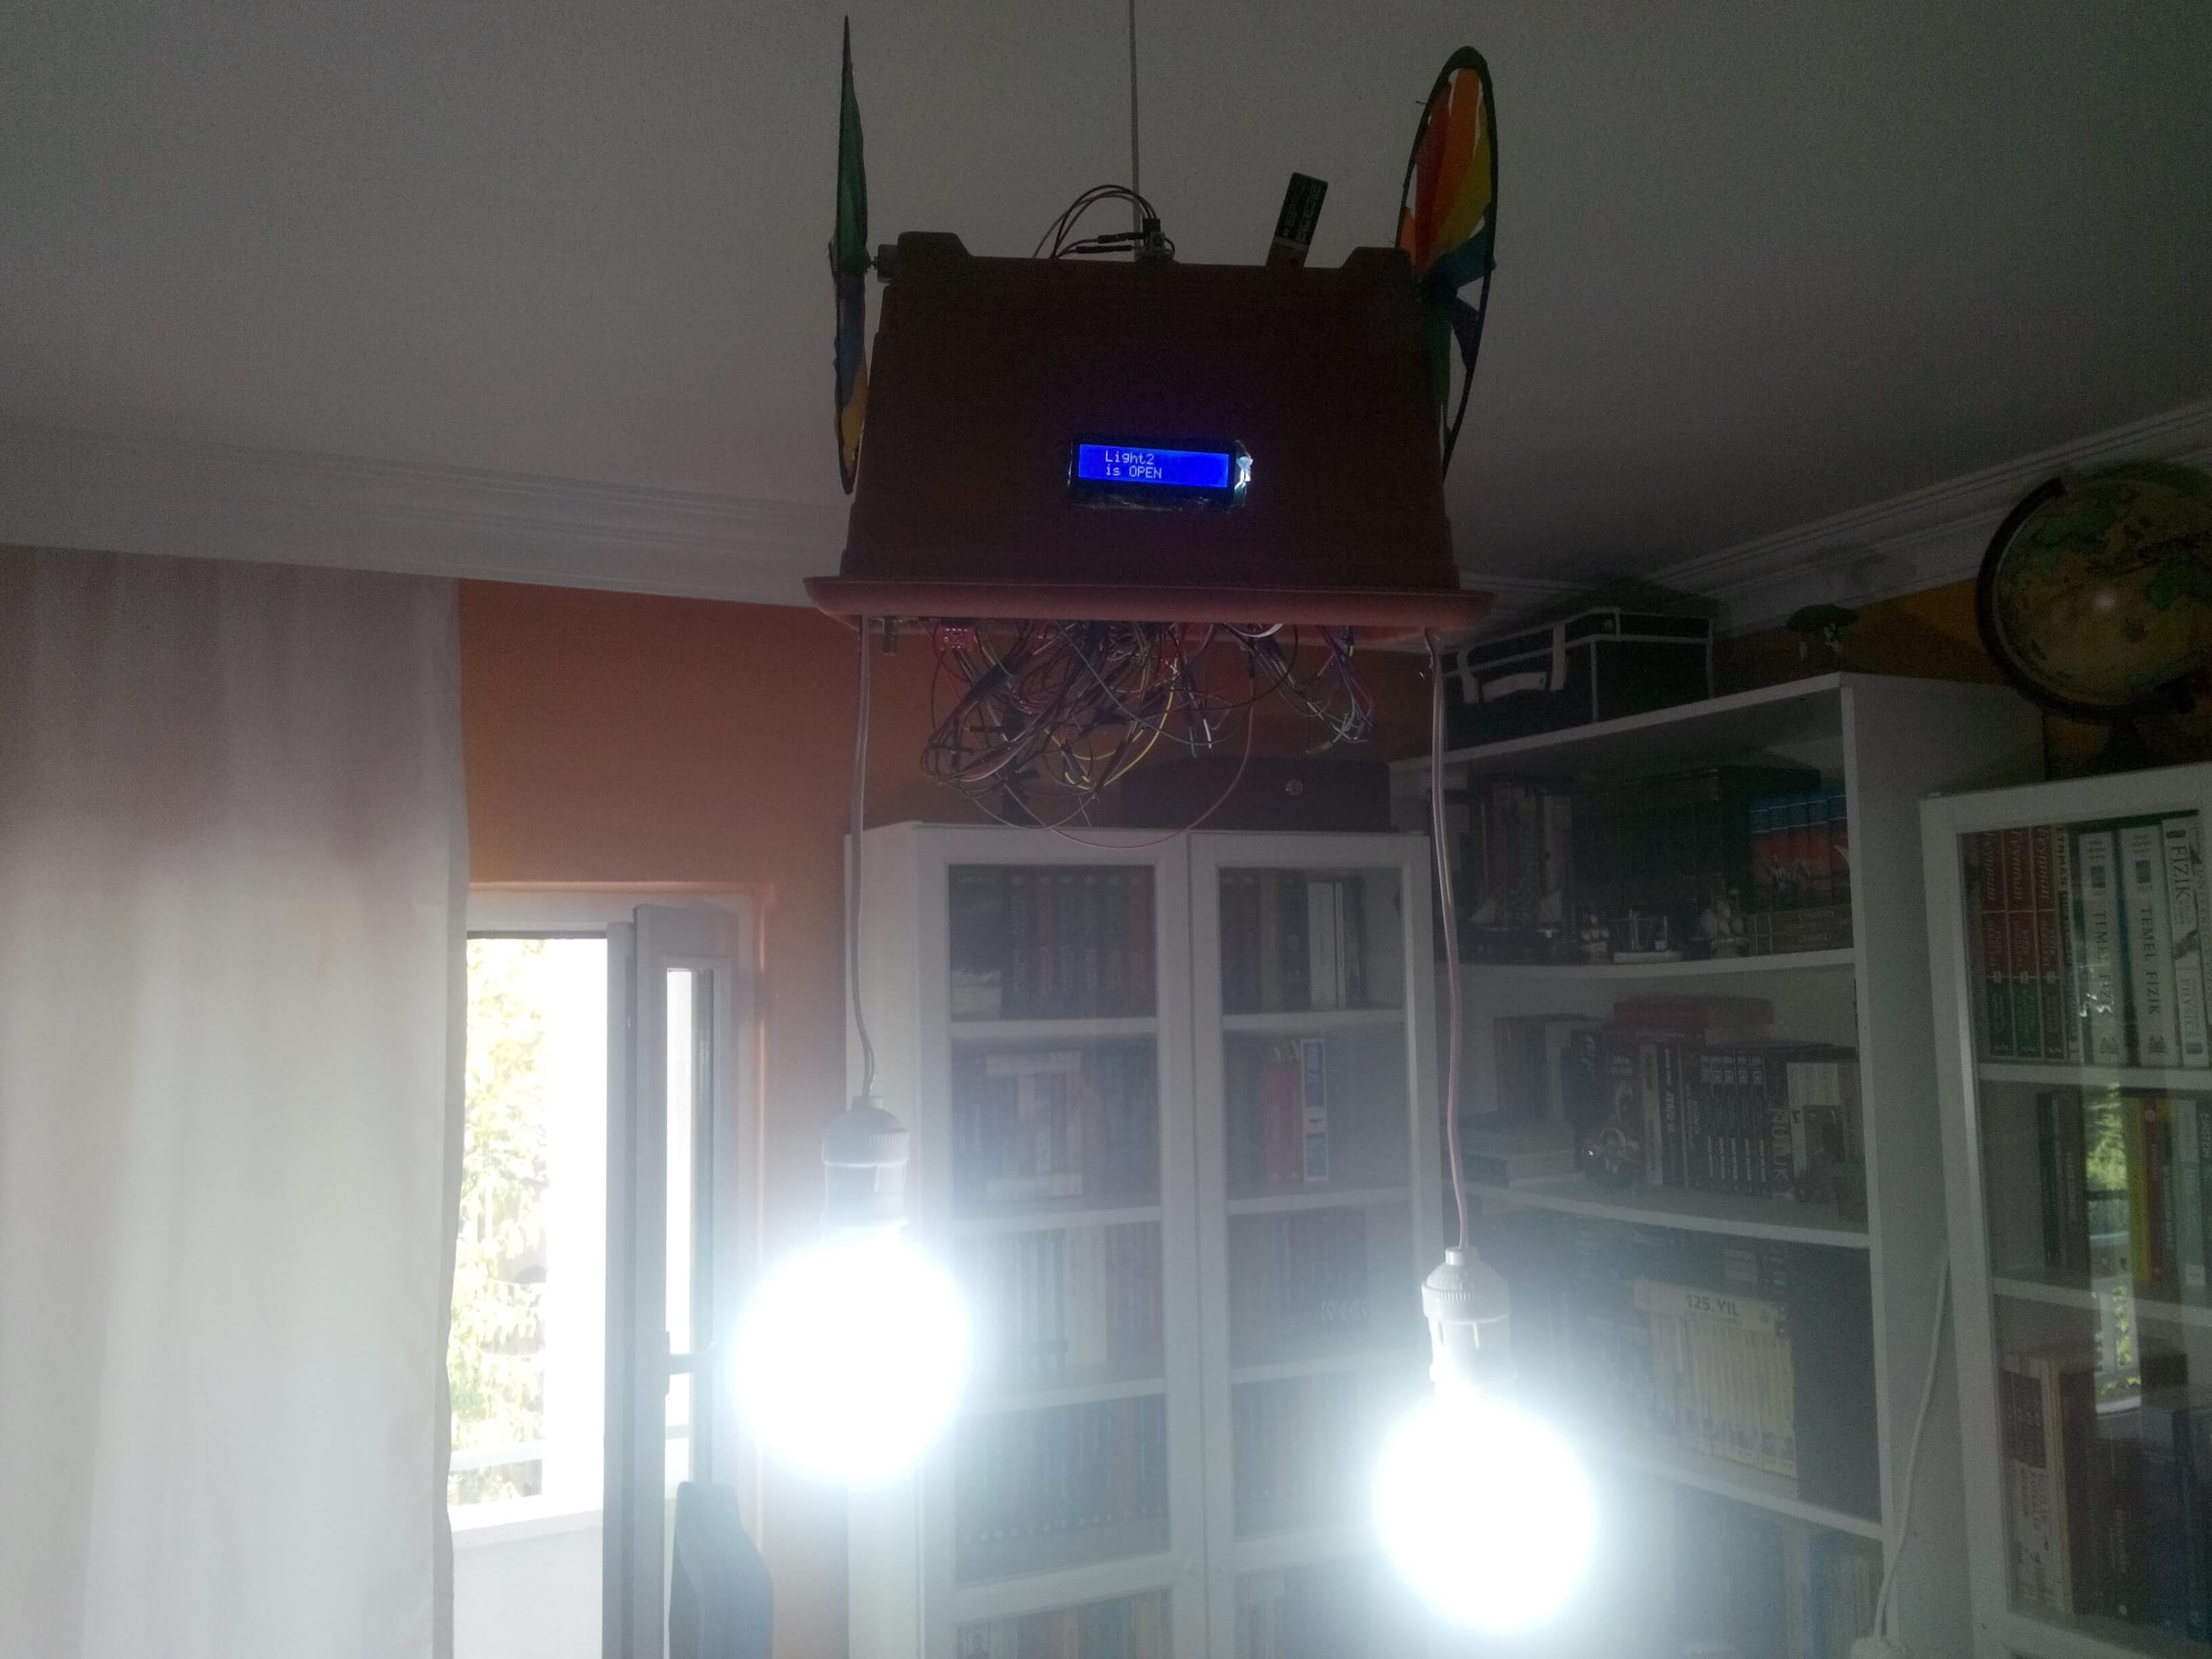
If Button- is pushed, Light2 is open and "Light2 is OPEN" command is activated.
If Buttonp+ is pushed, Light1 is off and "Light1 is OFF" command is activated.
If Buttonp- is pushed, Light2 is off and "Light2 is OFF" command is activated.
If Buttonup is pushed, DC Motor1 turns right.
If Buttonright is pushed, DC Motor1 turns left.
If Buttonleft is pushed, DC Motor2 turns right.
If Buttondown is pushed, DC Motor2 left.
If Buttonok is pushed, all DC motors are off.
If the flame sensor detects a fire, "Temperature is HIGH" will be written on LCD display and flameled(LED10) will open.
First of all, connect a wire to 3-way gang mains socket after that drill a hole for wire and glue 3-way socket to the bottom of the flowerpot.


Solder the components to each other. Glue the DC motors to the top of the flowerpot with two turning wheels. Glue and solder all the other components to the inside of flowerpot.


Connect two bulbs and an android phone charger (for feeding Arduino Mega with USB output) to 3-way socket.

Connect Remote Lamp to the plug carefully when all steps are done.


Remote Lamp
Download

Remote Lamp.ino
Download
         ///////////////////////////////////////////////
        //                Remote Lamp                //
       //                                           //
      //                by Kutluhan Aktar          //
     ///////////////////////////////////////////////


// Connections
// Arduino
//                           RGB LED
// Pin 2                     1
// 5V                        2
// Pin 3                     3
// Pin 4                     4
//
//                           Flame Sensor
// Pin 22                    1
// 5V                        5V
// GND                       GND
//
//                           Potentiometer
// 5V                        1
//
// GND                       3
//
//                           LCD Display (16,2)
// GND                       1
// 5V                        2
//                           Potentiometer Analog Pin
// Pin 23                    rs
// GND                       6
// Pin 24                    en
// Pin 25                    D4
// Pin 26                    D5
// Pin 27                    D6
// Pin 28                    D7
// 5V
// GND
//
// Pin 22                    Flame LED
// Pin 29                    LED1
// Pin 30                    LED2
// Pin 31                    LED3
// Pin 32                    LED4
// Pin 33                    LED5
// Pin 34                    LED6
// Pin 35                    LED7
// Pin 36                    LED8
// Pin 37                    LED9
//
//                           L298N Motor Driver
// 12V                       9V Battery (+)
// GND                       9V Battery (-)
// Pin 38                    İNT1
// Pin 39                    İNT2
// Pin 40                    İNT3
// Pin 41                    İNT4
//
//                           2-Way Relay
// 5V                        5V
// Pin 42                    İNT1
// Pin 43                    İNT2
// GND                       GND
//
//                           IR Receiver Module
// Pin 44                    DO
// 5V                        5V
// GND                       GND

#include
#include

const int RECV_PIN = 44;
IRrecv irrecv(RECV_PIN); // Define an object named irrecv.
decode_results results;  // Define a data code named results.

const int rs = 23, en = 24, d4 = 25, d5 = 26, d6 = 27, d7 = 28; // Describe LCD Display connections.
LiquidCrystal lcd(rs, en, d4, d5, d6, d7);

const int RGB1 = 2; // Describe RGB LED connections.
const int RGB2 = 3;
const int RGB3 = 4;

const int flameled = 22; // Flame sensor output.
const int flamesensor = A1;


const int led1 = 29; // Describe LED connections.
const int led2 = 30;
const int led3 = 31;
const int led4 = 32;
const int led5 = 33;
const int led6 = 34;
const int led7 = 35;
const int led8 = 36;
const int led9 = 37;

const int in1 = 38; // L298N Motor Driver connections.
const int in2 = 39;
const int in3 = 40;
const int in4 = 41;

const int int1 = 42; // 2-Way relay connections.
const int int2 = 43;

// Character codes for LCD display.
byte Smile[8] = {
  0b01110,
  0b11111,
  0b10101,
  0b11111,
  0b10101,
  0b10001,
  0b11111,
  0b01110,
};
byte H[8] = {
  0b00100,
  0b00100,
  0b00100,
  0b01110,
  0b01110,
  0b01110,
  0b11111,
  0b11111,
};

// IR codes obtained from TV remote control with IRrecvDemo example file.
#define T1 0xE0E020DF
#define T2 0xE0E0A05F
#define T3 0xE0E0609F
#define T4 0xE0E010EF
#define T5 0xE0E0906F
#define T6 0xE0E050AF
#define T7 0xE0E030CF
#define T8 0xE0E0B04F
#define T9 0xE0E0708F
#define T0 0xE0E08877
#define TA 0xE0E036C9
#define TB 0xE0E028D7
#define TC 0xE0E0A857
#define TD 0xE0E06897
#define Tu 0xE0E0E01F
#define Td 0xE0E0D02F
#define Tu1 0xE0E048B7
#define Td1 0xE0E008F7
#define Tw 0xE0E006F9
#define Ts 0xE0E08679
#define Ta 0xE0E046B9
#define Tf 0xE0E0A659
#define To 0xE0E016E9
#define Toff 0xE0E040BF
void setup(){

 digitalWrite(int1,HIGH);
 digitalWrite(int2,HIGH);

 irrecv.enableIRIn(); // Initial IR receiver module to obtain data.
 lcd.begin(16, 2);

 lcd.createChar(1, Smile); // Create LCD display characters from bytes.
 lcd.createChar(2, H);

 pinMode(RGB1, OUTPUT);
 pinMode(RGB2, OUTPUT);
 pinMode(RGB3, OUTPUT);

 pinMode(flameled,OUTPUT);

 pinMode(led1, OUTPUT);
 pinMode(led2, OUTPUT);
 pinMode(led3, OUTPUT);
 pinMode(led4, OUTPUT);
 pinMode(led5, OUTPUT);
 pinMode(led6, OUTPUT);
 pinMode(led7, OUTPUT);
 pinMode(led8, OUTPUT);
 pinMode(led9, OUTPUT);

 pinMode(in1, OUTPUT);
 pinMode(in2, OUTPUT);
 pinMode(in3, OUTPUT);
 pinMode(in4, OUTPUT);

 pinMode(int1, OUTPUT);
 pinMode(int2, OUTPUT);


}

void loop() {

   if (valueflame >= 1010){ // If the temperature is high, "Temperature is HIGH" will be written on LCD display and flameled will open.
    digitalWrite(flameled,HIGH);
    lcd.clear();
    lcd.setCursor(1,0);
    lcd.print("Temperature ");
    lcd.setCursor(1,1);
    lcd.print("is HIGH");
    lcd.setCursor(13,2);
    lcd.write(2);
    lcd.setCursor(14,2);
    lcd.write(2);
    lcd.setCursor(15,2);
    lcd.write(2);
   }
   if (valueflame < 1010){
    digitalWrite(flameled,LOW);

   }
   if (irrecv.decode(&results)) { // If IR Remote Module gets data accurately.

    if (results.value == T1){ // If Button1 is pushed, LED1 opens.
      digitalWrite(led1,HIGH);
    lcd.clear();
    lcd.setCursor(2,0);
    lcd.print("Led1");
    lcd.setCursor(2,1);
    lcd.print("is OPEN");
    }
    if (results.value == T2){ // If Button2 is pushed, LED2 opens.
      digitalWrite(led2,HIGH);
    lcd.clear();
    lcd.setCursor(2,0);
    lcd.print("Led2");
    lcd.setCursor(2,1);
    lcd.print("is OPEN");
    }
    if (results.value == T3){ // If Button3 is pushed, LED3 opens.
      digitalWrite(led3,HIGH);
    lcd.clear();
    lcd.setCursor(2,0);
    lcd.print("Led3");
    lcd.setCursor(2,1);
    lcd.print("is OPEN");
    }
    if (results.value == T4){ // If Button4 is pushed, LED4 opens.
      digitalWrite(led4,HIGH);
    lcd.clear();
    lcd.setCursor(2,0);
    lcd.print("Led4");
    lcd.setCursor(2,1);
    lcd.print("is OPEN");
    }
    if (results.value == T5){ // If Button5 is pushed, LED5 opens.
      digitalWrite(led5,HIGH);
    lcd.clear();
    lcd.setCursor(2,0);
    lcd.print("Led5");
    lcd.setCursor(2,1);
    lcd.print("is OPEN");
    }
    if (results.value == T6){ // If Button6 is pushed, LED6 opens.
      digitalWrite(led6,HIGH);
    lcd.clear();
    lcd.setCursor(2,0);
    lcd.print("Led6");
    lcd.setCursor(2,1);
    lcd.print("is OPEN");
    }
    if (results.value == T7){ // If Button7 is pushed, LED7 opens.
      digitalWrite(led7,HIGH);
    lcd.clear();
    lcd.setCursor(2,0);
    lcd.print("Led7");
    lcd.setCursor(2,1);
    lcd.print("is OPEN");
    }
    if (results.value == T8){ // If Button8 is pushed, LED8 opens.
      digitalWrite(led8,HIGH);
    lcd.clear();
    lcd.setCursor(2,0);
    lcd.print("Led8");
    lcd.setCursor(2,1);
    lcd.print("is OPEN");
    }
    if (results.value == T9){ // If Button9 is pushed, LED9 opens.
      digitalWrite(led9,HIGH);
    lcd.clear();
    lcd.setCursor(2,0);
    lcd.print("Led9");
    lcd.setCursor(2,1);
    lcd.print("is OPEN");
    }
    if (results.value == T0){ // If Button0 is pushed, all LED is off.
      digitalWrite(led1,LOW);
      digitalWrite(led2,LOW);
      digitalWrite(led3,LOW);
      digitalWrite(led4,LOW);
      digitalWrite(led5,LOW);
      digitalWrite(led6,LOW);
      digitalWrite(led7,LOW);
      digitalWrite(led8,LOW);
      digitalWrite(led9,LOW);

       analogWrite(RGB1, 255);
       analogWrite(RGB2, 255);
       analogWrite(RGB3, 255);

    lcd.clear();
    lcd.setCursor(2,0);
    lcd.print("LED");
    lcd.setCursor(2,1);
    lcd.print("OFF MODE");
    }
    if (results.value == TA){ // If ButtonA is pushed, RGB LED is red.
       analogWrite(RGB1, 0);
       analogWrite(RGB2, 255);
       analogWrite(RGB3, 255);
    lcd.clear();
    lcd.setCursor(2,0);
    lcd.print("RED");
    }
     if (results.value == TB){ // If ButtonB is pushed, RGB LED is green.
       analogWrite(RGB1, 255);
       analogWrite(RGB2, 0);
       analogWrite(RGB3, 255);
    lcd.clear();
    lcd.setCursor(2,0);
    lcd.print("GREEN");
    }
     if (results.value == TC){ // If ButtonC is pushed, RGB LED is yellow.
       analogWrite(RGB1, 0);
       analogWrite(RGB2, 0);
       analogWrite(RGB3, 255);
    lcd.clear();
    lcd.setCursor(2,0);
    lcd.print("YELLOW");
    }
     if (results.value == TD){ // If ButtonD is pushed, RGB LED is blue.
       analogWrite(RGB1, 255);
       analogWrite(RGB2, 255);
       analogWrite(RGB3, 0);
    lcd.clear();
    lcd.setCursor(2,0);
    lcd.print("BLUE");
    }
    if (results.value == Tu){ // If Button+ is pushed, Light1 is open.
    digitalWrite(int1,LOW);
    lcd.clear();
    lcd.setCursor(2,0);
    lcd.print("Light1");
    lcd.setCursor(2,1);
    lcd.print("is OPEN");
  }
    if (results.value == Td){ // If Button- is pushed, Light2 is open.
    digitalWrite(int2,LOW);
    lcd.clear();
    lcd.setCursor(2,0);
    lcd.print("Light2");
    lcd.setCursor(2,1);
    lcd.print("is OPEN");
  }
   if (results.value == Tu1){ // If Buttonp+ is pushed, Light1 is off.
    digitalWrite(int1,HIGH);
    lcd.clear();
    lcd.setCursor(2,0);
    lcd.print("Light1");
    lcd.setCursor(2,1);
    lcd.print("is OFF");
  }
   if (results.value == Td1){ // If Buttonp- is pushed, Light2 is off.
    digitalWrite(int2,HIGH);
    lcd.clear();
    lcd.setCursor(2,0);
    lcd.print("Light2");
    lcd.setCursor(2,1);
    lcd.print("is OFF");
  }
  if (results.value == Tw){ // If Buttonup is pushed, DC Motor1 turns right.
    digitalWrite(in1,HIGH);
    digitalWrite(in3,LOW);
    lcd.clear();
    lcd.setCursor(2,0);
    lcd.print("DC1");
    lcd.setCursor(2,1);
    lcd.print("turns RIGHT");
  }
  if (results.value == Ts){ // If Buttonright is pushed, DC Motor1 turns left.
    digitalWrite(in1,LOW);
    digitalWrite(in3,HIGH);
    lcd.clear();
    lcd.setCursor(2,0);
    lcd.print("DC1");
    lcd.setCursor(2,1);
    lcd.print("turns LEFT");
  }
   if (results.value == Ta){ // If Buttonleft is pushed, DC Motor2 turns right.
    digitalWrite(in2,HIGH);
    digitalWrite(in4,LOW);
    lcd.clear();
    lcd.setCursor(2,0);
    lcd.print("DC2");
    lcd.setCursor(2,1);
    lcd.print("turns RIGHT");
  }
  if (results.value == Tf){ // If Buttondown is pushed, DC Motor2 left.
    digitalWrite(in2,LOW);
    digitalWrite(in4,HIGH);
    lcd.clear();
    lcd.setCursor(2,0);
    lcd.print("DC2");
    lcd.setCursor(2,1);
    lcd.print("turns LEFT");
  }
  if(results.value == To){ // If Buttonok is pushed, all DC motors are off.
    digitalWrite(in1,LOW);
    digitalWrite(in2,LOW);
    digitalWrite(in3,LOW);
    digitalWrite(in4,LOW);
    lcd.clear();
    lcd.setCursor(2,0);
    lcd.print("DC");
    lcd.setCursor(2,1);
    lcd.print("OFF MODE");
  }
  if(results.value == Toff){ // If Buttonoff is pushed, "Good Night! with Smile Character" will be written on LCD display.
  lcd.clear();
  lcd.setCursor(0,0);
  lcd.print("Good Night!");
  lcd.setCursor(12,0);
  lcd.write(1);
  for(int i=0;i<16;i++){
    lcd.scrollDisplayRight();
    delay(150);
  }
  lcd.clear();
  lcd.setCursor(0,1);
  lcd.print("Good Night!");
  lcd.setCursor(12,1);
  lcd.write(1);
  for(int i=0;i<16;i++){
    lcd.scrollDisplayRight();
    delay(150);
  }
  }
    irrecv.resume(); // Continue to obtain IR codes after making the task.
   }
}
1 ) Arduino Mega2560 R3
2 ) Breadboard
3 ) 2 Channel 5V Relay
4 ) Mini Breadboard
5 ) IR Flame Sensor for Arduino
6 ) LCD Module for Arduino
7 ) L298N Dual H Bridge Stepper Motor Driver Board For Arduino
8 ) DC Electric Motor
9 ) Infrared IR Receiver Module Wireless Control Kit For Arduino