Even though we do not need handwriting or typing nowadays for taking notes or setting appointment reminders thanks to umpteen web and mobile applications, I am still fond of writing down my records on paper like in the old days :) Thus, I decided to create this project, which allows me to benefit from the advantages of an application while taking my notes and reminders on paper.
Instead of programming a web and mobile application from scratch to send commands to my thermal printer, I wanted to use Telegram, a cross-platform cloud-based messaging service compatible with iOS and Android. In Telegram, it is effortless to create bots with a command list unalike any other messaging applications, which are special accounts that do not require an additional phone number to set up. IoT Thermal Printer, Telegram bot I created for this project, let me print records in six different categories I need frequently:
Notes (Appointments)
Shopping Lists
URLs
Payments
Product Barcodes (Manufacturer Product Numbers)
Series (New Episode Release Dates)
To fetch commands transferred by IoT Thermal Printer, I developed an outgoing webhook for the Telegram bot, which interprets and replies commands or texts when updated by the Telegram Bot API.
Then, to receive commands from the webhook and print out records with graphics (bitmaps) for each category mentioned above, I used an Arduino Nano 33 IoT and a tiny (embedded) thermal printer.
Huge thanks to DFRobot for sponsoring this project.
Sponsored products by DFRobot:
⭐ Embedded Thermal Printer - USB - TTL Serial | Inspect
Figure - 56.1
Figure - 56.2
Figure - 56.3
Step 1: Building a bot for Telegram with BotFather
BotFather is a Telegram bot that lets us create and manage bots on Telegram without any coding required.
⭐ First of all, open BotFather on Telegram and enter /start to view the available command list and manuals.
Figure - 56.4
⭐ Use the /newbot command to create a new bot. Enter the name of your bot when BotFather asks you for a name. It is displayed in contact details and elsewhere.
thermal printer
⭐ Then, enter the username of your bot. Usernames are 5-32 characters long and are case insensitive, but may only include Latin characters, numbers, and underscores. They must end in 'bot', e.g. 'tetris_bot' or 'TetrisBot'.
thermal_printer_bot
⭐ After these steps, BotFather generates an authorization token for your new bot. The authorization token is a string along the lines of 123456:ABC-DEF1234ghIkl-zyx57W2v1u123ew11 that is required to authorize the bot and send requests to the Telegram Bot API. Keep your token secure and store it safely.
Figure - 56.5
⭐ If you want, you can change your bot's name afterward by using the /setname command, as did I.
IoT Thermal Printer
Figure - 56.6
⭐ Also, you can change your bot's profile picture by using the /setuserpic command.
Figure - 56.7
⭐ Finally, enter the /setcommands command to create the list of commands supported by your bot. Users will see these commands as suggestions when they type / in the chat with your bot.
⭐ The command list I created for my Telegram bot (IoT Thermal Printer):
/print_home - print all available functions
/print_notes - send and print a note
/print_shopping_list - create and print a shopping list
/print_url - send and print URLs
/print_payments - define and print payments
/print_product_barcode - define and print product barcodes
/print_series - enter and print a new episode date
/cover - display the given cover picture
/arduino - display Nano 33 IoT schematics
/help - functions and instructions
Figure - 56.8
Step 2: Developing a webhook to get updates from the Telegram Bot API in PHP
I developed this webhook, named Telegram_Thermal_Printer_Bot, in PHP to get updates from my bot (IoT Thermal Printer) via the Telegram Bot API. You can download it below - Telegram_Thermal_Printer_Bot.zip.
The webhook has two parts:
index.php - gets updates from the bot and send replies
results.php - prints the data from the bot saved in the database
I will talk about the results.php in the following steps.
First of all, I created a class named thermal_printer to define the database settings and functions to send texts and pictures as replies to the Telegram bot when the webhook receives updates.
⭐ In the __init__ function, the class requires four parameters to execute functions:
token - authorization token of the bot
web_path - Telegram Bot API server
conn - database connection settings
table - database table name
⭐ In the send_message function, the webhook sends the given text to the bot via the Telegram Bot API by using its authorization token.
⭐ If the webhook receives data from the Telegram Bot API, get the chat ID and message.
⭐ Depending on the type of the message - photo, video, document, and text - reply to the chat with the given ID.
⭐ Using the strpos function, detect whether one of the commands with content data is sent.
⭐ If so, split the content from the command by using the explode function.
⭐ In the bot, you should leave a blank space before entering the text (content) you want to print with thermal printers for these commands:
/print_notes text
/print_shopping_list item1, item2...
/print_url text
/print_payments text
/print_product_barcode text
/print_series text
⭐ Finally, save the transferred command and content to the database table and send the content as the reply to the bot.
⭐ For other commands, reply with the predefined responses:
/print_home
/cover
/arduino
/help
/start
How r u?
if($updates['update_id']){
$chat_id = $updates['message']['chat']['id'];
$message = $updates['message']['text'];
if($updates["message"]["photo"]){
$printer->send_message($chat_id, "Thank you for sending me a photo but I cannot process it yet 🎞");
}else if($updates["message"]["video"]){
$printer->send_message($chat_id, "Thank you for sending me a video but I cannot process it yet 📹");
}else if($updates["message"]["document"]){
$printer->send_message($chat_id, "Thank you for sending me a file but I cannot process it yet 📜");
}else{
if(strpos($message, "/print_notes") !== FALSE){
$command = "_note";
$content = explode(" ", $message, 2)[1];
$printer->database_update($command, $content);
$printer->send_message($chat_id, "Printed: ".$content);
}
if(strpos($message, "/print_shopping_list") !== FALSE){
$command = "shopping";
$content = explode(" ", $message, 2)[1];
$printer->database_update($command, $content);
$printer->send_message($chat_id, "Printed: ".$content);
}
if(strpos($message, "/print_url") !== FALSE){
$command = "url";
$content = explode(" ", $message, 2)[1];
$printer->database_update($command, $content);
$printer->send_message($chat_id, "Printed: ".$content);
}
if(strpos($message, "/print_payments") !== FALSE){
$command = "payment";
$content = explode(" ", $message, 2)[1];
$printer->database_update($command, $content);
$printer->send_message($chat_id, "Printed: ".$content);
}
if(strpos($message, "/print_product_barcode") !== FALSE){
$command = "barcode";
$content = explode(" ", $message, 2)[1];
$printer->database_update($command, $content);
$printer->send_message($chat_id, "Printed: ".$content);
}
if(strpos($message, "/print_series") !== FALSE){
$command = "series";
$content = explode(" ", $message, 2)[1];
$printer->database_update($command, $content);
$printer->send_message($chat_id, "Printed: ".$content);
}
switch($message){
case '/print_home':
$printer->database_update("home", "theamplituhedron.com");
$printer->send_message($chat_id, "Printed: OK");
break;
case '/start':
$printer->send_message($chat_id, "Leave a blank space before entering the text you want to print with thermal printers for these commands:\n\n/print_notes text\n/print_shopping_list item1, item2...\n/print_url text\n/print_payments text\n/print_product_barcode text\n/print_series text\n\nEnter /help to view descriptions.");
break;
case 'How r u?':
$printer->send_message($chat_id, "Thanks for asking.\nData processing is running just fine 😃");
break;
case '/cover':
$printer->send_photo($chat_id, "https://www.theamplituhedron.com/Telegram_Thermal_Printer_Bot/spiderman.jpg", 'Friendly Neighborhood Spider-Man');
break;
case '/arduino':
$printer->send_photo($chat_id, "https://www.theamplituhedron.com/Telegram_Thermal_Printer_Bot/arduino.jpg", 'Arduino Nano 33 IoT Schematics');
break;
case '/help':
$printer->send_message($chat_id, "Leave a blank space before entering the text you want to print with thermal printers for these commands:\n\n/print_notes text\n/print_shopping_list item1, item2...\n/print_url text\n/print_payments text\n/print_product_barcode text\n/print_series text\n\nDescriptions:\n\n/print_home - print all available functions\n/print_notes - send and print a note\n/print_shopping_list - create and print a shopping list\n/print_url - send and print URLs\n/print_payments - define and print payments\n/print_product_barcode - define and print product barcodes\n/print_series - enter and print a new episode date\n/cover - display the given cover picture\n/arduino - display Nano 33 IoT schematics\n/help - functions and instructions");
break;
}
}
}
Figure - 56.9
Figure - 56.10
Figure - 56.11
⭐ To be able to collate data transferred by the Telegram Bot API, create a database table and insert default variables.
telegramprinter > entries > variables
command
content
status
CREATE TABLE `entries`(
command varchar(255) PRIMARY KEY NOT NULL,
content varchar(255) NOT NULL,
`status` varchar(255) NOT NULL
);
INSERT INTO `entries`(`command`, `content`, `status`) VALUES ('default' , 'default', 'default')
Figure - 56.12
Figure - 56.13
Getting updates by making requests to https://api.telegram.org/ requires an SSL connection, so I used my website to host the webhook.
theamplituhedron.com
Figure - 56.14
However, the Bot API server source code is available at telegram-bot-api. You can run it locally and send the requests to your server instead of https://api.telegram.org.
Furthermore, if you want to use Raspberry Pi and Python instead of PHP, you can use this Python module to get updates from the Telegram Bot API.
Step 2.1: Setting up the webhook to fetch data from the bot
After creating the webhook, I specified the URL of the webhook for my bot (IoT Thermal Printer) by using the setWebhook method to receive incoming updates.
⭐ After specifying the URL of your webhook, you should see Webhook was set message.
⭐ Then, go to the Telegram bot and enter /start to test whether the webhook is working accurately or not.
Figure - 56.16
Figure - 56.17
⭐ Enter /help to view descriptions.
Figure - 56.18
⭐ To display the supported command list, enter /.
Figure - 56.19
Step 2.2: Transferring information coming from the bot as results
After taking the steps above, I developed the results.php to send information (command and content) saved in the database table to the Arduino Nano 33 IoT.
⭐ Select the first row in the database table - entries.
⭐ If the status variable set as "ready", the results.php shows command and content variables separated with the percentage sign (%) as the delimiter.
%_note%Meeting at 5 PM.%
%shopping%1.Meat and Fish 2.Bread 3.Dairy 4.Eggs 5.Condiments%
%url%https://www.hackster.io/kutluhan-aktar%
%payment%$50 on 01/12%
%barcode%DFRO503%
%series%One Piece 01/10/21%
%home%theamplituhedron.com%
Slide
⭐ To prevent sending the same information to the Arduino Nano 33 IoT repetitively, the results.php changes the status variable from "ready" to "printed". Then, it displays Already Printed! Waiting new commands...
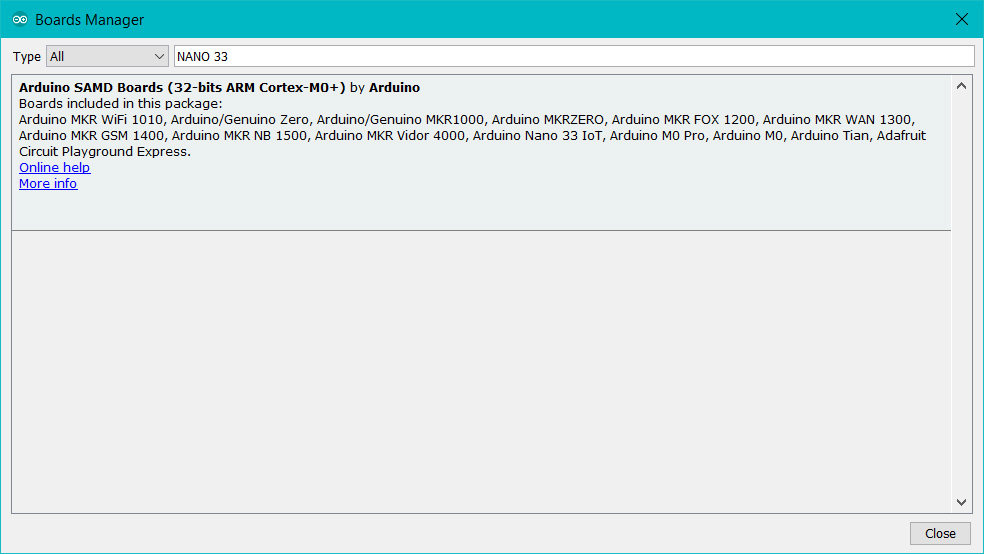
If you are a novice in programming with the Arduino Nano 33 IoT: do not worry, it is simple to use with Arduino IDE. Just download the required drivers - Arduino SAMD Core - as explained here.
Figure - 56.29
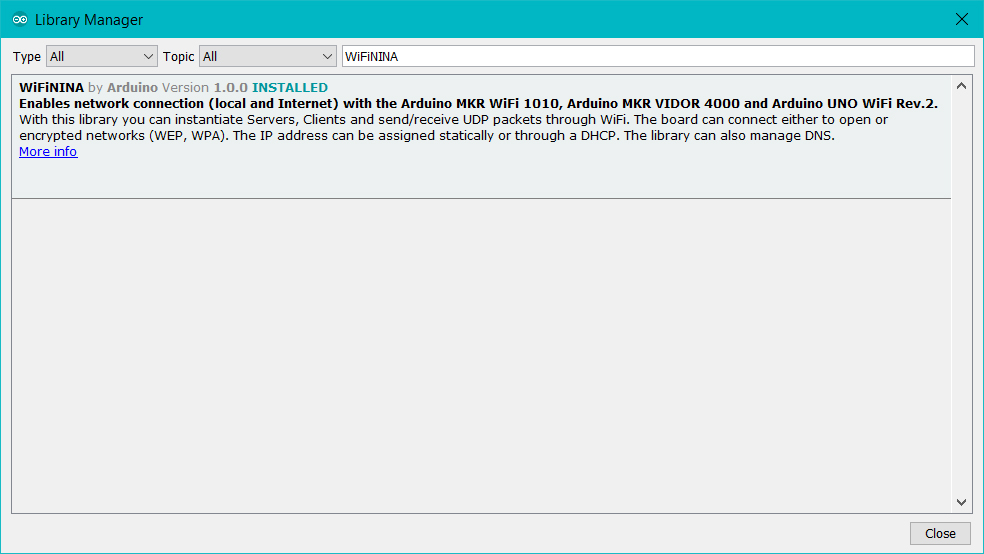
To be able to connect to the WiFi via the Arduino Nano 33 IoT, download the WiFiNINA library from here.
Figure - 56.30
I used the second serial port (Serial1) on the Arduino Nano 33 IoT to communicate with the tiny (embedded) thermal printer.
Serial Ports on the Arduino Nano 33 IoT:
"The USB connector of the board is directly connected to the USB host pins of the SAMD21. This routing enables you to use the Arduino NANO 33 IoT as a client USB peripheral (acting as a mouse or a keyboard connected to the computer) or as a USB host device so that devices like a mouse, keyboard, or an Android phone can be connected to the Arduino NANO 33 IoT. This port can also be used as a virtual serial port using the Serial object in the Arduino programming language. The RX0 and TX1 pins are a second serial port available as Serial1."
Then, Arduino Nano 33 IoT is ready to execute the project code :)
Step 4: Printing out texts, bitmaps, and barcodes with the tiny thermal printer
Built-in functions in the library to print text with different settings:
Inverted text: this is invoked by calling inverseOn() — you will get text that’s white-on-black instead of black-on-white. inverseOff() turns this off.
Double height: this makes text that is extra tall, call doubleHeightOn() — likewise, turn off with doubleHeightOff()
Left/Center/Right justified: this aligns text to the left or right edge of the page, or centered. You can set the alignment by calling justify('R') (for right-justified), justify('C') (for centered) or justify('L') (for left-justified). Left-justified is the default state.
Bold text: makes it stand out a bit more, enable with boldOn() and turn off with boldOff()
Underlined text: makes it stand out a bit more, enable with underlineOn() and turn off with underlineOff()
Large/Medium/Small text: by default we use small, medium is twice as tall, large is twice as wide/tall. Set the size with setSize('L'), setSize('M') or setSize('S')
Line spacing: you can change the space between lines of text by calling setLineHeight() where numpix is the number of pixels. The minimum is 24 (no extra space between lines), the default spacing is 32, and double-spaced text would be 64.
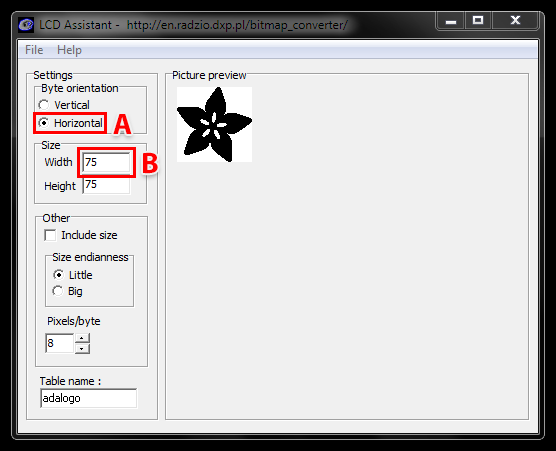
In Windows, to print bitmaps with the thermal printer:
⭐ Use an image editing program to save your images as 1-bit BMPs - the built-in Paint program will suffice.
You can download the images I used in this project (converted) below - images.zip.
⭐ First, in the “Byte orientation” section of the settings, select “Horizontal” (item A in the image above).
⭐ Second (item B above), you may need to change the Width setting. Because this software (and the thermal printer) handle images in horizontal groups of eight pixels, if the image width is not a multiple of 8, it will be truncated (cropped) to the nearest smaller 8-pixel boundary.
⭐ After converting each image, at the top of the file containing the new table data, change “const unsigned char” to “static const uint8_t PROGMEM” as shown below:
Figure - 56.33
⭐ Then, output the image by calling printBitmap(width, height, tablename), where width and height are the dimensions of the image in pixels.
To inspect the tutorial for Mac and Linux, click here.
Barcode Printing:
⭐ To print barcodes with different codes - UPC A, UPC E, EAN13, EAN8, CODE39, I25, CODEBAR, CODE93, CODE128, CODE11 and MSI - use the printBarcode("barcodedata", BARCODETYPE) function in the library.
In the Arduino IDE, after completing the steps above:
⭐ Define and initiate the thermal printer.
Adafruit_Thermal printer(&Serial1);
...
// NOTE: SOME PRINTERS NEED 19200 BAUD instead of 9600, check test page.
Serial1.begin(9600); // Initialize hardware serial
printer.begin();
⭐ Define the server and the pathway of the results page of the Telegram webhook.
⭐ Initialize the Ethernet client library.
// Change the server before running the code.
char server[] = "www.theamplituhedron.com";
// Define the pathway of the results page of the Telegram webhook.
String application = "/Telegram_Thermal_Printer_Bot/results.php";
// Initialize the Ethernet client library.
WiFiSSLClient client;
⭐ Check and connect to the WiFi module.
⭐ Connect to the Telegram webhook's results page.
// Connect to the Telegram webhook's results page on TheAmplituhedron.
if (client.connect(server, 443)){
Serial.println("Connected to the results page!"); // If get a connection, report back via serial:
// Make an HTTP request:
client.println("GET " + application + " HTTP/1.1");
client.println("Host: www.theamplituhedron.com");
client.println("Connection: close");
client.println();
}else{
Serial.println("Connection Error!");
}
⭐ If there are incoming bytes available, get the response from the Telegram webhook's results page.
⭐ Using the indexOf() function, check whether the Telegram bot (IoT Thermal Printer) sent a new command or not.
⭐ If so, split the response string by the predefined delimiter - the percentage sign (%).
⭐ Glean information as substrings (command and content).
⭐ Print the requested command with the given content.
// If there are incoming bytes available, get the response from the Telegram webhook's results page.
String response = "";
while (client.available()) { char c = client.read(); response += c; }
if(response != "" && response.indexOf("%") > 0){
// Split the response string by a pre-defined delimiter in a simple way. '%'(percentage) is defined as the delimiter in this project.
int delimiter, delimiter_1, delimiter_2;
delimiter = response.indexOf("%");
delimiter_1 = response.indexOf("%", delimiter + 1);
delimiter_2 = response.indexOf("%", delimiter_1 +1);
// Glean information as substrings.
String command = response.substring(delimiter + 1, delimiter_1);
String content = response.substring(delimiter_1 + 1, delimiter_2);
// Print the requested command with the given content:
if(command == "_note") print_notes(content);
if(command == "shopping") print_shopping_list(content);
if(command == "url") print_URL(content);
if(command == "payment") print_payments(content);
if(command == "barcode"){ char converted[sizeof(content)]; content.toCharArray(converted, sizeof(converted)); print_product_barcode(converted); }
if(command == "series") print_series(content);
if(command == "home") print_home(content);
}
delay(3000); // Wait 3 seconds before connection...
}
⭐ For the print_product_barcode() function to print the given content as a barcode, convert the "content" string to the "converted" char array.
I connected the tiny (embedded ) thermal printer to the Arduino Nano 33 IoT via the 5-pin communication cable. Then, to supply the thermal printer, I used a 12V external battery connected to an MB102 Power Supply Module. The higher the voltage, the clearer the printing effect (5~9V).
Figure - 56.41
I placed the mini breadboard, the Arduino Nano 33 IoT, and the MB102 Power Supply Module to the top of the tiny thermal printer. To the bottom, I fastened the external battery to conclude my design.
Figure - 56.42
Figure - 56.43
Modes and Features
📱📜 When the user sends a message including the /print_notes command on the Telegram bot (IoT Thermal Printer), the thermal printer prints out the given text as a note:
/print_notes Meeting at 5 PM.
Figure - 56.44
Figure - 56.45
Figure - 56.46
📱📜 When the user sends a message including the /print_shopping_list command on the Telegram bot, the thermal printer prints out the given text as a shopping list:
📱📜 Add \n to start a new line in the list.
/print_shopping_list 1.Meat and Fish\n2.Bread\n3.Dairy\n4.Eggs\n5.Condiments
Figure - 56.47
Figure - 56.48
Figure - 56.49
📱📜 When the user sends a message including the /print_url command on the Telegram bot, the thermal printer prints out the given text as an URL:
/print_url https://www.hackster.io/kutluhan-aktar
Figure - 56.50
Figure - 56.51
Figure - 56.52
Figure - 56.53
📱📜 When the user sends a message including the /print_payments command on the Telegram bot, the thermal printer prints out the given text as a payment reminder:
/print_payments $50 on 01/12
Figure - 56.54
Figure - 56.55
Figure - 56.56
📱📜 When the user sends a message including the /print_product_barcode command on the Telegram bot, the thermal printer prints out the given text (Manufacturer Product Number) as a barcode:
/print_product_barcode DFRO503
Figure - 56.57
Figure - 56.58
Figure - 56.59
📱📜 When the user sends a message including the /print_series command on the Telegram bot, the thermal printer prints out the given text as the new episode release date of a series:
/print_series One Piece 01/10/21
Figure - 56.60
Figure - 56.61
Figure - 56.62
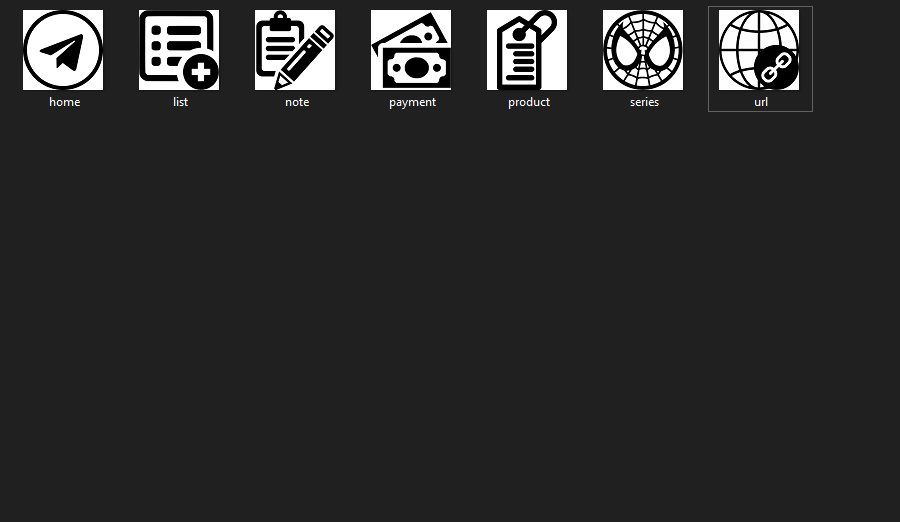
📱📜 When the user activates the /print_home command on the Telegram bot, as the home page, the thermal printer prints out all available features with their given command signs (bitmaps):
Figure - 56.63
Figure - 56.64
Figure - 56.65
📱📜 When the user activates the /cover command on the Telegram bot, the webhook replies with the selected cover picture for the bot :)
Figure - 56.66
📱📜 When the user activates the /arduino command on the Telegram bot, the webhook replies with the Arduino Nano 33 IoT pinout:
Figure - 56.67
Videos and Conclusion
After completing all steps above, I started to print out all my notes and reminders via Telegram without needing handwriting :)
<?php
// Define the themal_printer class and functions:
class thermal_printer {
	public $token, $web_path, $conn, $table;

	public function __init__($token, $web_path, $conn, $table){
		$this->token = $token;
		$this->web_path = $web_path.$token;
		$this->conn = $conn;
		$this->table = $table;
	}

	public function send_message($id, $string){
		$new_message = $this->web_path."/sendMessage?chat_id=".$id."&text=".urlencode($string);
		file_get_contents($new_message);
	}

	public function send_photo($id, $photo, $caption){
	    $new_photo = $this->web_path."/sendPhoto?chat_id=".$id."&photo=".$photo."&caption=".$caption;
	    file_get_contents($new_photo);
	}

	public function database_update($command, $content){
		$sql = "UPDATE `$this->table` SET `command`='$command', `content`='$content', `status`='ready' LIMIT 1";
		mysqli_query($this->conn, $sql);
	}
}
// Define database and server settings:
$server = "localhost";
$username = "<username>";
$password = "<password>";
$database_name = "telegramprinter";
$table_name = "entries";
$conn = mysqli_connect($server, $username, $password, $database_name);
$printer = new thermal_printer();
$printer->__init__("123456:ABC-DEF1234ghIkl-zyx57W2v1u123ew11", "https://api.telegram.org/bot", $conn, $table_name);
// Get updates from the Telegram Bot API.
$updates = json_decode(file_get_contents('php://input'), TRUE);
// Get commands.
if($updates['update_id']){
	$chat_id =   $updates['message']['chat']['id'];
	$message = $updates['message']['text'];

	if($updates["message"]["photo"]){
		$printer->send_message($chat_id, "Thank you for sending me a photo but I cannot process it yet 🎞");
	}else if($updates["message"]["video"]){
		$printer->send_message($chat_id, "Thank you for sending me a video but I cannot process it yet  📹");
	}else if($updates["message"]["document"]){
		$printer->send_message($chat_id, "Thank you for sending me a file but I cannot process it yet  📜");
	}else{
		if(strpos($message, "/print_notes") !== FALSE){
			$command = "_note";
			$content = explode(" ", $message, 2)[1];
			$printer->database_update($command, $content);
			$printer->send_message($chat_id, "Printed: ".$content);
		}
		if(strpos($message, "/print_shopping_list") !== FALSE){
			$command = "shopping";
			$content = explode(" ", $message, 2)[1];
			$printer->database_update($command, $content);
			$printer->send_message($chat_id, "Printed: ".$content);
		}
		if(strpos($message, "/print_url") !== FALSE){
			$command = "url";
			$content = explode(" ", $message, 2)[1];
			$printer->database_update($command, $content);
			$printer->send_message($chat_id, "Printed: ".$content);
		}
		if(strpos($message, "/print_payments") !== FALSE){
			$command = "payment";
			$content = explode(" ", $message, 2)[1];
			$printer->database_update($command, $content);
			$printer->send_message($chat_id, "Printed: ".$content);
		}
		if(strpos($message, "/print_product_barcode") !== FALSE){
			$command = "barcode";
			$content = explode(" ", $message, 2)[1];
			$printer->database_update($command, $content);
			$printer->send_message($chat_id, "Printed: ".$content);
		}
		if(strpos($message, "/print_series") !== FALSE){
			$command = "series";
			$content = explode(" ", $message, 2)[1];
			$printer->database_update($command, $content);
			$printer->send_message($chat_id, "Printed: ".$content);
		}

		switch($message){
		  case '/print_home':
		  $printer->database_update("home", "theamplituhedron.com");
		  $printer->send_message($chat_id, "Printed: OK");
		  break;
		  case '/start':
		  $printer->send_message($chat_id, "Leave a blank space before entering the text you want to print with thermal printers for these commands:\n\n/print_notes text\n/print_shopping_list item1, item2...\n/print_url text\n/print_payments text\n/print_product_barcode text\n/print_series text\n\nEnter /help to view descriptions.");
		  break;
		  case 'How r u?':
		  $printer->send_message($chat_id, "Thanks for asking.\nData processing is running just fine 😃");
		  break;
		  case '/cover':
		  $printer->send_photo($chat_id, "https://www.theamplituhedron.com/Telegram_Thermal_Printer_Bot/spiderman.jpg", 'Friendly Neighborhood Spider-Man');
	      break;
		  case '/arduino':
		  $printer->send_photo($chat_id, "https://www.theamplituhedron.com/Telegram_Thermal_Printer_Bot/arduino.jpg", 'Arduino Nano 33 IoT Schematics');
	      break;
		  case '/help':
		  $printer->send_message($chat_id, "Leave a blank space before entering the text you want to print with thermal printers for these commands:\n\n/print_notes text\n/print_shopping_list item1, item2...\n/print_url text\n/print_payments text\n/print_product_barcode text\n/print_series text\n\nDescriptions:\n\n/print_home - print all available functions\n/print_notes - send and print a note\n/print_shopping_list - create and print a shopping list\n/print_url - send and print URLs\n/print_payments - define and print payments\n/print_product_barcode - define and print product barcodes\n/print_series - enter and print a new episode date\n/cover - display the given cover picture\n/arduino - display Nano 33 IoT schematics\n/help - functions and instructions");
		  break;
	    }
	}
}
?>