Get notified when there is a change in the number of followers of your Twitter account and display status parameters via ESP32 through the notifier path(web application).
Advertisement:
Read Later
Get notified when there is a change in the number of followers of your Twitter account and display status parameters via ESP32 through the notifier path(web application).
Components :
[1]ESP-WROOM-32 Development Board[1]I2C LCD Display Module[1]20x4 LCD Screen[1]Push Button[1]5mm Green Led[1]5mm Red Led[1]Buzzer[2]Breadboard[1]220 ohm and 1K resistors[1]Female/Male Jumper W.[1]Male/Male Jumper W.I have a brand new Twitter account for my website, which has been getting new followers or losing them day by day. For a long time, I wanted to make a device tracking the number of followers of my account and as well as checking the status of it to notify me when there is a change.
To achieve my goal, I needed to glean information from Twitter first of all. To avoid any authentification process pertaining to Twitter API, I chose to use https://cdn.syndication.twimg.com to get the number of followers of a Twitter account using its screen name. When I managed to get information from Twitter, I programmed a web application in PHP, named Twitter Notifier Station, to print a data packet containing the number of followers, the screen name, the previous follower status, and the current follower status. By subscribing to TheAmplituhedron, you can use Twitter Notifier Station with your unique notifier path provided by TheAmplituhedron API as explained below. Nevertheless, if you want to create your web application on your server for this particular project, I leave the source code of the application below.
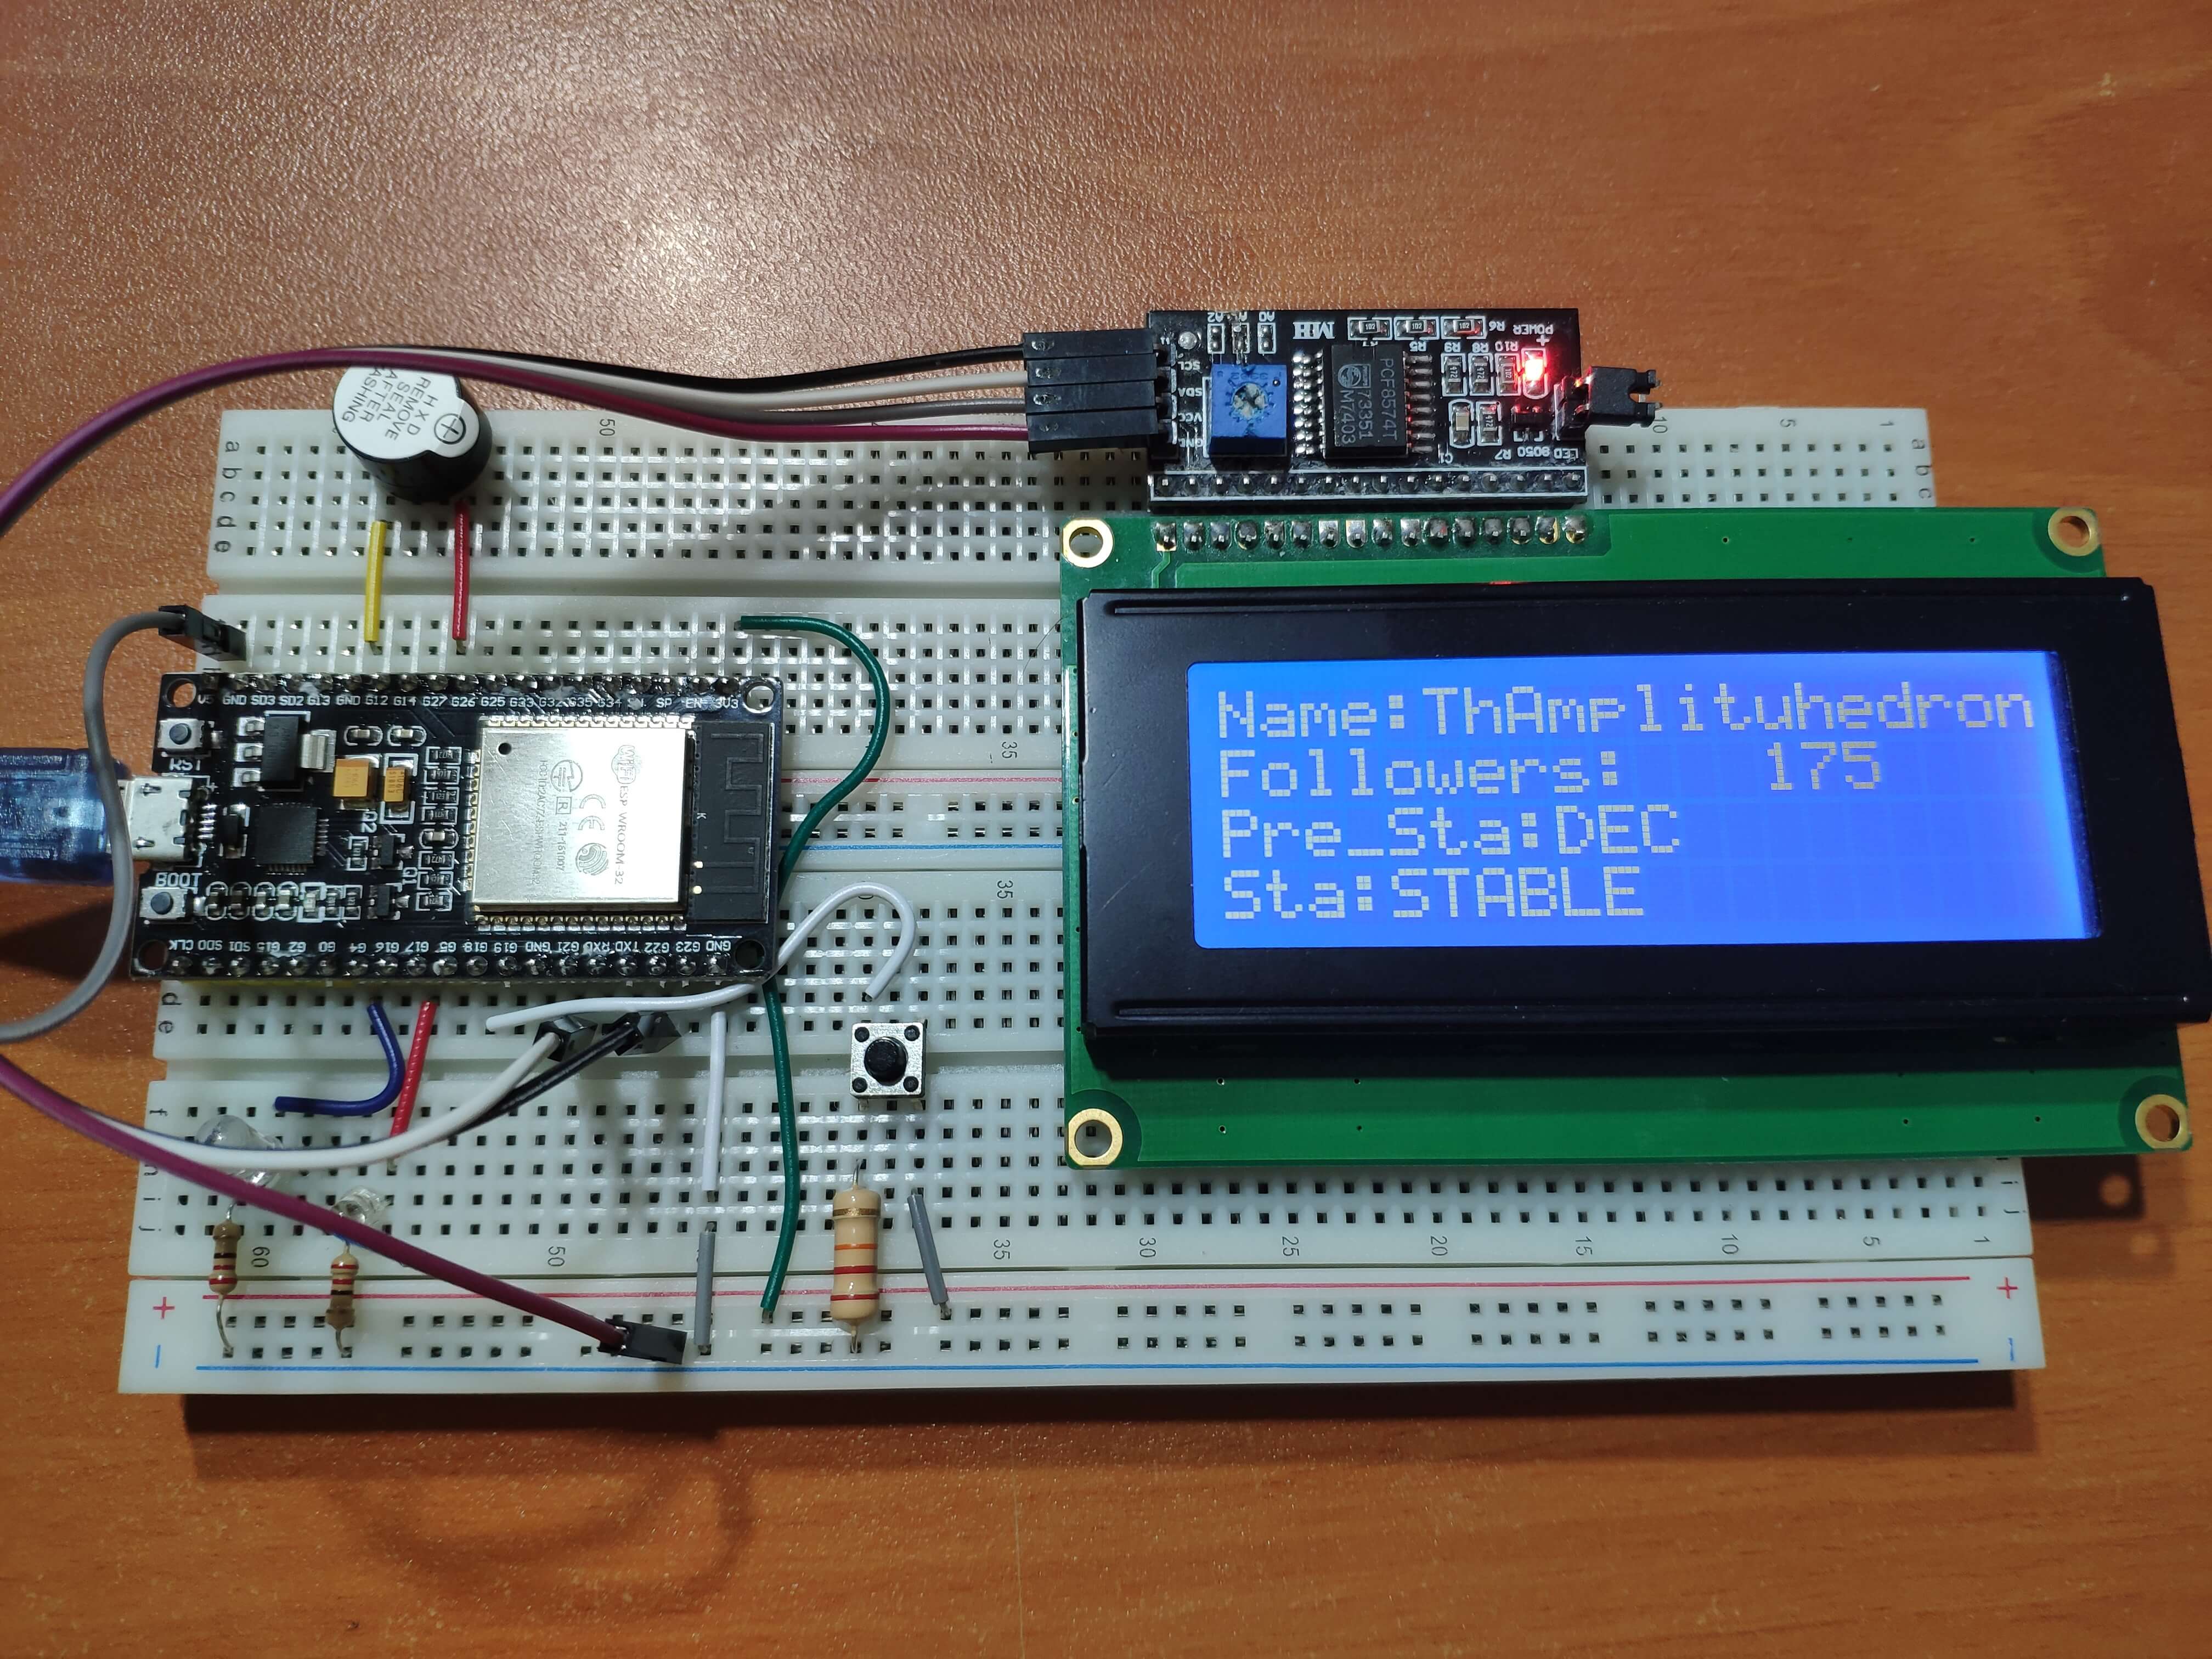
For connecting the host and gathering the data packet produced by the aforementioned web application, I used an ESP-WROOM-32 Development Board with which I was able to make an HTTP Get Request to my SSL protected server using the root certificate. To display information after collating data packets transferred from the web application, I used a 20x4 LCD Screen with I2C LCD Display Module. And, when there is a change in the number of followers of my Twitter account, I programmed ESP32 to display an alert message and tone generated by a buzzer.
First of all, download the required libraries for Arduino IDE below to continue the following steps.
Required Libraries:
For ESP32 Development Board, click here.
For I2C LCD Display Module, click here.
Without engaging an authentification process, you can get information from Twitter using the cdn.syndication.twimg third party host service with a screen name as shown on the source of the application below.
To permanently register a screen name and accurately track the previous status and the current status of the registered screen name, we need to save information coming from Twitter to a MySQL database.
Then, we can check whether there is a change in the number of followers of the registered Twitter account comparing the previous status and the current.
I programmed a web application named Twitter Notifier Station which can perform tasks above through a user-friendly control panel in which you can change the registered screen name anytime. It generates a unique notifier path transferring data for each user. You can inspect Twitter Notifier Station here.

Nevertheless, I leave the source code of the notifier path, if you want to create your web application for this particular project on your server. Just do not forget to save a screen name to the database before executing the code to avoid any possible error.

Depending on the status of the number of followers of the registered Twitter account, the notifier path prints four variables to be interpreted: the current number of followers, the registered screen name, the previous status, and the current status - INC, DEC, STABLE.
INC - There is an increase in the number of followers.
DEC - There is a decrease in the number of followers.
STABLE - There is no change in the number of followers.
Accessing your notifier path, you can elicit a data packet containing followers, the screen name, the previous status, and the current status, in the exact order, as shown below.
Note: The percentage sign(%) is the delimiter to separate information from the transferred data packet.

To collect information via ESP32 from the web, we have to make an HTTP Get or Post Request to a web page. I decided to use the WiFiClientSecure library to make HTTP requests due to its features for SSL protected servers.
To connect an SSL protected server using ESP32, we need to use the root certificate instead of the fingerprint as opposed to ESP8266. I shared the root certificate of TheAmplituhedron below but, if you want to use another SSL protected server, you have to change it on the code.

After connecting to the server, we can inspect the response message including the data packet and headers using the serial monitor, as well as WiFi connection status.

Now, the last step but not least, we can split the response using delimiter positions by creating substrings to elicit information we need - there is no simple function to split strings in Arduino other than this way.

Important: While Arduino IDE is trying to upload a new sketch: if this error message “A fatal error occurred: Failed to connect to ESP32: Timed out… Connecting…“ occurs, press the BOOT button on ESP32 and hold the button until you see this message "Writing at ... (100%)" before releasing the button in uploading.
1-) Display the screen name, the number of followers, the previous status, and the current status on a 20x4 LCD Screen.

2-) Detect if there is a change in the number of followers depending on the status parameters transferred by the notifier path - web application.

3-) When there is an increase in the number of followers, get notified by a green LED and a buzzer.

4-) When there is a decrease in the number of followers, get notified by a red LED and a buzzer.

5-) Close the notification message and turn back to the home screen by pressing the stop button.
All pin layout and connections are well-explained in "Twitter_Follower_Notifier.ino" below.
Note: I used the ESP32 default I2C pins - GPIO 21 and GPIO 22.

Affix two breadboards with each other to attach components properly without adding redundant wires. Make hardware connections as depicted in figures below:


Demonstration | Twitter Follower Notifier
Collating Data | Twitter Follower Notifier
ESP32 Code
Download
         ////////////////////////////////////////////////////
        //         Twiiter Follower Notifier              //
       //                                                //
      //          -------------------------             //
     //                ESP-WROOM-32                    //
    //               by Kutluhan Aktar                //
   //                                                //
  ////////////////////////////////////////////////////

// In this project, I wanted to create a tool with ESP32 Development Board to track the number of followers which my Twitter account gets or loses across a time period.
// To achieve that goal, I programmed a web application which detects the number of followers of a registered Twitter account and the stastus of it by getting
// information from Twitter and saving to a SQL database through a web hook without the Twitter authentification  process.
// You can access the source code of the aforementioned web application via the link below if you want to create your web application on your server.
// The web application, named Twitter Notifier Station, produces a data oacket containing the number of current followers of a registered Twitter account,
// the screen name of the account, and the previous and recent status of followers - INC, DEC, STABLE.
//
// INC - There is an increase in the number of followers.
// DEC - There is a decrease in the number of followers.
// STABLE - There is no change in the number of followers.
// Note: The percentage sign(%) is the delimiter to seperate information from the transferrred data packet.
//
// %[Followers]%[Screen_name]%[Previous_Status]%[Current_Status]%
// %174%ThAmplituhedron%INC%STABLE%
//
// Inspect the Twitter Notifier Station web application:
// https://www.theamplituhedron.com/dashboard/Twitter-Notifier-Station/
//
// As a reminder, my website has SSL protection and therefore you need to identify your connection using HTTPS protocols and entering TheAmplituhedron SSL Certificate
// if you are gonna use Twitter Notifier Station provided by TheAmplituhedron in your projects.
// You can learn about it more from the link below.
// https://www.theamplituhedron.com/projects/Twitter-Follower-Notifier/
//
// Connections
// ESP-WROOM-32 :
//                                LCD Screen I2C
// GND --------------------------- GND
// 5V(VCC) ----------------------- VIN
// G21 --------------------------- SDA
// G22 --------------------------- SCL
//
//                                INC_LED
// 4   ---------------------------
//                                DEC_LED
// 17  ---------------------------
//                                BUZZER
// 27  ---------------------------
//                                Stop_Button
// 18  ---------------------------

// include WiFi.h and WiFiClientSecure.h libraries to make an HTTP Get Request using ESP32 with the root certificate.
#include <WiFi.h>
#include <WiFiClientSecure.h>

// include LiquidCrystal_I2C to run I2C module.
#include <LiquidCrystal_I2C.h>

// initialize the library by associating I2C address for ESP32
LiquidCrystal_I2C lcd(0x27, 20, 4);

// Define your WiFi settings.
const char *ssid = "[WIFI_NAME]";
const char *password = "[WIFI_PASSWORD]";
// Define SSL Certificate to connect to the server.
// If you are using any other host than TheAmplituhedron, you have to change this root certificate and the host name.
const char *host = "www.theamplituhedron.com";
const char* certificate = \
"-----BEGIN CERTIFICATE-----\n" \
"MIIDxTCCAq2gAwIBAgIBADANBgkqhkiG9w0BAQsFADCBgzELMAkGA1UEBhMCVVMx\n" \
"EDAOBgNVBAgTB0FyaXpvbmExEzARBgNVBAcTClNjb3R0c2RhbGUxGjAYBgNVBAoT\n" \
"EUdvRGFkZHkuY29tLCBJbmMuMTEwLwYDVQQDEyhHbyBEYWRkeSBSb290IENlcnRp\n" \
"ZmljYXRlIEF1dGhvcml0eSAtIEcyMB4XDTA5MDkwMTAwMDAwMFoXDTM3MTIzMTIz\n" \
"NTk1OVowgYMxCzAJBgNVBAYTAlVTMRAwDgYDVQQIEwdBcml6b25hMRMwEQYDVQQH\n" \
"EwpTY290dHNkYWxlMRowGAYDVQQKExFHb0RhZGR5LmNvbSwgSW5jLjExMC8GA1UE\n" \
"AxMoR28gRGFkZHkgUm9vdCBDZXJ0aWZpY2F0ZSBBdXRob3JpdHkgLSBHMjCCASIw\n" \
"DQYJKoZIhvcNAQEBBQADggEPADCCAQoCggEBAL9xYgjx+lk09xvJGKP3gElY6SKD\n" \
"E6bFIEMBO4Tx5oVJnyfq9oQbTqC023CYxzIBsQU+B07u9PpPL1kwIuerGVZr4oAH\n" \
"/PMWdYA5UXvl+TW2dE6pjYIT5LY/qQOD+qK+ihVqf94Lw7YZFAXK6sOoBJQ7Rnwy\n" \
"DfMAZiLIjWltNowRGLfTshxgtDj6AozO091GB94KPutdfMh8+7ArU6SSYmlRJQVh\n" \
"GkSBjCypQ5Yj36w6gZoOKcUcqeldHraenjAKOc7xiID7S13MMuyFYkMlNAJWJwGR\n" \
"tDtwKj9useiciAF9n9T521NtYJ2/LOdYq7hfRvzOxBsDPAnrSTFcaUaz4EcCAwEA\n" \
"AaNCMEAwDwYDVR0TAQH/BAUwAwEB/zAOBgNVHQ8BAf8EBAMCAQYwHQYDVR0OBBYE\n" \
"FDqahQcQZyi27/a9BUFuIMGU2g/eMA0GCSqGSIb3DQEBCwUAA4IBAQCZ21151fmX\n" \
"WWcDYfF+OwYxdS2hII5PZYe096acvNjpL9DbWu7PdIxztDhC2gV7+AJ1uP2lsdeu\n" \
"9tfeE8tTEH6KRtGX+rcuKxGrkLAngPnon1rpN5+r5N9ss4UXnT3ZJE95kTXWXwTr\n" \
"gIOrmgIttRD02JDHBHNA7XIloKmf7J6raBKZV8aPEjoJpL1E/QYVN8Gb5DKj7Tjo\n" \
"2GTzLH4U/ALqn83/B2gX2yKQOC16jdFU8WnjXzPKej17CuPKf1855eJ1usV2GDPO\n" \
"LPAvTK33sefOT6jEm0pUBsV/fdUID+Ic/n4XuKxe9tQWskMJDE32p2u0mYRlynqI\n" \
"4uJEvlz36hz1\n" \
"-----END CERTIFICATE-----\n";

// Define your notifier path settings.
// Do not forget to enter your hedron to connect your notifier path on TheAmplituhedron properly.
String SERVER = "https://www.theamplituhedron.com/dashboard/Twitter-Notifier-Station/";
String HEDRON = "[YOUR_HEDRON]";
String NOTIFIER_PATH = SERVER + HEDRON + ".php";

// Define data holders.
String readString, screen_name, previous_status, status;
int followers;

// Define INC_LED, DEC_LED, Stop_Button, and BUZZER pins.
int INC_LED = 4;
int DEC_LED = 17;
int Stop_Button = 18;
int BUZZER = 27;

// Define the exit boolean to turn off notifier.
boolean EXIT = false;

void setup(){
  pinMode(INC_LED, OUTPUT);
  pinMode(DEC_LED, OUTPUT);
  pinMode(Stop_Button, INPUT);

  // BUZZER
  ledcSetup(0,8000,12);
  ledcAttachPin(BUZZER,0);

  Serial.begin(115200);

  // Connect ESP32 to your WiFi.
  WiFi.begin(ssid, password);

  Serial.print("Try to connect to WiFi. Please wait! ");
  // Wait until successful connection established.
  while (WiFi.status() != WL_CONNECTED) {
    delay(500);
    Serial.print("*");
  }

  // If connection is successful, write WiFi SSID to serial monitor along with assigned IPAddress.
  Serial.print("\n\n-------------------------------------\n\nConnection is successful!\n\nConnected WiFi SSID :");
  Serial.print(ssid);
  Serial.print("\n\nConnected IP_Adress: \n\n");
  //Serial.println(WiFi.localIP());

  // initialize LCD Screen.
  lcd.init();

  // turn on LCD backlight
  lcd.backlight();

}

void loop(){
  // define client.
  WiFiClientSecure client;
  // set the root certificate - CA_Cert.
  client.setCACert(certificate);
  // If the host is not responding,return.
  if(!client.connect(host, 443)){
    Serial.println("Connection Failed!");
    return;
  }
  // Send a GET request to the notifier path ro receive variables.
  client.print(String("GET ") + NOTIFIER_PATH + " HTTP/1.1\r\n" + "Host: " + host + "\r\n" + "Connection: close\r\n\r\n");
  // Detect whether client is responding properly or not.
  unsigned long timeout = millis();
  while (client.available() == 0) {
    if (millis() - timeout > 5000) {
       Serial.println(">>> Client Timeout !");
       client.stop();
       return;
    }
  }

  // Save variables coming from the notifier path.
  while(client.available()){
      // By using the plus character, get the response from the notifier path.
      readString = client.readStringUntil('+');

      Serial.print("Succesfully Gathered: \n");
      Serial.print(readString);
  }

  // Split variables from the transferred data packet using the percentage sign(%) as the delimiter.
  int delimiter_1, delimiter_2, delimiter_3, delimiter_4, delimiter_5;
  delimiter_1 = readString.indexOf("%");
  delimiter_2 = readString.indexOf("%", delimiter_1 + 1);
  delimiter_3 = readString.indexOf("%", delimiter_2 + 1);
  delimiter_4 = readString.indexOf("%", delimiter_3 + 1);
  delimiter_5 = readString.indexOf("%", delimiter_4 + 1);
  // Get variables.
  followers = readString.substring(delimiter_1 + 1, delimiter_2).toInt();
  screen_name = readString.substring(delimiter_2 + 1, delimiter_3);
  previous_status = readString.substring(delimiter_3 + 1, delimiter_4);
  status = readString.substring(delimiter_4 + 1, delimiter_5);

  client.stop();

  if(status == "STABLE"){
      lcd.setCursor(0,0);
      lcd.print("Name:" + screen_name);
      lcd.setCursor(0, 1);
      lcd.print("Followers:");
      lcd.setCursor(13, 1);
      lcd.print(followers);
      lcd.setCursor(0, 2);
      lcd.print("Pre_Sta:" + previous_status);
      lcd.setCursor(0, 3);
      lcd.print("Sta:" + status);

      digitalWrite(INC_LED, LOW);
      digitalWrite(DEC_LED, LOW);
      EXIT = false;
      ledcWrite(0,0);

  }else if(status == "INC"){
    lcd.clear();
    while(EXIT == false){
      lcd.setCursor(2,0);
      lcd.print("Congratulations!");
      lcd.setCursor(0,2);
      lcd.print("You have new");
      lcd.setCursor(0,3);
      lcd.print("followers :)");

      ledcWriteTone(0, 500);
      digitalWrite(INC_LED, HIGH);
      digitalWrite(DEC_LED, LOW);

      if(digitalRead(Stop_Button) > 0){
         EXIT = true;
         lcd.clear();
      }
    }
  }else if(status == "DEC"){
    lcd.clear();
    while(EXIT == false){
      lcd.setCursor(6,0);
      lcd.print("Sorry !");
      lcd.setCursor(0,2);
      lcd.print("You lost");
      lcd.setCursor(0,3);
      lcd.print("followers :(");

      ledcWriteTone(0, 500);
      digitalWrite(INC_LED, LOW);
      digitalWrite(DEC_LED, HIGH);

      if(digitalRead(Stop_Button) > 0){
         EXIT = true;
         lcd.clear();
      }
    }
  }

  delay(1000);
}
Notifier_Path Source Code
Download
<?php
// Define your server settings.
$conn = mysqli_connect("[ServerName]", "[UserName]", "[Password]", "[DatabaseName]");
// Check whether the requested sql command is working properly or not.
function checkDatabase($sql){
	return (mysqli_num_rows(mysqli_query($GLOBALS['conn'], $sql)) > 0) ? true : false;
}

$_sql = "SELECT * FROM `[TableName]` WHERE ...";

// As columns in the table, I created followers, screen_name, and status.
// Do not forget to save a screen name to the database before executing the code to avoid any possible error.
if(checkDatabase($_sql)){
	if($result = mysqli_fetch_assoc(mysqli_query($conn, $_sql))){
		$url = "https://cdn.syndication.twimg.com/widgets/followbutton/info.json?screen_names=".$result['screen_name'];
		$data = json_decode(file_get_contents($url), true);
        $followers = (int)$data[0]['followers_count'];
		if((int)$result['followers'] == $followers){
			$output = array(
			   "followers" => $result['followers'],
			   "screen_name" => $result['screen_name'],
			   "last_status" => $result['status'],
			   "status" => "STABLE"
			);
		}else if((int)$result['followers'] > $followers){
			$__sql = "UPDATE `[TableName]` SET `followers`='$followers', `status`='DEC' WHERE ...";
			mysqli_query($conn, $__sql);
			$output = array(
			   "followers" => $followers,
			   "screen_name" => $result['screen_name'],
			   "last_status" => $result['status'],
			   "status" => "DEC"
			);
		}else if((int)$result['followers'] < $followers){
			$__sql = "UPDATE `[TableName]` SET `followers`='$followers', `status`='INC' WHERE ...";
			mysqli_query($conn, $__sql);
			$output = array(
			   "followers" => $followers,
			   "screen_name" => $result['screen_name'],
			   "last_status" => $result['status'],
			   "status" => 'INC'
			);
		}

		echo "%".$output['followers']."%".$output['screen_name']."%".$output['last_status']."%".$output['status']."%";
	}
}

exit();

?>

Zip Folder(All files)
Download
Root Certificate
Download
Fritzing File
Download
1 ) ESP-WROOM-32 Development Board
2 ) I2C LCD Display Module
3 ) 20x4 LCD Screen
4 ) Buzzer
5 ) 5mm LED Kit
6 ) Push Button
7 ) Solderless Breadboard + Power Supply + Jumper Cable Kits