Thanks to our evolved acuity, it is not struggling for us to detect ripeness by the appearance of a fruit or vegetable. However, nowadays, foods are a subject of mass production. Thus, we need a more reliable and effortless method to distinguish fruits and vegetables depending on their ripeness than the naked eye. In the hope of assisting food companies, grocery stores, and farmers in sorting fruits and vegetables, I developed this device that detects ripening stages by spectral color with a neural network model.
As fruits and vegetables ripen, they change color because of the four families of pigments:
These pigments are groups of molecular structures absorbing a specific set of wavelengths and reflecting the remainder. Unripe fruits are green because of chlorophyll in their cells. As they ripen, the chlorophyll breaks down and is replaced by orange carotenoids and red anthocyanins. These compounds are antioxidants that prevent the fruit from spoiling too quickly in the air. Then, the enzymatic browning occurs and causes discoloration - turning brown. Enzymes function as a catalyst for chemical reactions instigating discoloration, such as:
hydroxylation of phenols
oxidation of phenols
After doing some research on color-changing processes as fruits and vegetables ripen, I decided to build an artificial neural network (ANN) based on the classification model to interpret the spectral color of varying fruits and vegetables to predict ripening stages.
Before building and testing my neural network model, I developed a web application in PHP to collate the spectral color data of fruits and vegetables generated by the AS7341 visible light sensor to create a ripening stages data set by spectral color. I used an Arduino Nano 33 IoT to send the data produced by the visible light sensor to the web application. Empirically, I assigned a ripening stage (label) while obtaining spectral color data for each fruit and vegetable by using four class buttons connected to the Nano 33 IoT:
Early Ripe
Partially Ripe
Ripe
Decay
After completing the data set, I built my artificial neural network (ANN) with TensorFlow to make predictions on the ripening stages (labels) based on spectral color.
Then, after testing, I conducted experiments with my neural network model to predict the ripening stages of varying fruits and vegetables by spectral color. As far as my experiments go, the model is working impeccably.
So, this is my project in a nutshell 😃
In the following steps, you can find more detailed information on coding, data collection, and building an artificial neural network model with TensorFlow.
Huge thanks to DFRobot for sponsoring this project.
Step 1: Developing a web application in PHP to collate spectral color data of fruits and vegetables
I developed this web application (Vegetables and Fruits Data Logger) in PHP to obtain spectral color data of fruits and vegetables from the AS7341 visible light sensor via the Arduino Nano 33 IoT and insert this data into a CSV file (spectral_color_database.csv) to create a ripening stages data set by spectral color.
The web application includes one file (index.php) and requires these parameters to insert a new row (entry) to the data set:
F1
F2
F3
F4
F5
F6
F7
F8
nir_1
nir_2
class
💻 index.php
⭐ Check whether all required parameters are transferred by the Nano 33 IoT.
⭐ If so, create the data array with the obtained parameters, including the current date.
⭐ Insert the recently generated data array into the spectral_color_database.csv file as a new row by using the fputcsv function.
⭐ Then, print: Data Inserted Successfully!
⭐ If there are omissions or no incoming data, print: Waiting for data from the AS7341 sensor to insert...
# Check the incoming data packet:
if(isset($_GET["F1"]) && isset($_GET["F2"]) && isset($_GET["F3"]) && isset($_GET["F4"]) && isset($_GET["F5"]) && isset($_GET["F6"]) && isset($_GET["F7"]) && isset($_GET["F8"]) && isset($_GET["nir_1"]) && isset($_GET["nir_2"]) && isset($_GET["class"])){
	# Create the data array.
	$data = array($_GET["F1"], $_GET["F2"], $_GET["F3"], $_GET["F4"], $_GET["F5"], $_GET["F6"], $_GET["F7"], $_GET["F8"], $_GET["nir_1"], $_GET["nir_2"], $_GET["class"], date("m/d"));
    # Insert the recently generated data array into the CSV file as a new row.
	$file = fopen("spectral_color_database.csv", "a");
	fputcsv($file, $data);
	fclose($file);
	// Print result:
	echo "Data Inserted Successfully!";
}else{
	echo "Waiting for data from the AS7341 sensor to insert...";
}
Figure - 64.4
Step 1.1: Setting up the web application on Raspberry Pi
After creating the PHP web application, I decided to run it on my Raspberry Pi, but you can run the application on any server as long as it is a PHP server.
If you want to use Raspberry Pi but do not know how to set up a LAMP web server on it, you can inspect this tutorial.
⭐ First of all, extract the Vegetables_and_Fruits_Data_Logger.zip folder.
Figure - 64.5
⭐ Then, move the application folder (Vegetables_and_Fruits_Data_Logger) to the apache server (/var/www/html) by using the terminal since the apache server is a protected location.
⭐ Otherwise, the web application inserts the incoming data as a new row to the CSV file (data set) by adding the current date and prints: Data Inserted Successfully!
If you are a novice in programming with the Arduino Nano 33 IoT, follow the steps below to program it with the Arduino IDE.
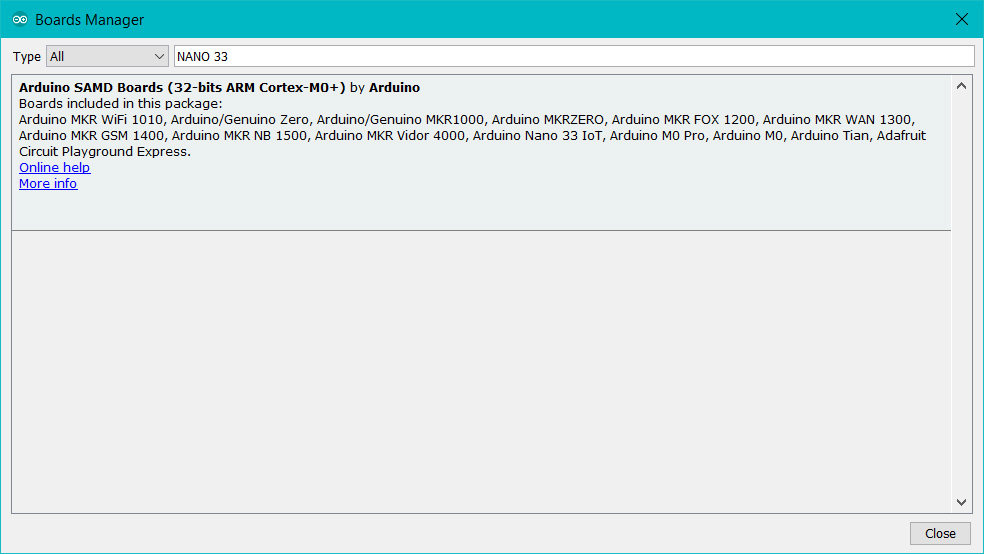
⭐ Download the required drivers - Arduino SAMD Core - as explained here.
Figure - 64.9
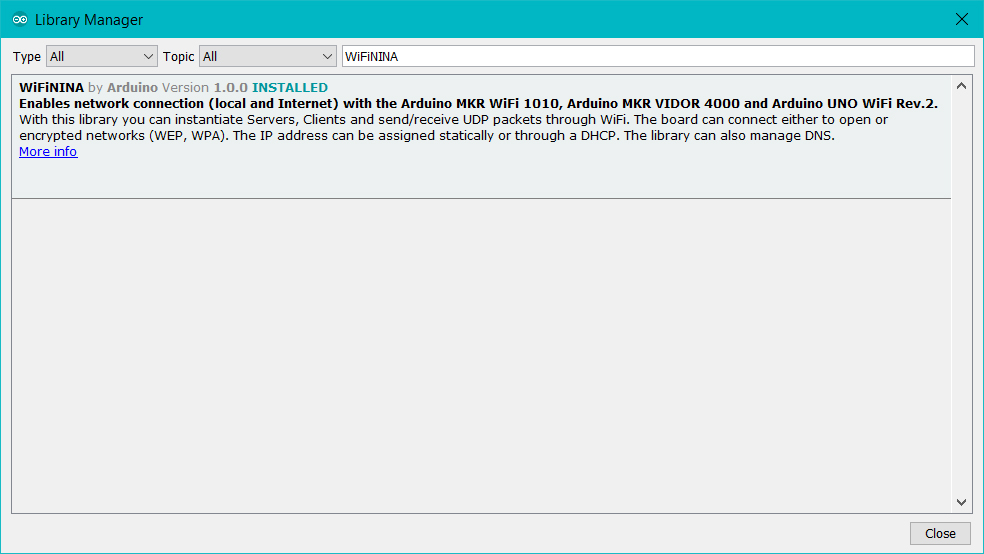
⭐ To be able to connect to the WiFi, download the WiFiNINA library from here.
Figure - 64.10
Step 3: Programming the Arduino Nano 33 IoT to obtain the required parameters and send them to the web application
First of all, to be able to obtain spectral color data from the AS7341 visible light sensor with the Arduino Nano 33 IoT, you need to install the DFRobot AS7341 library.
⭐ Include required libraries and define the WiFi settings.
char ssid[] = "SSID";        // your network SSID (name)
char pass[] = "PASSWORD";    // your network password (use for WPA, or use as key for WEP)
int keyIndex = 0;            // your network key Index number (needed only for WEP)
int status = WL_IDLE_STATUS;

// Enter the IPAddress of your Raspberry Pi.
IPAddress server(192, 168, 1, 20);

// Initialize the Ethernet client library
WiFiClient client; /* WiFiSSLClient client; */
⭐ Define the AS7341 visible light sensor settings and objects.
// Define the AS7341 object.
DFRobot_AS7341 as7341;
// Define AS7341 data objects:
DFRobot_AS7341::sModeOneData_t data1;
DFRobot_AS7341::sModeTwoData_t data2;
⭐ Detect if I2C can communicate properly and enable the built-in LED on the AS7341 sensor.
  // Detect if I2C can communicate properly
  while (as7341.begin() != 0) {
    Serial.println("I2C init failed, please check if the wire connection is correct");
    delay(1000);
  }

  // Enable the built-in LED on the AS7341 sensor.
  as7341.enableLed(true);
⭐ Check for the WiFi module to verify the connection.
  if (WiFi.status() == WL_NO_MODULE) { Serial.println("Connection Failed!"); while (true); }
  // Attempt to connect to the WiFi network:
  while (status != WL_CONNECTED) {
    Serial.println("Attempting to connect to WiFi !!!");
    // Connect to WPA/WPA2 network. Change this line if using open or WEP network:
    status = WiFi.begin(ssid, pass);
    // Wait 10 seconds for connection:
    delay(10000);
  }
⭐ In the read_controls function, read potentiometer and four class button values.
⭐ In the adjust_brightness function, set pin current to control the brightness (1~20 corresponds to current 4mA, 6mA, 8mA, 10mA, 12mA, ......, 42mA) of the built-in LED on the AS7341 sensor.
⭐ Start spectrum measurement with the AS7341 sensor and read the value of sensor data channel 0~5 under these channel mapping modes:
eF1F4ClearNIR
eF5F8ClearNIR
⭐ Then, print spectral color data generated by the sensor:
// Start spectrum measurement:
// Channel mapping mode: 1.eF1F4ClearNIR
as7341.startMeasure(as7341.eF1F4ClearNIR);
// Read the value of sensor data channel 0~5, under eF1F4ClearNIR
data1 = as7341.readSpectralDataOne();
// Channel mapping mode: 2.eF5F8ClearNIR
as7341.startMeasure(as7341.eF5F8ClearNIR);
// Read the value of sensor data channel 0~5, under eF5F8ClearNIR
data2 = as7341.readSpectralDataTwo();
// Print data:
Serial.print("F1(405-425nm): "); Serial.println(data1.ADF1);
Serial.print("F2(435-455nm): "); Serial.println(data1.ADF2);
Serial.print("F3(470-490nm): "); Serial.println(data1.ADF3);
Serial.print("F4(505-525nm): "); Serial.println(data1.ADF4);
Serial.print("F5(545-565nm): "); Serial.println(data2.ADF5);
Serial.print("F6(580-600nm): "); Serial.println(data2.ADF6);
Serial.print("F7(620-640nm): "); Serial.println(data2.ADF7);
Serial.print("F8(670-690nm): "); Serial.println(data2.ADF8);
// CLEAR and NIR:
Serial.print("Clear_1: "); Serial.println(data1.ADCLEAR);
Serial.print("NIR_1: "); Serial.println(data1.ADNIR);
Serial.print("Clear_2: "); Serial.println(data2.ADCLEAR);
Serial.print("NIR_2: "); Serial.println(data2.ADNIR);
Serial.print("\n------------------------------\n");
delay(1000);
⭐ Send spectral color data to the PHP web application by assigning a ripening stage label [0 - 3] depending on the pressed class button:
⭐ Connect to the web application named Vegetables and Fruits Data Logger.
⭐ If the connection is successful, create the query string with the spectral color data and the selected ripening stage label. Otherwise, turn on the 5mm red LED.
⭐ Then, make a Get request with the query string to send the required parameters to the web application.
⭐ If there are incoming bytes available, get the response from the web application.
⭐ If the transferred data is inserted into the data set (spectral_color_database.csv) successfully by the web application, turn on the 5mm green LED:
void make_a_get_request(String application, String _class){
// Connect to the web application named Vegetables_and_Fruits_Data_Logger. Change '80' with '443' if you are using SSL connection.
if(client.connect(server, 80)){
// If successful:
Serial.println("\n\nConnected to the server!");
// Create the query string:
String query = application + "?F1="+data1.ADF1+"&F2="+data1.ADF2+"&F3="+data1.ADF3+"&F4="+data1.ADF4+"&F5="+data2.ADF5+"&F6="+data2.ADF6+"&F7="+data2.ADF7+"&F8="+data2.ADF8+"&nir_1="+data1.ADNIR+"&nir_2="+data2.ADNIR+"&class="+_class;
// Make an HTTP Get request:
client.println("GET " + query + " HTTP/1.1");
client.println("Host: 192.168.1.20");
client.println("Connection: close");
client.println();
}else{
Serial.println("Server Error!");
digitalWrite(red, HIGH);
}
delay(2000); // Wait 2 seconds after connection...
// If there are incoming bytes available, get the response from the web application.
String response = "";
while (client.available()) { char c = client.read(); response += c; }
if(response != ""){
Serial.println(response);
Serial.println("\n");
// Check whether the transferred data is inserted successfully or not:
if(response.indexOf("Data Inserted Successfully!") > 0){
digitalWrite(green, HIGH);
}else{
digitalWrite(red, HIGH);
}
}
// Turn off LEDs:
delay(3000);
digitalWrite(green, LOW);
digitalWrite(red, LOW);
}
Figure - 64.11
Figure - 64.12
Figure - 64.13
Figure - 64.14
Figure - 64.15
⭐ By serial communication, while running, the Arduino Nano 33 IoT prints:
the brightness level of the built-in LED on the AS7341 sensor
spectral color data generated by the AS7341 sensor
server response from the web application
Figure - 64.16
Figure - 64.17
Step 4: Creating the ripening stages data set based on spectral color
To train my neural network model on ripening stages by spectral color, I needed to collect spectral color data of varying fruits and vegetables to create a data set with eminent validity. Hence, I decided to use the AS7341 visible light sensor to collect spectral color data.
This sensor employs the new generation of AS7341 spectral sensor IC launched by the well-known AMS company. It features eight channels for visible light, one channel for near-IR (NIR), one channel without a filter (Clear), and an extra channel distributed over ambient light flicker (Flicker). Also, it has six parallel 16-bit ADC channels for signal and data processing. Thanks to the two integrated LEDs with adjustable brightness, it can collect data even in a dark environment.
Figure - 64.18
#️⃣ While running, I collected these parameters with the AS7341 visible light sensor:
F1 (405-425nm)
F2 (435-455nm)
F3 (470-490nm)
F4 (505-525nm)
F5 (545-565nm)
F6 (580-600nm)
F7 (620-640nm)
F8 (670-690nm)
Clear_1
NIR_1
Clear_2
NIR_2
#️⃣ As explained in the previous step, I connected the AS7341 sensor to the Arduino Nano 33 IoT to send parameters and the assigned ripening stage labels to the PHP web application. After obtaining data, the web application inserts the required parameters by adding the current date parameter (Step 1) into the spectral_color_database.csv file (data set) under these columns:
F1
F2
F3
F4
F5
F6
F7
F8
NIR_1
NIR_2
Ripeness
Date
#️⃣ After completing programming and assembling the device, I selected eleven different fruits and vegetables to collect their ripeness classes by spectral color:
Figure - 64.19
#️⃣ The device allows the user to send data to the web application and assign a ripeness class (label) by pressing one of the four class buttons:
0 — Early Ripe
1 — Partially Ripe
2 — Ripe
3 — Decay
#️⃣ For each fruit and vegetable, I collated spectral color data and the empirically assigned ripeness class for ten days, three times a day:
Figure - 64.20
Figure - 64.21
Figure - 64.22
Figure - 64.23
Figure - 64.24
Figure - 64.25
#️⃣ The device lets the user adjust the brightness of the built-in LED on the AS7341 sensor with the potentiometer.
#️⃣ If the transferred data is inserted into the data set successfully, the device turns on the 5mm green LED. Otherwise, it turns on the 5mm red LED.
Figure - 64.26
Figure - 64.27
As expected, fruits and vegetables had gradually gone stale during ten days of data collecting:
Figure - 64.28
Figure - 64.29
Finally, after collecting ripeness classes by spectral color three times a day for ten days, I elicited a data set (spectral_color_database.csv) with eminent validity to train my neural network model.
Figure - 64.30
Step 5: Building an Artificial Neural Network (ANN) with TensorFlow
When I completed my ripening stages by spectral color data set, I started to work on my artificial neural network (ANN) model to make predictions on the ripening stages of varying fruits and vegetables.
I decided to create my neural network model with TensorFlow in Python. Thus, first of all, I followed the steps below to grasp a better understanding of my data set:
Data Visualization
Data Scaling (Normalizing)
Data Preprocessing
Data Splitting
As explained in the previous steps, I empirically assigned ripening stage classes for each fruit and vegetable entry (input) while collecting spectral color data. Hence, I used these pre-defined classes as labels and did not need to preprocess my data set for assigning labels:
0 — Early Ripe
1 — Partially Ripe
2 — Ripe
3 — Decay
After scaling (normalizing) and preprocessing inputs in my data set, I elicited ten input variables and one label for each fruit and vegetable entry, classified with the four mentioned classes. Then, I built an artificial neural network model with TensorFlow and trained it with my data set to obtain the best possible results and predictions.
Layers:
10 [Input]
16 [Hidden]
32 [Hidden]
64 [Hidden]
128 [Hidden]
256 [Hidden]
4 [Output]
Figure - 64.31
Figure - 64.32
To execute all steps above, I created a class named Ripeness_Detection in Python after including the required libraries:
import tensorflow as tf
from tensorflow import keras
import matplotlib.pyplot as plt
import numpy as np
import pandas as pd
Subsequently, I will discuss coding in Python for each step I mentioned above.
Also, you can download build_neural_network_model.py to inspect coding.
Figure - 64.33
Step 5.1: Visualizing the ripening stages data set based on spectral color
Before diving into building a neural network model, it is crucial to understand the given data set to pass the model appropriately formatted data.
So, in this step, I will show you how to visualize the ripening stages data set and scale (normalize) it in Python.
⭐ First of all, read the ripening stages data set from spectral_color_database.csv.
⭐ In the graphics function, visualize the requested columns from the ripening stages data set by using the Matplotlib library.
def graphics(self, column_1, column_2, x_label, y_label):
# Show requested columns from the data set:
plt.style.use("dark_background")
plt.gcf().canvas.set_window_title('Vegetables and Fruits Ripeness Detection by Color')
plt.hist2d(self.df[column_1], self.df[column_2], cmap='RdBu')
plt.colorbar()
plt.xlabel(x_label)
plt.ylabel(y_label)
plt.title(x_label)
plt.show()
⭐ In the data_visualization function, scrutinize all columns before scaling and preprocessing ripening stages data set to build a model with appropriately formatted data.
Step 5.2: Assigning labels (pre-defined ripening stages) and scaling (normalizing) the input data
Before building and training my neural network model, I utilized pre-defined ripeness classes for each food and vegetable entry (input) as its label.
⭐ In the define_and_assign_labels function, get pre-defined ripeness classes (labels) [0 - 3] for each input in the data set and append them to the labels array.
After assigning labels, I needed to create inputs to train my neural network model. From my ripening stages data set, I decided to use these ten parameters, generated by the AS7341 visible light sensor as spectral color data, to create inputs:
F1
F2
F3
F4
F5
F6
F7
F8
NIR_1
NIR_2
After selecting ten parameters for inputs and visualizing the data set, I scaled (normalized) each parameter column to format them properly.
Normally, each input for a fruit or vegetable in the data set looked like this before scaling:
After completing scaling (normalizing), I extracted these scaled parameter columns from the ripening stages data set for each fruit and vegetable entry (input):
scaled_F1
scaled_F2
scaled_F3
scaled_F4
scaled_F5
scaled_F6
scaled_F7
scaled_F8
scaled_NIR_1
scaled_NIR_2
Input with the scaled parameters:
[0.131 0.148 0.184 0.765 1 1 1 0.809 0.276 0.273]
⭐ In the scale_data_and_define_inputs function, divide every parameter column into their required values in order to make them smaller than or equal to 1.
⭐ Then, create inputs with the scaled parameters, append them to the inputs array, and convert this array to a NumPy array by using the asarray() function.
⭐ Each input includes ten parameters [shape=(10,)]:
Step 5.3: Training the model (ANN) on the ripening stage classes based on spectral color
After preprocessing and scaling (normalizing) the ripening stages data set to create inputs and labels, I split them as training (95%) and test (5%) sets:
Step 6: Experimenting with the model by making predictions on ripening stages
After completing and saving my neural network model, I acquired spectral color data of fruits and vegetables with the device and formatted them as input parameters, depending on how I scaled (normalized) them (Step 5.2) while training the model. Then, I created a NumPy array (prediction_array) consisting of the formatted input parameters to predict ripening stages by spectral color with the model.
The model predicts possibilities of labels (ripeness classes) for each input as an array of 4 numbers. They represent the model's "confidence" that the given input array corresponds to each of the four different ripeness classes based on spectral color [0 - 3], as shown in Step 5.
[0] Early Ripe
[1] Partially Ripe
[2] Ripe
[3] Decay
⭐ In the make_predictions function:
⭐ Load the saved model (ANN_Ripeness_Detection.h5) into memory.
⭐ Format the input data.
⭐ Then, set the input tensor values with the formatted input data in a NumPy array for each fruit and vegetable input - prediction_array.
⭐ Run the model to make predictions.
⭐ Finally, display the most accurate label (ripeness class) predicted by the model for each input using the argmax() function.
def make_predictions(self):
saved_model = keras.models.load_model("E:\PYTHON\Vegetables_and_Fruits_Ripeness_Detection\model\ANN_Ripeness_Detection.h5")
prediction_array = np.array([
[0.131,0.148,0.184,0.765,1,1,1,0.809,0.276,0.273],
[0.143,0.122,0.157,0.228,1,1,1,1,0.335,0.334],
[0.038,0.032,0.032,0.030,0.042,0.055,0.467,0.880,0.100,0.102],
[0.002,0.001,0.001,0.002,0.003,0.003,0.002,0.007,0.010,0.012]
])
predictions = saved_model.predict(prediction_array)
print("\n\nModel Predictions:\n")
for i in range(len(prediction_array)):
print("INPUT[" + str(i+1) + "] => ", self.ripeness_class_names[np.argmax(predictions[i])])
Figure - 64.46
I run the model to predict the ripening stages of lots of fruits and vegetables at my disposal. As far as my experiment goes, the model is working impeccably :)
Figure - 64.47
Connections and Adjustments
// Connections
// Arduino Nano 33 IoT :
// AS7341 11-Channel Spectral Color Sensor
// 3.3V --------------------------- +
// GND --------------------------- -
// A5 --------------------------- C
// A4 --------------------------- D
// 10K Potentiometer
// A0 --------------------------- S
// Class Button_1 (6x6)
// D2 ---------------------------
// Class Button_2 (6x6)
// D3 ---------------------------
// Class Button_3 (6x6)
// D4 ---------------------------
// Class Button_4 (6x6)
// D5 ---------------------------
// 5mm Green LED
// D6 ---------------------------
// 5mm Red LED
// D7 ---------------------------
To collect and send spectral color data generated by the AS7341 visible light sensor, I attach the sensor to an Arduino Nano 33 IoT. Then, I connected four class buttons to assign a ripeness class (Early Ripe, Partially Ripe, Ripe, Decay) when sending data to the PHP web application. I used a potentiometer (long-shaft with knob) to adjust the brightness of the built-in LED on the AS7341 sensor. Finally, I added 5mm green and red LEDs indicating the response from the web application - successful or not.
Figure - 64.48
Figure - 64.49
After completing connections, I fastened breadboards and the AS7341 sensor to an old bookshelf with a hot glue gun to create a solid device.
Figure - 64.50
Figure - 64.51
Videos and Conclusion
After completing all steps above and experimenting, the device became a skillful assistant to categorize fruits and vegetables depending on ripening stages by spectral color :)
Figure - 64.52
Further Discussions
By bringing this ripeness detection method by spectral color into common usage, it can help to[1]:
🍒🥕 avert farmers from consuming a lot of time for manual sorting and examining of fruits and vegetables from harvest till its growth period,
🍒🥕 improve yield estimation,
🍒🥕 accelerate disease detection.
Figure - 64.53
References
[1]Mrs Rex Fiona et al 2019 J. Phys.: Conf. Ser. 1362 012033.
/////////////////////////////////////////////
// Vegetables and Fruits Ripeness //
// Detection by Color w/ TensorFlow //
// ----------------- //
// (Arduino Nano 33 IoT) //
// by Kutluhan Aktar //
// //
/////////////////////////////////////////////
//
// Collate spectral color data of varying fruits and vegetables and interpret this data set w/ a neural network model to predict ripening stages.
//
// For more information:
// https://www.theamplituhedron.com/projects/Vegetables_and_Fruits_Ripeness_Detection_by_Color_w_TensorFlow/
//
//
// Connections
// Arduino Nano 33 IoT :
// AS7341 11-Channel Spectral Color Sensor
// 3.3V --------------------------- +
// GND --------------------------- -
// A5 --------------------------- C
// A4 --------------------------- D
// 10K Potentiometer
// A0 --------------------------- S
// Class Button_1 (6x6)
// D2 ---------------------------
// Class Button_2 (6x6)
// D3 ---------------------------
// Class Button_3 (6x6)
// D4 ---------------------------
// Class Button_4 (6x6)
// D5 ---------------------------
// 5mm Green LED
// D6 ---------------------------
// 5mm Red LED
// D7 ---------------------------
// Include required libraries:
#include <WiFiNINA.h>
#include "DFRobot_AS7341.h"
char ssid[] = "SSID"; // your network SSID (name)
char pass[] = "PASSWORD"; // your network password (use for WPA, or use as key for WEP)
int keyIndex = 0; // your network key Index number (needed only for WEP)
int status = WL_IDLE_STATUS;
// Enter the IPAddress of your Raspberry Pi.
IPAddress server(192, 168, 1, 20);
// Initialize the Ethernet client library
WiFiClient client; /* WiFiSSLClient client; */
// Define the AS7341 object.
DFRobot_AS7341 as7341;
// Define AS7341 data objects:
DFRobot_AS7341::sModeOneData_t data1;
DFRobot_AS7341::sModeTwoData_t data2;
// Define the potentiometer pin:
#define pot A0
// Define the class button pins:
#define class_1 2
#define class_2 3
#define class_3 4
#define class_4 5
// Define the control LED pins:
#define green 6
#define red 7
// Define the data holders:
int pot_val, class_1_val, class_2_val, class_3_val, class_4_val;
void setup(){
Serial.begin(9600);
// Class button settings:
pinMode(class_1, INPUT_PULLUP);
pinMode(class_2, INPUT_PULLUP);
pinMode(class_3, INPUT_PULLUP);
pinMode(class_4, INPUT_PULLUP);
// Control LED settings:
pinMode(green, OUTPUT);
pinMode(red, OUTPUT);
// Detect if I2C can communicate properly
while (as7341.begin() != 0) {
Serial.println("I2C init failed, please check if the wire connection is correct");
delay(1000);
}
// Enable the built-in LED on the AS7341 sensor.
as7341.enableLed(true);
// Check for the WiFi module:
if (WiFi.status() == WL_NO_MODULE) { Serial.println("Connection Failed!"); while (true); }
// Attempt to connect to the WiFi network:
while (status != WL_CONNECTED) {
Serial.println("Attempting to connect to WiFi !!!");
// Connect to WPA/WPA2 network. Change this line if using open or WEP network:
status = WiFi.begin(ssid, pass);
// Wait 10 seconds for connection:
delay(10000);
}
}
void loop(){
read_controls();
adjust_brightness();
// Start spectrum measurement:
// Channel mapping mode: 1.eF1F4ClearNIR
as7341.startMeasure(as7341.eF1F4ClearNIR);
// Read the value of sensor data channel 0~5, under eF1F4ClearNIR
data1 = as7341.readSpectralDataOne();
// Channel mapping mode: 2.eF5F8ClearNIR
as7341.startMeasure(as7341.eF5F8ClearNIR);
// Read the value of sensor data channel 0~5, under eF5F8ClearNIR
data2 = as7341.readSpectralDataTwo();
// Print data:
Serial.print("F1(405-425nm): "); Serial.println(data1.ADF1);
Serial.print("F2(435-455nm): "); Serial.println(data1.ADF2);
Serial.print("F3(470-490nm): "); Serial.println(data1.ADF3);
Serial.print("F4(505-525nm): "); Serial.println(data1.ADF4);
Serial.print("F5(545-565nm): "); Serial.println(data2.ADF5);
Serial.print("F6(580-600nm): "); Serial.println(data2.ADF6);
Serial.print("F7(620-640nm): "); Serial.println(data2.ADF7);
Serial.print("F8(670-690nm): "); Serial.println(data2.ADF8);
// CLEAR and NIR:
Serial.print("Clear_1: "); Serial.println(data1.ADCLEAR);
Serial.print("NIR_1: "); Serial.println(data1.ADNIR);
Serial.print("Clear_2: "); Serial.println(data2.ADCLEAR);
Serial.print("NIR_2: "); Serial.println(data2.ADNIR);
Serial.print("\n------------------------------\n");
delay(1000);
// Send data to the PHP web application (Vegetables_and_Fruits_Data_Logger) depending on the selected ripeness class [0 - 3]:
if(!class_1_val) make_a_get_request("/Vegetables_and_Fruits_Data_Logger/", "0");
if(!class_2_val) make_a_get_request("/Vegetables_and_Fruits_Data_Logger/", "1");
if(!class_3_val) make_a_get_request("/Vegetables_and_Fruits_Data_Logger/", "2");
if(!class_4_val) make_a_get_request("/Vegetables_and_Fruits_Data_Logger/", "3");
}
void read_controls(){
  // Potentiometer:
  pot_val = analogRead(pot);
  // Class Buttons:
  class_1_val = digitalRead(class_1);
  class_2_val = digitalRead(class_2);
  class_3_val = digitalRead(class_3);
  class_4_val = digitalRead(class_4);
}
void adjust_brightness(){
// Set pin current to control brightness (1~20 corresponds to current 4mA,6mA,8mA,10mA,12mA,......,42mA)
int brightness = map(pot_val, 0, 1023, 1, 21);
Serial.print("\nBrightness: "); Serial.println(brightness);
as7341.controlLed(brightness);
}
void make_a_get_request(String application, String _class){
  // Connect to the web application named Vegetables_and_Fruits_Data_Logger. Change '80' with '443' if you are using SSL connection.
  if(client.connect(server, 80)){
    // If successful:
    Serial.println("\n\nConnected to the server!");
    // Create the query string:
    String query = application + "?F1="+data1.ADF1+"&F2="+data1.ADF2+"&F3="+data1.ADF3+"&F4="+data1.ADF4+"&F5="+data2.ADF5+"&F6="+data2.ADF6+"&F7="+data2.ADF7+"&F8="+data2.ADF8+"&nir_1="+data1.ADNIR+"&nir_2="+data2.ADNIR+"&class="+_class;
    // Make an HTTP Get request:
    client.println("GET " + query + " HTTP/1.1");
    client.println("Host: 192.168.1.20");
    client.println("Connection: close");
    client.println();
  }else{
    Serial.println("Server Error!");
    digitalWrite(red, HIGH);
  }
  delay(2000); // Wait 2 seconds after connection...
  // If there are incoming bytes available, get the response from the web application.
  String response = "";
  while (client.available()) { char c = client.read(); response += c; }
  if(response != ""){
    Serial.println(response);
    Serial.println("\n");
    // Check whether the transferred data is inserted successfully or not:
    if(response.indexOf("Data Inserted Successfully!") > 0){
      digitalWrite(green, HIGH);
    }else{
      digitalWrite(red, HIGH);
    }
  }
  // Turn off LEDs:
  delay(3000);
  digitalWrite(green, LOW);
  digitalWrite(red, LOW);
}
# Vegetables and Fruits Ripeness Detection by Color w/ TensorFlow
#
# Windows, Linux, or Ubuntu
#
# By Kutluhan Aktar
#
# Collate spectral color data of varying fruits and vegetables and interpret this data set w/ a neural network model to predict ripening stages.
#
#
# For more information:
# https://www.theamplituhedron.com/projects/Vegetables_and_Fruits_Ripeness_Detection_by_Color_w_TensorFlow/
import tensorflow as tf
from tensorflow import keras
import matplotlib.pyplot as plt
import numpy as np
import pandas as pd
# Create a class to build a neural network model after getting, visualizing, and scaling (normalizing) the data set of fruits and vegetables based on spectral color.
class Ripeness_Detection:
def __init__(self, data):
self.df = data
self.inputs = []
self.labels = []
# Define class names for each ripening stage based on color.
self.ripeness_class_names = ["Early Ripe", "Partially Ripe", "Ripe", "Decay"]
# Create graphics for requested columns.
def graphics(self, column_1, column_2, x_label, y_label):
# Show requested columns from the data set:
plt.style.use("dark_background")
plt.gcf().canvas.set_window_title('Vegetables and Fruits Ripeness Detection by Color')
plt.hist2d(self.df[column_1], self.df[column_2], cmap='RdBu')
plt.colorbar()
plt.xlabel(x_label)
plt.ylabel(y_label)
plt.title(x_label)
plt.show()
# Visualize data before creating and feeding the neural network model.
def data_visualization(self):
# Scrutinize requested columns to build a model with appropriately formatted data:
self.graphics('F1', 'NIR_1', 'F1(405-425nm)', 'Near-Infrared')
self.graphics('F2', 'NIR_1', 'F2(435-455nm)', 'Near-Infrared')
self.graphics('F3', 'NIR_1', 'F3(470-490nm)', 'Near-Infrared')
self.graphics('F4', 'NIR_1', 'F4(505-525nm)', 'Near-Infrared')
self.graphics('F5', 'NIR_2', 'F5(545-565nm)', 'Near-Infrared')
self.graphics('F6', 'NIR_2', 'F6(580-600nm)', 'Near-Infrared')
self.graphics('F7', 'NIR_2', 'F7(620-640nm)', 'Near-Infrared')
self.graphics('F8', 'NIR_2', 'F8(670-690nm)', 'Near-Infrared')
# Assign labels for each fruit or vegetable reading according to the pre-defined classes.
def define_and_assign_labels(self):
self.labels = self.df.pop("Ripeness")
# Scale (normalize) data depending on the neural network model and define inputs.
def scale_data_and_define_inputs(self):
self.df["scaled_F1"] = self.df.pop("F1") / 1000
self.df["scaled_F2"] = self.df.pop("F2") / 1000
self.df["scaled_F3"] = self.df.pop("F3") / 1000
self.df["scaled_F4"] = self.df.pop("F4") / 1000
self.df["scaled_F5"] = self.df.pop("F5") / 1000
self.df["scaled_F6"] = self.df.pop("F6") / 1000
self.df["scaled_F7"] = self.df.pop("F7") / 1000
self.df["scaled_F8"] = self.df.pop("F8") / 1000
self.df["scaled_NIR_1"] = self.df.pop("NIR_1") / 1000
self.df["scaled_NIR_2"] = self.df.pop("NIR_2") / 1000
# Create the inputs array using the scaled variables:
for i in range(len(self.df)):
self.inputs.append(np.array([self.df["scaled_F1"][i], self.df["scaled_F2"][i], self.df["scaled_F3"][i], self.df["scaled_F4"][i], self.df["scaled_F5"][i], self.df["scaled_F6"][i], self.df["scaled_F7"][i], self.df["scaled_F8"][i], self.df["scaled_NIR_1"][i], self.df["scaled_NIR_2"][i]]))
self.inputs = np.asarray(self.inputs)
# Split inputs and labels into training and test sets.
def split_data(self):
l = len(self.df)
# (95%, 5%) - (training, test)
self.train_inputs = self.inputs[0:int(l*0.95)]
self.test_inputs = self.inputs[int(l*0.95):]
self.train_labels = self.labels[0:int(l*0.95)]
self.test_labels = self.labels[int(l*0.95):]
# Build and train an artificial neural network (ANN) to make predictions on the ripening stages of fruits and vegetables based on spectral color.
def build_and_train_model(self):
# Build the neural network:
self.model = keras.Sequential([
keras.Input(shape=(10,)),
keras.layers.Dense(16),
keras.layers.Dense(32),
keras.layers.Dense(64),
keras.layers.Dense(128),
keras.layers.Dense(256),
keras.layers.Dense(4, activation='softmax')
])
# Compile:
self.model.compile(optimizer='adam', loss="sparse_categorical_crossentropy", metrics=['accuracy'])
# Train:
self.model.fit(self.train_inputs, self.train_labels, epochs=19)
# Test the accuracy:
print("\n\nModel Evaluation:")
test_loss, test_acc = self.model.evaluate(self.test_inputs, self.test_labels)
print("Evaluated Accuracy: ", test_acc)
# Save the model for further usage:
def save_model(self):
self.model.save("E:\PYTHON\Vegetables_and_Fruits_Ripeness_Detection\model\ANN_Ripeness_Detection.h5")
# Run Artificial Neural Network (ANN):
def Neural_Network(self, save):
self.define_and_assign_labels()
self.scale_data_and_define_inputs()
self.split_data()
self.build_and_train_model()
if save:
self.save_model()
# Make ripening stage [0 - 3] predictions with the saved model:
def make_predictions(self):
saved_model = keras.models.load_model("E:\PYTHON\Vegetables_and_Fruits_Ripeness_Detection\model\ANN_Ripeness_Detection.h5")
prediction_array = np.array([
[0.131,0.148,0.184,0.765,1,1,1,0.809,0.276,0.273],
[0.143,0.122,0.157,0.228,1,1,1,1,0.335,0.334],
[0.038,0.032,0.032,0.030,0.042,0.055,0.467,0.880,0.100,0.102],
[0.002,0.001,0.001,0.002,0.003,0.003,0.002,0.007,0.010,0.012]
])
predictions = saved_model.predict(prediction_array)
print("\n\nModel Predictions:\n")
for i in range(len(prediction_array)):
print("INPUT[" + str(i+1) + "] => ", self.ripeness_class_names[np.argmax(predictions[i])])
# Read the collated data set of fruits and vegetables:
csv_path = "E:\PYTHON\Vegetables_and_Fruits_Ripeness_Detection\spectral_color_database.csv"
df = pd.read_csv(csv_path)
# Define a new class object named 'fruits_and_vegetables':
fruits_and_vegetables = Ripeness_Detection(df)
# Visualize data:
#fruits_and_vegetables.data_visualization()
# Artificial Neural Network (ANN):
fruits_and_vegetables.Neural_Network(False)
# Make predictions:
#fruits_and_vegetables.make_predictions()