During these unprecedented times - COVID-19 pandemic - one of the most crucial precautions to falter the detrimental effects of coronavirus is to avert the spread of the virus worldwide as much as possible. Especially as we know that it is spreading even faster than seasonal influenza viruses: "With the worldwide spread of the novel Coronavirus Disease 2019 (COVID-19), caused by the SARS-CoV-2 virus, we are experiencing a declared pandemic. One of the largest preoccupations about this new virus is its notable ability to spread given the absence of any effective treatment, vaccine, and immunity in human populations. Epidemiologists quantify the ability of infectious agents to spread by estimating the basic reproduction number (R0) statistic (Delamater et al., 2019), which measures the average number of people each contagious person infects. The new coronavirus is transmitting at an average R0 between 2.7 and 3.2 (Billah, Miah & Khan, 2020; Liu et al., 2020), which is greater than seasonal influenza viruses that spread every year around the planet (median R0 of 1.28, Biggerstaff et al., 2014).(1)"
The spreading of infectious diseases, including COVID-19, depends on human interactions. However, in an environment where behavioral patterns and physical contacts are evolving due to mass transportation and globalization, measuring human interactions to apply necessary regulations and stipulations is a major challenge yet. And, since it is difficult to exclude the possibility of asymptomatic cases due to the long incubation period, issuing regulations is becoming even more critical, such as "Face mask use indoors remains very important in settings with poor ventilation and where there are lots of people nearby." But, even strict regulations and precautions are not enough to avert the spread of coronavirus alone. We need to reduce human interactions as much as possible.
According to the following research, we know that coronavirus keeps spreading and affecting businesses, even with strict regulations but continuing human interactions: "The aviation sector has been experiencing an unprecedented crisis since March 2020. Indeed, almost all airports have been paralyzed following the outbreak of the Covid-19 pandemic. Euro control had announced a significant 88% reduction in the number of flights by May 1, 2020 (Eurocontrol, 2020a, 2020b). The flow of international traffic contributed significantly to the spread of the virus worldwide (Kraemer et al., 2020). In Europe, for example, it seems that the areas least affected by the virus are those where no international airport is located. One of the main characteristics of COVID-19 is its long incubation period, which currently averages 5.2 days (Guan et al., 2020). Contagiousness during the incubation period is one of the reasons why COVID19 spreads so widely compared to other viruses, making it extremely difficult to exclude the possibility of asymptomatic passengers passing through the airport (Postorino et al., 2020; Pullano et al., 2020).(2)"
After researching the mentioned topics, I wanted to contribute to the solution of applying regulations while reducing human contact and interactions as much as possible. Thus, I decided to create this prototype, which aims to minimize the number of staff having to interact with people to notify them wearing masks; while applying regulations by detecting people without a mask and fining them with a penalty receipt automatically.
To decrease interactions as much as possible, I designed this prototype as an all-in-one service with hardware and software. The device follows these protocols while operating:
Live streams while operating
Receives commands (direction and speed) as Python Arguments from the PHP web application (Mask Detection Robot Dashboard)
Detects people without a mask automatically using the object classification
Captures pictures of people without a mask after detecting
Sends pictures of people without a mask to the web application as evidence
Prints the penalty receipt after detecting, including the QR code of the payment page showing the payment options and the corroborating evidence of the issued fine - the captured picture
As software, I developed a web application in PHP, named Mask Detection Robot Dashboard, which shows the live stream, executes Python script including Arguments to control the robot chassis, saves the captured images, and generates a payment page for each receipt.
And, I developed an application in Python, named Autonomous Mask Detection Robot, which detects people without a mask, captures pictures, sends the captured pictures to the PHP web application as evidence, and prints penalty receipts with unique receipt numbers.
As hardware, I used a DFRobot HUSKYLENS AI Camera to detect people without a mask by utilizing its integrated object classification mode. And, to be able to make the device move on command, I used a Black Gladiator - Tracked Robot Chassis and an L298N Motor Driver Module. Then, I added a Tiny (Embedded) Thermal Printer to the device to print the receipt after detecting people without a mask.
Lastly, I used a USB webcam to live stream and capture pictures of people without a mask when detected. To supply the robot chassis and the thermal printer, I used a 12V external battery with an MB102 Power Supply Module.
Huge thanks to DFRobot for sponsoring this project.
⭐ Black Gladiator - Tracked Robot Chassis | Inspect
⭐ Embedded Thermal Printer - USB - TTL Serial | Inspect
Figure - 54.1
Figure - 54.2
Figure - 54.3
Figure - 54.4
Step 1: Detecting people without a mask with the object classification mode in HuskyLens
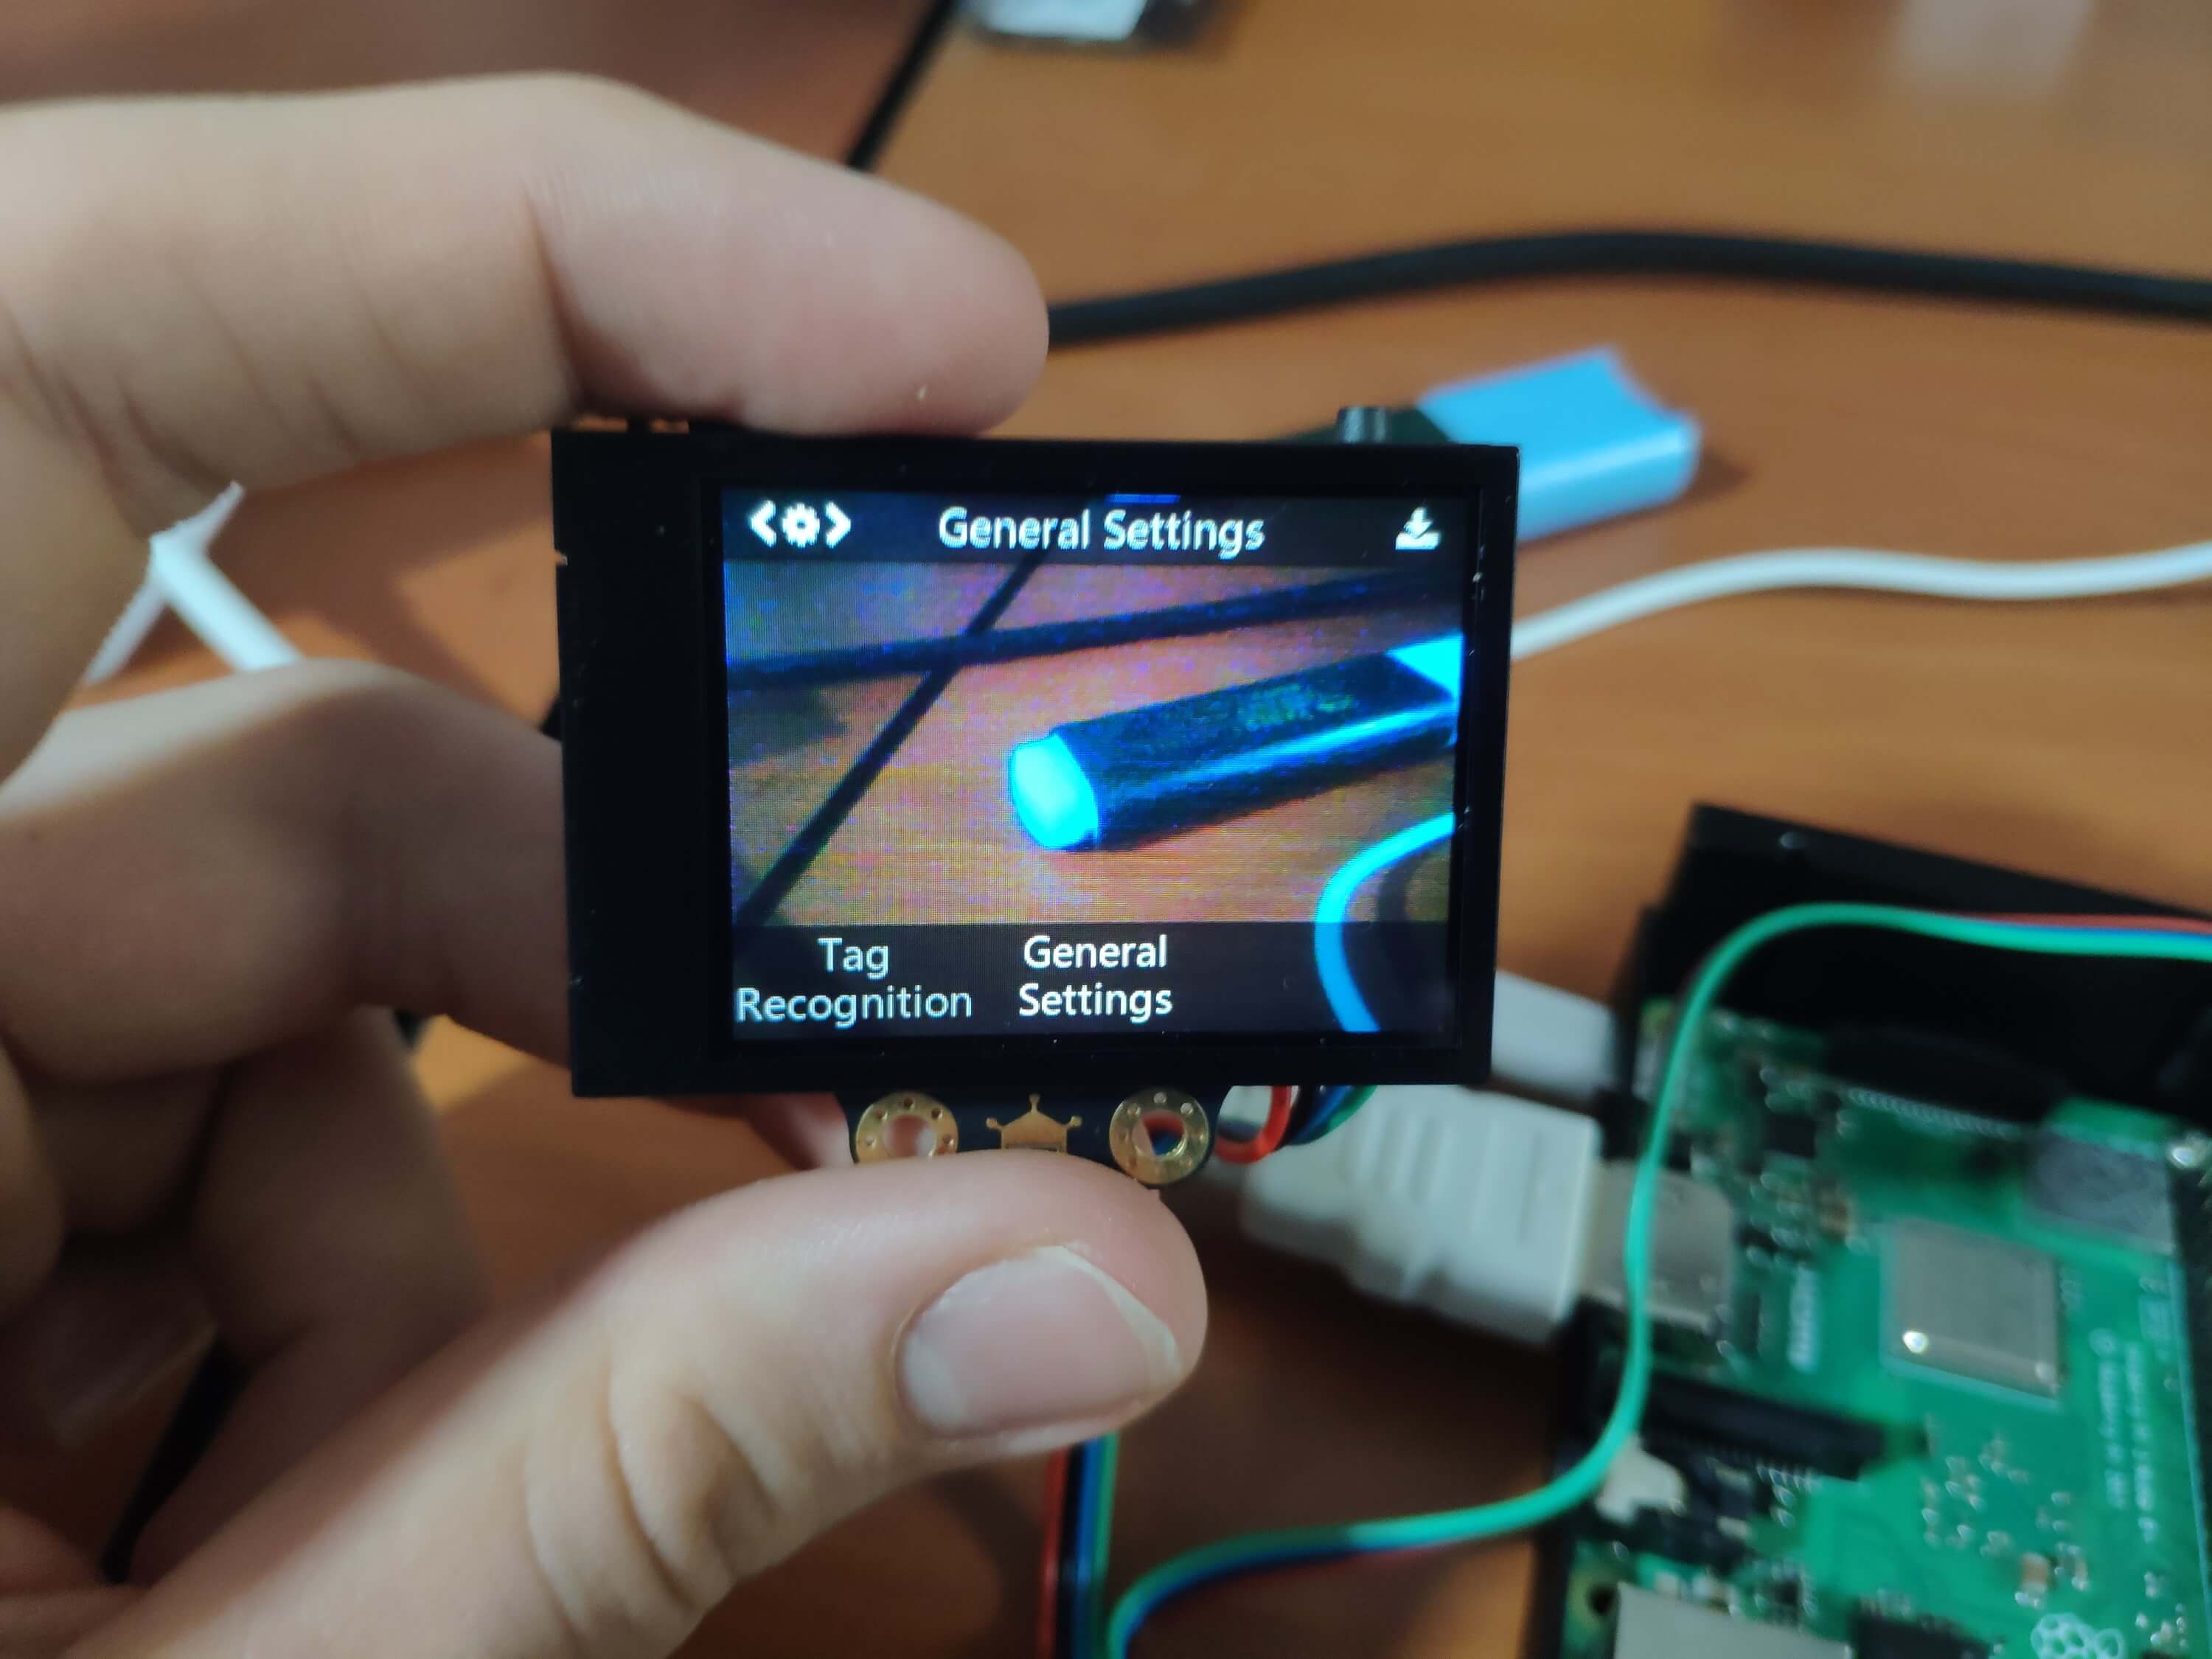
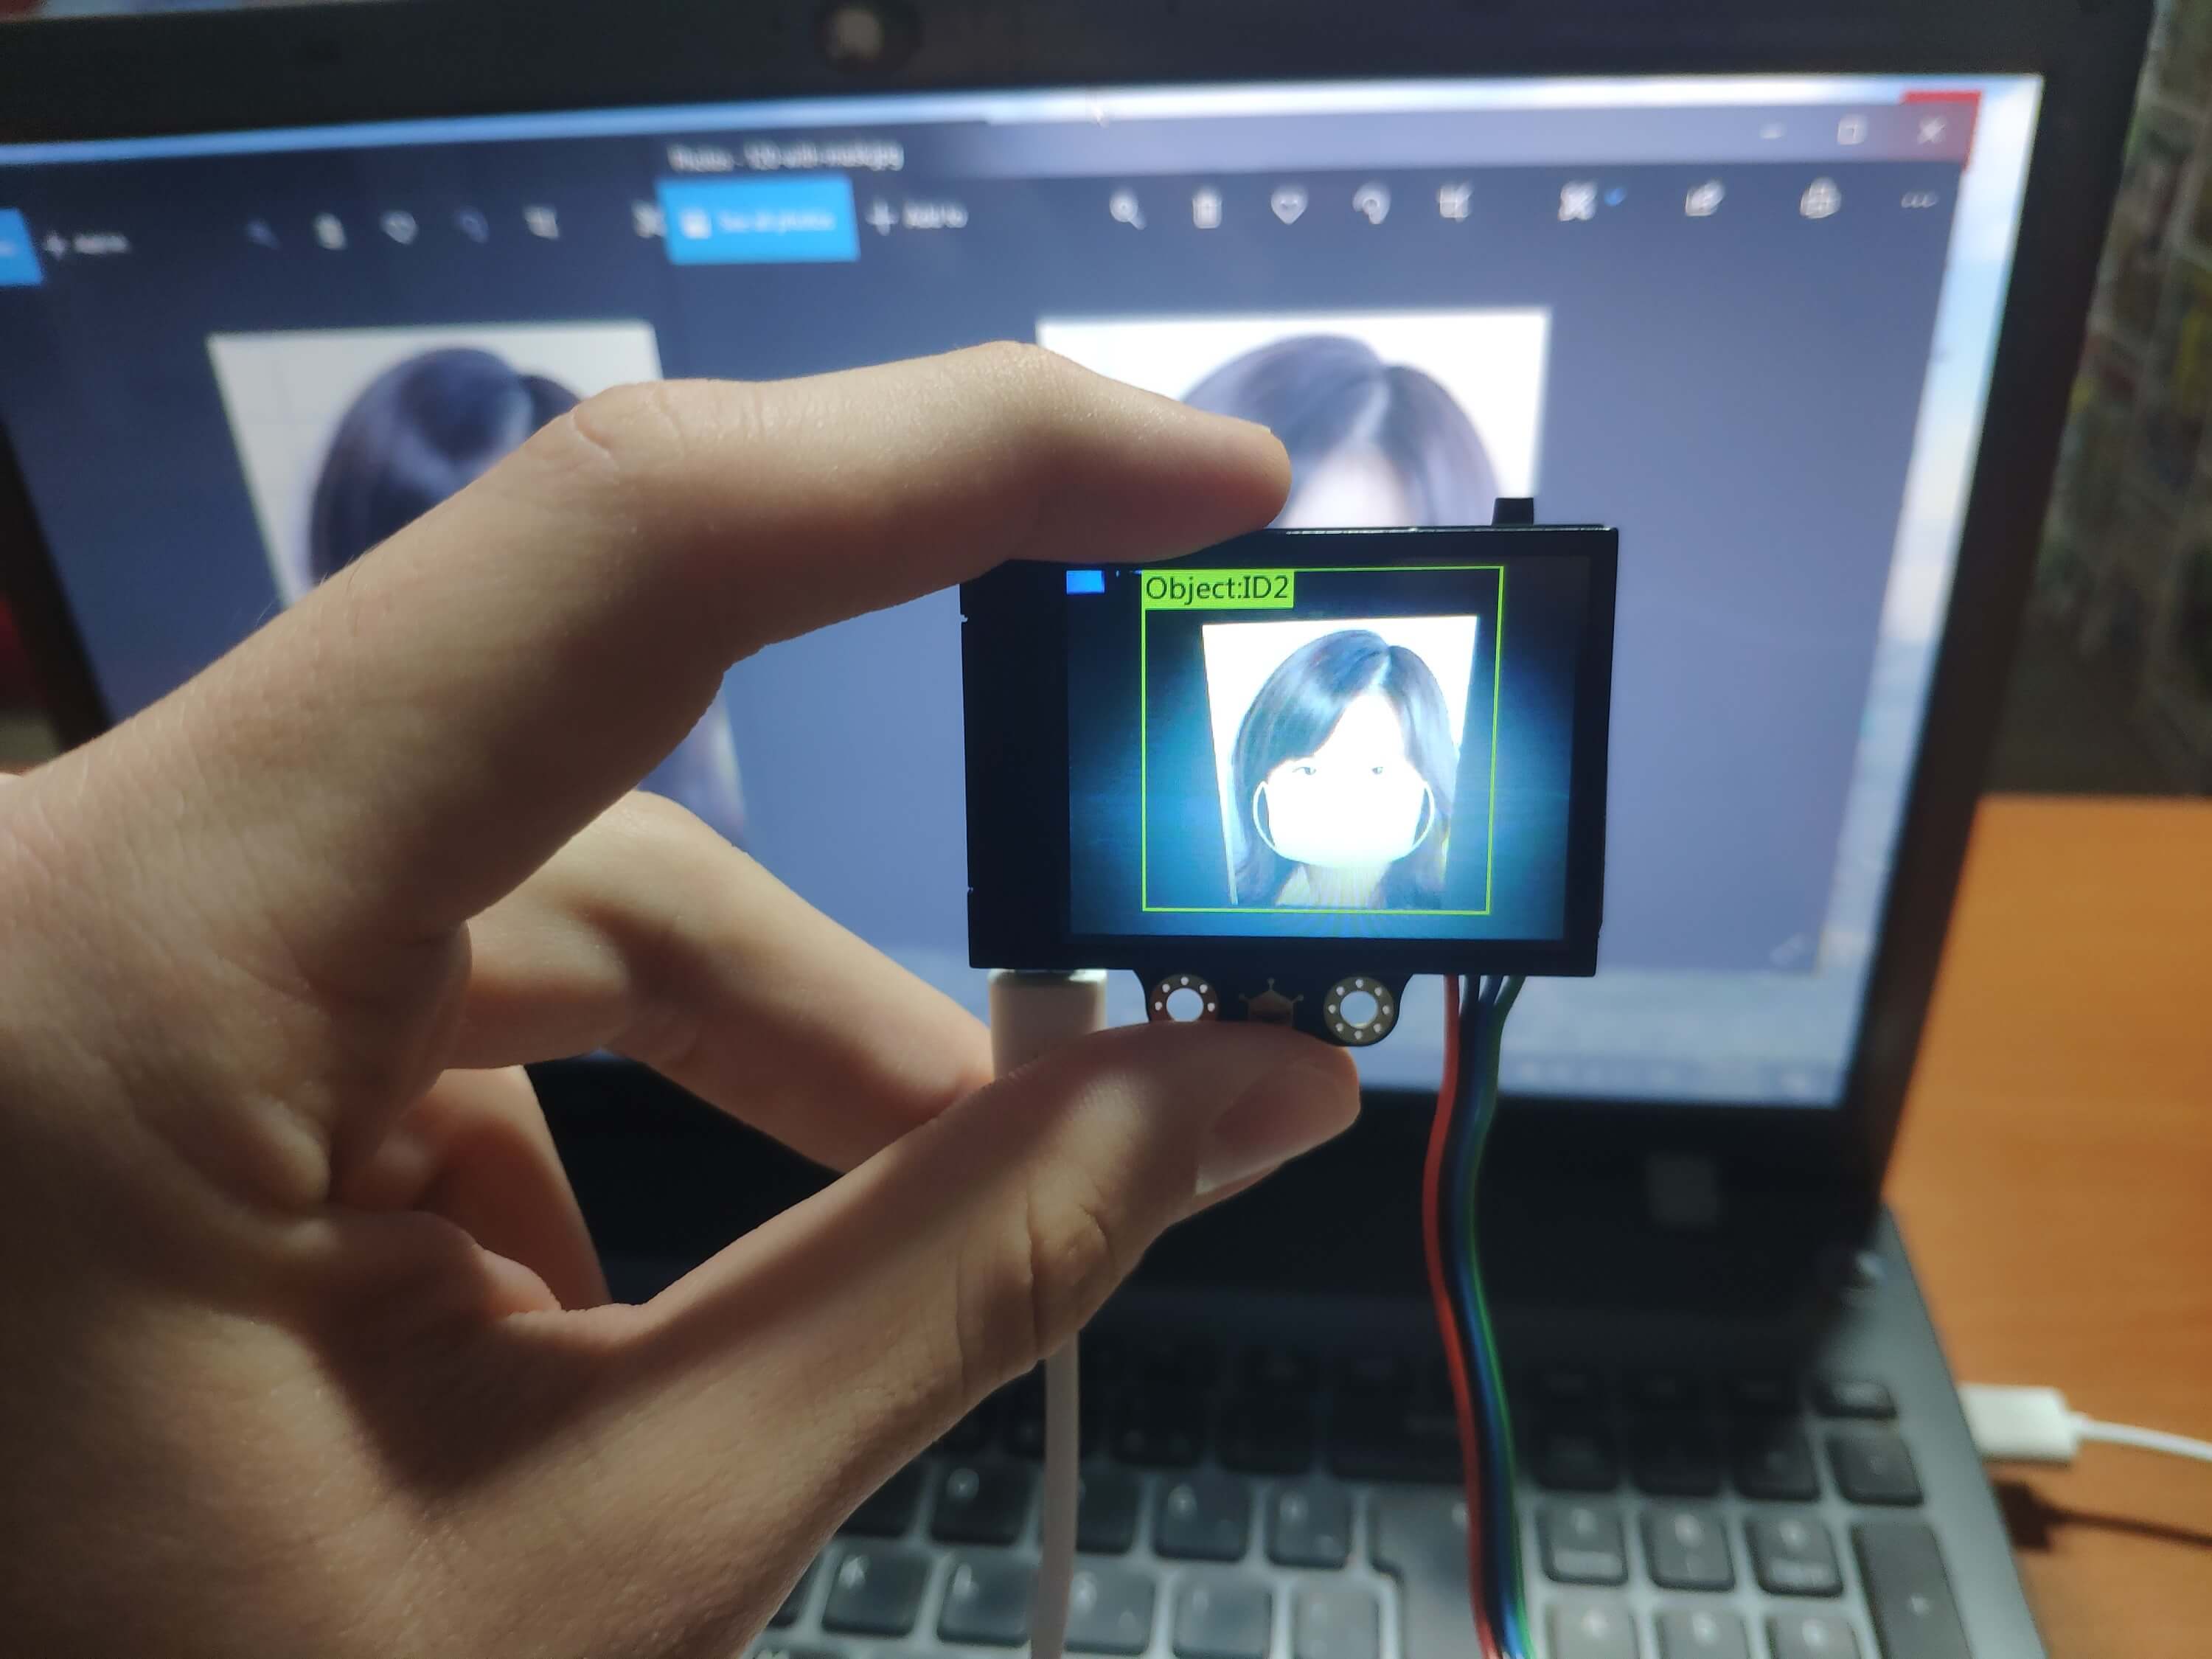
I chose to use the DFRobot HuskyLens AI camera in my project since it has an embedded screen showing the results of face mask detection. In that regard, I could display the results without making the device more complicated with screen connections. Also, HuskyLens includes build-in algorithms supporting six functions - face recognition, object tracking, object recognition, line tracking, color recognition, and tag recognition - controlled with an easy-to-use interface.
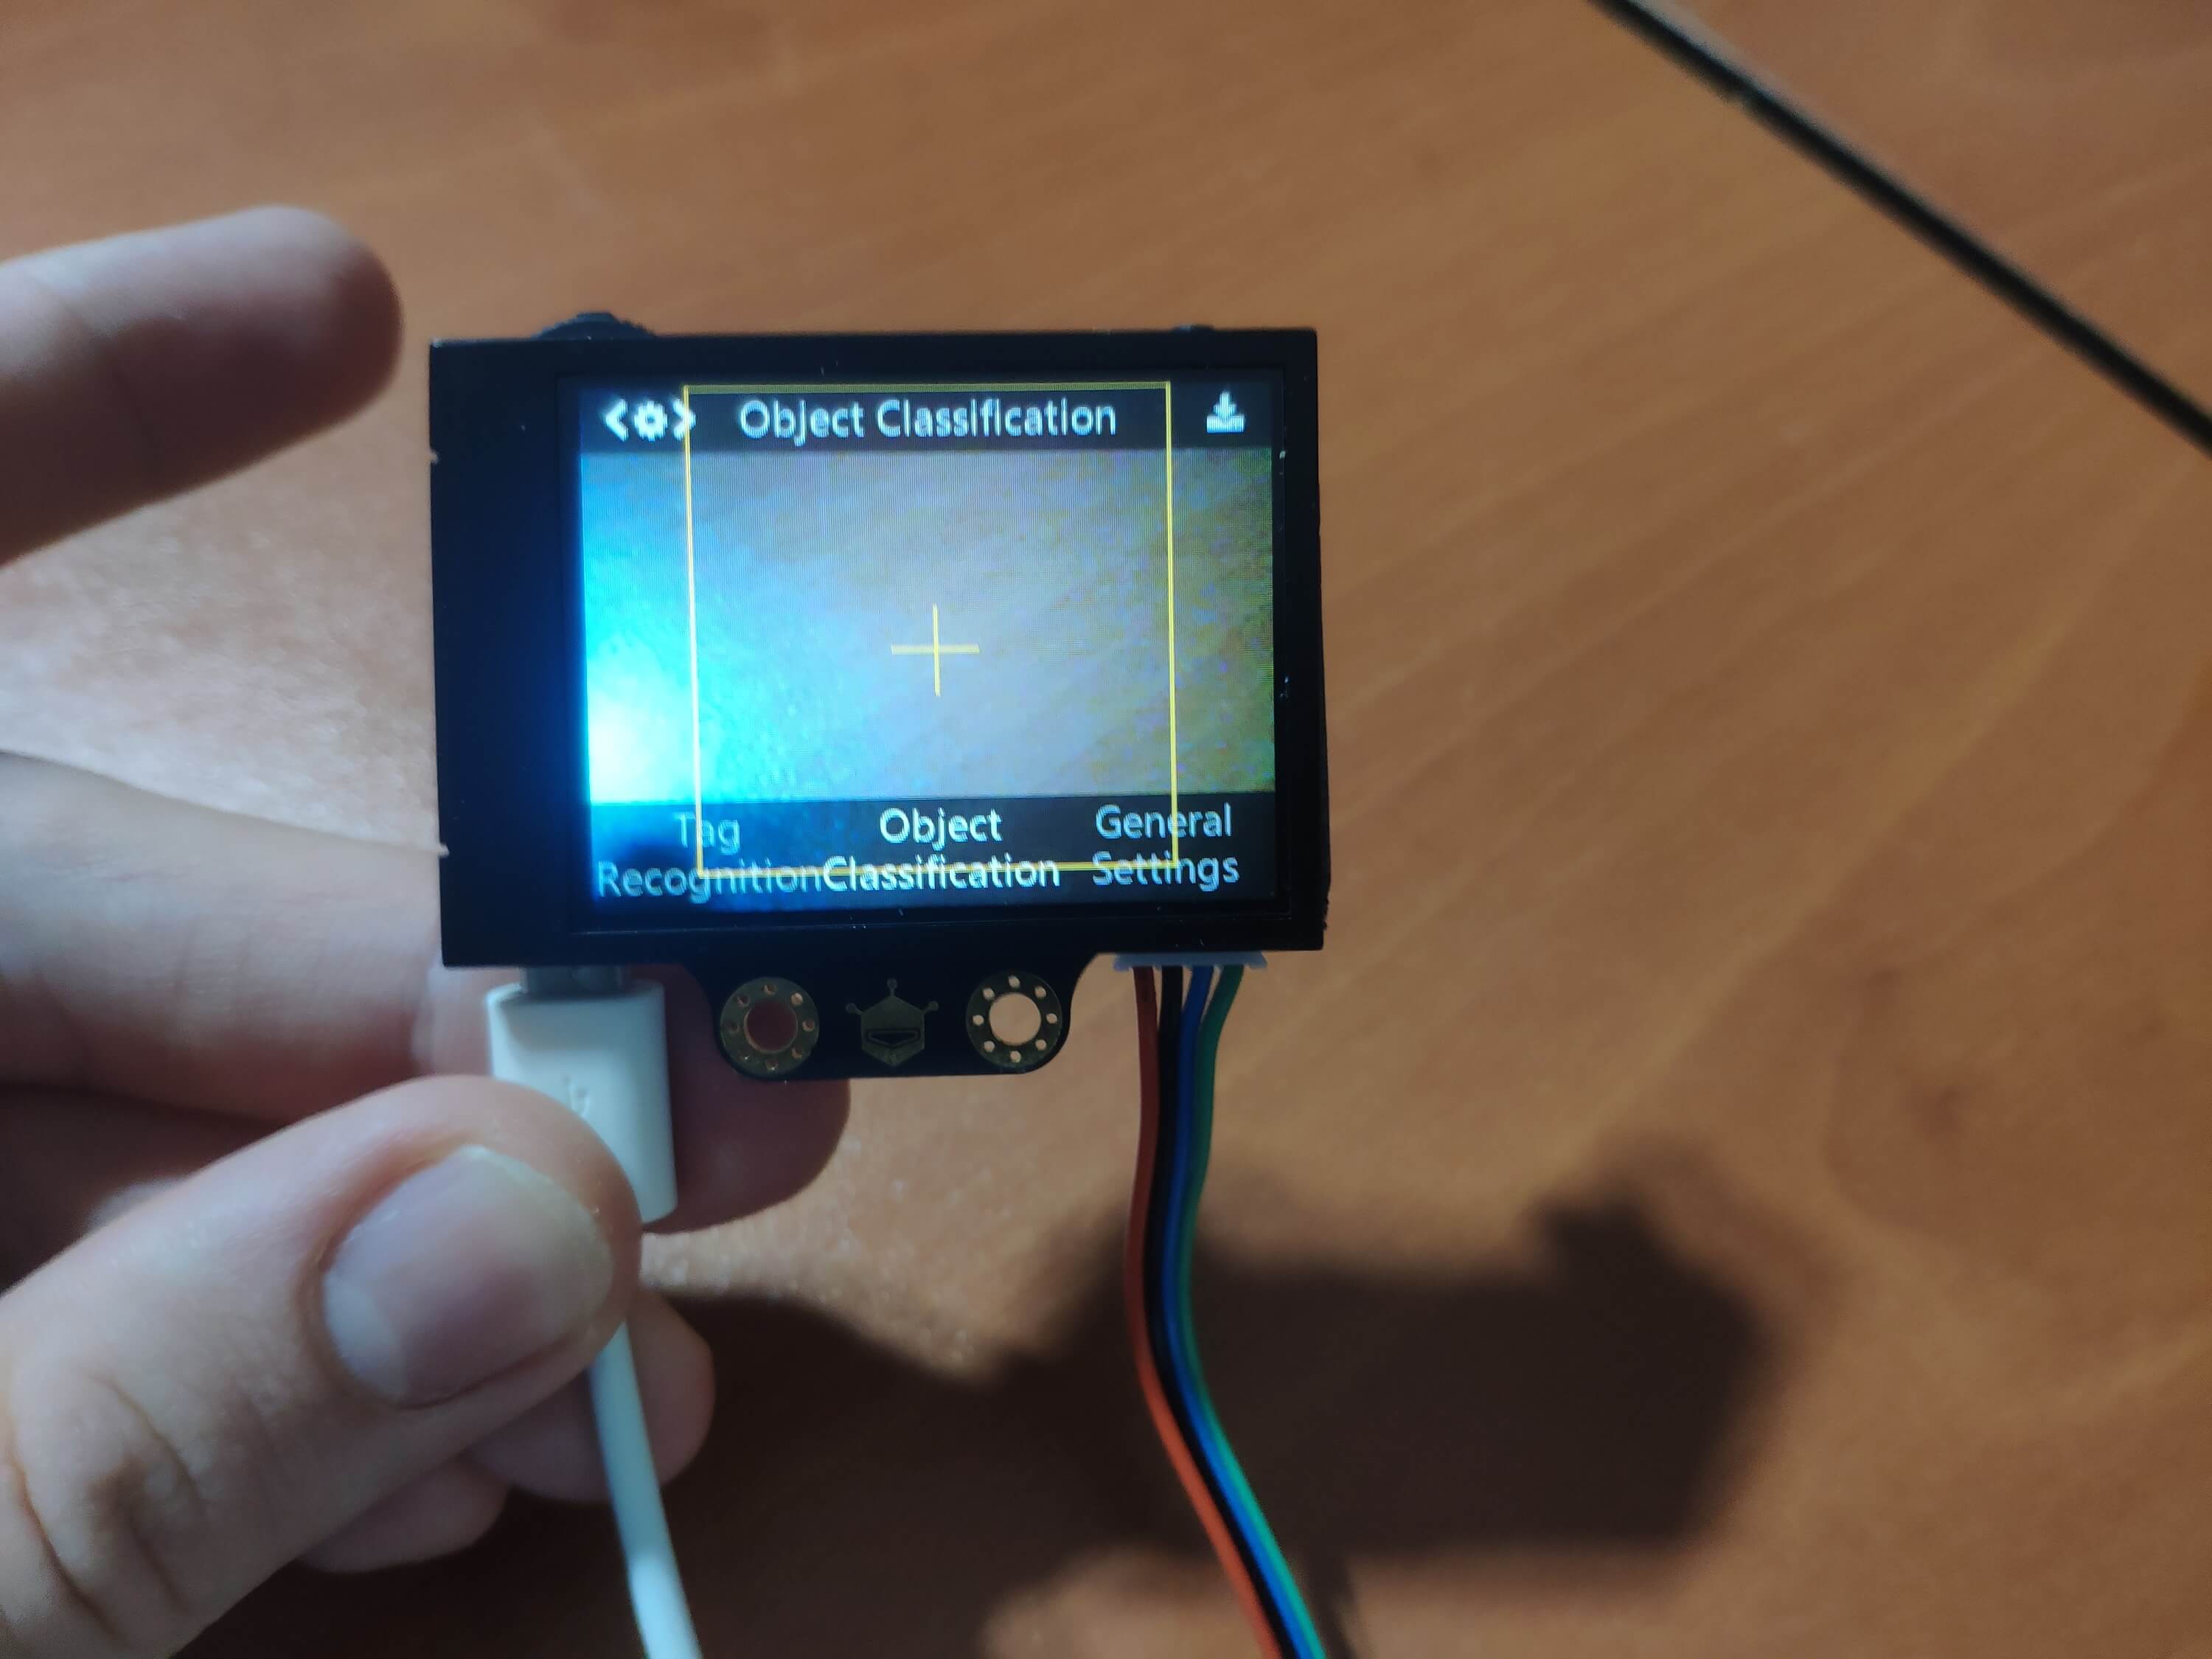
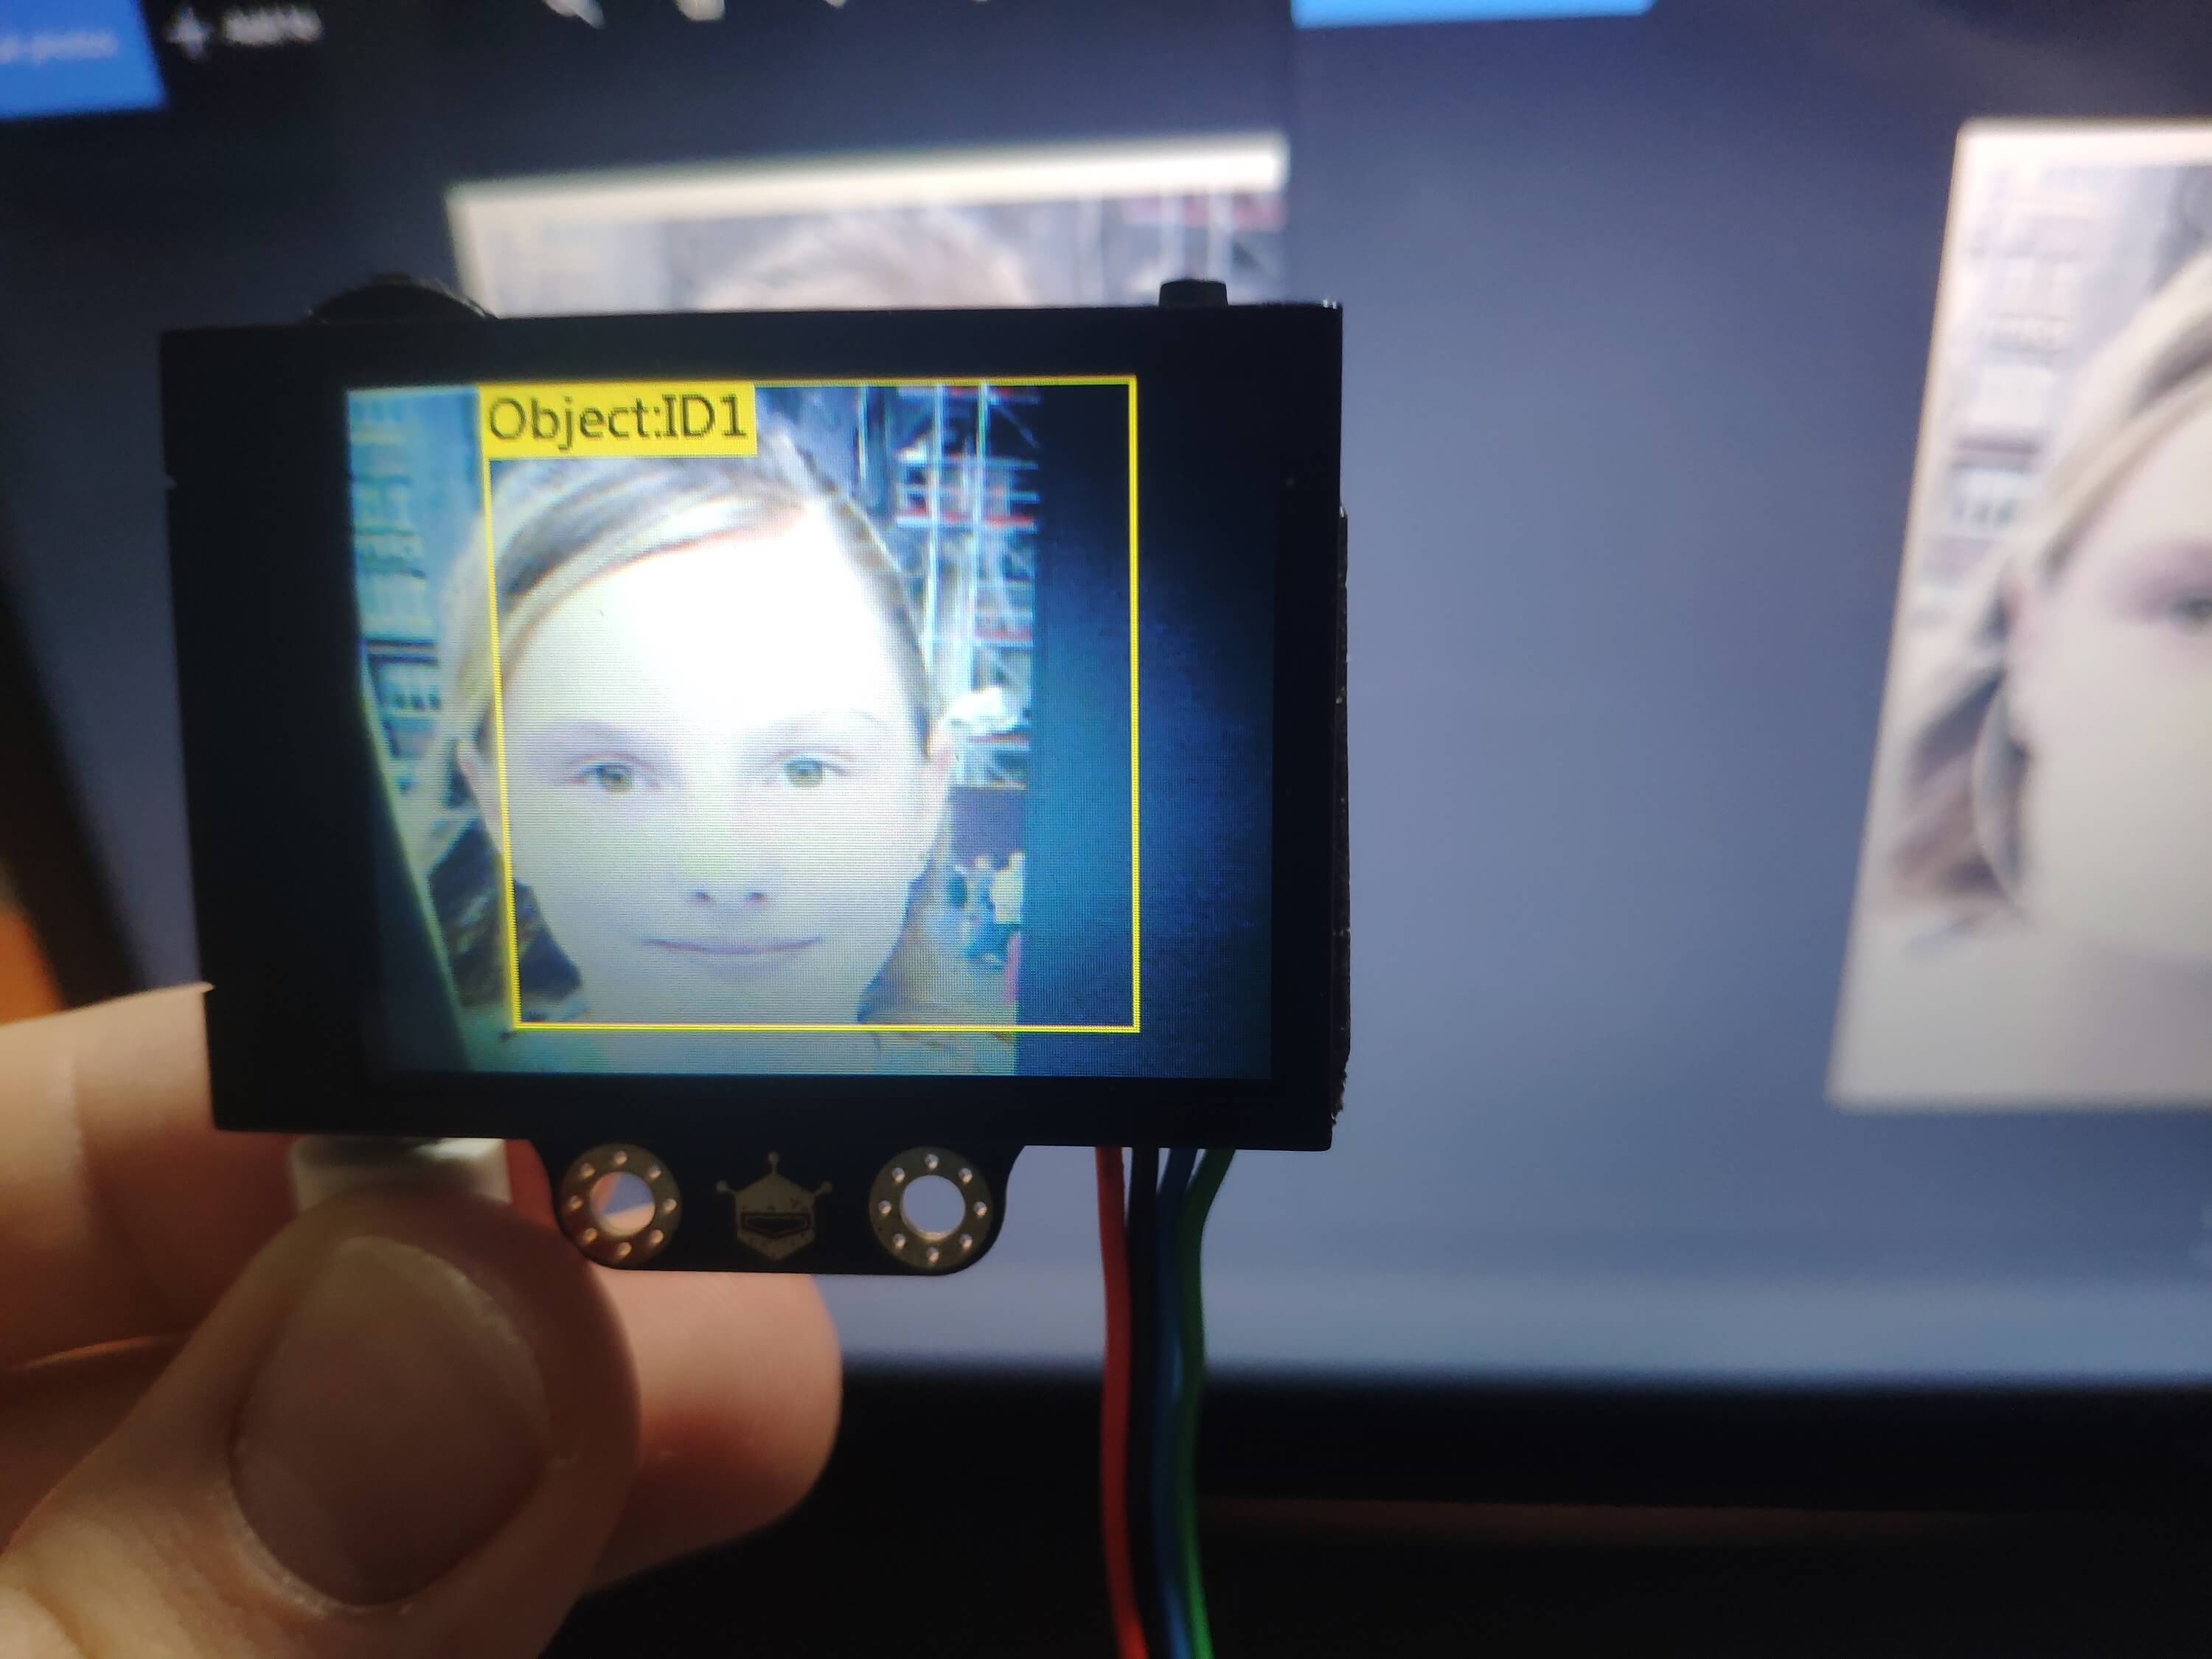
However, we need to activate the object classification mode to detect face masks since the other embedded functions are not capable of face mask detection. The object classification function of HuskyLens can learn from multiple photos of different objects by built-in machine learning algorithms. After completing the object classification learning, when HuskyLens detects the learned object, it can recognize and display the object ID number. Well, the more it learns, the more accurate the recognition can be.
You can get more information about HuskyLens features and functions here.
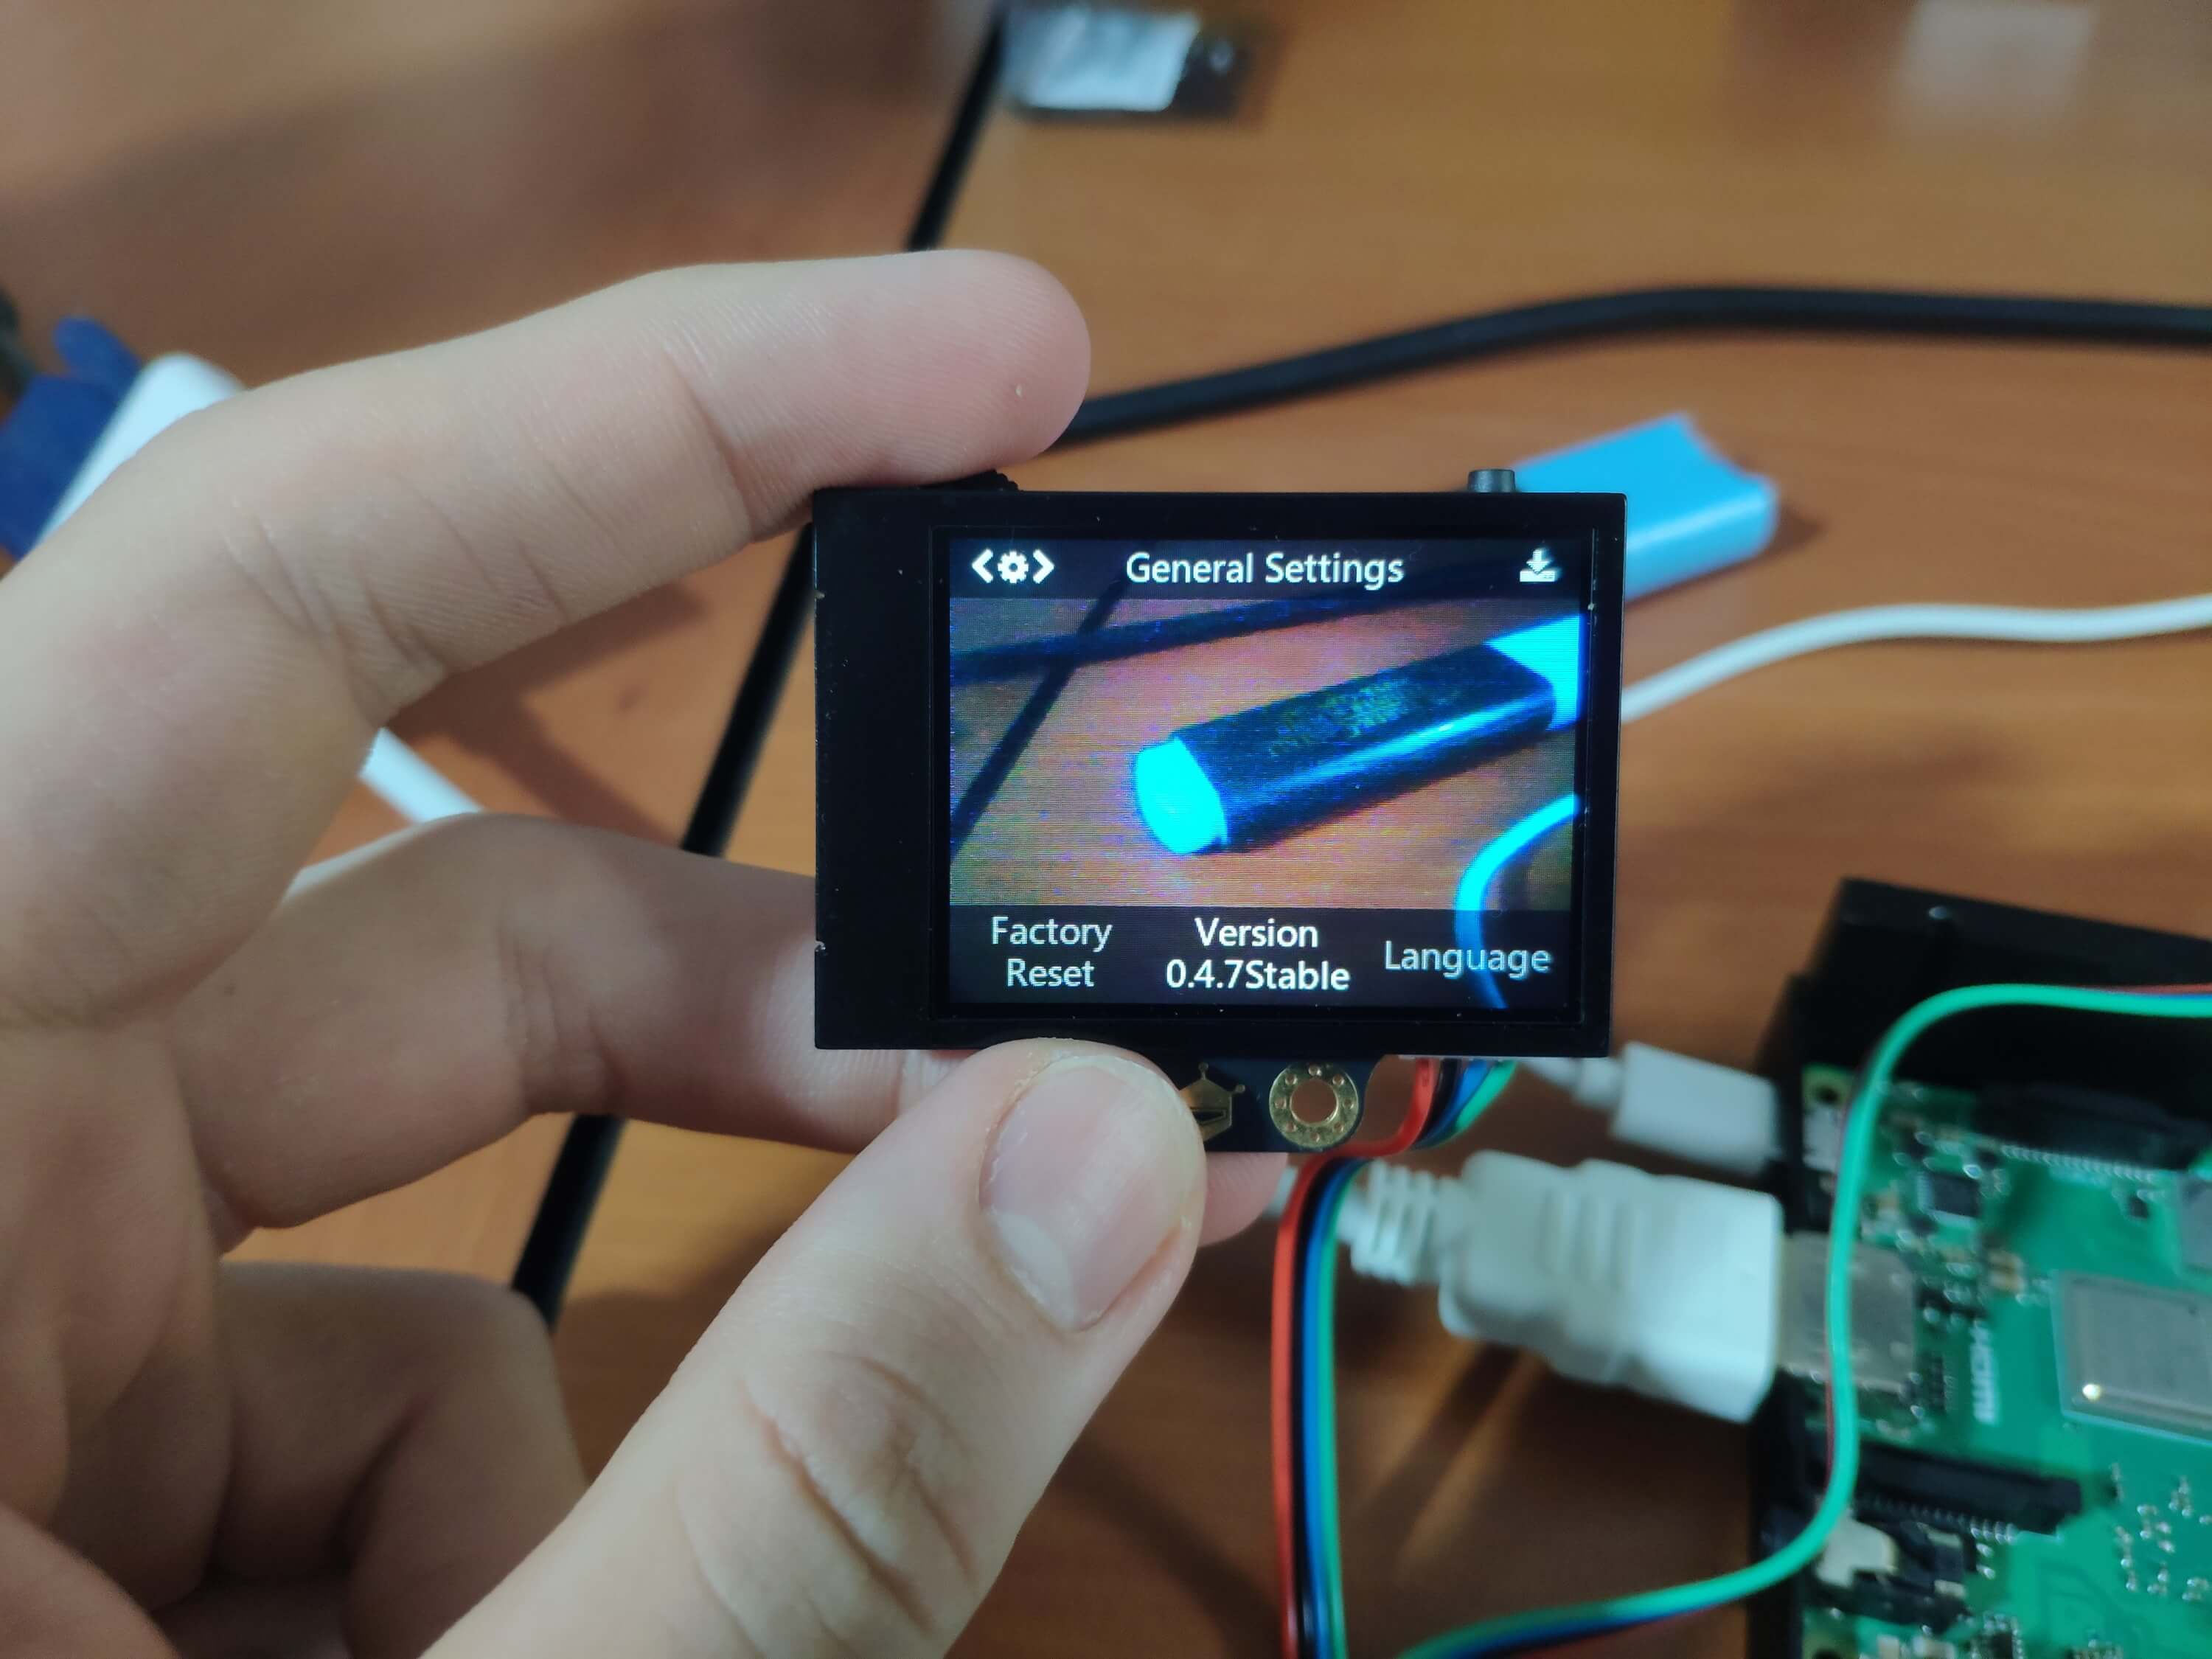
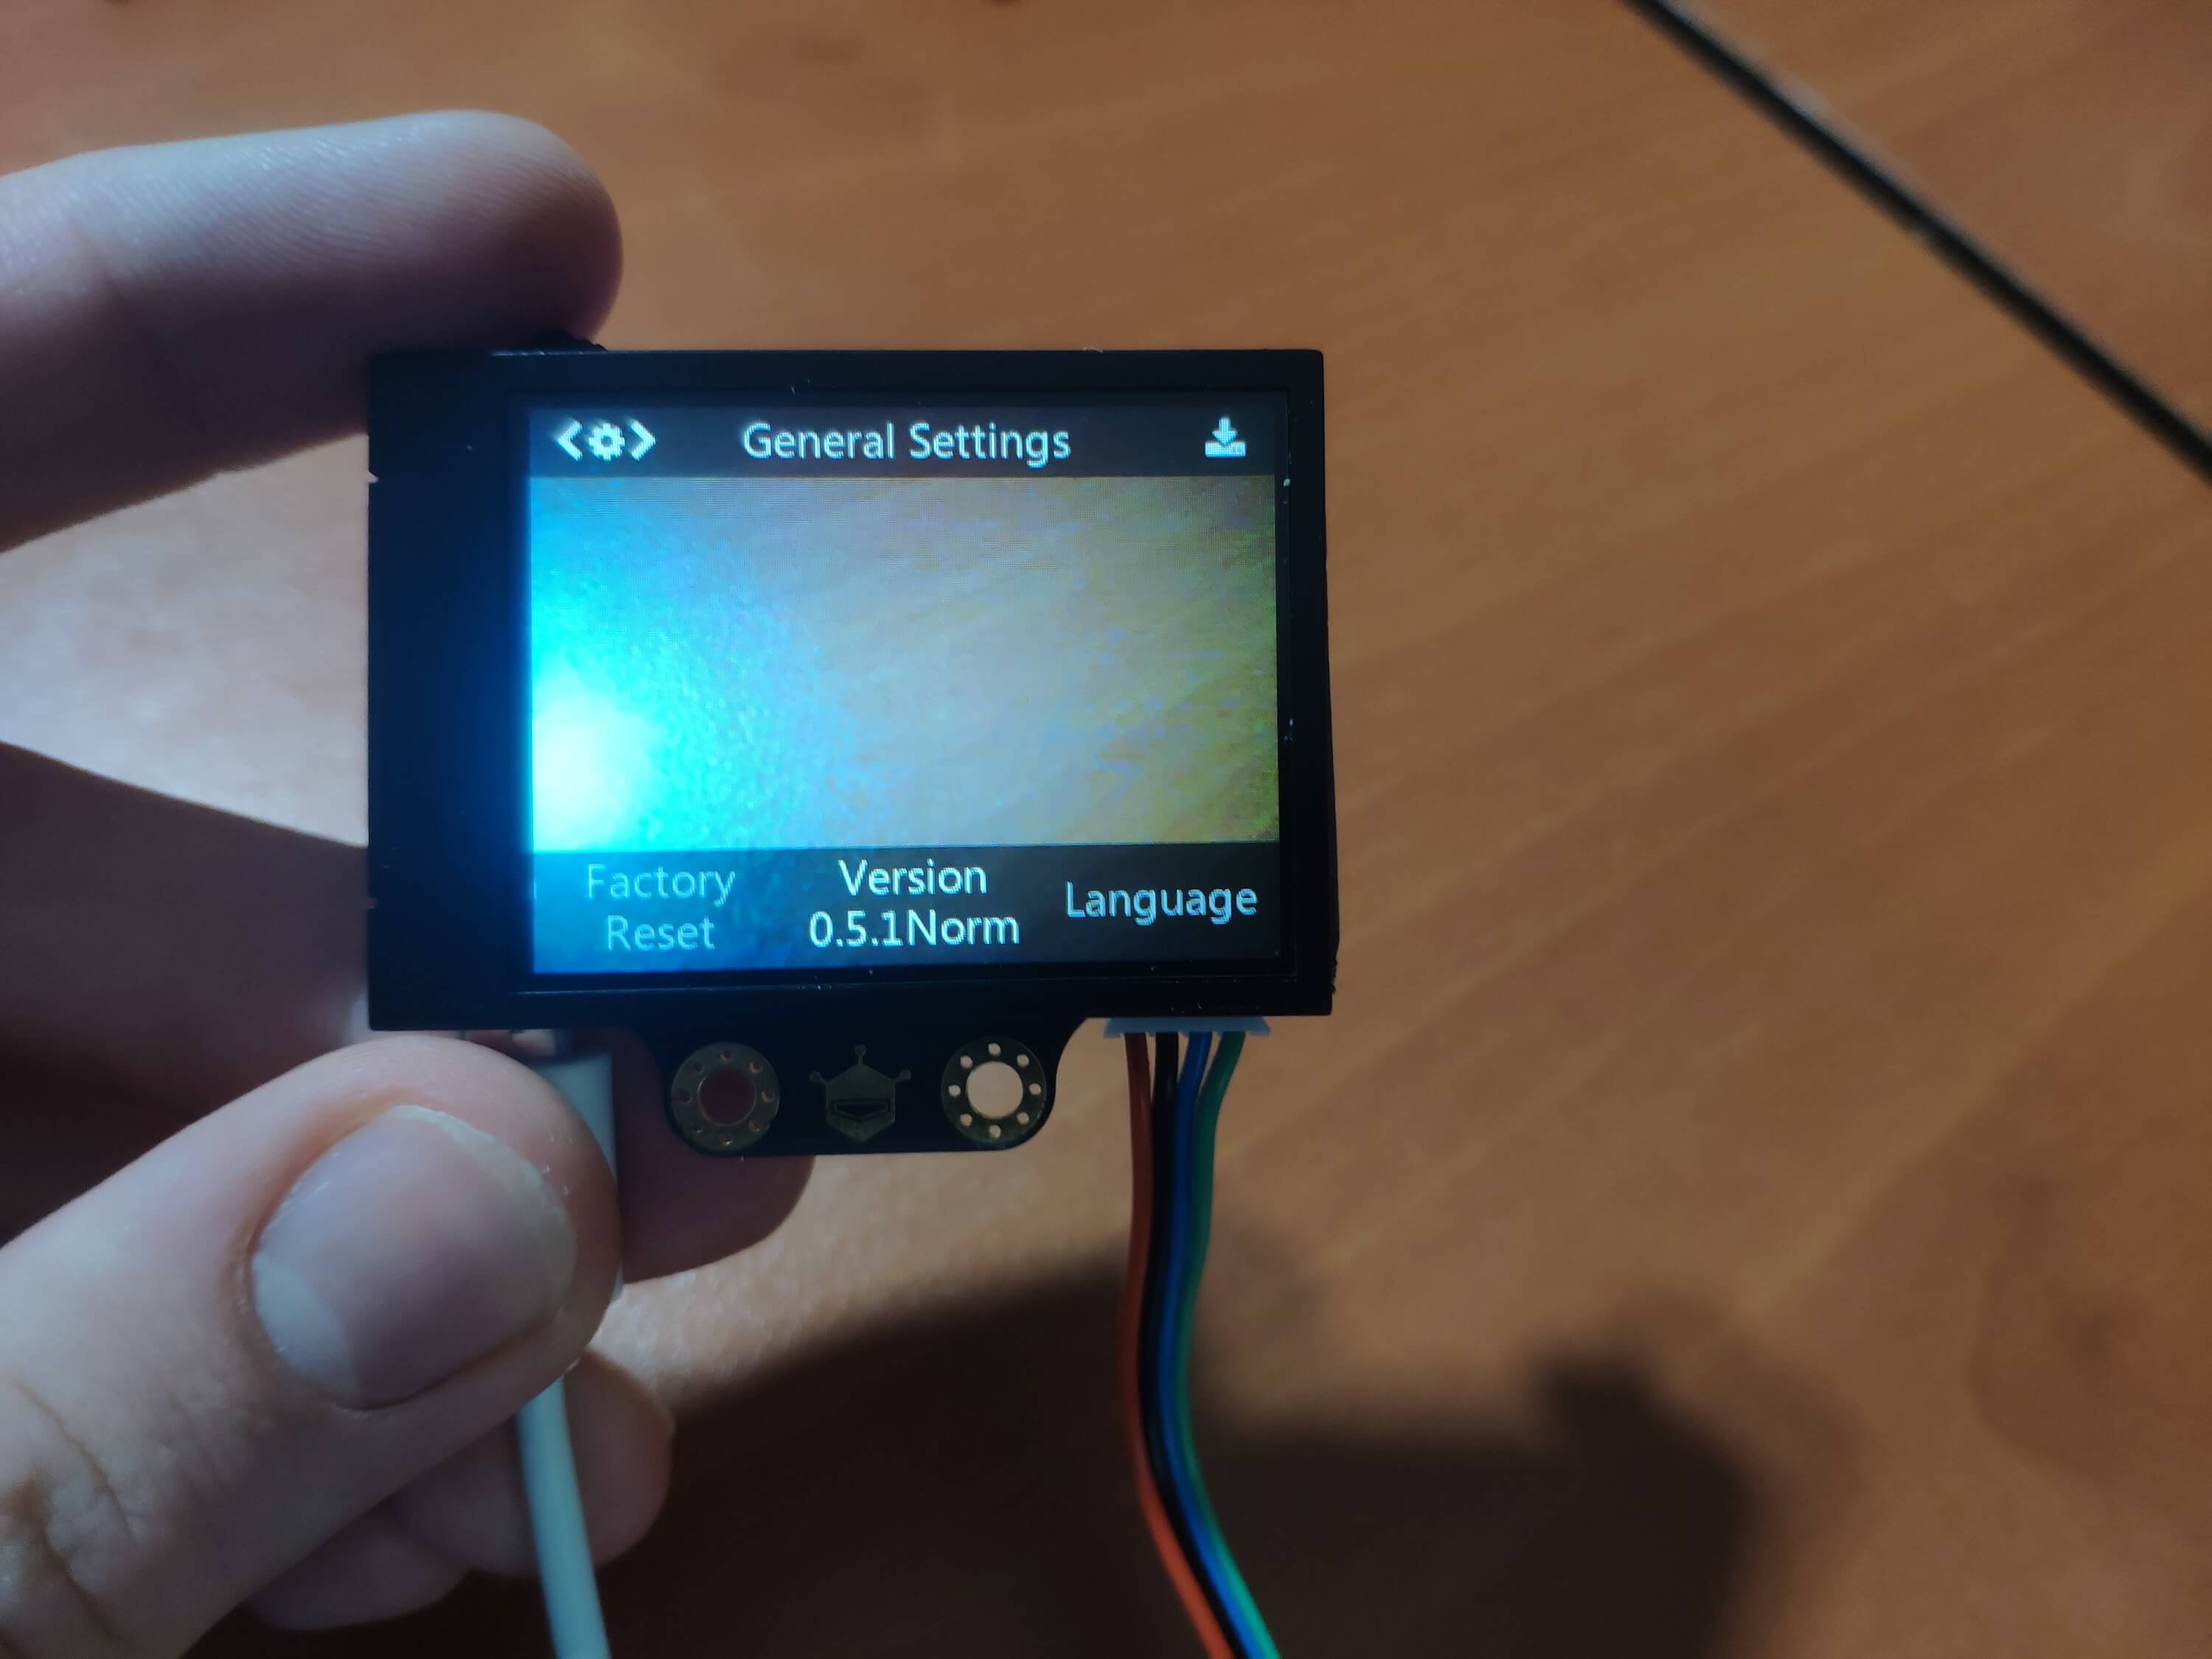
We need to upgrade the firmware version to be able to use the object classification function. Follow the instructions below to upgrade the HuskyLens firmware:
⭐ Click the General Settings to view the version number.
Figure - 54.5
Figure - 54.6
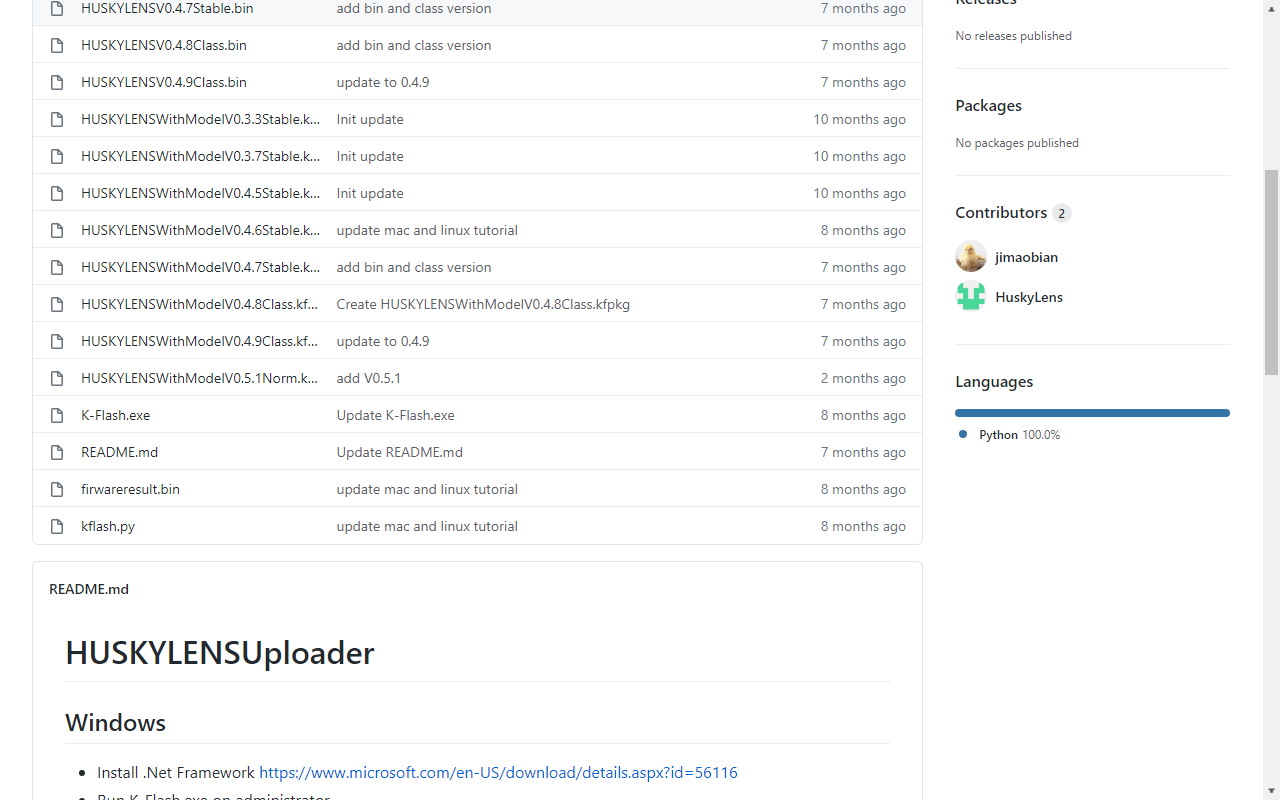
⭐ Download the HuskyLens Uploader for Windows here or in the Downloads below. If requested, you may need to install the CP2102N chip driver here.
⭐ Download the latest firmware (V0.5.1Norm) file here or in the Downloads below.
Figure - 54.7
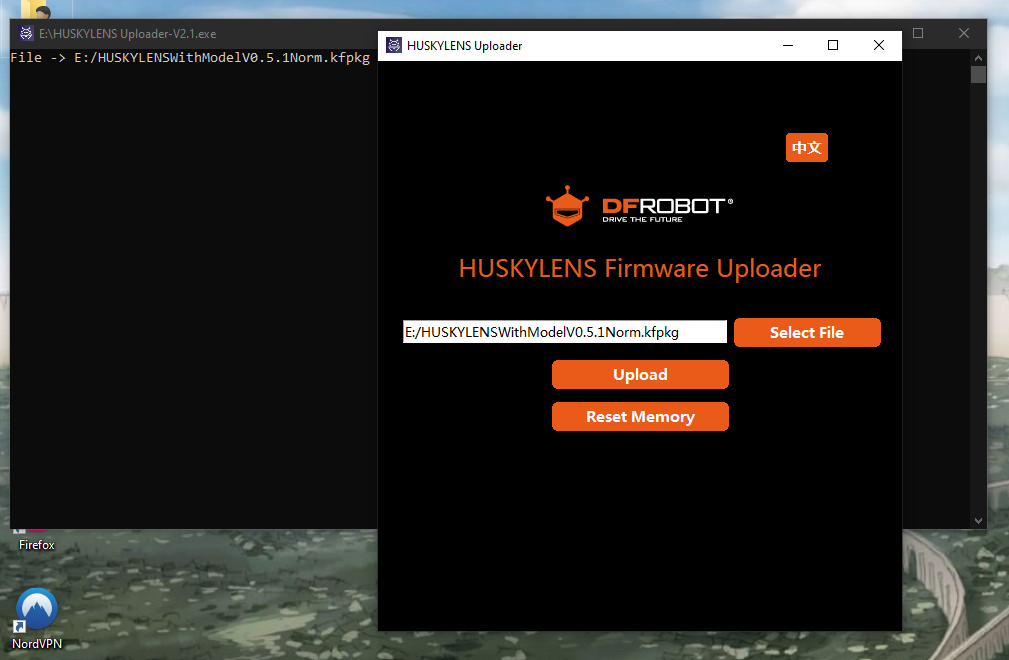
⭐ Run the HuskyLens Uploader, a small black cmd window will pop up first, and after a while, the interface window will appear, then click the Select File button to load the firmware file.
Figure - 54.8
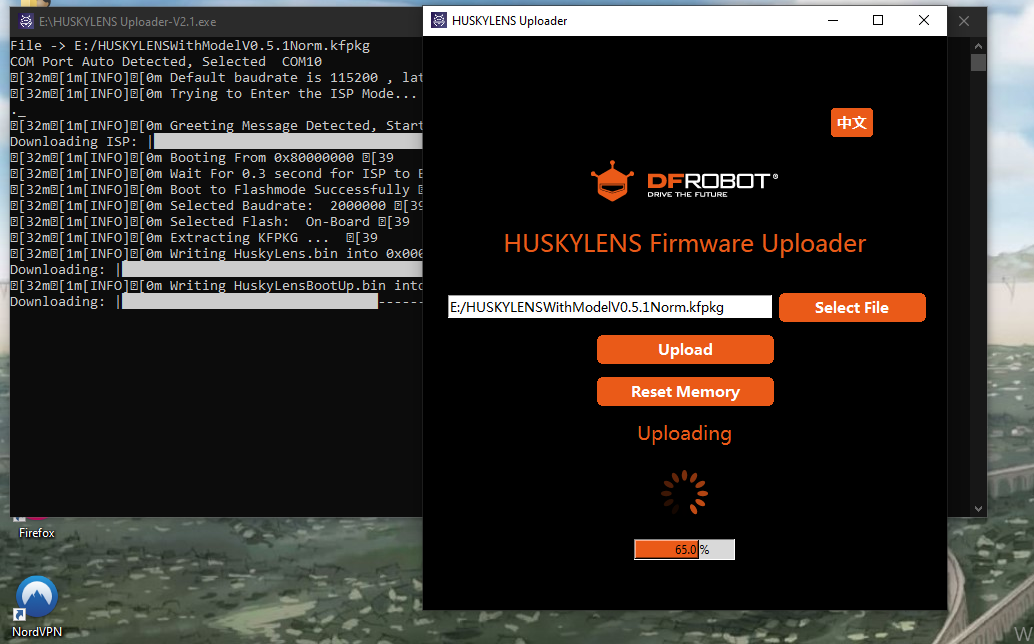
⭐ Click the Upload button. Wait about 5 minutes to complete the uploading.
Figure - 54.9
Then, you should see the upgraded version number on the settings menu.
Figure - 54.10
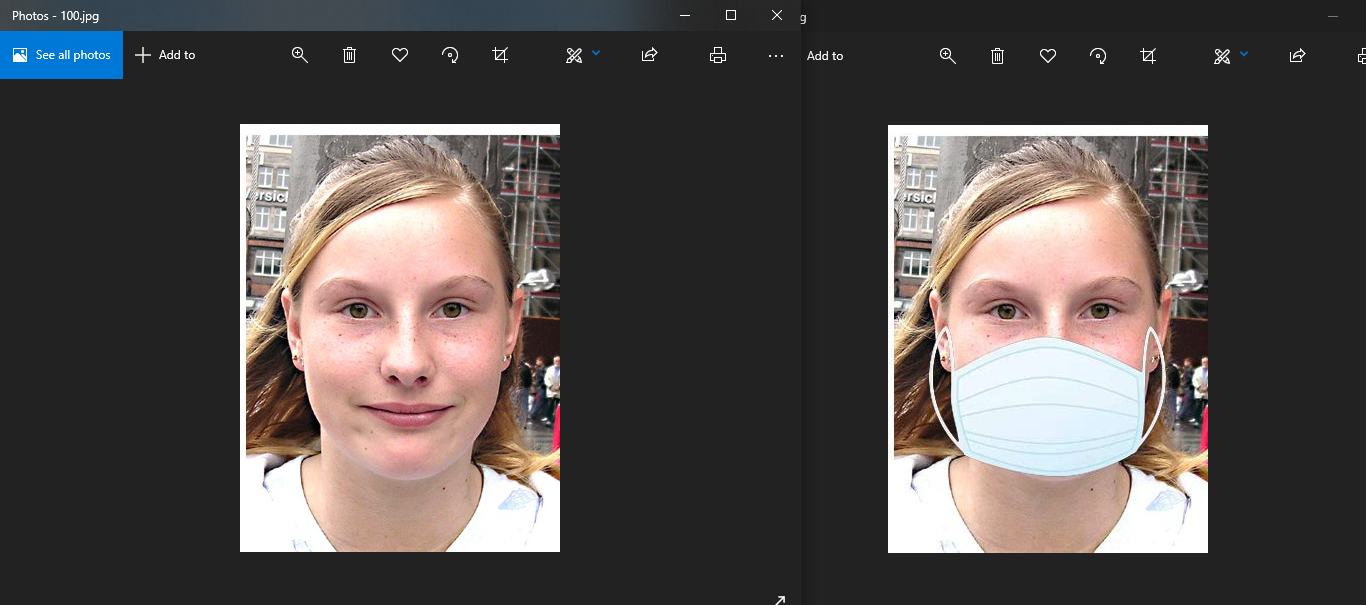
After upgrading the firmware version, we need to train the object classification algorithms to learn people with and without masks as different classes. To train and test HuskyLens algorithms, I used the pictures in this dataset provided by Prajna Bhandary.
You can download the pictures I used in the Downloads below - mask_recognition_data_set.zip
Figure - 54.11
Figure - 54.12
⭐ Switch to the object classification mode to run embedded algorithms.
Figure - 54.13
⭐ Then, select the pictures with which you want to train HuskyLens - one pair (masked and unmasked) is enough.
Figure - 54.14
⭐ Press the learning button for HuskyLens to learn images without a mask. With a long press, HuskyLens can learn images from different angles. According to its instructions, pictures of more than 30 are necessary for each image (class). But, I highly recommend you to take between 250 and 300 pictures for each image (class) - masked and unmasked.
⭐ Next, follow the same steps for HuskyLens to learn images with a mask. Also, for better results, I suggest you include a default class by scanning a blank image.
Figure - 54.15
Figure - 54.16
⭐ Finally, after training the algorithms, to conduct experiments with the object classification, point HuskyLens to different images (masked and unmasked).
Figure - 54.17
Figure - 54.18
Figure - 54.19
Figure - 54.20
Step 2: Reading results generated by HuskyLens with Raspberry Pi
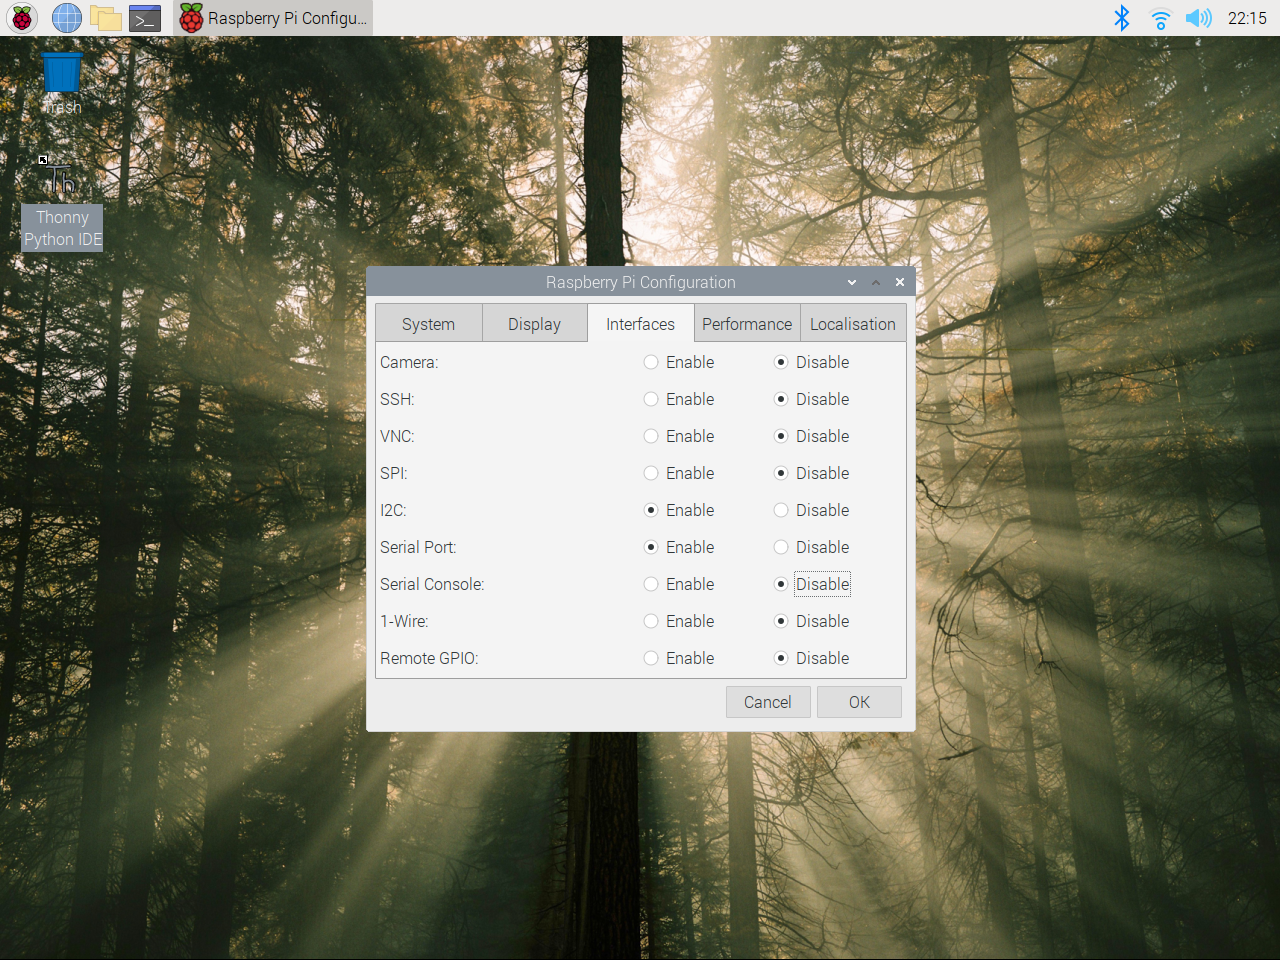
To be able to send the detected blocks and object ID numbers by HuskyLens to the Raspberry Pi, we will use the I2C protocol and the official HuskyLens library. The primary protocol for communication between the HuskyLens and the Raspberry Pi is I2C. I2C protocol requires us to use the 4-Pin connector to wire ground, power, SDA, and SCL pins.
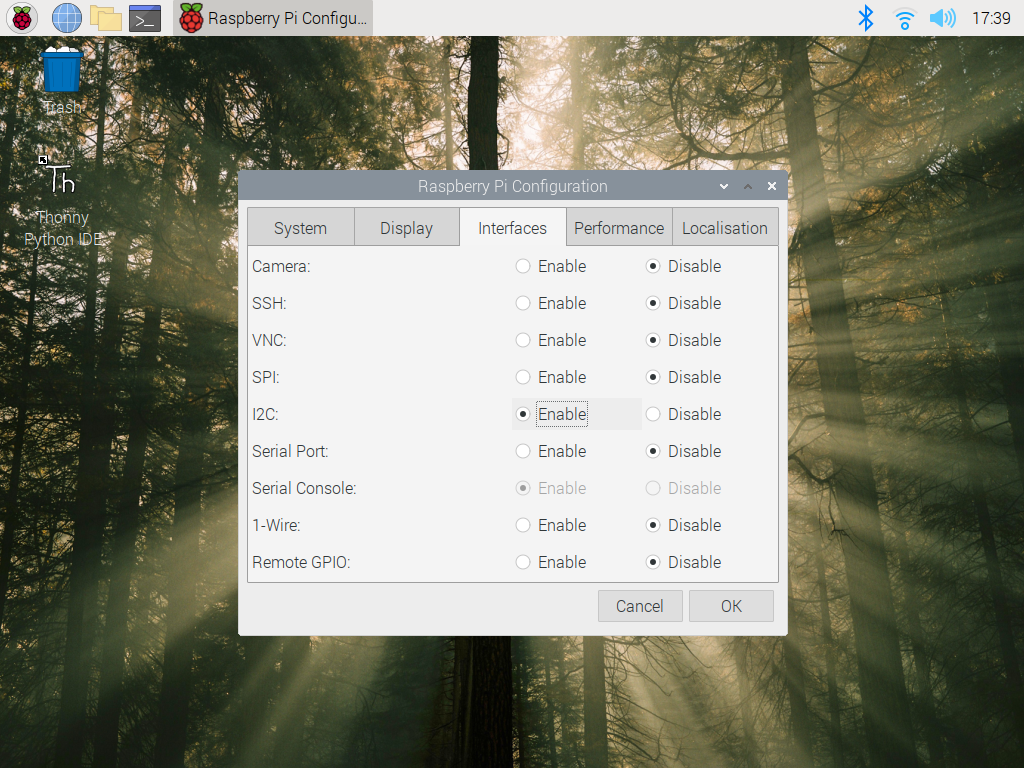
⭐ First of all, open the Raspberry Pi configuration settings to enable I2C.
Figure - 54.21
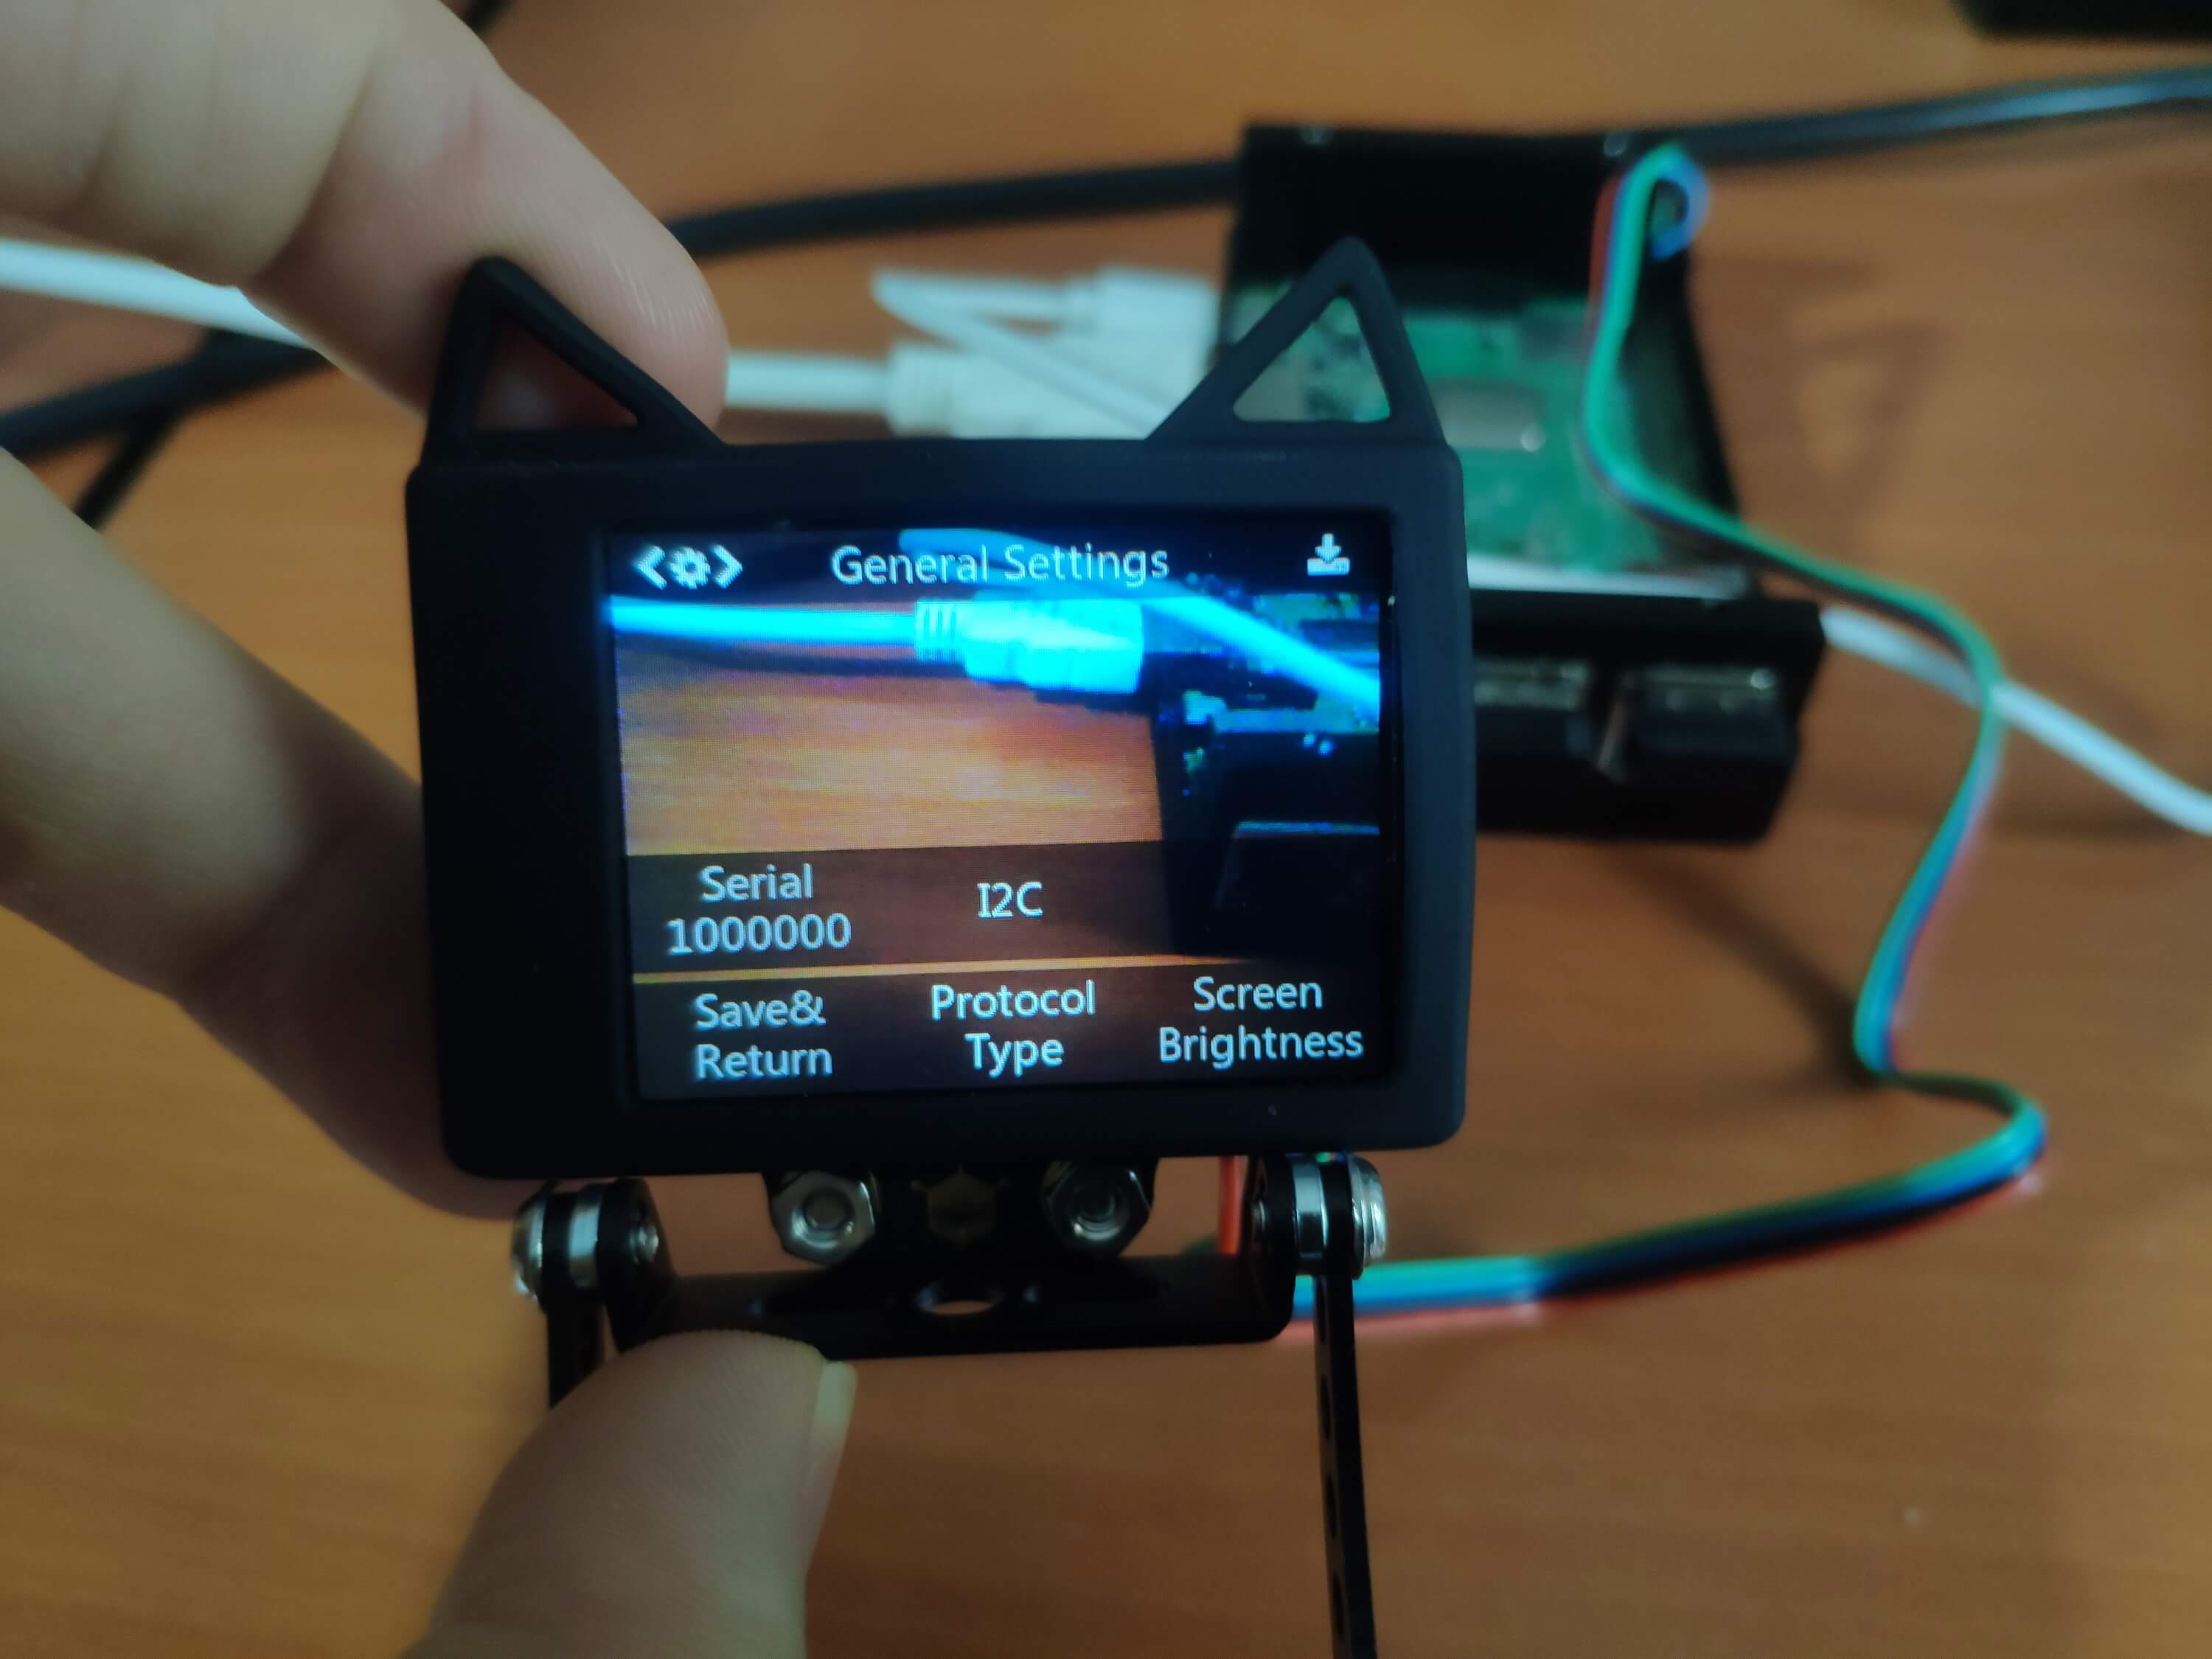
⭐ After connecting HuskyLens, go to the General Settings and select I2C as the protocol type.
Figure - 54.22
⭐ Then, open the terminal and install the required modules on Raspberry Pi.
sudo apt-get install -y i2c-tools
sudo apt-get install python-smbus
sudo pip3 install pyserial pypng
Figure - 54.23
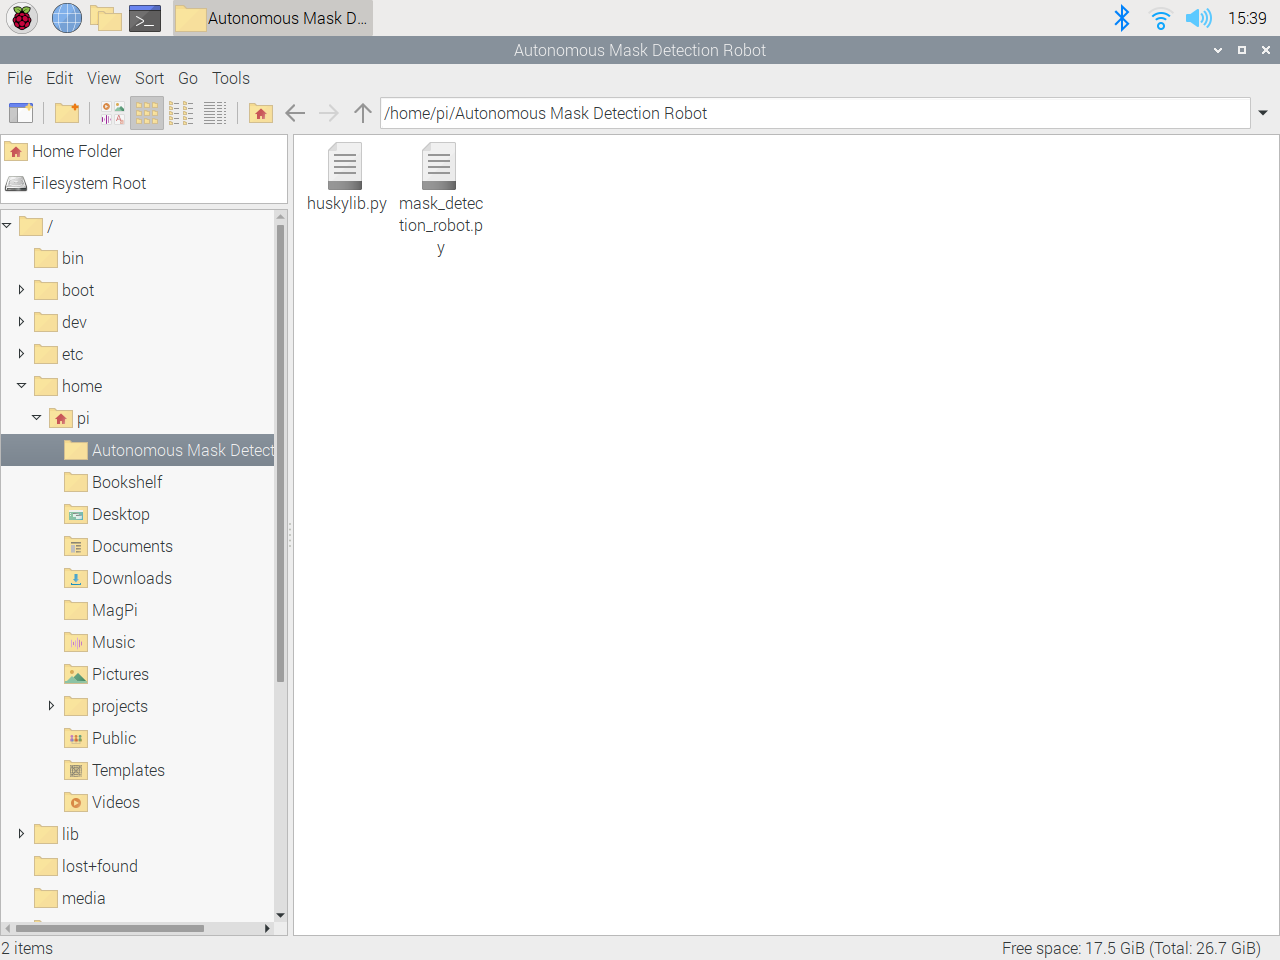
⭐ Download the HuskyLens Python Library here or in the Downloads below. Then, place the huskylib.py file in your application folder. You can download the application folder I created, including the library and required files below - Autonomous_Mask_Detection_Robot.zip.
Figure - 54.24
In coding, after importing the library, you should define HuskyLens settings to elicit detected blocks and arrows from HuskyLens. Then, you need to decode the data generated by HuskyLens - blocks.
The depicted code is a part of the Python class (Mask_Detection_Robot) I created for the application.
from huskylib import HuskyLensLibrary

...

        # Define HusklyLens settings
        self.husky_lens = HuskyLensLibrary("I2C", "", address=0x32)
        self.husky_lens_ID = 0

...

    # Decode the data generated by the HuskyLens.
    def decodeHuskyLens(self, obj):
        count=1
        if(type(obj)==list):
            for i in obj:
                #print("\t " + ("BLOCK_" if i.type=="BLOCK" else "ARROW_") + str(count) + " : " + json.dumps(i.__dict__))
                self.husky_lens_ID = json.loads(json.dumps(i.__dict__))["ID"]
                count+=1
        else:
            #print("\t " + ("BLOCK_" if obj.type=="BLOCK" else "ARROW_") + str(count) + " : " + json.dumps(obj.__dict__))
            self.husky_lens_ID = json.loads(json.dumps(obj.__dict__))["ID"]

...

        # Get the recently read block from the HuskyLens to detect the object ID.
        self.decodeHuskyLens(self.husky_lens.blocks())

...
Step 3: Streaming live video via the Raspberry Pi web server by using Motion
We need to create a Webcam server to be able to live stream with Raspberry Pi. Luckily, creating a Webcam server is easy with the help of the Motion module in Python.
You can get more information about the Motion module here.
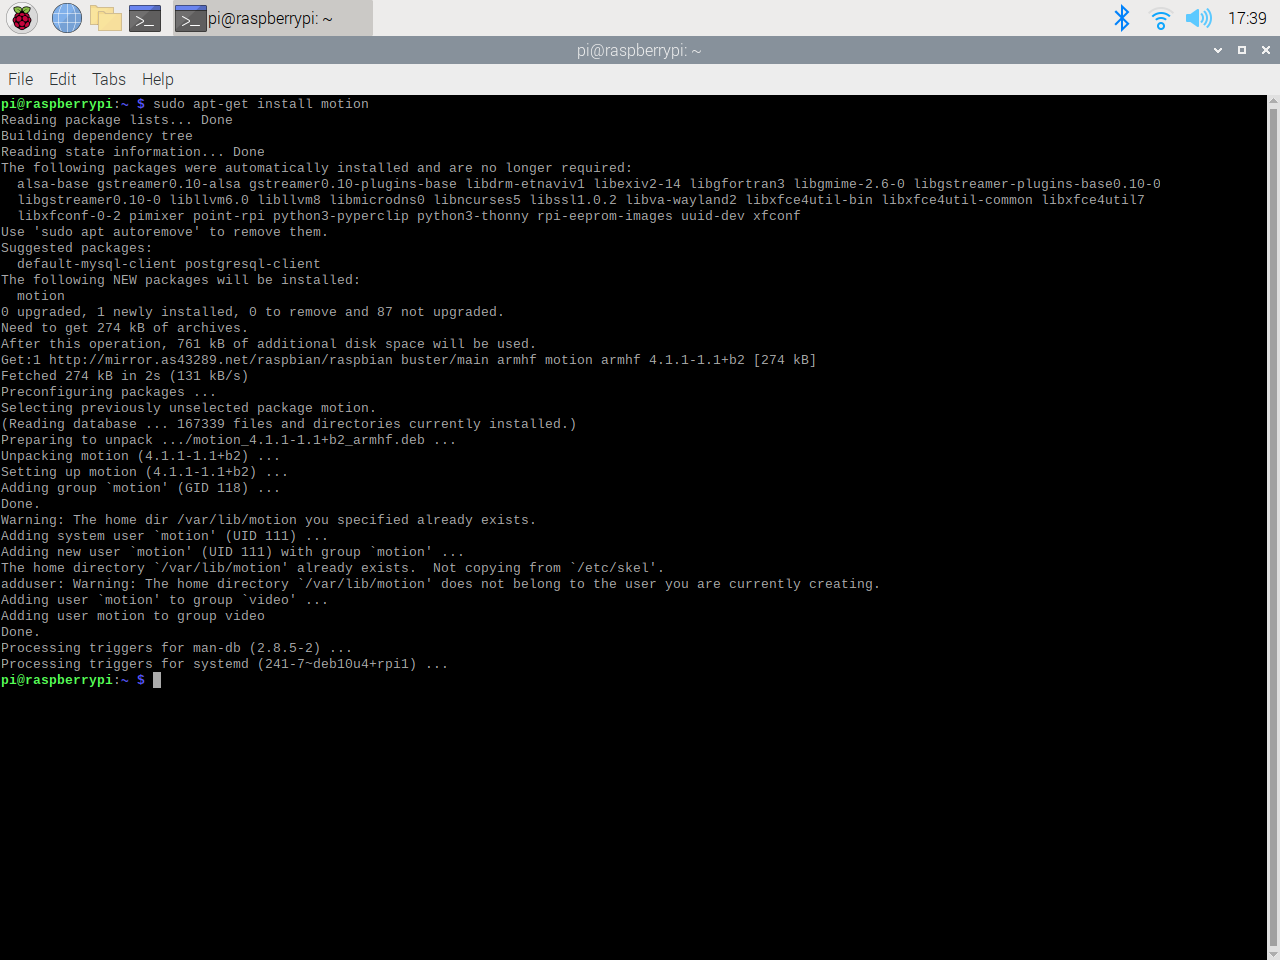
⭐ First of all, open the terminal and install the Motion module on Raspberry Pi.
sudo apt-get install motion
Figure - 54.25
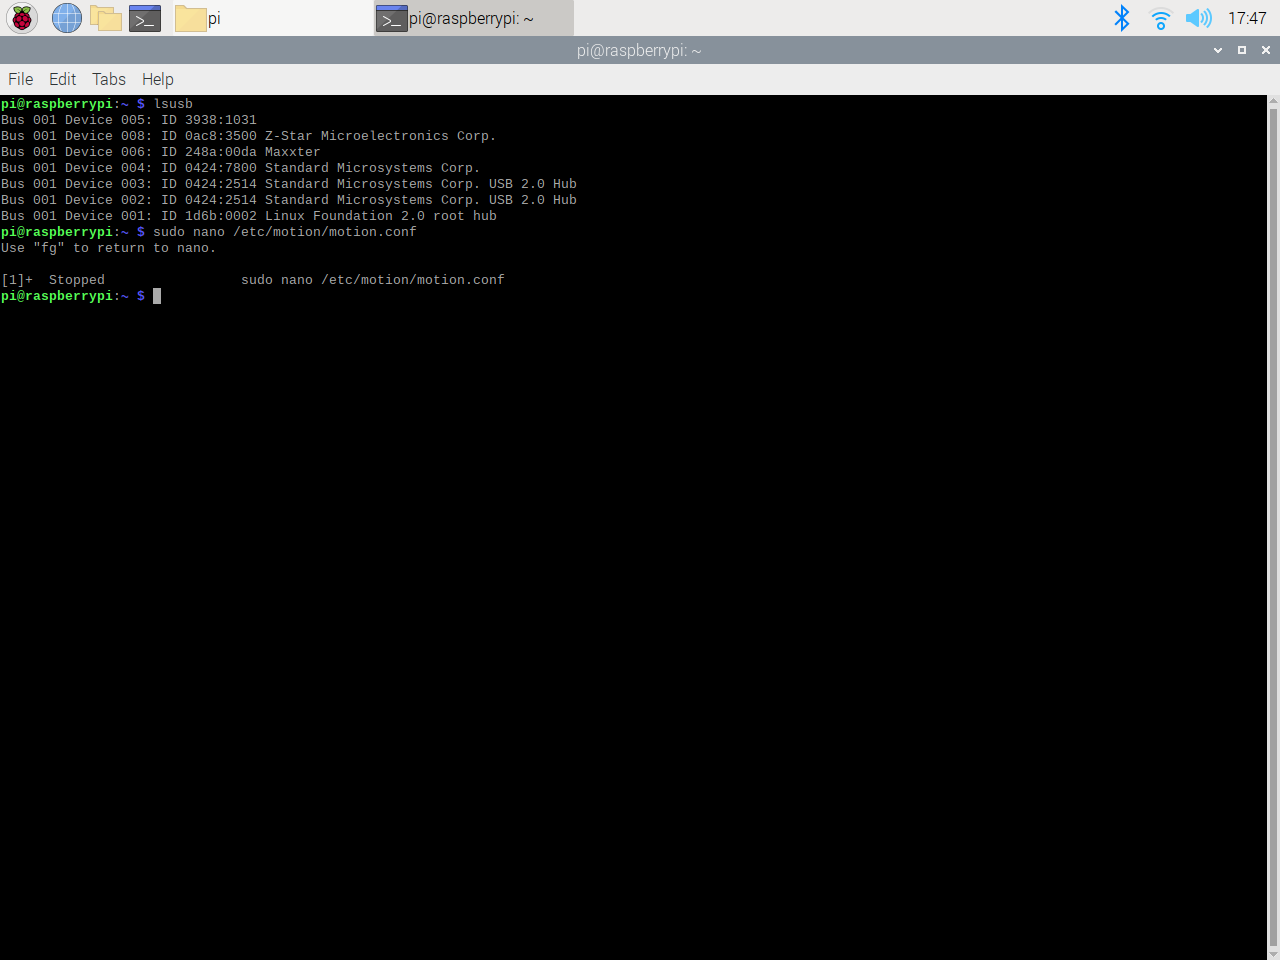
⭐ Then, connect your USB webcam to Raspberry Pi and make sure the camera is detected accurately with the command below:
lsusb
Figure - 54.26
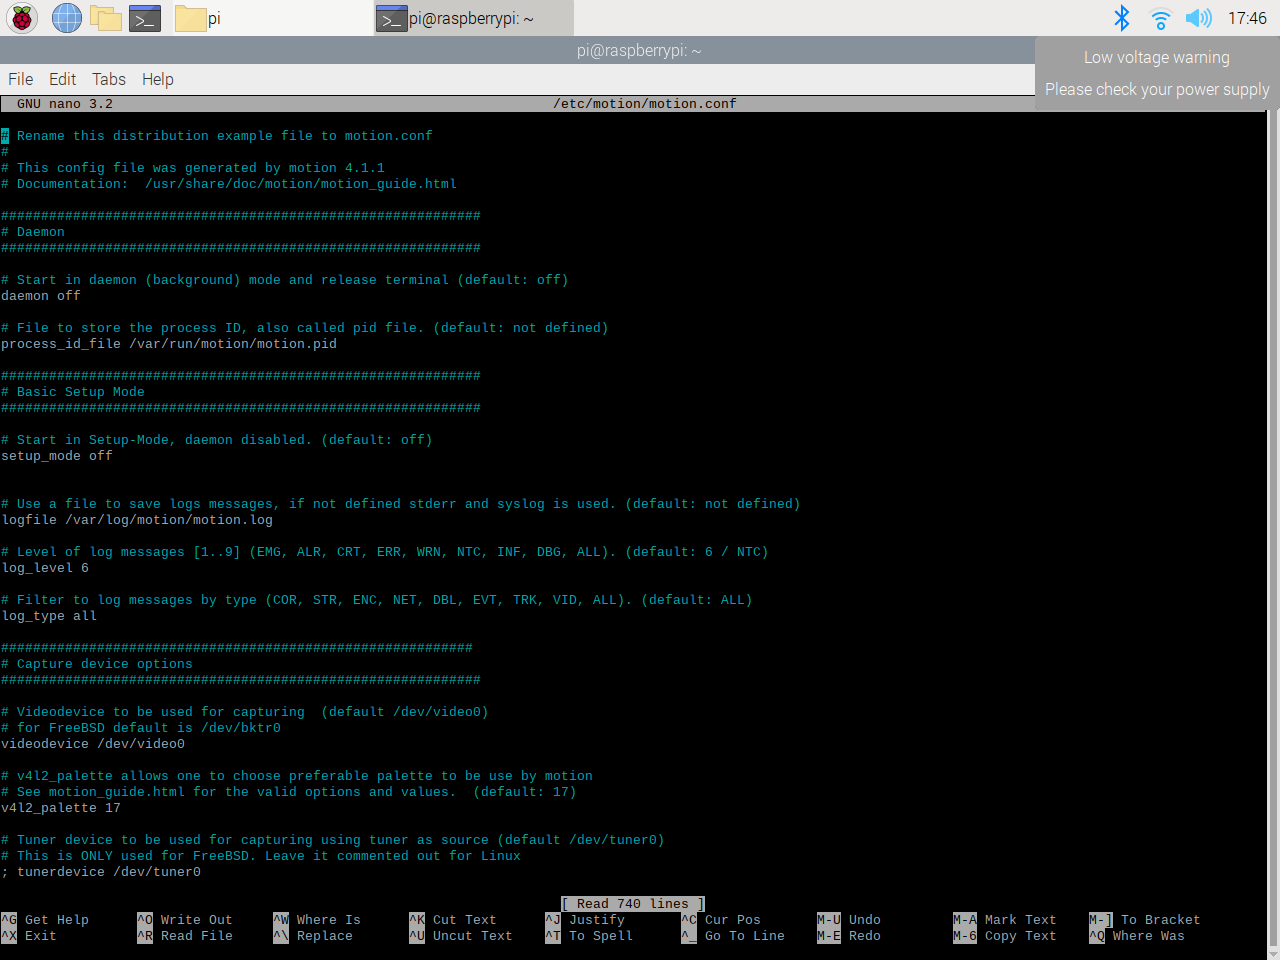
⭐ Now, you need to change some settings in the configuration file to start live streaming. Enter the command below to view the configuration file.
sudo nano /etc/motion/motion.conf
Figure - 54.27
⭐ Then, change the settings as follows:
daemon on
stream_localhost off
stream_maxrate 50
framerate 50
width 640
height 480
stream_port 8081
stream_quality 100
webcontrol_localhost off
quality 100
post_capture 5
Figure - 54.28
⭐ To activate the Motion module on start, enter the following command and set the start_motion_daemon to yes.
sudo nano /etc/default/motion
Figure - 54.29
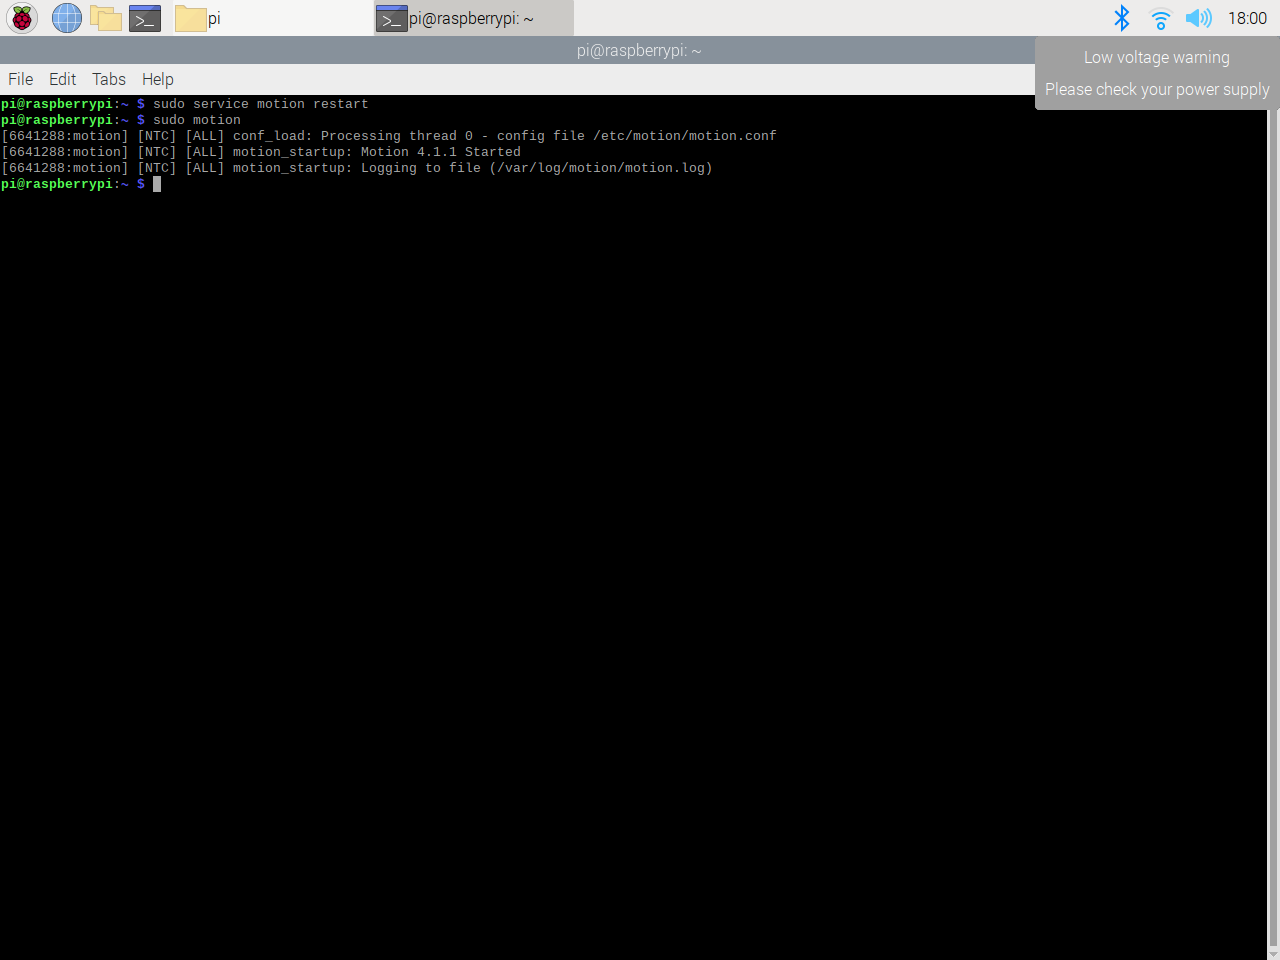
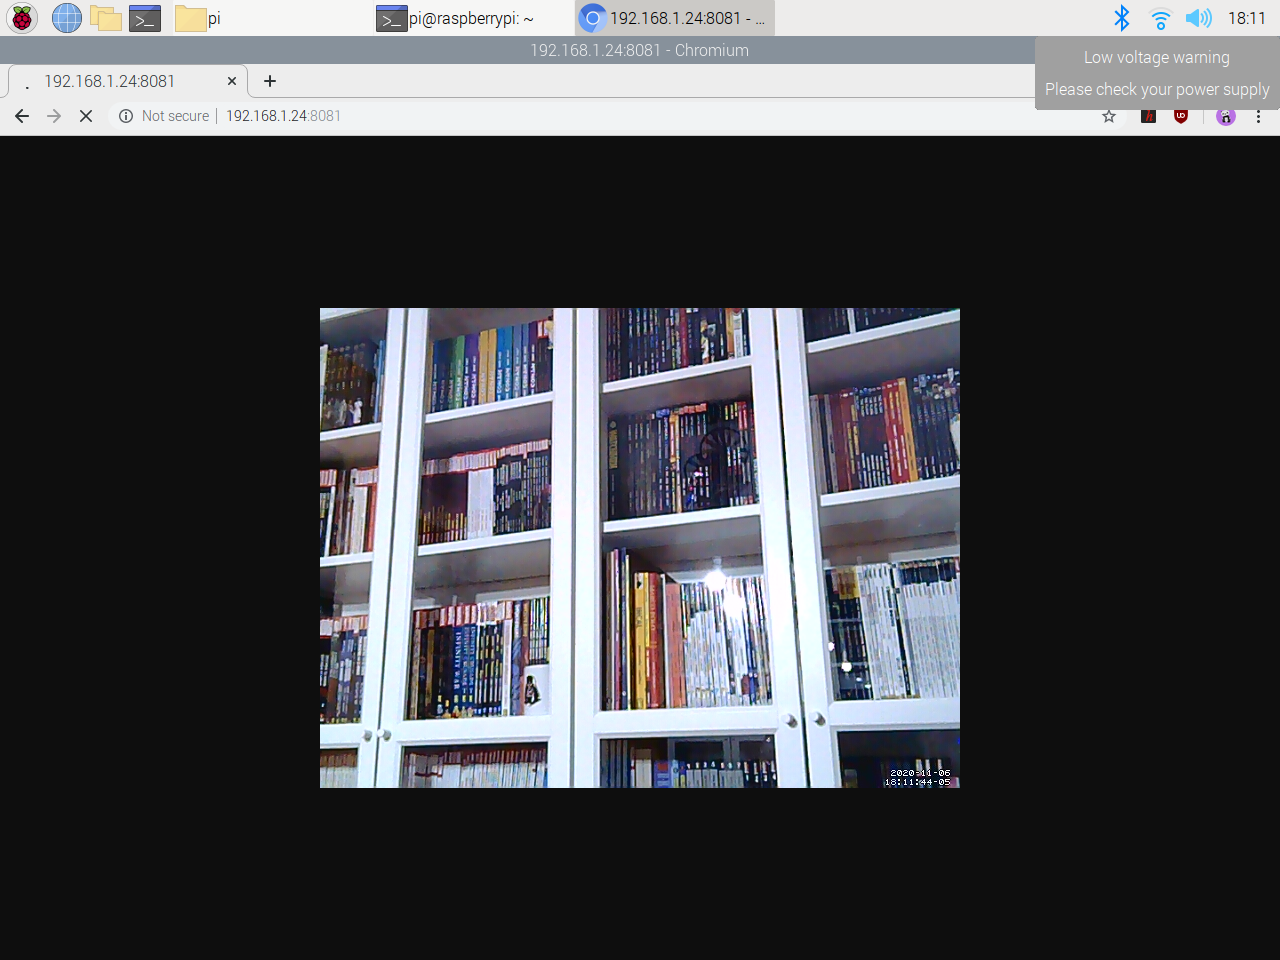
After starting the Motion module for the first time, you should see the live stream on the 8081 port.
sudo service motion restart
sudo motion
Figure - 54.30
IP_Address:8081
Figure - 54.31
Step 4: Capturing and sending pictures of people without a mask when detected
In this step, we will take a picture when HuskyLens detects someone without a mask and send it to a server (Apache on Raspberry Pi) to be saved as corroborating evidence of the penalty receipt.
Unfortunately, we cannot capture pictures easily with the Motion module explained in the previous step. Therefore, we need to use another library - fswebcam - to take pictures with a USB webcam.
⭐ Open the terminal and install the fswebcam module with the command below.
sudo apt install fswebcam
Figure - 54.32
⭐ After downloading the fswebcam module, you can call it by using the subprocess module in a Python script to take pictures when requested. But, to take pictures with this module, you need to disable and restart the Motion module first as follows:
sudo service motion stop
fswebcam -D 2 -S 20 -r widthxheight file_location
sudo service motion start
The depicted code is a part of the Python class (Mask_Detection_Robot) I created for the application.
...

    # Capture people without a mask when detected by the Huskylens.
    def capture_unmasked(self, width, height, case_code, file_path):
        command_capture = "fswebcam -D 2 -S 20 -r " + width + "x" + height + " " + file_path + case_code + ".jpg"
        command_stop_motion = "sudo service motion stop"
        command_start_motion = "sudo service motion start"
        # Take a picture after interrupting the motion module.
        print("\nStatus => Motion Module Interrupted!")
        call([command_stop_motion], shell=True)
        sleep(10)
        print("\nStatus => Fswebcam Module Activated!\n")
        call([command_capture], shell=True)
        sleep(5)
        print("\nStatus => Motion Module Restarted!\n")
        call([command_start_motion], shell=True)
        sleep(5)

...
⭐ Then, define the file location and run the code to take a picture with given settings - resolution, frame, and seconds - when HuskyLens detects people without a mask.
Figure - 54.33
Now, we will use the requests module to transfer the recently captured image to a web server (Apache on Raspberry Pi). Also, the requests module lets us display the response from the server after making a POST request.
The depicted code is a part of the Python class (Mask_Detection_Robot) I created for the application.
...

    # Send the recently captured pictures of people without a mask to the server.
    def send_captured_img_to_server(self, case_code, file_path):
        url_path = "http://" + self.server + "/Mask_Detection_Robot_Dashboard/captured/"
        captured_image_path = file_path + case_code + ".jpg"
        files = {'captured_image': open(captured_image_path, 'rb')}
        # Make an HTTP Post Request to the server to send the captured image.
        request = requests.post(url_path, files=files)
        print("\nStatus => Recently Captured Image Transferred!")
        # Print the response from the server.
        print("\nServer: " + request.text + "\n")

...
Step 5: Using the embedded (tiny) thermal printer to print text and QR code
In this step, we will print a penalty receipt with the QR code of its payment page when HuskyLens detects people without a mask.
There are various types of thermal printers with different abilities, but all of them are controlled by similar methods and functions. In this project, I used an embedded (tiny) thermal printer supporting TTL and USB.
You can get more information about the thermal printer I used here.
⭐ First of all, open the Raspberry Pi configuration settings to enable Serial Port.
Figure - 54.34
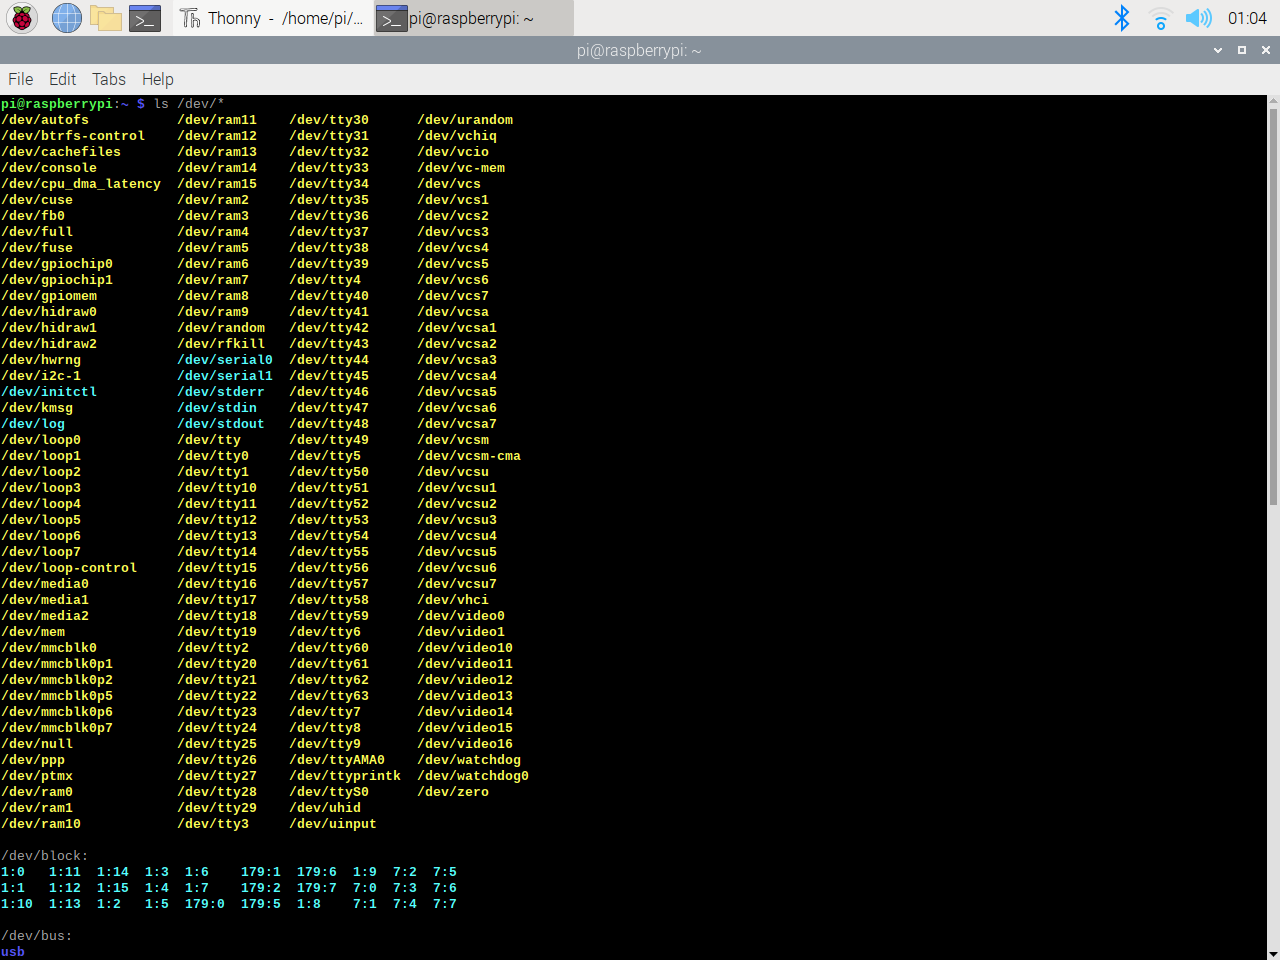
⭐ Connect the tiny thermal printer to Raspberry Pi via the USB cable. Then, enter the following command to check the occupied serial ports - folders.
ls /dev/*
Figure - 54.35
⭐ If the printer is not showing or working on "/dev/ttyUSB0", enter the following command to find which channel it occupies in the usb folder. You should see a folder name like "lp0".
ls /dev/usb*
⭐ Then, to check whether the thermal printer is working precisely or not, enter the commands below.
⭐ Do not forget that you need to set the permission of "/dev/usb/lp0" to 666 to be able to send commands to the printer.
sudo chmod 666 /dev/usb/lp0
echo -e "This is a test message.\\n\\n" > /dev/usb/lp0
Figure - 54.36
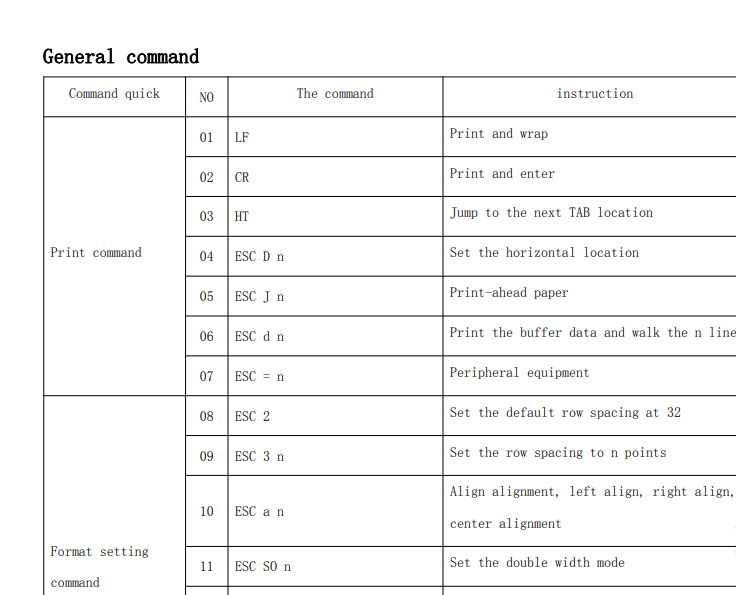
⭐ After that, you can send ESC/POS commands to the thermal printer to change settings such as font size, inverted, and position. Although there are libraries to use ESC/POS commands, sending them directly to the printer is way faster and reduces faint letters and lines. You can download the general instruction set of ESC/POS commands for the thermal printer in the Downloads below.
Figure - 54.37
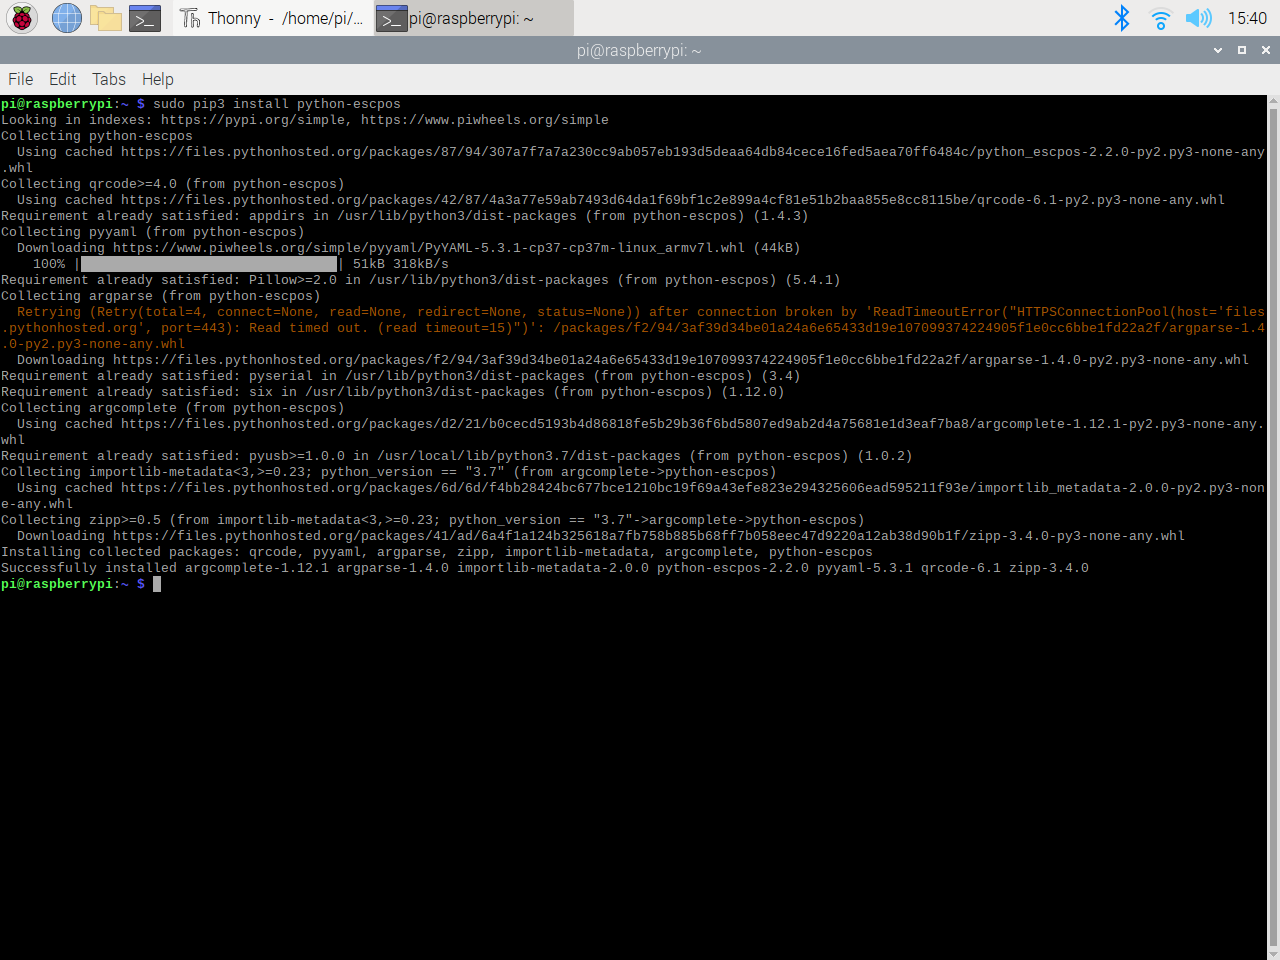
⭐ However, printing QR codes with ESC/POS commands alone is perplexing, so you need to download the escpos module to be able to print QR codes easily.
sudo pip3 install python-escpos
Figure - 54.38
After taking the steps above, the thermal printer should print the penalty receipt with the QR code of its payment page when you execute the code if HuskyLens detects people without a mask.
The depicted code is a part of the Python class (Mask_Detection_Robot) I created for the application.
...

    # Via the Thermal Printer, print the fine receipt when detecting people without a mask.
    def print_fine_receipt(self, case_code, fine, due):
        print("\nStatus => Printer Working!")
        # Define character design and font sizes for each line.
        command_thermal_printer = []
        command_thermal_printer.append("sudo chmod 666 /dev/usb/lp0")
        command_thermal_printer.append("printf '\x1B\x45\x01' > /dev/usb/lp0")
        command_thermal_printer.append("printf '\x1D\x42\x01' > /dev/usb/lp0")
        command_thermal_printer.append("printf '\x1D\x21\x37' > /dev/usb/lp0")
        command_thermal_printer.append("echo '&&&' > /dev/usb/lp0")
        command_thermal_printer.append("printf '\x1D\x42\x10' > /dev/usb/lp0")
        command_thermal_printer.append("printf '\x1D\x21\x24\x0a' > /dev/usb/lp0")
        command_thermal_printer.append("echo 'COVID-19' > /dev/usb/lp0")
        command_thermal_printer.append("printf '\x1D\x21\x12' > /dev/usb/lp0")
        command_thermal_printer.append("echo 'Management' > /dev/usb/lp0")
        command_thermal_printer.append("echo 'Violation' > /dev/usb/lp0")
        command_thermal_printer.append("echo 'Notice' > /dev/usb/lp0")
        command_thermal_printer.append("printf '\x1D\x21\x01' > /dev/usb/lp0")
        command_thermal_printer.append("echo '\\nReceipt No:' > /dev/usb/lp0")
        command_thermal_printer.append("echo '" + case_code + "\\n' > /dev/usb/lp0")
        command_thermal_printer.append("echo 'Issue Date: " + datetime.datetime.now().strftime('%m-%d-%Y') + "' > /dev/usb/lp0")
        command_thermal_printer.append("echo 'Time: " + datetime.datetime.now().strftime('%H:%M:%S') + "' > /dev/usb/lp0")
        command_thermal_printer.append("echo 'Amount: " + fine + "' > /dev/usb/lp0")
        command_thermal_printer.append("echo 'Due Date: In " + due + " Days\\n' > /dev/usb/lp0")
        command_thermal_printer.append("printf '\x1D\x21\x09' > /dev/usb/lp0")
        command_thermal_printer.append("echo '(!) You comitted' > /dev/usb/lp0")
        command_thermal_printer.append("echo 'a code' > /dev/usb/lp0")
        command_thermal_printer.append("echo 'violation by not' > /dev/usb/lp0")
        command_thermal_printer.append("echo 'wearing a mask' > /dev/usb/lp0")
        command_thermal_printer.append("echo 'in public.\\n' > /dev/usb/lp0")
        command_thermal_printer.append("echo '(!) To inspect the' > /dev/usb/lp0")
        command_thermal_printer.append("echo 'picture showing' > /dev/usb/lp0")
        command_thermal_printer.append("echo 'you not wearing' > /dev/usb/lp0")
        command_thermal_printer.append("echo 'a mask in public' > /dev/usb/lp0")
        command_thermal_printer.append("echo 'and pay the penalty' > /dev/usb/lp0")
        command_thermal_printer.append("echo 'enter your' > /dev/usb/lp0")
        command_thermal_printer.append("echo 'receipt number' > /dev/usb/lp0")
        command_thermal_printer.append("echo 'to this page:\\n' > /dev/usb/lp0")

        # Print each line via the serial port.
        for i in range(len(command_thermal_printer)):
            call([command_thermal_printer[i]], shell=True)
            sleep(0.5)
        # Print QR Code w/ Settings
        thermal_printer = printer.File("/dev/usb/lp0")
        thermal_printer.qr("http://" + self.server + "/Mask_Detection_Robot_Dashboard/Payments/?q=" + case_code, size=4, model=2)
        thermal_printer.cut()
        print("\nStatus => Printer Printed the Receipt!\n\n")

...
Step 6: Creating the Autonomous Mask Detection Robot application in Python
In this section, I will talk about how I created an application, named Autonomous Mask Detection Robot, in Python for the robot and what features it includes. The application consists of two parts - files:
mask_detection_robot.py
chassis_controls.py
I will discuss the chassis_controls.py and its features in the following steps in detail.
In the previous steps, I have already covered most of the mask_detection_robot.py and explained its features - the Mask_Detection_Robot class. But, you can get more information about the Python class as follows.
⭐ After importing the required modules, the class lets the user define the server (host of the web application) and the file location (where captured pictures will be saved).
⭐ In the __init__ function, the class sets and checks the HuskyLens AI camera. Also, it creates the default receipt number - case_code.
from huskylib import HuskyLensLibrary
import json
from time import sleep
import datetime
import string
import random
from subprocess import call
import requests
from escpos import *

# Create the Mask Detection Robot class with the required settings:
class Mask_Detection_Robot:
    def __init__(self, server, file_location):
        # Define the IP Address and the file location:
        self.server = server
        self.file_location = file_location
        # Define HusklyLens settings
        self.husky_lens = HuskyLensLibrary("I2C", "", address=0x32)
        self.husky_lens_ID = 0
        # Define the case code - unique for each case.
        self.case_code = "default"
        # Test the communication with the HuskyLens.
        print("First request testing: {}".format(self.husky_lens.knock()))

...
⭐ In the generate_unique_case_code function, the class generates a unique and random receipt number (case_code) if executed.
 ...

    # Generate a unique case code for each detected people without a mask.
    def generate_unique_case_code(self, length):
        letters_and_digits = string.ascii_letters + string.digits
        self.case_code = ''.join(random.choice(letters_and_digits) for i in range(length))
        print("\nCase Code Generated => " + self.case_code)

...
⭐ In the MASK_DETECTION function, the class executes all the explained functions in a row if HuskyLens detects people without a mask.
⭐ Do not forget to change the server with the IP Address that of your Raspberry Pi.
...

    def MASK_DETECTION(self):
        # Get the recently read block from the HuskyLens to detect the object ID.
        self.decodeHuskyLens(self.husky_lens.blocks())
        if(self.husky_lens_ID == 1):
            print("ID = " + str(self.husky_lens_ID) + " Status => Masked")
        elif(self.husky_lens_ID == 2):
            print("ID = " + str(self.husky_lens_ID) + " Status => UnMasked")
            # Generate the case code.
            self.generate_unique_case_code(15)
            # Capture people without a mask.
            self.capture_unmasked("640", "480", self.case_code, self.file_location)
            # Send the captured image to the server.
            self.send_captured_img_to_server(self.case_code, self.file_location)
            # Print the fine receipt with the penalty.
            self.print_fine_receipt(self.case_code, "$50", "3")
        elif(self.husky_lens_ID == 3):
            print("ID = " + str(self.husky_lens_ID) + " Status => Default")


# Define a new class object named 'robot':
robot = Mask_Detection_Robot("192.168.1.24", "/home/pi/Autonomous_Mask_Detection_Robot/captured/")

while True:
    # Get blocks from the HuskyLens:
    robot.MASK_DETECTION()
    sleep(2)
⭐ When HuskyLens detects people without a mask, the class saves the captured picture to the given location (/captured) by naming it with the receipt number; and sends it to the web application as corroborating evidence of the printed receipt.
Figure - 54.39
⭐ Furthermore, the class shows the process of detection for testing the robot via the shell when connected to a screen.
Figure - 54.40
Figure - 54.41
Figure - 54.42
You can inspect and download the code files separately or within the application folder - Autonomous_Mask_Detection_Robot.zip.
Figure - 54.43
Figure - 54.44
Figure - 54.45
Figure - 54.46
Step 7: Assembling the robot chassis and connecting the L298N Motor Driver Module
In this step, we will assembly a Black Gladiator (Tracked Robot Chassis) to make the device moveable and flexible; and connect an L298N Motor Driver Module to the robot chassis to be able to control motors easily with GPIO pins.
I will discuss how I sent commands and controlled the GPIO pins with Python Arguments via the PHP web application in the following step.
⭐ Install the load-bearing wheel (first install the M4*50 long screw into the load-bearing wheel), and lock the other side with the M4 screw.
Figure - 54.47
⭐ Place the gasket on the bracket and insert the load-bearing wheel into the hole of the bracket. Then, seal it with the other gasket and the M4 nut.
Figure - 54.48
⭐ Insert the motor into the bracket and tighten it with 3 M3*6 flat head screws.
Figure - 54.49
⭐ Join the two sides of the drive wheel and lock it with the M3*8 hex socket screw.
Figure - 54.50
⭐ Attach the drive wheel to the motor and tighten the connection with a black screw sent with the kit.
Figure - 54.51
⭐ Disconnect the track to measure the required track length and discard the redundant part.
Figure - 54.52
⭐ Wrap and reconnect the track after attaching to wheels.
Figure - 54.53
⭐ Solder male jumper wires to motors and connect them to the L298N Motor Driver Module. Then, fasten the L298N module to the bottom of the bracket with a hot glue gun.
Figure - 54.54
Figure - 54.55
Step 8: Controlling the L298N Motor Driver Module with Python Arguments
The chassis_controls.py file is the second part of the Python application. It uses the argparse module, the recommended command-line parsing module in the Python standard library, to receive and execute commands via flags passed in the command line. In that regard, it allows the user to control the direction and speed of the robot chassis by merely changing variables in the command line - direction and speed.
You can get more information on the argparse module here.
⭐ After making GPIO settings and connections, if the file receives direction - forward, left, right, or backward - and speed - low, moderate, or high - variables in the command line, then it changes the direction and speed of the robot chassis.
import argparse
import RPi.GPIO as GPIO
from time import sleep

...

# If the file is not imported:
if __name__ == '__main__':
   parser = argparse.ArgumentParser()
   parser.add_argument("--direction", required=True, help="define the direction of the robot chassis")
   parser.add_argument("--speed", help="define the speed of the robot chassis")
   args = parser.parse_args()
   # Mandatory Direction Controls:
   if(args.direction == "forward"):
       GPIO.output(in_1_1, GPIO.LOW)
       GPIO.output(in_1_2, GPIO.HIGH)
       GPIO.output(in_2_1, GPIO.HIGH)
       GPIO.output(in_2_2, GPIO.LOW)
       print("Robot => Going Forward!")
       sleep(1)
   elif(args.direction == "left"):
       GPIO.output(in_1_1, GPIO.LOW)
       GPIO.output(in_1_2, GPIO.HIGH)
       GPIO.output(in_2_1, GPIO.LOW)
       GPIO.output(in_2_2, GPIO.LOW)
       print("Robot => Going Left!")
       sleep(1)
   elif(args.direction == "right"):
       GPIO.output(in_1_1, GPIO.LOW)
       GPIO.output(in_1_2, GPIO.LOW)
       GPIO.output(in_2_1, GPIO.HIGH)
       GPIO.output(in_2_2, GPIO.LOW)
       print("Robot => Going Right!")
       sleep(1)
   elif(args.direction == "backward"):
       GPIO.output(in_1_1, GPIO.HIGH)
       GPIO.output(in_1_2, GPIO.LOW)
       GPIO.output(in_2_1, GPIO.LOW)
       GPIO.output(in_2_2, GPIO.HIGH)
       print("Robot => Going Backward!")
       sleep(1)
   else:
       print("Direction Value => Error!")
   # Optional Speed Controls:
   if args.speed:
       if(args.speed == "low"):
           s_1.ChangeDutyCycle(50)
           s_2.ChangeDutyCycle(50)
           print("Robot => Low Speed!")
           sleep(1)
       elif(args.speed == "moderate"):
           s_1.ChangeDutyCycle(75)
           s_2.ChangeDutyCycle(75)
           print("Robot => Moderate Speed!")
           sleep(1)
       elif(args.speed == "high"):
           s_1.ChangeDutyCycle(90)
           s_2.ChangeDutyCycle(90)
           print("Robot => High Speed!")
           sleep(1)
       else:
           print("Speed Value => Error!")

   print("Waiting New Command!")

...
⭐ To test the code, open the terminal and enter the command below. If you installed the chassis_controls.py in a different location, change the folder path.
Step 9: Setting up a LAMP web server on Raspberry Pi
If you are a novice in programming with Raspberry Pi, you can inspect well-explained instructions and tutorials on the official Raspberry Pi website.
To go to the official Raspberry Pi setting up tutorial, click here.
Figure - 54.58
⭐ Open a terminal window by selecting Accessories > Terminal from the menu.
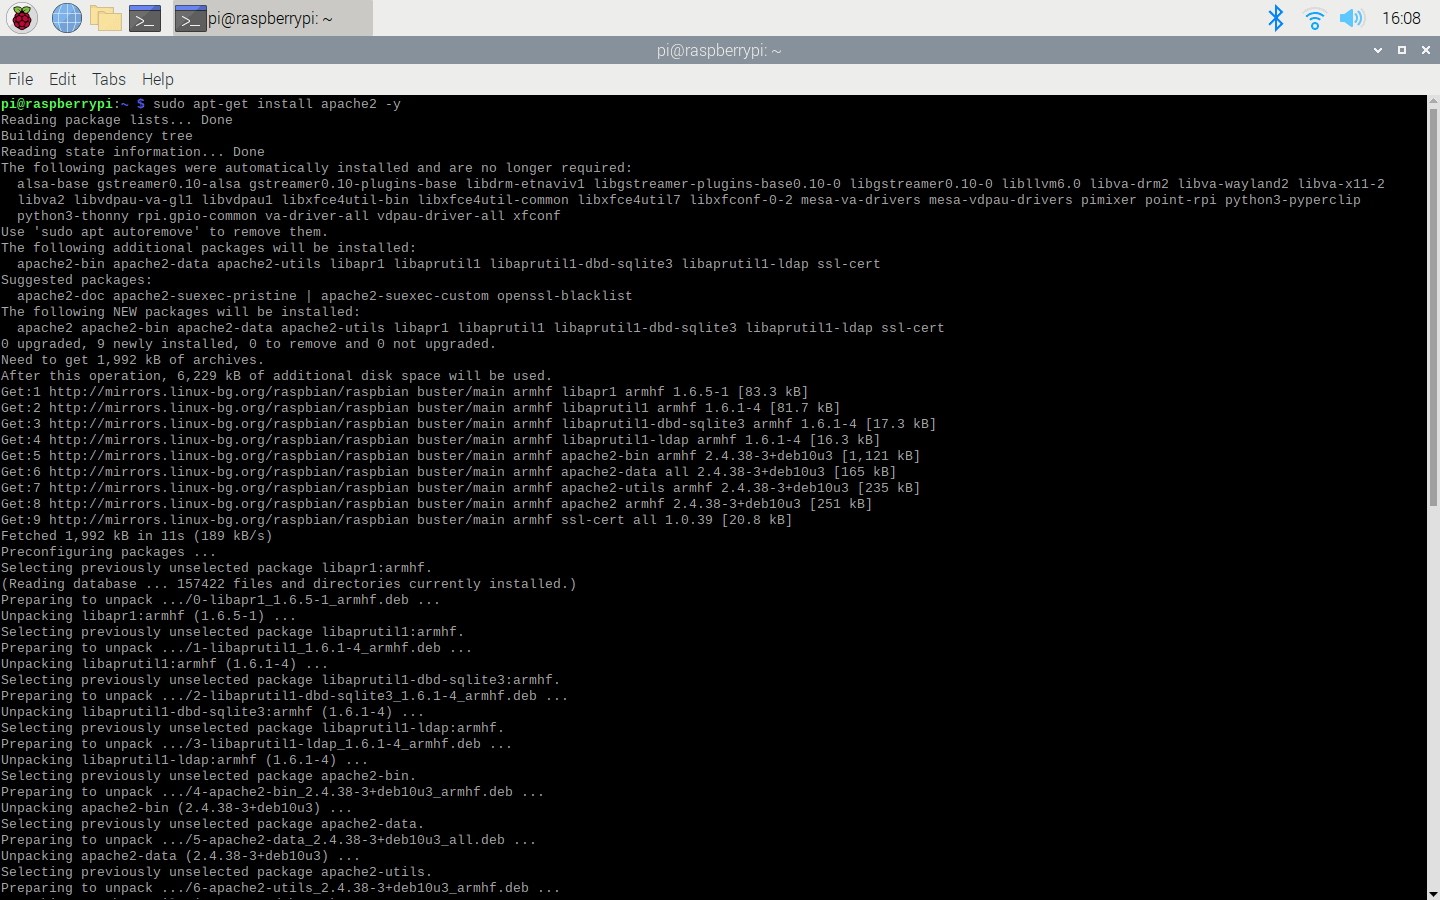
⭐ Install the apache2 package by typing the following command into the terminal and pressing Enter:
sudo apt-get install apache2 -y
Figure - 54.59
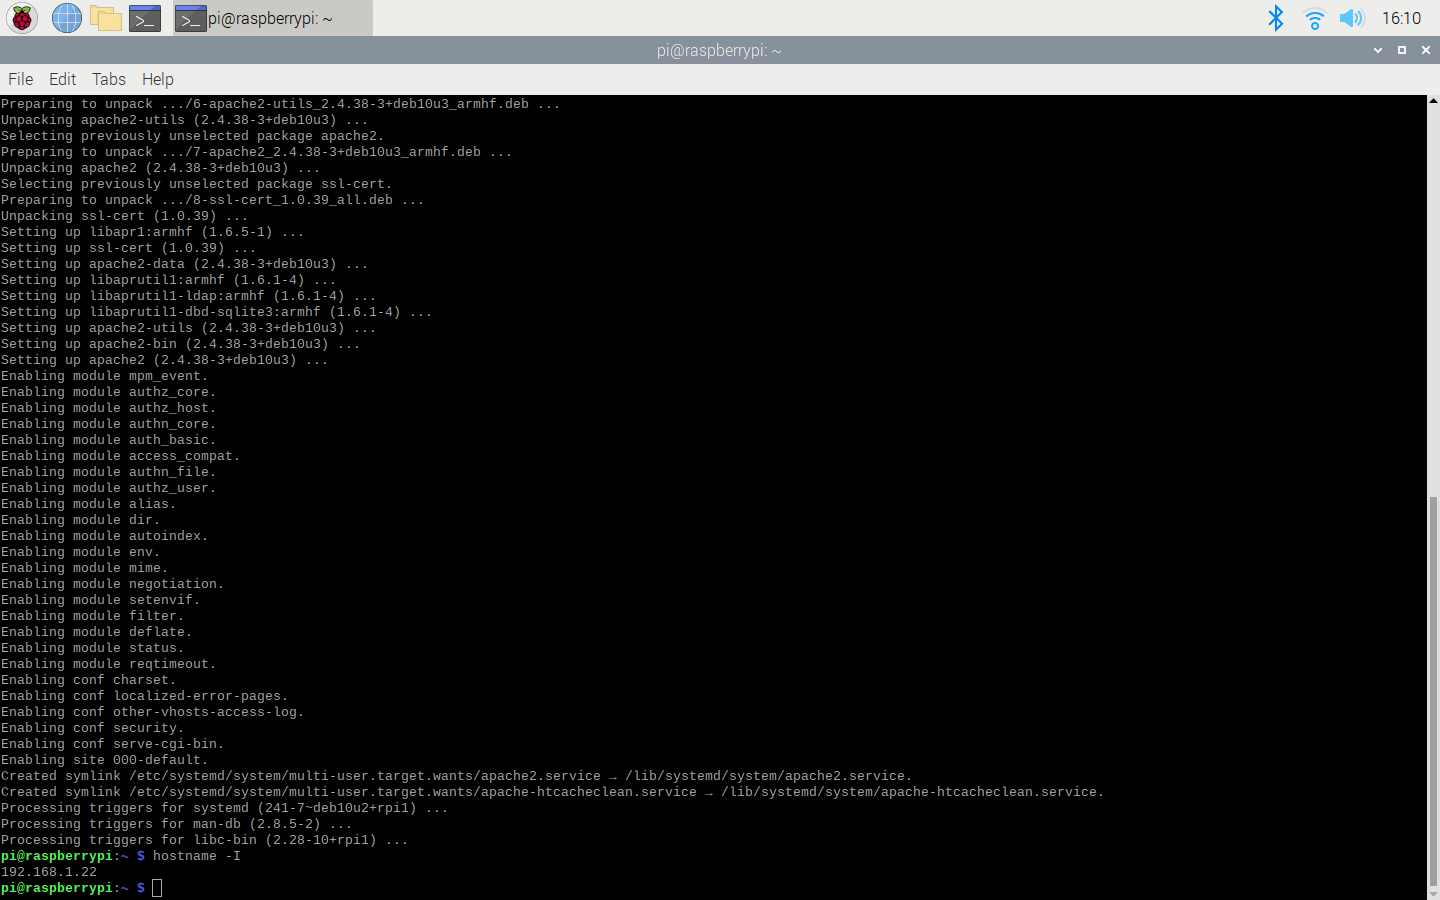
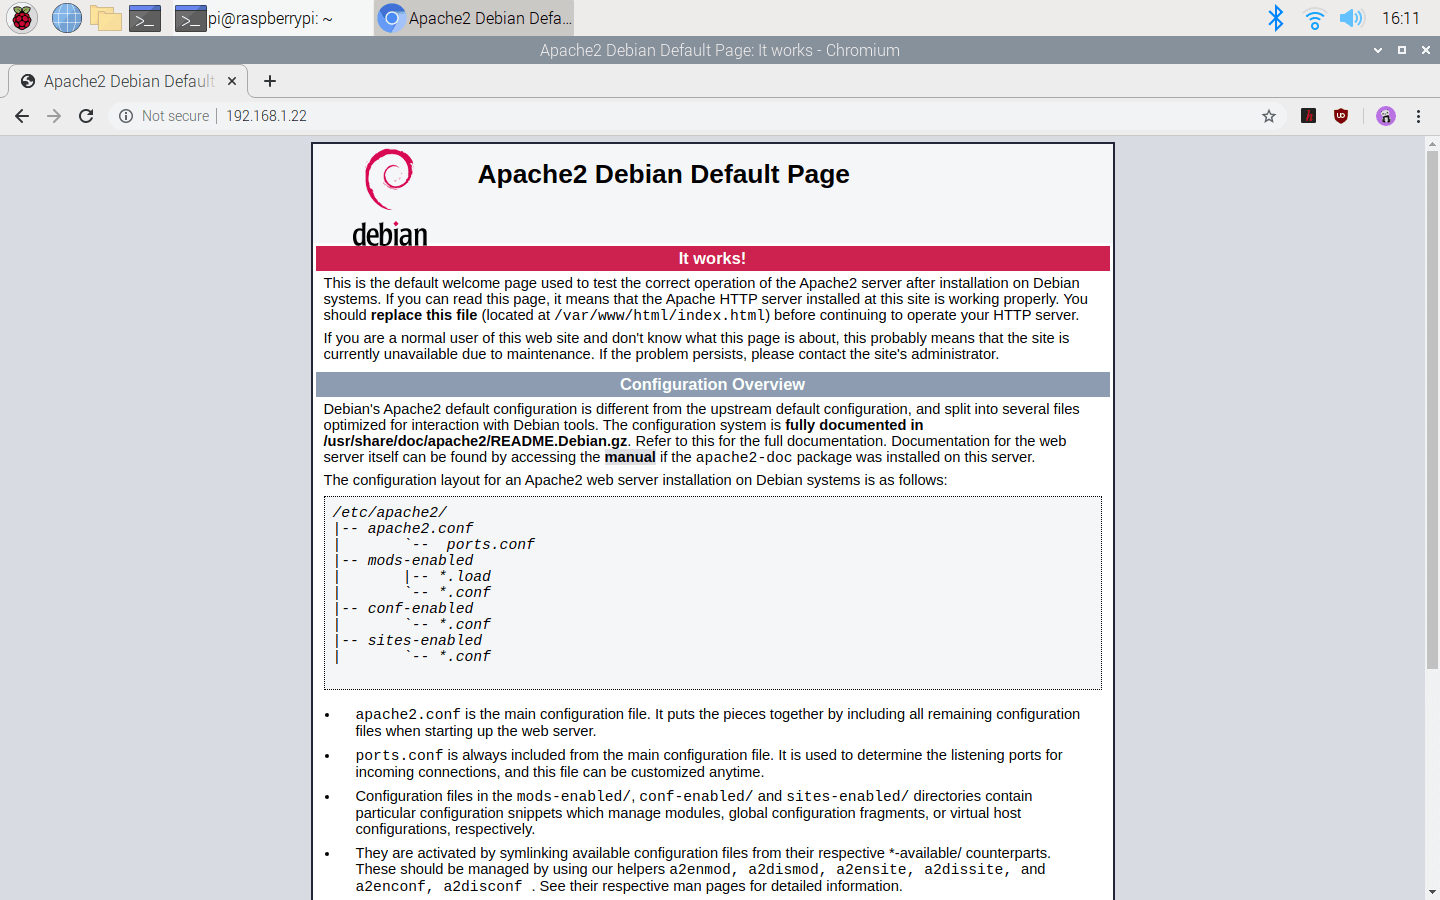
⭐ To test the server, open Chromium by selecting Internet > Chromium Web Browser from the menu and enter http://localhost.
⭐ If you want, you can use the IP address of your Raspberry Pi as well.
hostname -I
Figure - 54.60
Figure - 54.61
⭐ Install the PHP package with the following command:
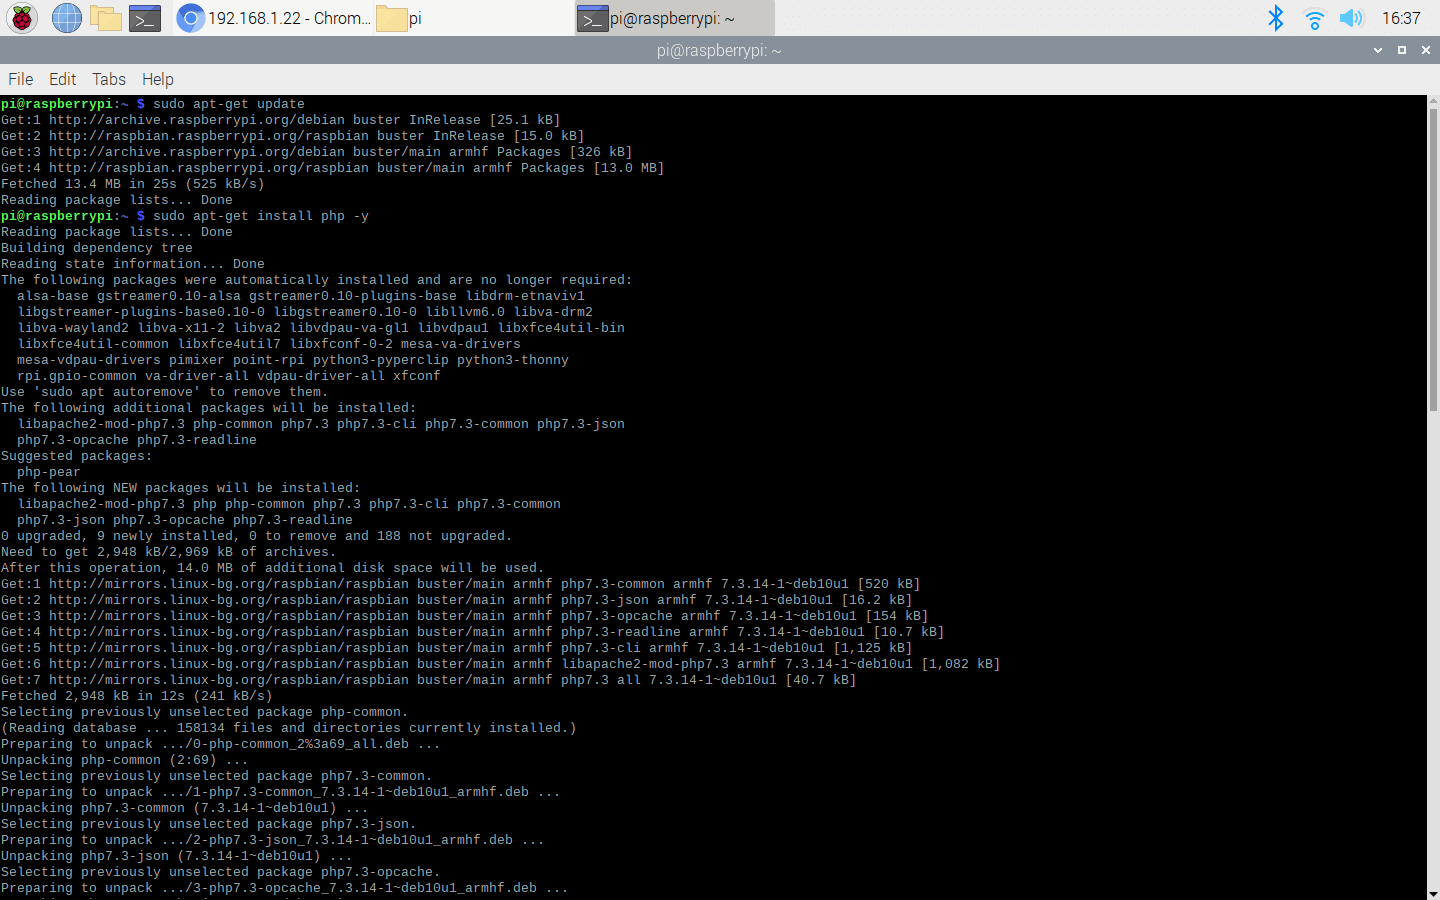
⭐ Do not forget to update the Pi.
sudo apt-get update
sudo apt-get install php -y
Figure - 54.62
⭐ Then, restart the apache server to be able to use the installed packages on the localhost:
sudo service apache2 restart
Step 10: Developing the Mask Detection Robot Dashboard web application in PHP and JavaScript
In this step, I will talk about how I developed the Mask Detection Robot Dashboard web application in PHP and JavaScript, which consists of three separate sections:
Control Panel (Dashboard)
Payments
Captured (Pictures)
And the Control Panel (Dashboard) includes three files:
index.php
index.js
index.css
⭐ In the index.php file, the application embeds the live stream by the Raspberry Pi in the iframe element to display it. Do not forget to change the IP Address before running the application.
⭐ Also, the application shows the control options of the robot chassis in the form element and lets the user submit commands after selected without a submit button via jQuery.
⭐ In the index.js file, the application sends the form information - direction and speed - to the index.php file without a submit button via AJAX if the user inputs new data to the form element.
$(".controls").on("input", ".submit", function(){
	// Get the recent command.
	var direction = document.querySelector('input[name="direction"]:checked').value;
	var speed = document.querySelector('select[name="speed"]').value;
	// Send the recent command to the page to execute related Python script.
	$.ajax({
		url: "?direction=" + direction + "&speed=" + speed,
	    type: "GET",
	    //success: () => {alert("D: " + direction + "\nS: " + speed);}
	});
});
Subsequently, I will explain the Payments and Captured sections in detail.
Figure - 54.64
Figure - 54.65
Figure - 54.66
Step 10.1: Executing Python Arguments (script) in PHP when requested
⭐ After receiving commands, the index.php file executes a shell command by using the exec function to run the chassis_controls.py file in the Python application while passing the transferred form information as the Python Arguments - direction and speed.
<?php

// Check if there is a new command.
if(isset($_GET["direction"]) && !empty($_GET["direction"])){
	$direction = $_GET["direction"];
	// If transferred, get the optional speed value.
	$speed = (isset($_GET["speed"])) ? $_GET["speed"] : "low";
	// Execute the requested Python file with arguments as the recent commands - direction and speed.
	exec("python /home/pi/Autonomous_Mask_Detection_Robot/chassis_controls.py --direction='".$direction."' --speed='".$speed."'");
	echo "Commands =><br><br>Direction: $direction <br><br>Speed: $speed";
	// Close
	exit();
}

?>
Figure - 54.67
However, in Raspberry Pi, to be able to control GPIO pins over the web, we have to give permission to the apache server to run the GPIO module. Generally, the apache server runs under the www-data username, so we need to add the gpio group to the www-data user.
⭐ Open the terminal and enter the command below to add the gpio group to the www-data user. Then, restart the apache server.
sudo usermod -a -G gpio www-data
sudo service apache2 restart
Figure - 54.68
⭐ Check whether the PHP web application executes the chassis_controls.py file accurately by sending commands manually.
Figure - 54.69
Step 10.2: Saving pictures of people without a mask to the server
In the Captured section (/captured), the web application saves the pictures taken and transferred by the Python application as corroborating evidence of the issued fine for each receipt.
In Raspberry Pi, to be able to save pictures to the apache server, we need to set the permission of the target location (/captured) to 777 since the apache server is a protected location.
⭐ Open the terminal and enter the command below to set the permission of the captured folder to 777.
⭐ Then, when the Python application sends a picture to the web application (/captured), the application saves the picture to the server with the given settings.
<?php

// If the captured images of people without a mask are transferred from the  Mask Detection Robot (Raspberry Pi):
if(!empty($_FILES["captured_image"]['name'])){
	// Image File:
	$captured_image_properties = array(
	    "name" => $_FILES["captured_image"]["name"],
	    "tmp_name" => $_FILES["captured_image"]["tmp_name"],
		"size" => $_FILES["captured_image"]["size"],
		"extension" => pathinfo($_FILES["captured_image"]["name"], PATHINFO_EXTENSION)
	);

    // Check whether the uploaded file extensions are in allowed formats.
	$allowed_formats = array('jpg', 'png');
	if(!in_array($captured_image_properties["extension"], $allowed_formats)){
		echo 'FILE => File Format Not Allowed!';
	}else{
		// Check whether the uploaded file sizes exceed the data limit - 5MB.
		if($captured_image_properties["size"] > 5000000){
			echo "FILE => File size cannot exceed 5MB!";
		}else{
			// Save the uploaded image.
			move_uploaded_file($captured_image_properties["tmp_name"], $captured_image_properties["name"]);
			echo "FILE => Saved Successfully!";
		}
	}
}

?>
⭐ Go to the captured folder in the web application to view the pictures transferred by the Python application after detection.
Figure - 54.71
Step 10.3: Designing a payment page showing information and pictures by receipt numbers
In the Payments section (/Payments), the web application creates a payment page for each generated receipt number (case_code) by the Python application.
⭐ To search for a receipt number, send the receipt number to the web application (/Payments) via the q (query) variable.
.../Payments/?q=<receipt_number>
⭐ If there is a picture named with the given receipt number in the captured folder as corroborating evidence of the penalty receipt, then the web application displays:
Fine Amount
Payment Options
Captured Picture (Evidence)
...

<?php

// If the receipt number is correct, display the captured image, the penalty, and payment options.
if(isset($_GET["q"]) && !empty($_GET["q"])){
	if(file_exists("../captured/".$_GET["q"].".jpg")){
		echo '
		       <h2>Receipt No: '.$_GET["q"].'</h2>
			   <h2>Amount: $50</h2>
			   <button>PayPal</button>
			   <button>Bank Transfer</button>
			   <img src="../captured/'.$_GET["q"].'.jpg" />
	    ';
	}else{
		echo "<h2>Receipt No: Not Found!</h2>";
	}
}

?>

...
Figure - 54.72
Figure - 54.73
⭐ Otherwise, the web application prints "Receipt No: Not Found!".
Figure - 54.74
Step 10.4: Installing the PHP web application on Raspberry Pi
You can download the PHP web application in the Downloads below - named Mask_Detection_Robot_Dashboard.zip - and upload it to your Raspberry Pi, including all required files.
⭐ Download the web application - Mask_Detection_Robot_Dashboard.zip
Figure - 54.75
⭐ Extract the zipped folder.
Figure - 54.76
Figure - 54.77
⭐ Move the application folder (Mask_Detection_Robot_Dashboard) from Downloads to the server (/var/www/html) by using the terminal since the apache server is a protected location.
First of all, I connected the HuskyLens AI Camera to the Raspberry Pi by using the 4-Pin connector to wire GND, 5V, SDA, and SCL pins as depicted below.
Figure - 54.79
Then, I connected the USB webcam to the Raspberry Pi.
Figure - 54.80
Next, I connected the embedded (tiny) thermal printer to the Raspberry Pi via the USB cable. To supply the thermal printer, I used a 12V external battery connected to an MB102 Power Supply Module. The higher the voltage, the clearer the printing effect (5~9V).
Figure - 54.81
Finally, I connected the Raspberry Pi GPIO pins shown below to the L298N Motor Driver to be able to control the direction and speed of the robot chassis.
I supplied the motors by connecting the 12V external battery to the L298N Motor Driver Module via the MB102 Power Supply Module.
The ground of the external battery should be connected to the ground of the Raspberry Pi.
To conclude the design of the web-enabled ML face mask detection robot, I fastened and attached all components to the top of the robot chassis by using a hot glue gun and screws.
Figure - 54.83
Figure - 54.84
Figure - 54.85
After completing the design and testing the robot, I supplied the Raspberry Pi with a Xiaomi 20000 mAh 3 Pro Type-C Powerbank to make the device mobile and agile while operating.
Figure - 54.86
Features and Functions
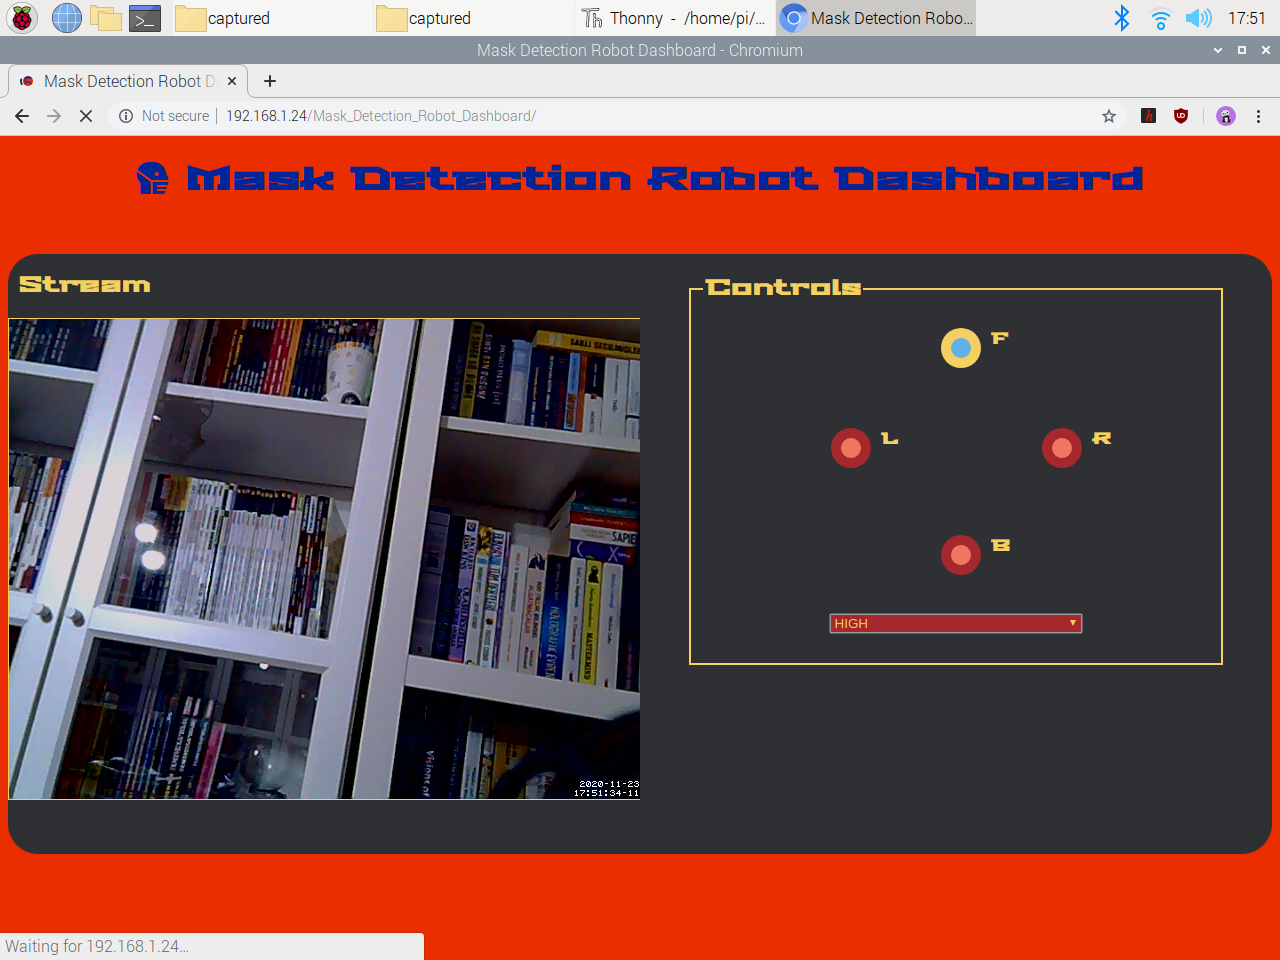
⭐ The web-enabled ML face mask detection robot live streams in the PHP web application (Mask Detection Robot Dashboard) while operating.
Figure - 54.87
⭐ The robot moves when the user sends commands - direction (forward, left, right, or backward) and speed (low, moderate, or high) - via the PHP web application.
Figure - 54.88
⭐ The robot detects people without a mask by utilizing the object classification mode of the HuskyLens AI Camera.
Figure - 54.89
Figure - 54.90
Figure - 54.91
⭐ When the robot detects people without a mask, it generates a unique receipt number, captures pictures of people with no mask, and sends them to the PHP web application as evidence.
⭐ Then, the web application creates a payment page for each receipt number and shows the captured picture of the given receipt number as the corroborating evidence of the issued fine.
Figure - 54.92
⭐ After detecting people with no mask, the robot prints penalty receipts automatically to notify them wearing masks. The penalty receipt shows:
Receipt Number
Issue Date
Issue Time
Fine Amount
Due Date
Warnings
QR code of the payment page
Figure - 54.93
Figure - 54.94
⭐ By scanning the QR code printed on a penalty receipt, the payment page of the penalty receipt can be opened to view payment options and the captured image named with the given receipt number as corroborating evidence of the issued fine.
Figure - 54.95
Figure - 54.96
⭐ The robot can be controlled on desktop and mobile since the web application is compatible with mobile devices.
Figure - 54.97
Figure - 54.98
Videos and Conclusion
After finishing coding and assembling, I tested the web-enabled ML face mask detection robot, and it worked stupendously while performing each feature and function :)
I could not record a video while testing the robot in crowds due to the rapid increase in the COVID-19 cases in my country.
Figure - 54.99
Figure - 54.100
Figure - 54.101
References
(1)Coelho MTP, Rodrigues JFM, Medina AM, Scalco P, Terribile LC, Vilela B, Diniz-Filho JAF, Dobrovolski R. 2020. Global expansion of COVID-19 pandemic is driven by population size and airport connections. PeerJ 8:e9708 https://doi.org/10.7717/peerj.9708
(2)Yassine Dabachine, Hamza Taheri, Mohamed Biniz, Belaid Bouikhalene, Abdessamad Balouki, Strategic design of precautionary measures for airport passengers in times of global health crisis Covid 19: Parametric modelling and processing algorithms, Journal of Air Transport Management, Volume 89, 2020, 101917, ISSN 0969-6997, https://doi.org/10.1016/j.jairtraman.2020.101917.
# Web-enabled ML Mask Detection Robot Fines for No Mask w/ Penalty Receipt

# Raspberry Pi 3 Model B+ or 4

# By Kutluhan Aktar

# A prototype to minimize the number of staffs having to interact w/ people
# to notify them wearing masks live streaming while operating.

# For more information:
# https://www.theamplituhedron.com/projects/Web-enabled-ML-Mask-Detection-Robot-Fines-for-No-Mask-w-Penalty-Receipt

from huskylib import HuskyLensLibrary
import json
from time import sleep
import datetime
import string
import random
from subprocess import call
import requests
from escpos import *

# Create the Mask Detection Robot class with the required settings:
class Mask_Detection_Robot:
    def __init__(self, server, file_location):
        # Define the IP Address and the file location:
        self.server = server
        self.file_location = file_location
        # Define HusklyLens settings
        self.husky_lens = HuskyLensLibrary("I2C", "", address=0x32)
        self.husky_lens_ID = 0
        # Define the case code - unique for each case.
        self.case_code = "default"
        # Test the communication with the HuskyLens.
        print("First request testing: {}".format(self.husky_lens.knock()))

    # Decode the data generated by the HuskyLens.
    def decodeHuskyLens(self, obj):
        count=1
        if(type(obj)==list):
            for i in obj:
                #print("\t " + ("BLOCK_" if i.type=="BLOCK" else "ARROW_") + str(count) + " : " + json.dumps(i.__dict__))
                self.husky_lens_ID = json.loads(json.dumps(i.__dict__))["ID"]
                count+=1
        else:
            #print("\t " + ("BLOCK_" if obj.type=="BLOCK" else "ARROW_") + str(count) + " : " + json.dumps(obj.__dict__))
            self.husky_lens_ID = json.loads(json.dumps(obj.__dict__))["ID"]

    # Generate a unique case code for each detected people without a mask.
    def generate_unique_case_code(self, length):
        letters_and_digits = string.ascii_letters + string.digits
        self.case_code = ''.join(random.choice(letters_and_digits) for i in range(length))
        print("\nCase Code Generated => " + self.case_code)

    # Capture people without a mask when detected by the Huskylens.
    def capture_unmasked(self, width, height, case_code, file_path):
        command_capture = "fswebcam -D 2 -S 20 -r " + width + "x" + height + " " + file_path + case_code + ".jpg"
        command_stop_motion = "sudo service motion stop"
        command_start_motion = "sudo service motion start"
        # Take a picture after interrupting the motion module.
        print("\nStatus => Motion Module Interrupted!")
        call([command_stop_motion], shell=True)
        sleep(10)
        print("\nStatus => Fswebcam Module Activated!\n")
        call([command_capture], shell=True)
        sleep(5)
        print("\nStatus => Motion Module Restarted!\n")
        call([command_start_motion], shell=True)
        sleep(5)

    # Send the recently captured pictures of people without a mask to the server.
    def send_captured_img_to_server(self, case_code, file_path):
        url_path = "http://" + self.server + "/Mask_Detection_Robot_Dashboard/captured/"
        captured_image_path = file_path + case_code + ".jpg"
        files = {'captured_image': open(captured_image_path, 'rb')}
        # Make an HTTP Post Request to the server to send the captured image.
        request = requests.post(url_path, files=files)
        print("\nStatus => Recently Captured Image Transferred!")
        # Print the response from the server.
        print("\nServer: " + request.text + "\n")

    # Via the Thermal Printer, print the fine receipt when detecting people without a mask.
    def print_fine_receipt(self, case_code, fine, due):
        print("\nStatus => Printer Working!")
        # Define character design and font sizes for each line.
        command_thermal_printer = []
        command_thermal_printer.append("sudo chmod 666 /dev/usb/lp0")
        command_thermal_printer.append("printf '\x1B\x45\x01' > /dev/usb/lp0")
        command_thermal_printer.append("printf '\x1D\x42\x01' > /dev/usb/lp0")
        command_thermal_printer.append("printf '\x1D\x21\x37' > /dev/usb/lp0")
        command_thermal_printer.append("echo '&&&' > /dev/usb/lp0")
        command_thermal_printer.append("printf '\x1D\x42\x10' > /dev/usb/lp0")
        command_thermal_printer.append("printf '\x1D\x21\x24\x0a' > /dev/usb/lp0")
        command_thermal_printer.append("echo 'COVID-19' > /dev/usb/lp0")
        command_thermal_printer.append("printf '\x1D\x21\x12' > /dev/usb/lp0")
        command_thermal_printer.append("echo 'Management' > /dev/usb/lp0")
        command_thermal_printer.append("echo 'Violation' > /dev/usb/lp0")
        command_thermal_printer.append("echo 'Notice' > /dev/usb/lp0")
        command_thermal_printer.append("printf '\x1D\x21\x01' > /dev/usb/lp0")
        command_thermal_printer.append("echo '\\nReceipt No:' > /dev/usb/lp0")
        command_thermal_printer.append("echo '" + case_code + "\\n' > /dev/usb/lp0")
        command_thermal_printer.append("echo 'Issue Date: " + datetime.datetime.now().strftime('%m-%d-%Y') + "' > /dev/usb/lp0")
        command_thermal_printer.append("echo 'Time: " + datetime.datetime.now().strftime('%H:%M:%S') + "' > /dev/usb/lp0")
        command_thermal_printer.append("echo 'Amount: " + fine + "' > /dev/usb/lp0")
        command_thermal_printer.append("echo 'Due Date: In " + due + " Days\\n' > /dev/usb/lp0")
        command_thermal_printer.append("printf '\x1D\x21\x09' > /dev/usb/lp0")
        command_thermal_printer.append("echo '(!) You comitted' > /dev/usb/lp0")
        command_thermal_printer.append("echo 'a code' > /dev/usb/lp0")
        command_thermal_printer.append("echo 'violation by not' > /dev/usb/lp0")
        command_thermal_printer.append("echo 'wearing a mask' > /dev/usb/lp0")
        command_thermal_printer.append("echo 'in public.\\n' > /dev/usb/lp0")
        command_thermal_printer.append("echo '(!) To inspect the' > /dev/usb/lp0")
        command_thermal_printer.append("echo 'picture showing' > /dev/usb/lp0")
        command_thermal_printer.append("echo 'you not wearing' > /dev/usb/lp0")
        command_thermal_printer.append("echo 'a mask in public' > /dev/usb/lp0")
        command_thermal_printer.append("echo 'and pay the penalty' > /dev/usb/lp0")
        command_thermal_printer.append("echo 'enter your' > /dev/usb/lp0")
        command_thermal_printer.append("echo 'receipt number' > /dev/usb/lp0")
        command_thermal_printer.append("echo 'to this page:\\n' > /dev/usb/lp0")

        # Print each line via the serial port.
        for i in range(len(command_thermal_printer)):
            call([command_thermal_printer[i]], shell=True)
            sleep(0.5)
        # Print QR Code w/ Settings
        thermal_printer = printer.File("/dev/usb/lp0")
        thermal_printer.qr("http://" + self.server + "/Mask_Detection_Robot_Dashboard/Payments/?q=" + case_code, size=4, model=2)
        thermal_printer.cut()
        print("\nStatus => Printer Printed the Receipt!\n\n")

    def MASK_DETECTION(self):
        # Get the recently read block from the HuskyLens to detect the object ID.
        self.decodeHuskyLens(self.husky_lens.blocks())
        if(self.husky_lens_ID == 1):
            print("ID = " + str(self.husky_lens_ID) + " Status => Masked")
        elif(self.husky_lens_ID == 2):
            print("ID = " + str(self.husky_lens_ID) + " Status => UnMasked")
            # Generate the case code.
            self.generate_unique_case_code(15)
            # Capture people without a mask.
            self.capture_unmasked("640", "480", self.case_code, self.file_location)
            # Send the captured image to the server.
            self.send_captured_img_to_server(self.case_code, self.file_location)
            # Print the fine receipt with the penalty.
            self.print_fine_receipt(self.case_code, "$50", "3")
        elif(self.husky_lens_ID == 3):
            print("ID = " + str(self.husky_lens_ID) + " Status => Default")


# Define a new class object named 'robot':
robot = Mask_Detection_Robot("192.168.1.24", "/home/pi/Autonomous_Mask_Detection_Robot/captured/")

while True:
    # Get blocks from the HuskyLens:
    robot.MASK_DETECTION()
    sleep(2)
$(".controls").on("input", ".submit", function(){
	// Get the recent command.
	var direction = document.querySelector('input[name="direction"]:checked').value;
	var speed = document.querySelector('select[name="speed"]').value;
	// Send the recent command to the page to execute related Python script.
	$.ajax({
		url: "?direction=" + direction + "&speed=" + speed,
	    type: "GET",
	    //success: () => {alert("D: " + direction + "\nS: " + speed);}
	});
});


.PNG)
.PNG)
.PNG)
.PNG)


.PNG)
.PNG)