As you can see in my previous electronics projects, I am fond of developing web applications showing good congruence with Twilio's API, giving unique features to electronics projects via WhatsApp.
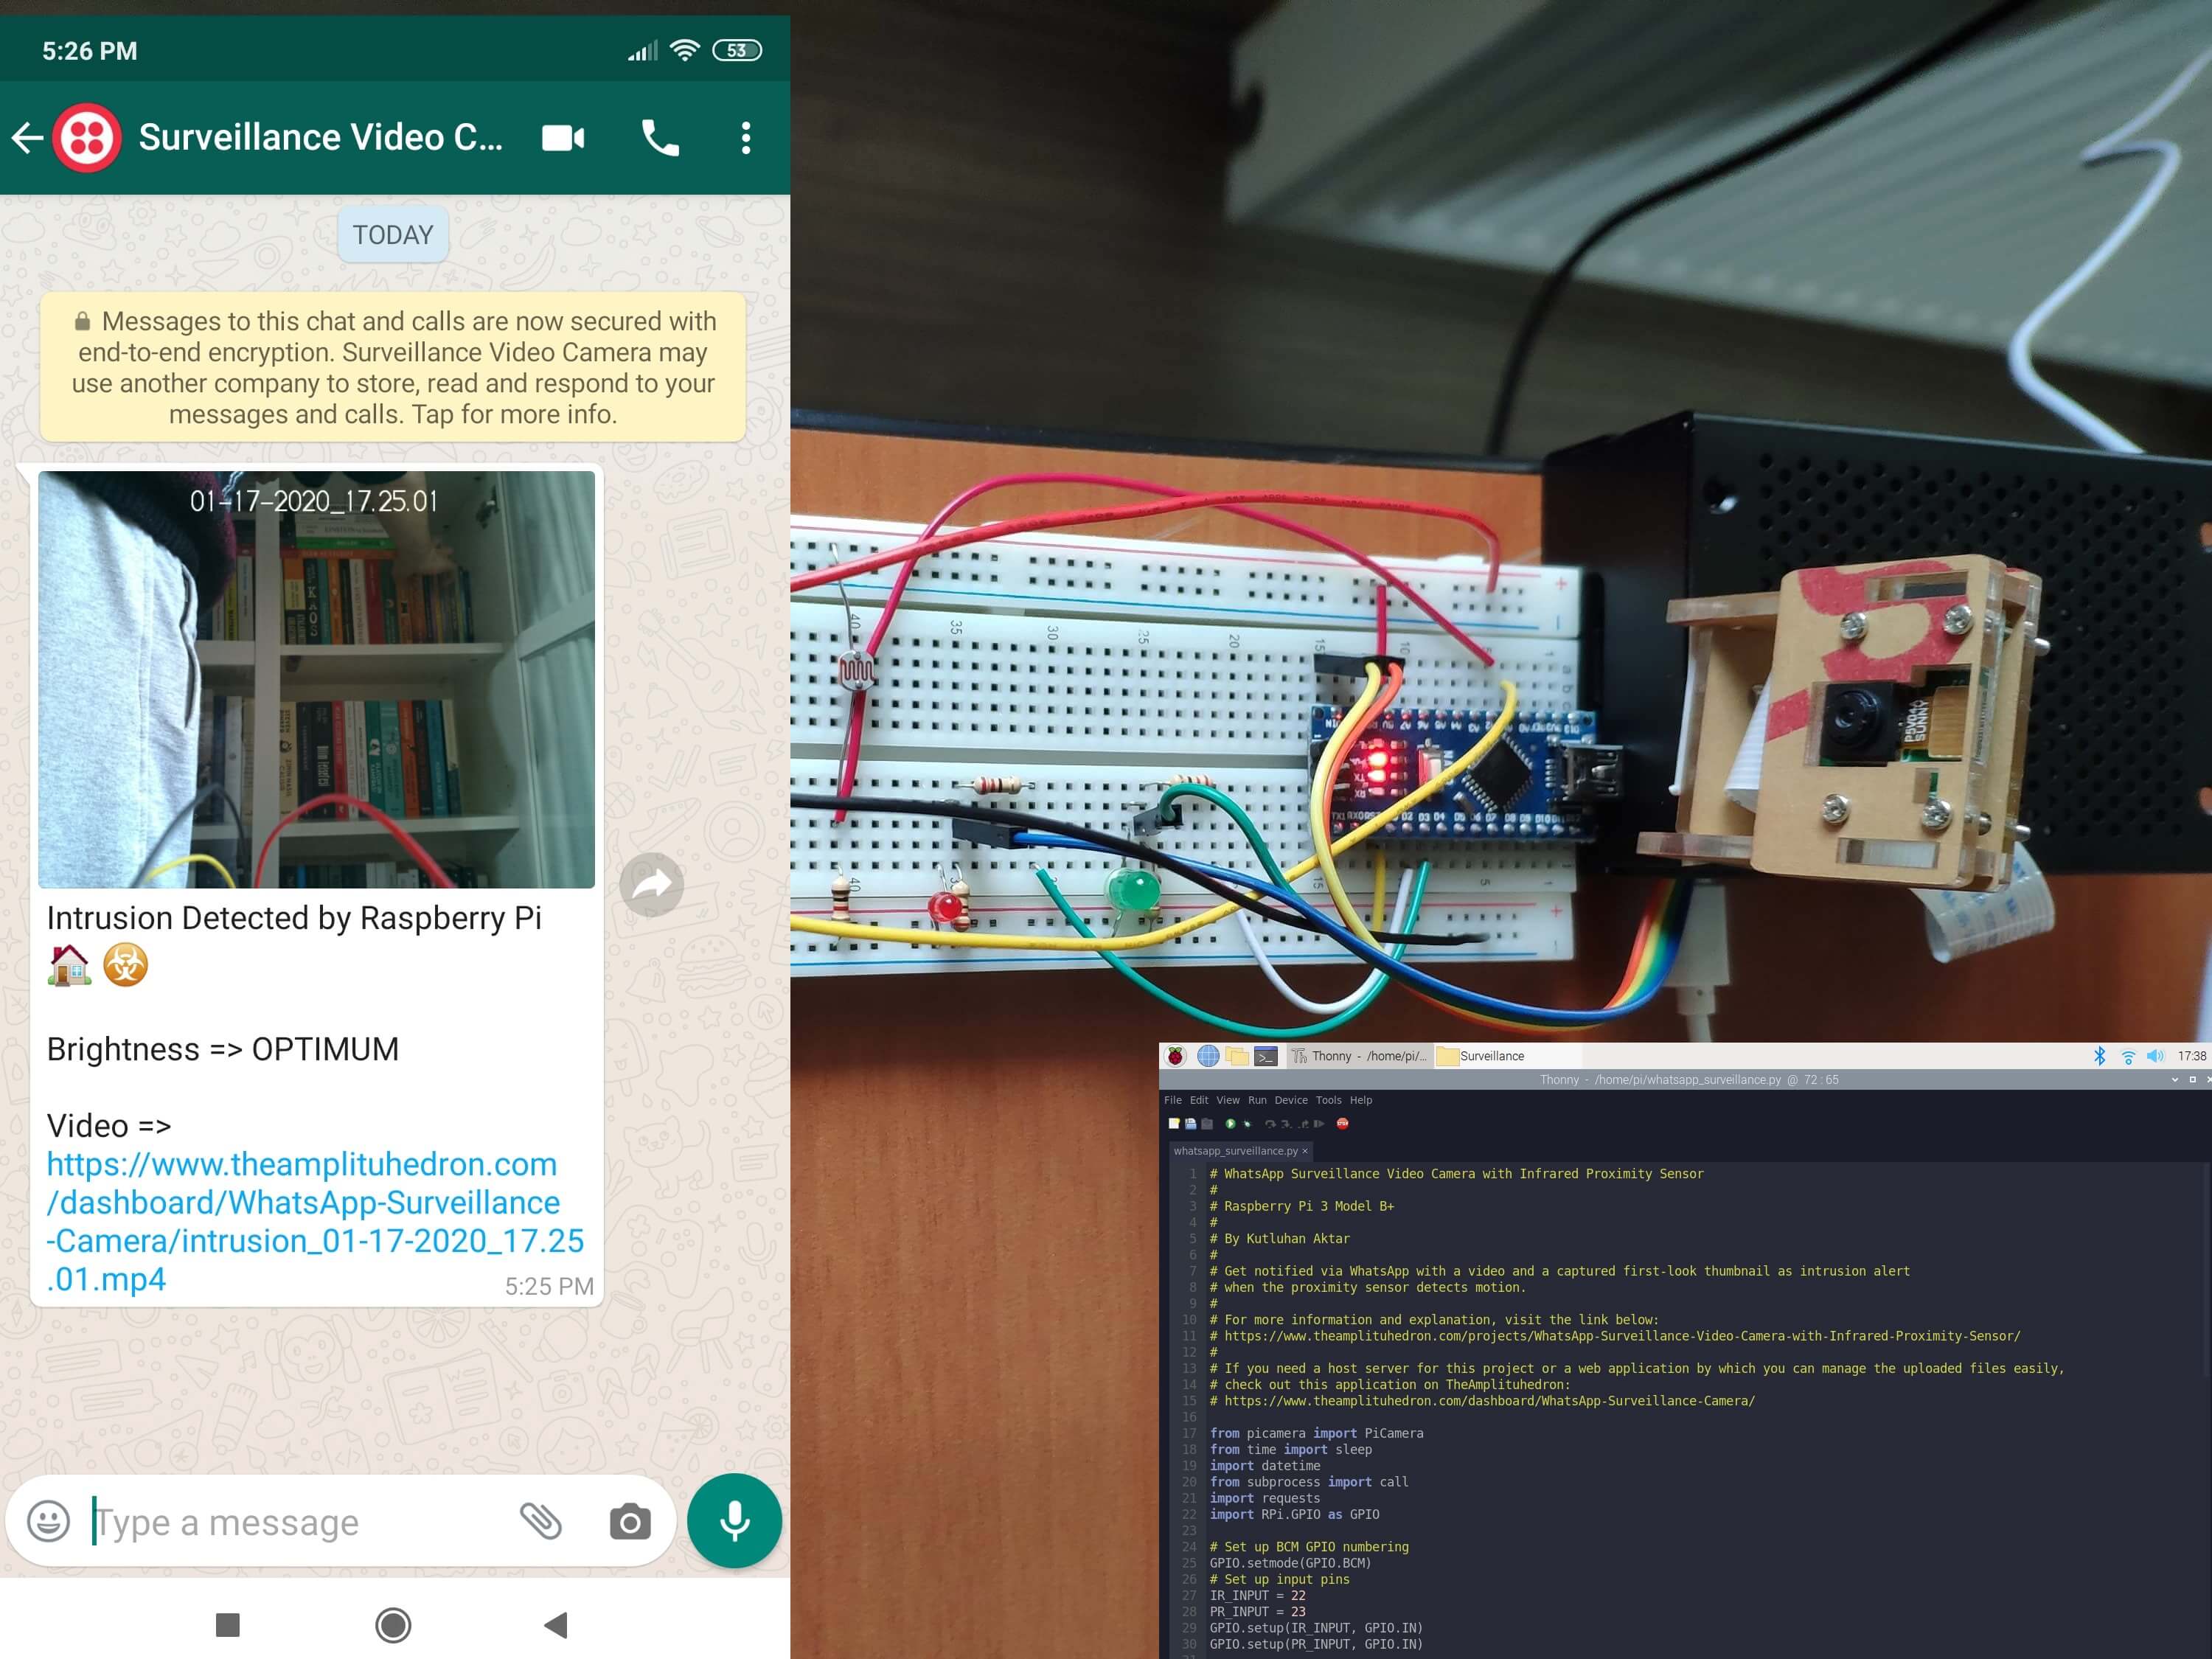
In this project, I wanted to create a surveillance video camera for my library, especially for one particular bookcase, to get notified when someone takes a book or organizes books differently. In that regard, I programmed a Raspberry Pi 3 Model B+ to capture the first-look thumbnail image and record a video with timestamp according to the data collated by Arduino Nano - motion and brightness. After collecting files and information from sensors, Raspberry Pi transfers them to the file_pathway webhook to be sent to the verified phone number as WhatsApp notification messages. In PHP, I provided the source code of the file_pathway webhook: save the file_pathway webhook on your server by entering your Twilio account settings - works stupendously even on the localhost.
Aside from this project, if you need a host server for the file_pathway webhook or a user interface on your server to manage the uploaded files easily, inspect this web application on TheAmplituhedron.
Some of the mentioned products and components in this project are sponsored by digitspace:
- Raspberry Pi 3B Micro-HDMI VGA Converter Cables | Inspect
- Raspberry Pi 5V3A Power Adapter USB Cable with Switch | Inspect
Figure - 36.1
Step 1: Twilio for WhatsApp
To send WhatsApp messages through Twilio's API, the only thing you need to do is to sign up for a Twilio Trial Account.
After signing up, with your SID and Auth Token, you can use Twilio's API for WhatsApp without any charge. As explained on Twilio, you need to join a shared phone number with your phone in order to verify your phone number and initiate WhatsApp template messages.
Important: In this project, we use Twilio's API to send WhatsApp notification messages in PHP and thus you do not need to change the default endpoint URL of your Twilio application in the Sandbox. In other words, you can use the file_pathway webhook even on the localhost.
For more information and learn how to activate your account, click the link below.
You can sign up to Twilio with my referral code here.
Figure - 36.2
Figure - 36.3
Figure - 36.3.1
Step 2: Developing the file_pathway webhook
Elicit files and information from Raspberry Pi to save them to the server - video, captured thumbnail image, and brightness.
Send the currently uploaded files to the verified phone number as intrusion alert via WhatsApp.
To manage that, you have to download Twilio PHP Helper Library in your server from here.
- If the uploaded file names are not empty, get the brightness value and file properties for each uploaded file - name, temporary name, size, and extension.
- Check whether the uploaded file extensions are in allowed formats and whether the uploaded file sizes exceed the data limit - 5MB.
- Define media URLs.
- Upload files to the server.
- Send the information of the uploaded files, including temporary names, to Raspberry Pi as the response message.
- Define the required properties by Twilio's API to send files and information to the verified phone number via WhatsApp - SID, AUTH_TOKEN, Verified Number, and Shared Number.
- Note: Refrain from adding '+' at the beginning of the phone numbers when entering them as send_data_to_WhatsApp() function parameters.
Figure - 36.4
Figure - 36.5
Figure - 36.6
Step 3: Setting Up Raspberry Pi
If you are a novice in programming with Raspberry Pi, you can find well-explained instructions and tutorials on official Raspberry Pi website.
To go to the official Raspberry Pi setting up tutorial, click here.
Figure - 36.7
- Update Raspberry Pi before running the terminal.
Figure - 36.8
Figure - 36.9
Step 4: Setting Up the Camera Module
To learn how to connect the Raspberry Pi Camera Module to your Raspberry Pi and take pictures, record video, and apply image effects, go to the official getting started with the camera module tutorial.
Figure - 36.10
Step 5: Programming Raspberry Pi to send files and information to the file_pathway webhook in Python
- Create a file named whatsapp_surveillance.py on your IDE.
Figure - 36.11
- Add the required libraries.
- Set up BCM GPIO numbering.
- Define input pins to get signals from Arduino Nano.
- Initiate the camera module with pre-defined settings.
- Annotate the date on the generated files as the timestamp.
- Capture an image as the thumbnail and record a 15 seconds video.
Note: Raspberry Pi records videos in the h264 format, but unfortunately, this format is not supported by WhatsApp. To convert video formats, download MP4Box as shown here.
- Convert the h264 format to the mp4 format using MP4Box as terminal command to open videos on WhatsApp.
- Define the file_pathway location to send the currently recorded video and data to the server. I used TheAmplituhedron to host the file_pathway webhook for my surveillance camera, change the URL as your file_pathway directory location on your server - e.g., https://www.theamplituhedron.com/dashboard/WhatsApp-Surveillance-Camera/file_pathway.php
- Define the files and the data parameters - video, captured image, and brightness.
Note: Download the requests library to make HTTP requests in Python as shown here.
- Make an HTTP Post Request to the file_pathway webhook to send information.
- Print the response sent by the file_pathway webhook.
- Initiate the loop.
- Get values from the input pins.
- If the proximity sensor detects motion, activate record_trespassing() and send_video_to_server() functions.
Figure - 36.12
Figure - 36.13
Figure - 36.14
Figure - 36.15
Code testing on the shell:
Figure - 36.16
Figure - 36.17
Figure - 36.18
Display the generated files(.h264, .jpg, .mp4) on Raspberry Pi:
Figure - 36.19
Figure - 36.20
Step 6: Reading Analog Sensors with Raspberry Pi using Arduino Nano
Unfortunately, Raspberry Pi is not capable of reading analog signals from analog sensors since it does not include a built-in ADC (Analog to Digital Converter) circuit.
You can either add an external ADC such as the MCP3008 to read analog signals with Raspberry Pi or use capacitors to read resistance values.
Nevertheless, in this project, I used an Arduino Nano to read analog signals from the analog sensors because I have lots of spare Arduino Nano boards at my disposal. Arduino Nano generates digital output values according to the thresholds for each sensor - GP2Y0A02YK0F Infrared Proximity Sensor and Photoresistor. If the predefined condition is met, it produces 1 (HIGH) as the digital output detected as the input value by Raspberry Pi.
Then, Raspberry Pi can read analog signals from sensors as the digital output values generated by Arduino Nano with the input pins to activate record_trespassing() and send_video_to_server() functions.
Do not forget to add voltage dividers for each input pin due to the voltage discrepancy between Raspberry Pi and Arduino Nano.
- Get brightness as percentage values from the photoresistor using the map() function.
- Get distance in centimeters from the GP2Y0A02YK0F Infrared Proximity Sensor using the sensor value in the datasheet - 0.0048828125 (5 / 1024).
- Define conditions to generate digital output values as signals detectable by Raspberry Pi.
Figure - 36.21
Figure - 36.22
Features
1-) Check whether the brightness is optimum or low for the camera module using the photoresistor.
Figure - 36.23
2-) Detect intruders using the GP2Y0A02YK0F Infrared Proximity Sensor.
Figure - 36.24
3-) If the proximity sensor detects motion, capture a first-look thumbnail image and record a 15 seconds video.
Figure - 36.25
4-) Send the captured image(jpg), the video(mp4), and the brightness value as intrusion alert to the verified phone number via WhatsApp.
Figure - 36.26
Figure - 36.27
Figure - 36.28
Figure - 36.29
Connections
Set up Raspberry Pi and its peripherals.
Slide
Assembly the camera module holder.
Slide
Attach Arduino Nano, sensors, and components on the breadboard.
Slide
Affix the camera module and the breadboard to the Raspberry Pi board case. And, connect the Raspberry Pi GPIO input pins to the Arduino Nano digital output pins as shown on the schematic.
Slide
Videos
Testing Code on Shell
Intrusion Alert on WhatsApp
Video Recorded by Raspberry Pi | intrusion_01-17-2020_17.25.01
# WhatsApp Surveillance Video Camera with Infrared Proximity Sensor
#
# Raspberry Pi 3 Model B+
#
# By Kutluhan Aktar
#
# Get notified via WhatsApp with a video and a captured first-look thumbnail as intrusion alert
# when the proximity sensor detects motion.
#
# For more information and explanation, visit the link below:
# https://www.theamplituhedron.com/projects/WhatsApp-Surveillance-Video-Camera-with-Infrared-Proximity-Sensor/
#
# If you need a host server for this project or a web application by which you can manage the uploaded files easily,
# check out this application on TheAmplituhedron:
# https://www.theamplituhedron.com/dashboard/WhatsApp-Surveillance-Camera/

from picamera import PiCamera
from time import sleep
import datetime
from subprocess import call
import requests
import RPi.GPIO as GPIO

# Set up BCM GPIO numbering
GPIO.setmode(GPIO.BCM)
# Set up input pins
IR_INPUT = 22
PR_INPUT = 23
GPIO.setup(IR_INPUT, GPIO.IN)
GPIO.setup(PR_INPUT, GPIO.IN)

# Define functions:

# Initiate the camera module with pre-defined setttings.
camera = PiCamera()
camera.resolution = (640, 480)
camera.framerate = 15

def record_trespassing(file_h264, file_mp4, file_capture, text):
    # Add date as timestamp on the generated files.
    camera.annotate_text = text
    # Capture an image as the thumbnail.
    sleep(2)
    camera.capture(file_capture)
    print("\r\nImage Captured! \r\n")
    # Record a 15 seconds video.
    camera.start_recording(file_h264)
    sleep(20)
    camera.stop_recording()
    print("Rasp_Pi => Video Recorded! \r\n")
    # Convert the h224 format to the mp4 format.
    command = "MP4Box -add " + file_h264 + " " + file_mp4
    call([command], shell=True)
    print("\r\nRasp_Pi => Video Converted! \r\n")

def send_video_to_server(file_mp4, file_capture, brightness):
    # Define the file path to send the currently recorded video to the server.
    url = 'https://www.theamplituhedron.com/dashboard/WhatsApp-Surveillance-Camera/file_pathway.php'
    files = {'rasp_video': open(file_mp4, 'rb'), 'rasp_capture': open(file_capture, 'rb')}
    data = {'brightness': brightness}
    # Make an HTTP Post Request to the server.
    request = requests.post(url, files=files, data=data)
    # Print the response from the server.
    print ("Rasp_Pi => Files Transferred! \r\n")
    print(request.text + "\r\n")

# Initiate the loop.
while True:
    print("Waiting...")

    if GPIO.input(IR_INPUT):
        brightness = "LOW" if GPIO.input(PR_INPUT) else "OPTIMUM"
        # Get the current date as the timestamp to generate unique file names.
        date = datetime.datetime.now().strftime('%m-%d-%Y_%H.%M.%S')
        capture_img = '/home/pi/Surveillance/intrusion_' + date + '.jpg'
        video_h264 = '/home/pi/Surveillance/intrusion_' + date + '.h264'
        video_mp4 = '/home/pi/Surveillance/intrusion_' + date + '.mp4'
        # Create and send files:
        record_trespassing(video_h264, video_mp4, capture_img, date)
        send_video_to_server(video_mp4, capture_img, brightness)

    sleep(1)
         ////////////////////////////////////////////////////
        //      WhatsApp Surveillance Video Camera        //
       //        with Infrared Proximity Sensor          //
      //           -------------------------            //
     //                 Arduino Nano                   //
    //               by Kutluhan Aktar                //
   //                                                //
  ////////////////////////////////////////////////////

// Get notified via WhatsApp with a video and a captured first-look thumbnail as intrusion alert when the proximity sensor detects motion.
//
// This code is only for reading analog inputs in order to pass the values to Raspberry Pi.
//
// For more information, visit the project page:
// https://www.theamplituhedron.com/projects/WhatsApp-Surveillance-Video-Camera-with-Infrared-Proximity-Sensor/
//
// If you need a host server for this project or a web application by which you can manage the uploaded files easily, check out this application on TheAmplituhedron:
// https://www.theamplituhedron.com/dashboard/WhatsApp-Surveillance-Camera/
//
// Connections
// Arduino Nano :
//                                Sharp-GP2Y0A02YK0F IR Sensor
// GND --------------------------- GND
// 5V  --------------------------- +
// A0  --------------------------- Signal
//
//                                Photoresistor
// A1  ---------------------------
//                                IR_OUTPUT_LED
// D3  ---------------------------
//                                PR_OUTPUT_LED
// D4  ---------------------------


// Define sensor pins.
#define IR_PIN A0
#define PR_PIN A1
#define IR_OUTPUT 3
#define PR_OUTPUT 4

// Define data holders.
int distance, brightness;

void setup() {
  Serial.begin(9600);

  pinMode(IR_OUTPUT, OUTPUT);
  pinMode(PR_OUTPUT, OUTPUT);

}

void loop() {
  // Get brightness.
  brightness = map(analogRead(PR_PIN), 0, 1023, 0, 100);

  // Get distance from Sharp-GP2Y0A02YK0F IR Sensor.
  float volts = analogRead(IR_PIN) * 0.0048828125; // Sensor Value: (5 / 1024)
  distance = 13 * pow(volts, -1); //from datasheet graph
  delay(100);

  Serial.println("Brightness: " + String(brightness) + "%\n\n");
  Serial.println("Distance: " + String(distance) + "cm");

  // Send signal to Raspberry Pi.
  if(distance < 9){ digitalWrite(IR_OUTPUT, HIGH); }else{ digitalWrite(IR_OUTPUT, LOW); }

  if(brightness < 10){digitalWrite(PR_OUTPUT, HIGH); }else{ digitalWrite(PR_OUTPUT, LOW); }
}