Advertisement:
Read Later
Although there are myriads of web and mobile applications you can implement on your electronics projects pertaining to IoT - Internet of Things - did you know that you can utilize WhatsApp, rather than usual applications for web communication, to make your electronics projects more intriguing and exciting?
Oddly enough, WhatsApp Business API does not allow users to include WhatsApp features on their personal projects unless users register their personal phone numbers to the API. Nevertheless, luckily, we can use the WhatsApp Business API with the shared phone numbers provided by Twilio without struggling to register our personal phone numbers to the API. Even if you are a novice in developing IoT projects, it is simple to learn Twilio's API for WhatsApp to make your electronics projects WhatsApp-enabled by taking the following steps below.
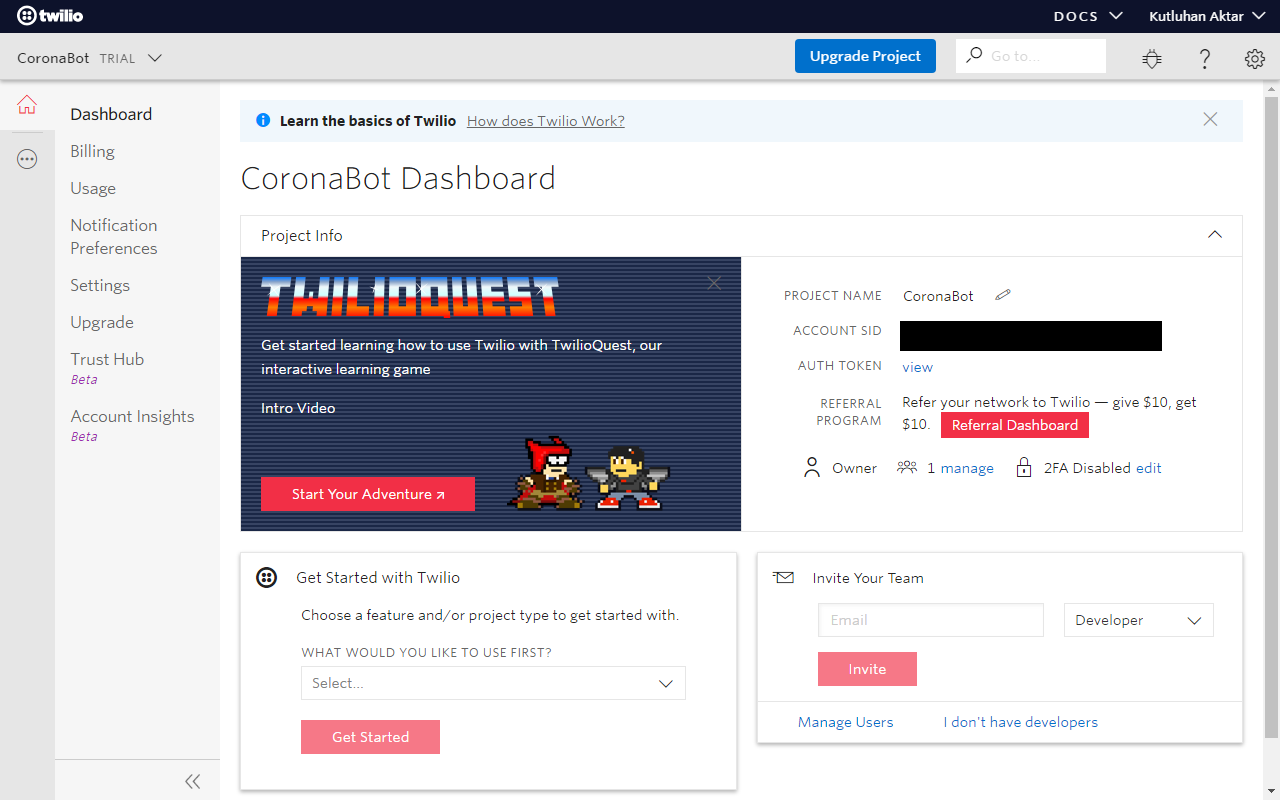
To be able to use Twilio's API (Programmable Messaging API) for WhatsApp, you have to create a trial (free) account on Twilio. You can click here to create a trial account on Twilio with my referral code :)
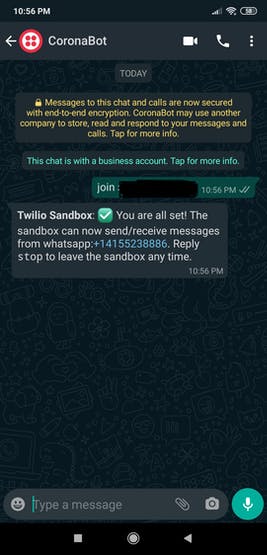
After signing up - with your Account SID and Auth Token - you can use Twilio's API for WhatsApp without any charge. As explained in tutorials on Twilio, you need to join a shared phone number with your authentication code in order to verify your phone number and initiate Twilio's API for WhatsApp.
You can get more information about Twilio's Programmable Messaging API for WhatsApp from here:
https://www.twilio.com/whatsapp
What you can do with the Twilio for WhatsApp
Follow the steps below to add a new application on your Twilio account. You can inspect the electronics project in which I created the depicted application in the subsequent section.
1) After signing up for Twilio, open your Dashboard and click on the menu to create a new application.
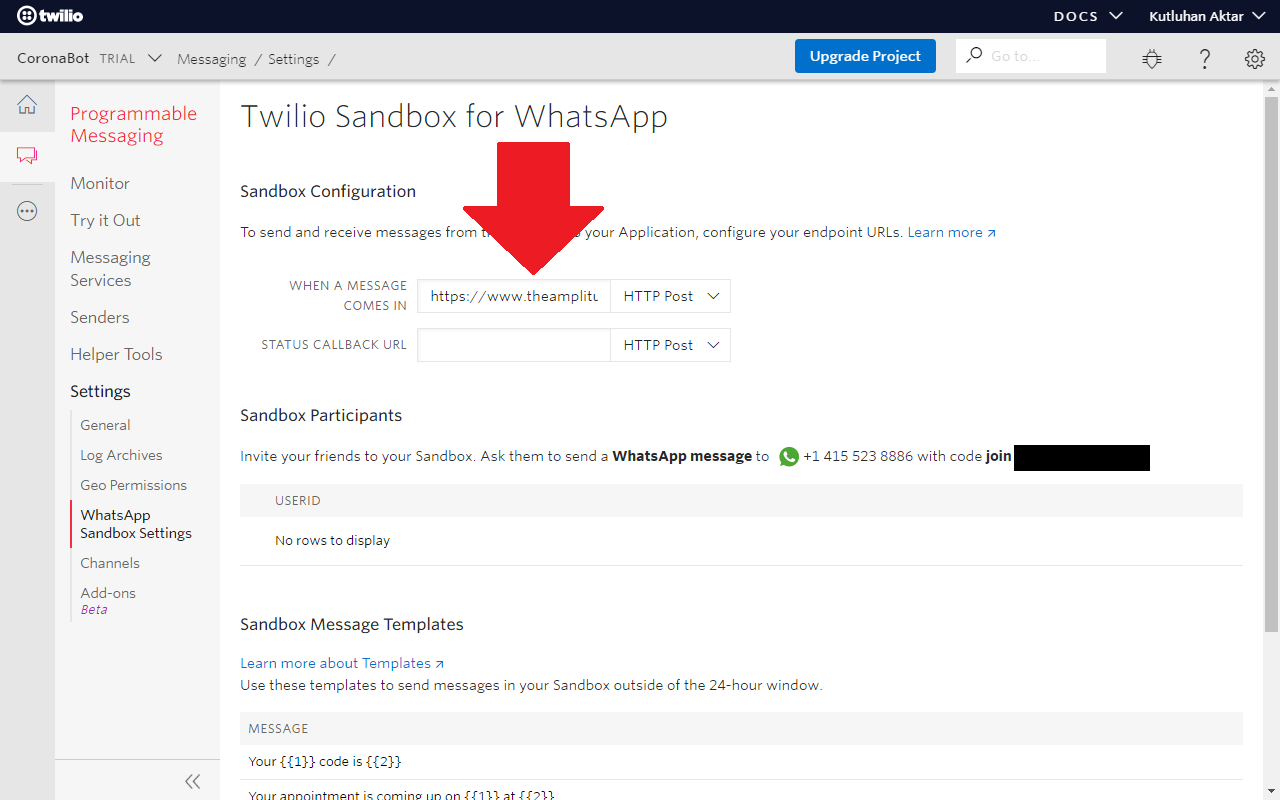
2) Then go to the SandBox to get the verification code.
https://www.twilio.com/console/sms/whatsapp/sandbox
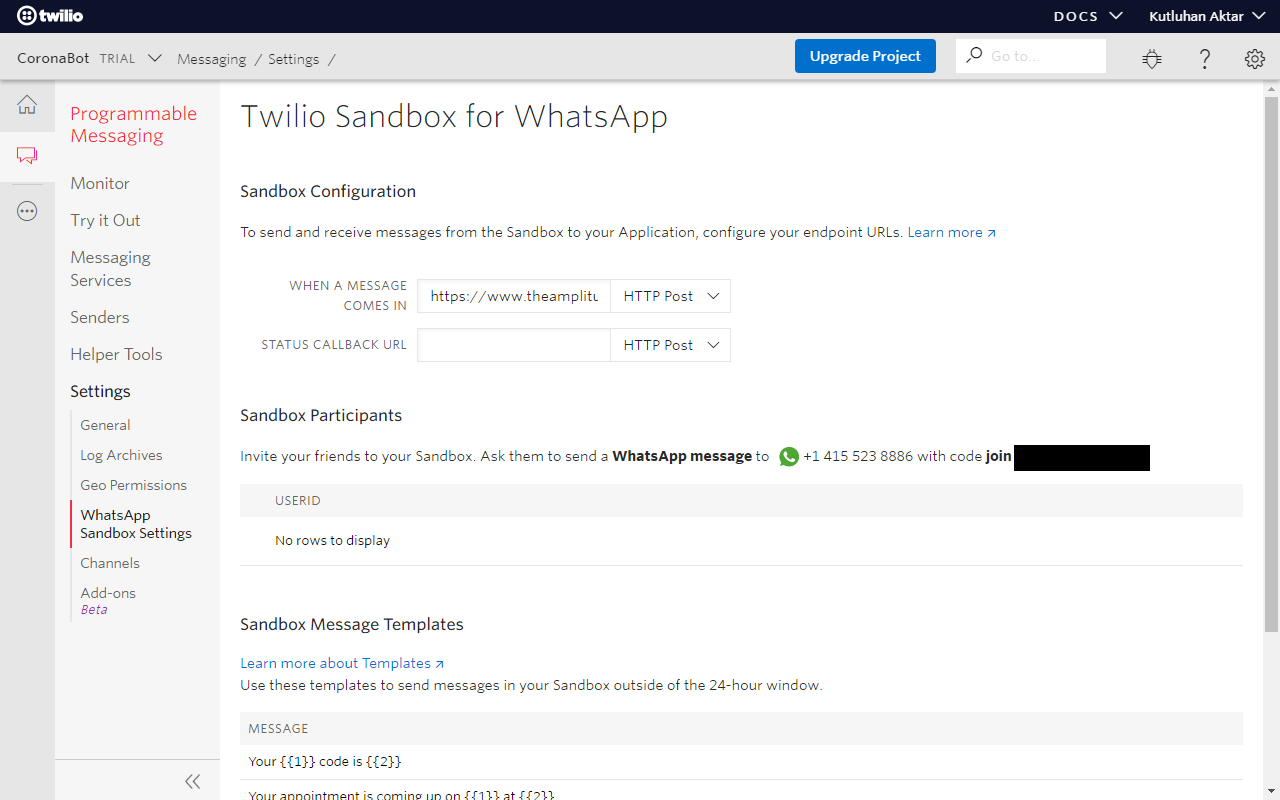
3) As explained in the SandBox, connect your phone number to the shared phone number provided by Twilio by using the verification code.
As you can see on Twilio's Programmable Messaging API instructions page, Twilio lets users utilize the mentioned API in the following programming languages:
For each language, you have to install provided helper libraries on your server to be able to send and receive WhatsApp messages via Twilio. In this tutorial, I will discuss building with Twilio's Helper Library for PHP. But, you can get more information about how to make my coding in PHP compatible with other provided languages here:
https://www.twilio.com/docs/libraries
To download Twilio's Helper Library for PHP on your server, click here:
https://www.twilio.com/docs/libraries/php
Do not forget that you need to copy your Account SID and Auth_Token from the console that of your application.
https://www.twilio.com/console
Receiving WhatsApp messages from the server
After pairing your phone number - TO - with the shared phone number - FROM - provided by Twilio, you do not need to take any further steps but hosting this code file - the webhook - on your server.
The code file belongs to my previous project: you can get more information about it in the subsequent section.
<?php

require_once '/path/to/vendor/autoload.php';

use Twilio\Rest\Client;

if(isset($_GET["id"]) && isset($_GET["token"]) && isset($_GET["body"]) && isset($_GET["from"]) && isset($_GET["to"])){
	$sid    = $_GET["id"];
    $token  = $_GET["token"];
    $twilio = new Client($sid, $token);

	$to = $_GET['to'];
	$from = $_GET['from'];
	$body = $_GET['body'];

	$message = $twilio->messages
                  ->create("whatsapp:+".$to,
                           array(
                               "from" => "whatsapp:+".$from,
                               "body" => $body
                           )
                  );
    echo 'Message Send...';

}else{
	echo "There is no request yet! Copy this link(webhook) and make an HTTP Get Request from your device.";
}

?>
Transferring WhatsApp messages to the server
After connecting your phone number to the shared phone number provided by Twilio:
In order to send messages to your server, you need to change the WHEN A MESSAGE COMES IN default address in your SandBox with the location of where you host the webhook - i.e., the code file below - in your server.
The code file belongs to my previous project: you can get more information about it in the subsequent section.
<?php

require_once "/path/to/vendor";

use Twilio\TwiML\MessagingResponse;

$response = new MessagingResponse();

/*
Get Variables from MySQL Server

And save variables to an array as shown below.

MySQL -> $data

SELECT * FROM...

.
.
.

*/

$data = array(
	"DATA_1" => "test",
	"DATA_2" => "test",
	"DATA_3" => "test",
	"DATA_4" => "test",
	"DATA_5" => "test",
	"DATA_6" => "test",
	"COMMAND" => "test"
	);

if(isset($_GET['Data_1']) && isset($_GET['Data_2']) && isset($_GET['Data_3']) && isset($_GET['Data_4']) && isset($_GET['Data_5']) && isset($_GET['Data_6'])){
	/*
	If all variables are sent by NodeMCU, save them to the MySQL Database and print the pre-defined command on the database as response to send the command to NodeMCU.

	$new = array(
		"DATA_1" => strip_tags(mysqli_real_escape_string($this->conn, $_GET['Data_1'])),
		"DATA_2" => strip_tags(mysqli_real_escape_string($this->conn, $_GET['Data_2']),
		"DATA_3" => strip_tags(mysqli_real_escape_string($this->conn, $_GET['Data_3'])),
		"DATA_4" => strip_tags(mysqli_real_escape_string($this->conn, $_GET['Data_4'])),
		"DATA_5" => strip_tags(mysqli_real_escape_string($this->conn, $_GET['Data_5'])),
		"DATA_6" => strip_tags(mysqli_real_escape_string($this->conn, $_GET['Data_6']))
	);

	UPDATE `` SET ...

	.
	.
	.

	*/

	echo $data['COMMAND'];
	exit();
}else{
	/* If a message is transferred by a verified phone to this application, get the body. */
	if(isset($_POST['Body'])){
		switch($_POST['Body']){
		case "Temperature":
		$response->message("Temperature -> ".$data['DATA_1']);
		break;
		case 'Pressure':
		$response->message('Pressure -> '.$data['DATA_2']);
		break;
		case "Altitude":
		$response->message('Altitude -> '.$data['DATA_3']);
		break;
		case 'Date':
		$response->message('Date -> '.$data['DATA_4']);
		break;
		case 'Time':
		$response->message('Time -> '.$data['DATA_5']);
		break;
		case 'Latitude and Longitude':
		$response->message('Latitude and Longitude -> '.$data['DATA_6']);
		break;
		case 'Map Location':
		$response->message('https://www.google.com/maps/search/?api=1&query='.$data['DATA_6']);
		break;
		case 'Go Straight':
		/* Save Command to the database. */
		$response->message("Command is transferred to the device.");
		break;
		case 'Go Back':
		/* Save Command to the database. */
		$response->message("Command is transferred to the device.");
		break;
		case 'Go Right':
		/* Save Command to the database. */
		$response->message("Command is transferred to the device.");
		break;
		case 'Go Left':
		/* Save Command to the database. */
		$response->message("Command is transferred to the device.");
		break;
		case 'Halt':
		/* Save Command to the database. */
		$response->message("Command is transferred to the device.");
		break;
		case 'Programmed by':
		$response->message('This application is programmed by Kutluhan Aktar and provided by TheAmplituhedron. For more information, please click the link:'."\n".' https://www.theamplituhedron.com/projects/WhatsApp-Mapping-and-Weather-Forecast-Chat-Bot/');
		break;
		case 'About':
		$response->message('https://www.theamplituhedron.com/about/');
		break;
		case 'How r u?':
		$response->message("Thanks for asking."."\n"."Data processing is running just fine ");
		break;
		case 'Further information':
		$response->message('https://www.theamplituhedron.com/dashboard/WhatsApp-Two-Way-Connection-Hub/');
		break;
		case 'Contact':
		$response->message('You can contact me directly at info@theamplituhedron.com');
		break;
		case 'Spidey':
		$message = $response->message('');
        $message->body('Media Feature Testing.'."\n".'Spider-Man');
        $message->media('https://www.theamplituhedron.com/dashboard/WhatsApp-Two-Way-Connection-Hub/Spider.jpg');
		break;
		case 'Batman':
		$message = $response->message('');
        $message->body('Media Feature Testing.'."\n".'Batman');
        $message->media('https://www.theamplituhedron.com/dashboard/WhatsApp-Two-Way-Connection-Hub/Batman.jpg');
		break;
		case 'Help':
		$response->message('Integrated Keywords:'."\n\n".' Temperature '."\n".' Pressure '."\n".' Altitude '."\n".' Date '."\n".' Time '."\n".' Latitude and Longitude '."\n".' Map Location '."\n".' Go Straight '."\n".' Go Back '."\n".' Go Right '."\n".' Go Left '."\n".' Halt '."\n".' Programmed by '."\n".' About '."\n".' How r u? '."\n".' Further information '."\n".' Contact '."\n".' Spidey '."\n".' Batman '."\n".' Help');
		break;
		default:
		$response->message('Not defined!'."\n".'You have entered: '.$_POST['Body']."\n".'Please enter Help to view all keywords.');

	}
		print $response;

	}else{
		echo 'Nothing Detected! Check the connection!';
		exit();
	}
}

?>
I created various IoT projects in which I utilized Twilio's API for WhatsApp to elicit and send information via WhatsApp messages. I hosted webhooks for the projects in the localhost - Windows and Raspberry Pi. From the project tutorials, you can get more information about server settings on Raspberry Pi and Windows (w/ XAMPP).
As follows, I presented some of my projects to show you what you can achieve with WhatsApp as a developer and maker :)
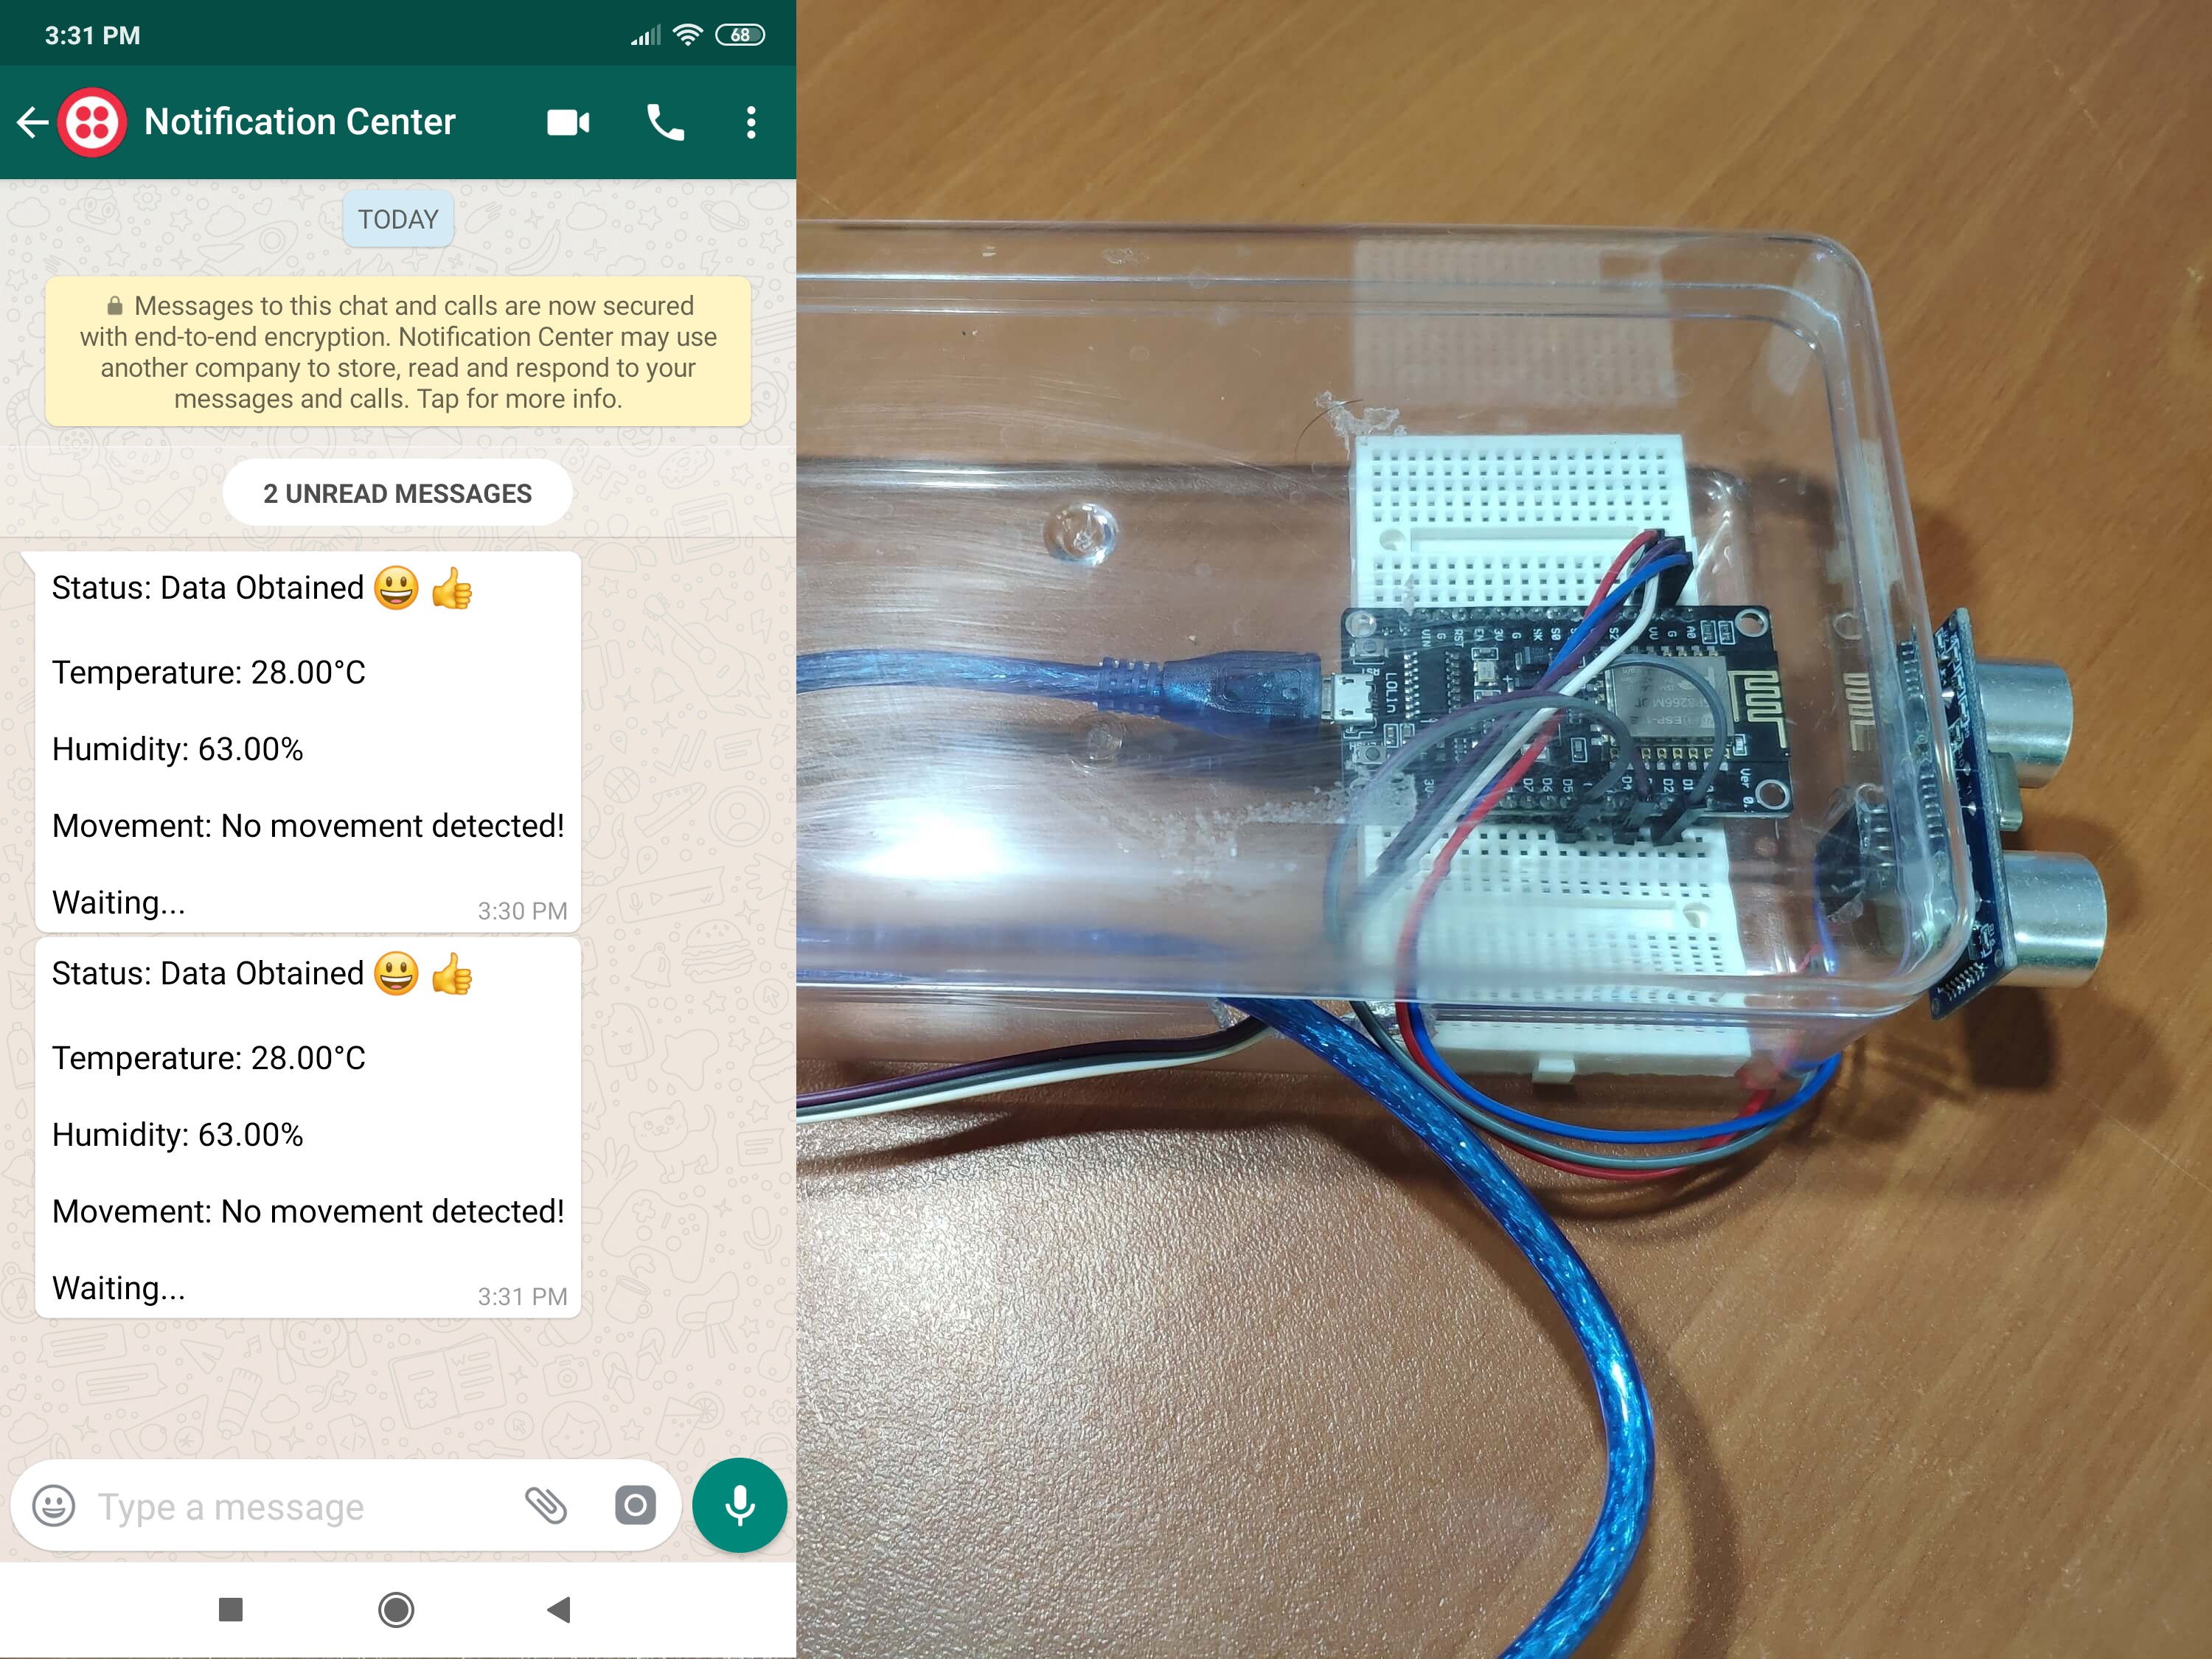
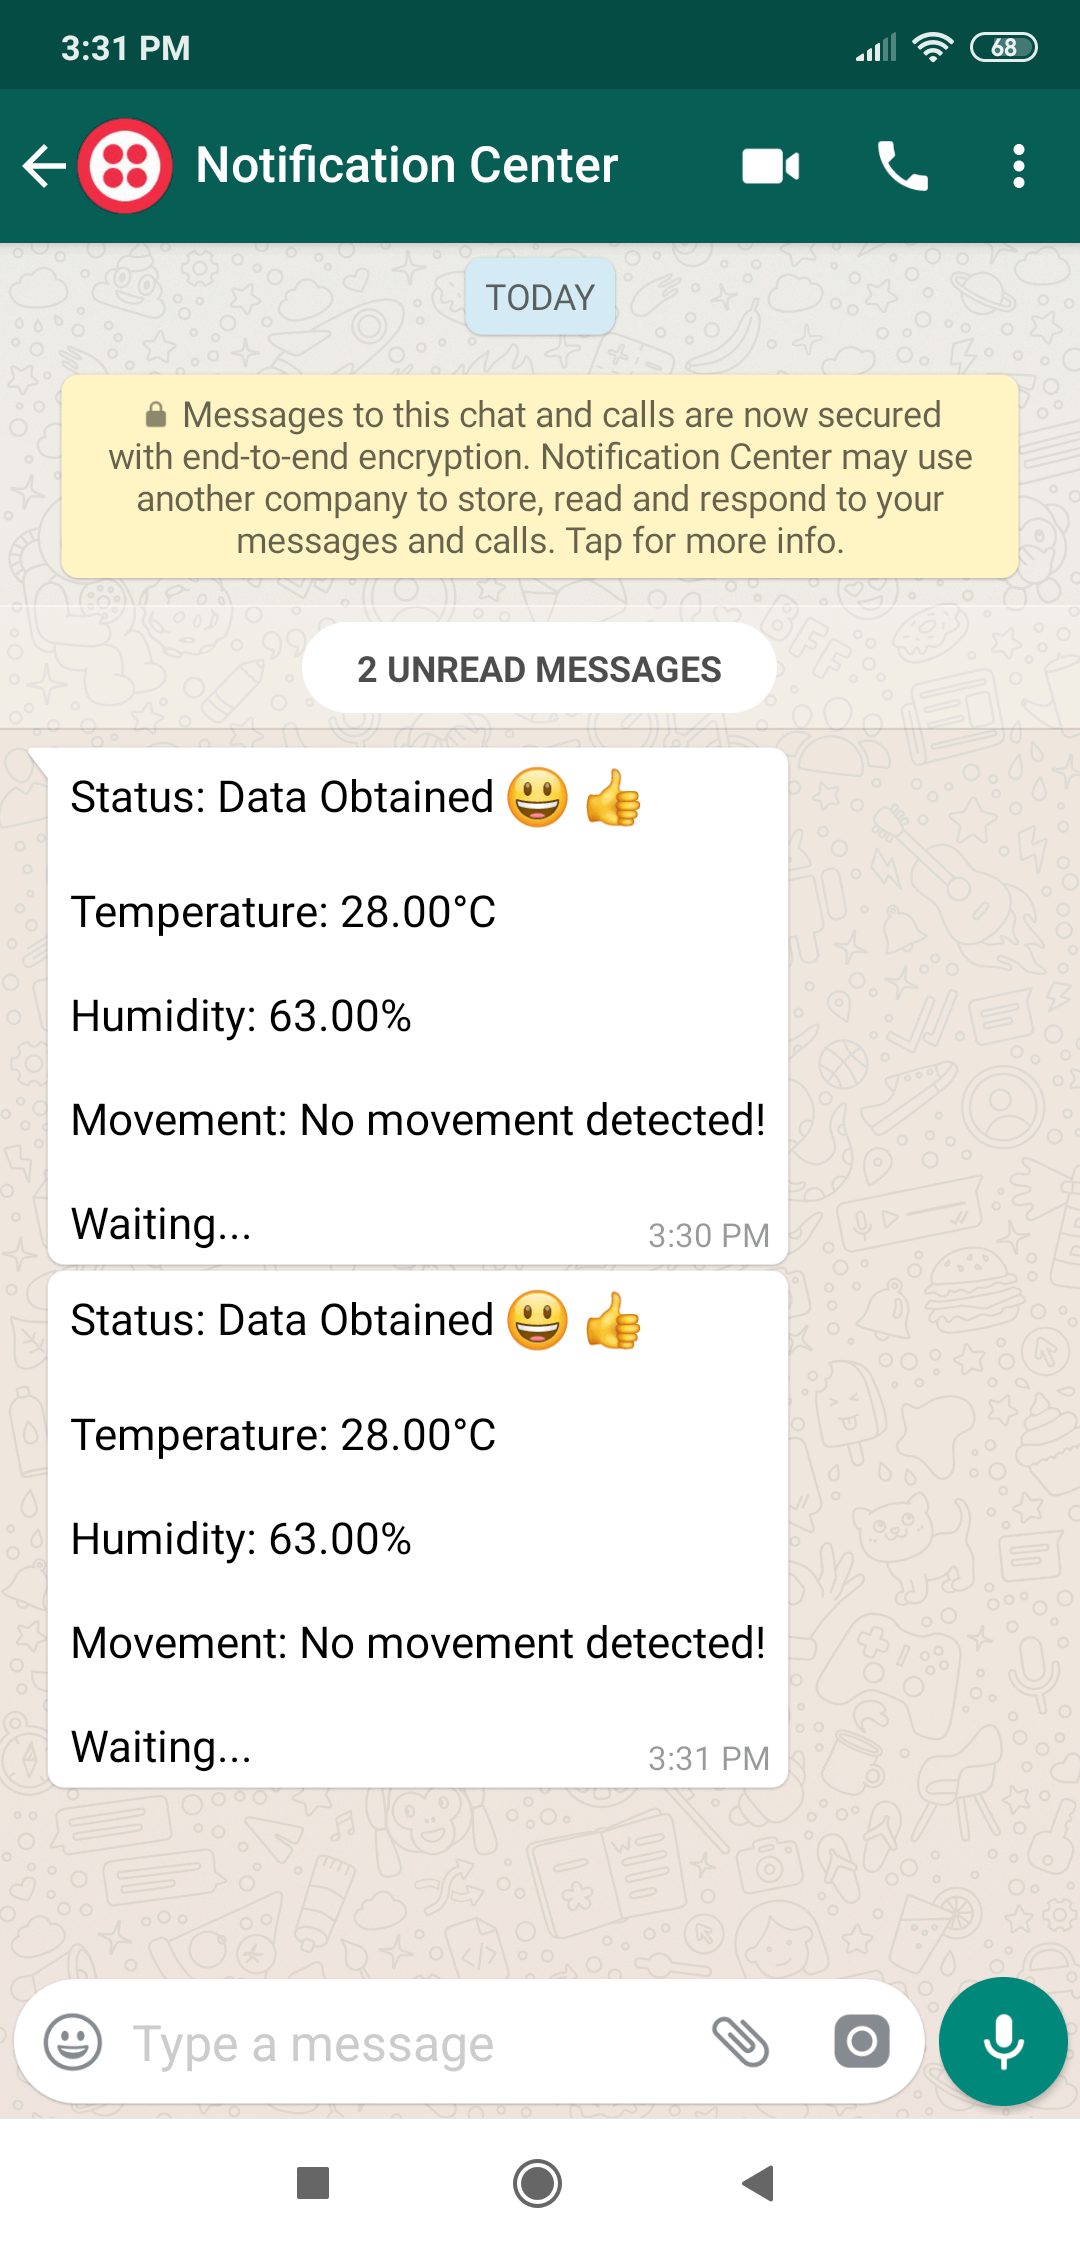
WhatsApp Notification Station | NodeMCU ESP8266 [ESP-12E]
In a nutshell:
Send temperature, humidity and movement information as WhatsApp messages to your phone every half-minute through a webhook via Twilio API.
I wanted to obtain three variables as WhatsApp messages in every half minute - temperature, humidity, and movement. In other words, WhatsApp Notification Station sends these three variables to the webhook to be combined as a template WhatsApp message every half minute. I used a DHT11 Temperature and Humidity Sensor to elicit temperature and humidity at the same time, and an HC-SR04 Ultrasonic Sensor to detect any movement (trespassing).
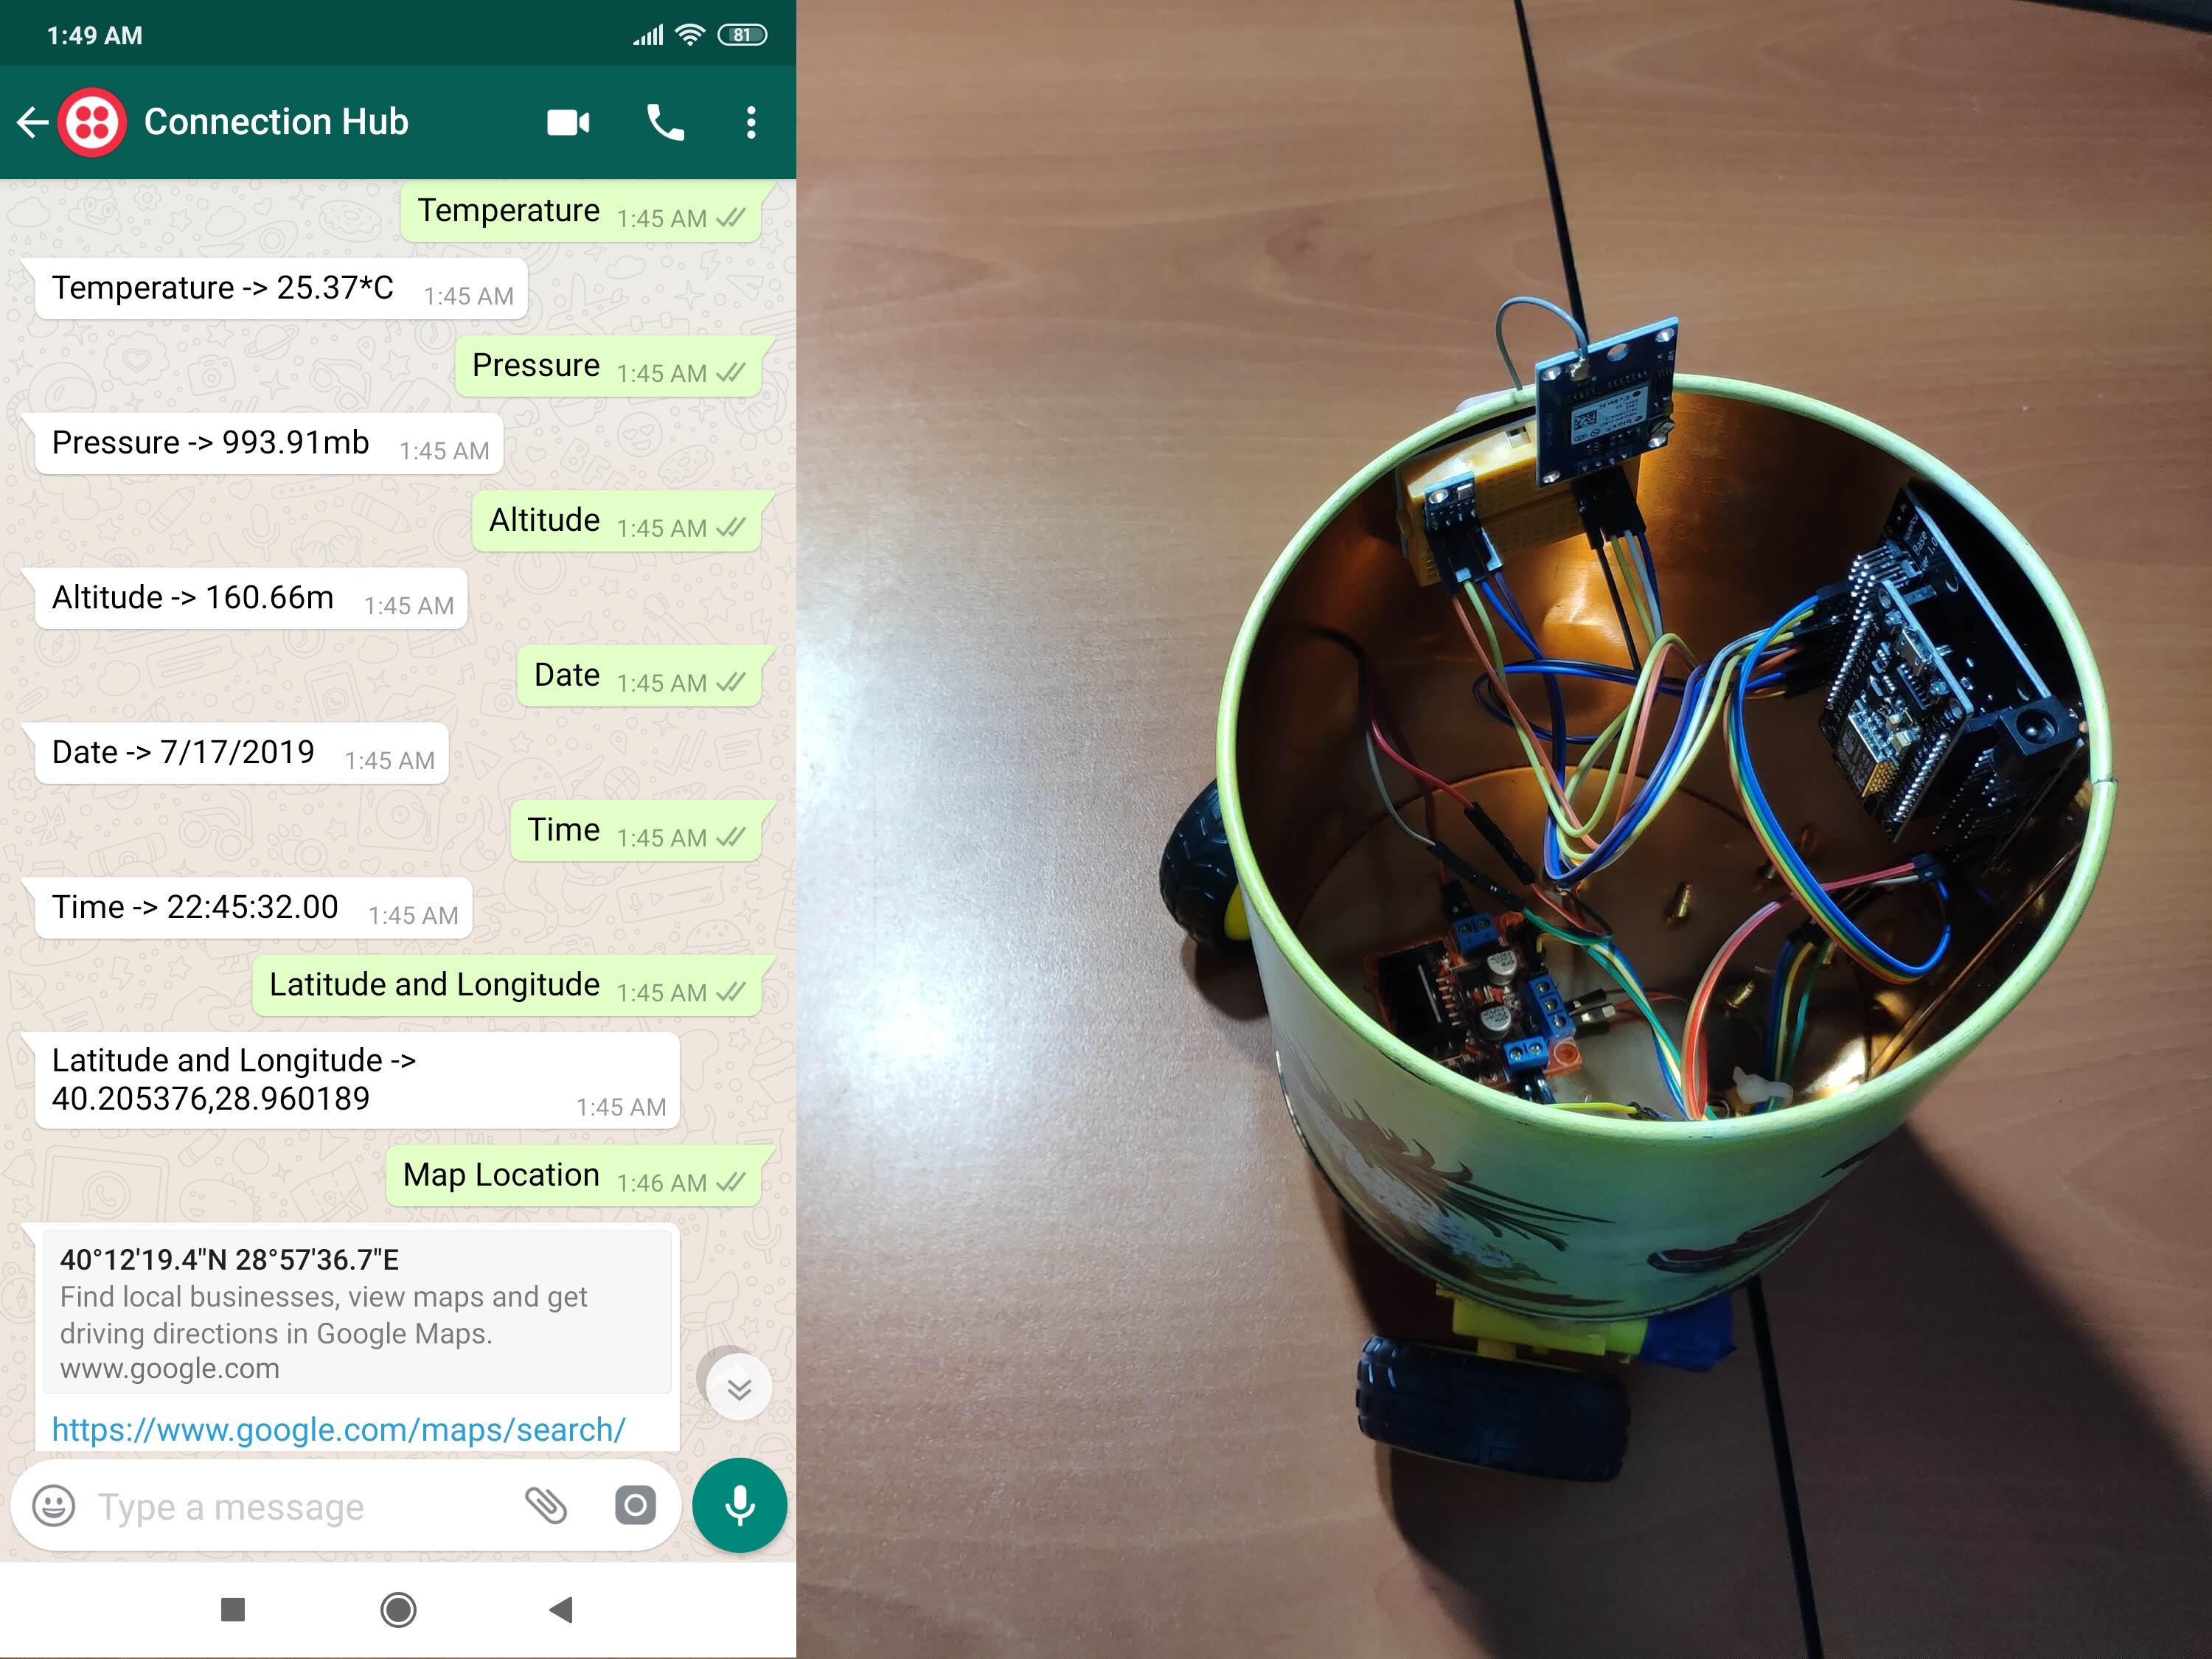
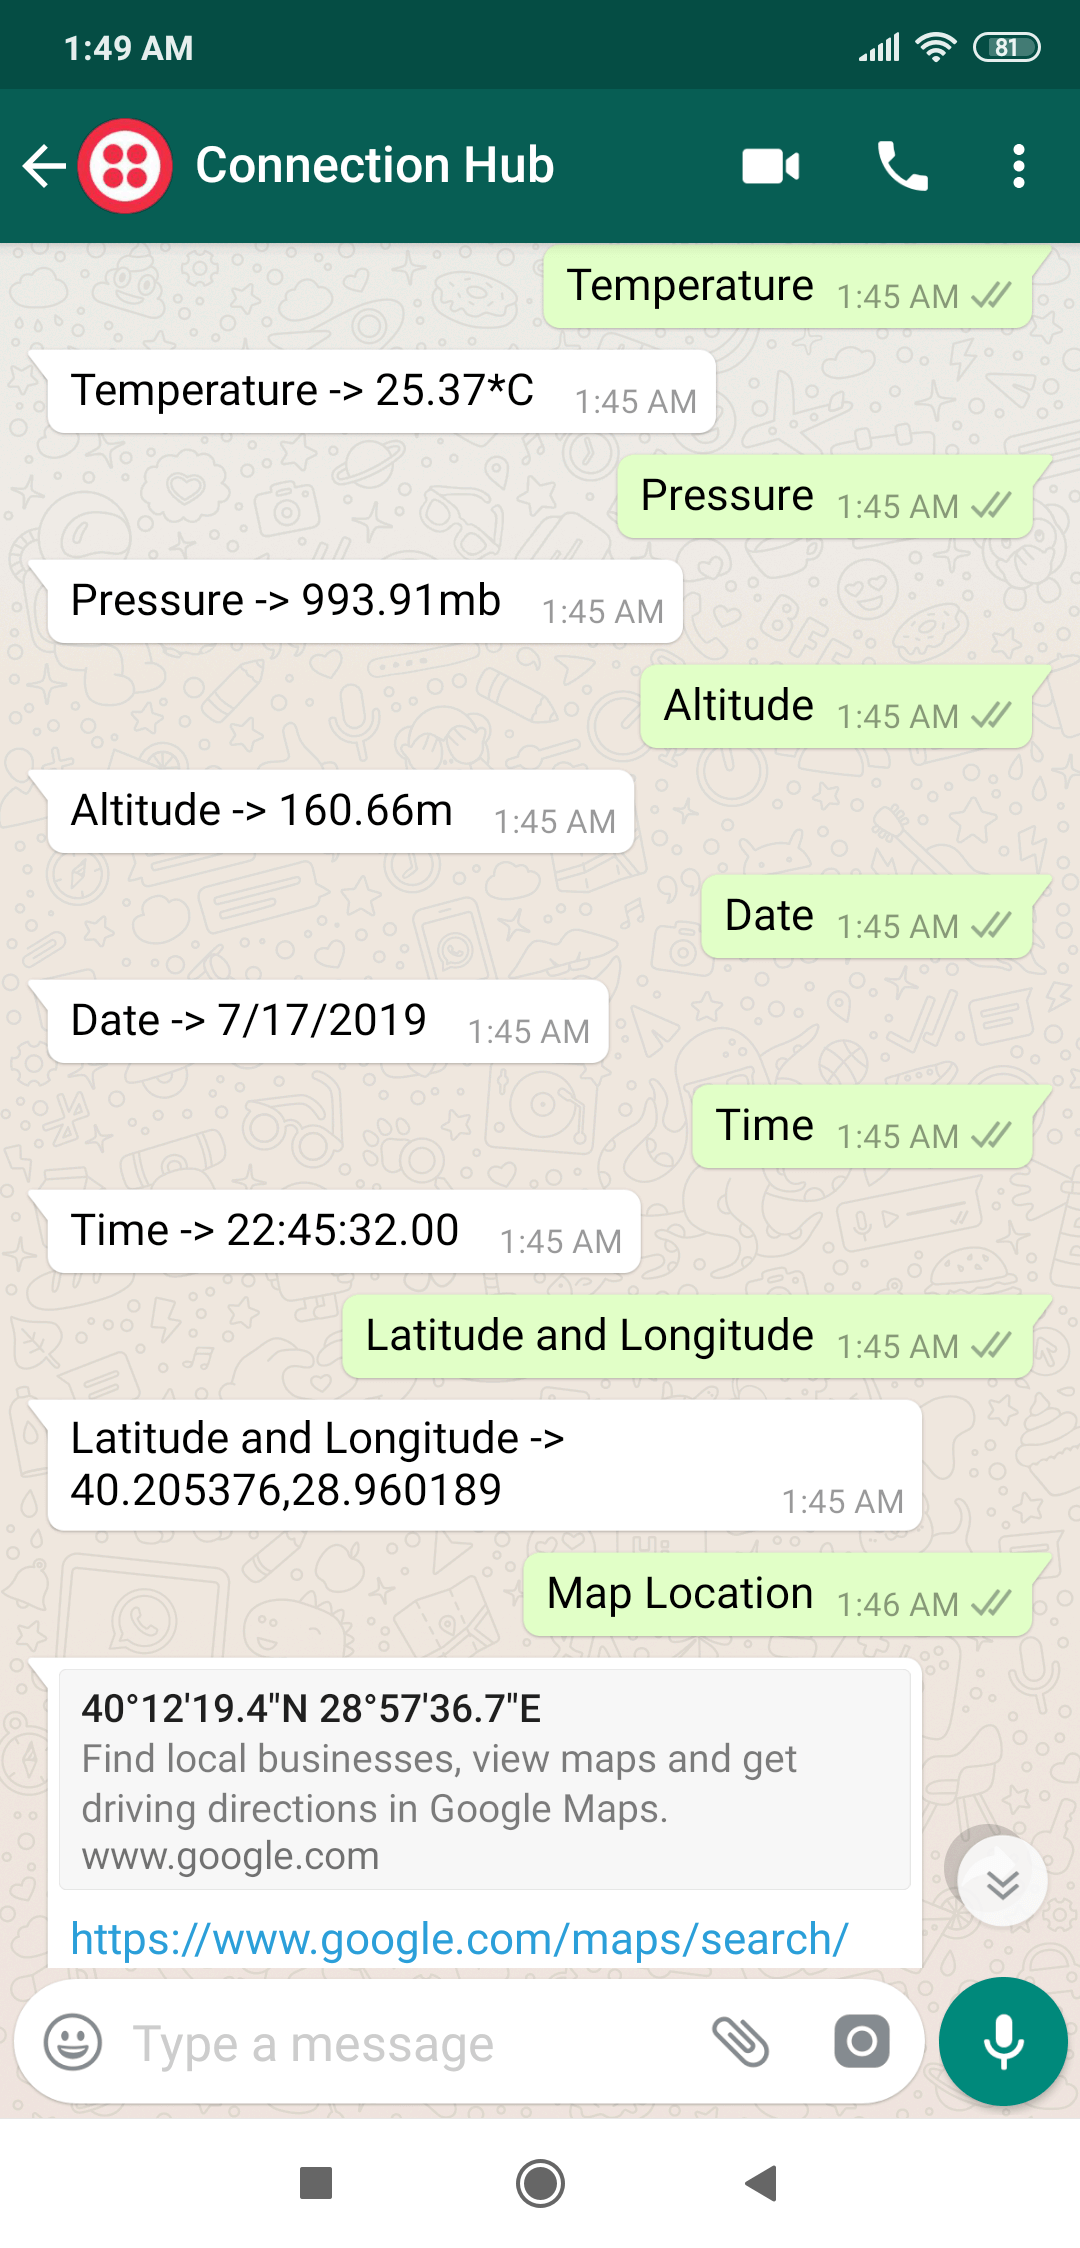
WhatsApp Mapping and Weather Forecast Chat Bot | NodeMCU ESP8266 [ESP-12E]
In a nutshell:
Through WhatsApp, get variables (location, altitude, pressure... ) from NodeMCU as requested or send commands to NodeMCU via Twilio's API.
In this project, I wanted to make a remote mapping and weather forecast bot sending temperature, pressure, altitude, latitude, and longitude when requested as WhatsApp response messages and control the base by giving commands through WhatsApp. To gather data, I decided to use a BMP180 Pressure and Temperature Sensor, and a GY-NEO6MV2 GPS Module and to make the base remote and controllable, I used an L298N Motor Driver and two Wheel and DC Motor Kit along with a ball caster.
Also, you can view the location generated by the GPS module on Google Maps through WhatsApp.
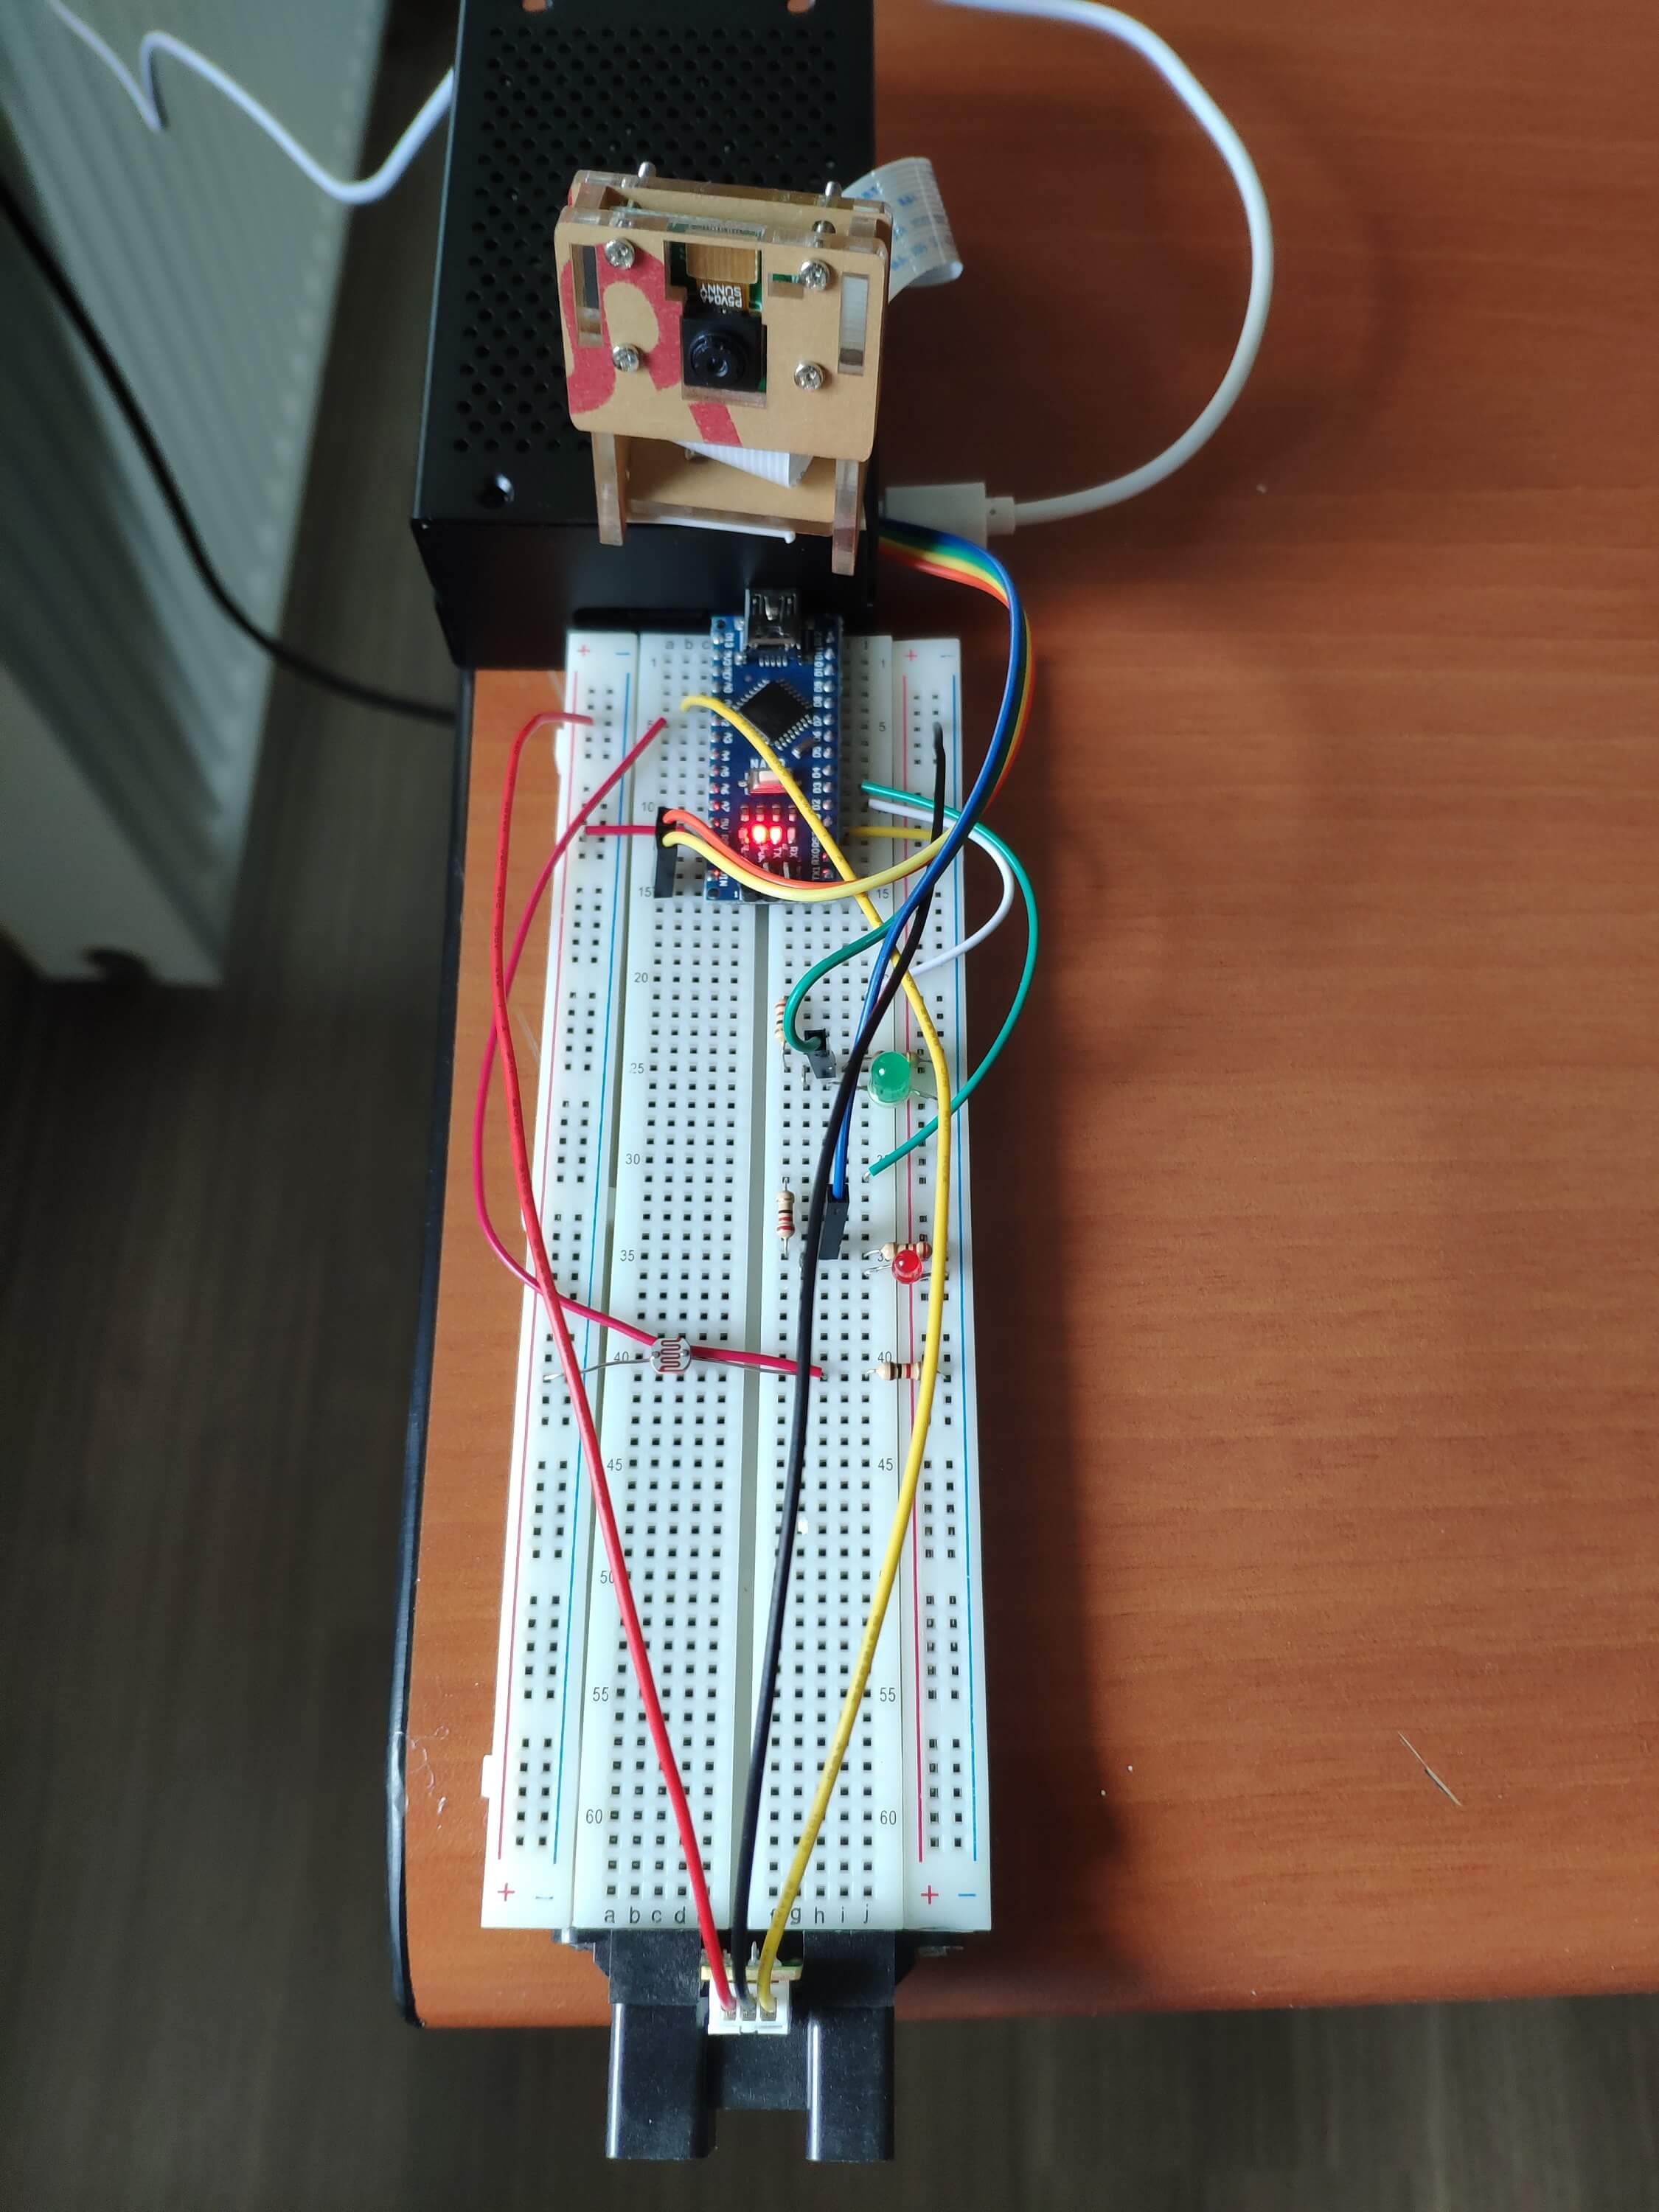
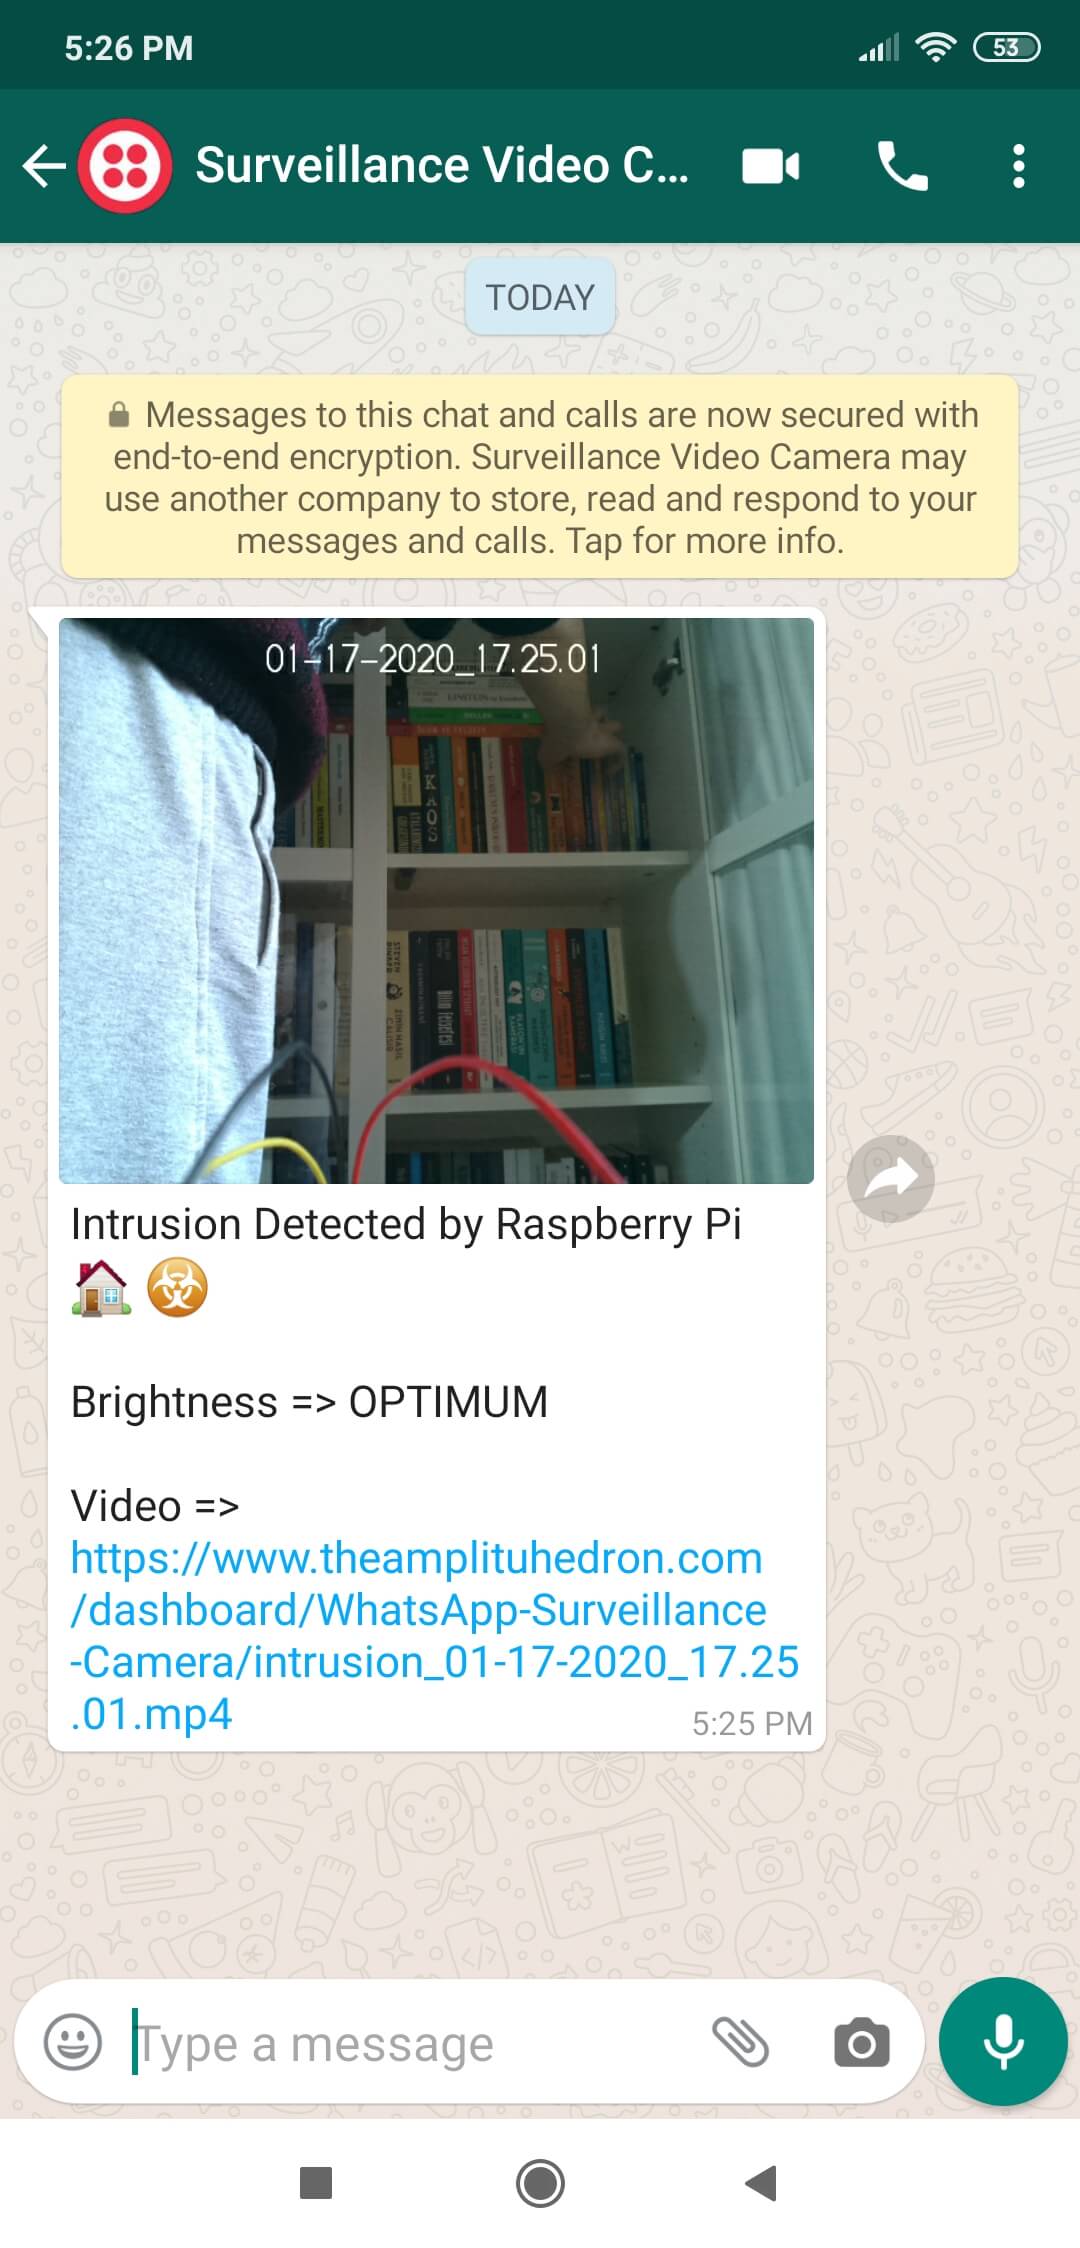
WhatsApp Surveillance Video Camera with IR Proximity Sensor | Raspberry Pi and Arduino
In a nutshell:
Get notified via WhatsApp with a video (mp4) and a captured first-look thumbnail image as intrusion alert when the IR sensor detects motion.
In this project, I wanted to create a surveillance video camera for my library, especially for one particular bookcase, to get notified when someone takes a book or organizes books differently. In that regard, I programmed a Raspberry Pi 3 Model B+ to capture the first-look thumbnail image and record a video with timestamp according to the data collated by Arduino Nano - motion and brightness. After collecting files and information from sensors, Raspberry Pi transfers them to the file_pathway webhook to be sent to the verified phone number as WhatsApp notification messages. In PHP, I provided the source code of the file_pathway webhook: save the file_pathway webhook on your server by entering your Twilio account settings - works stupendously even on the localhost.
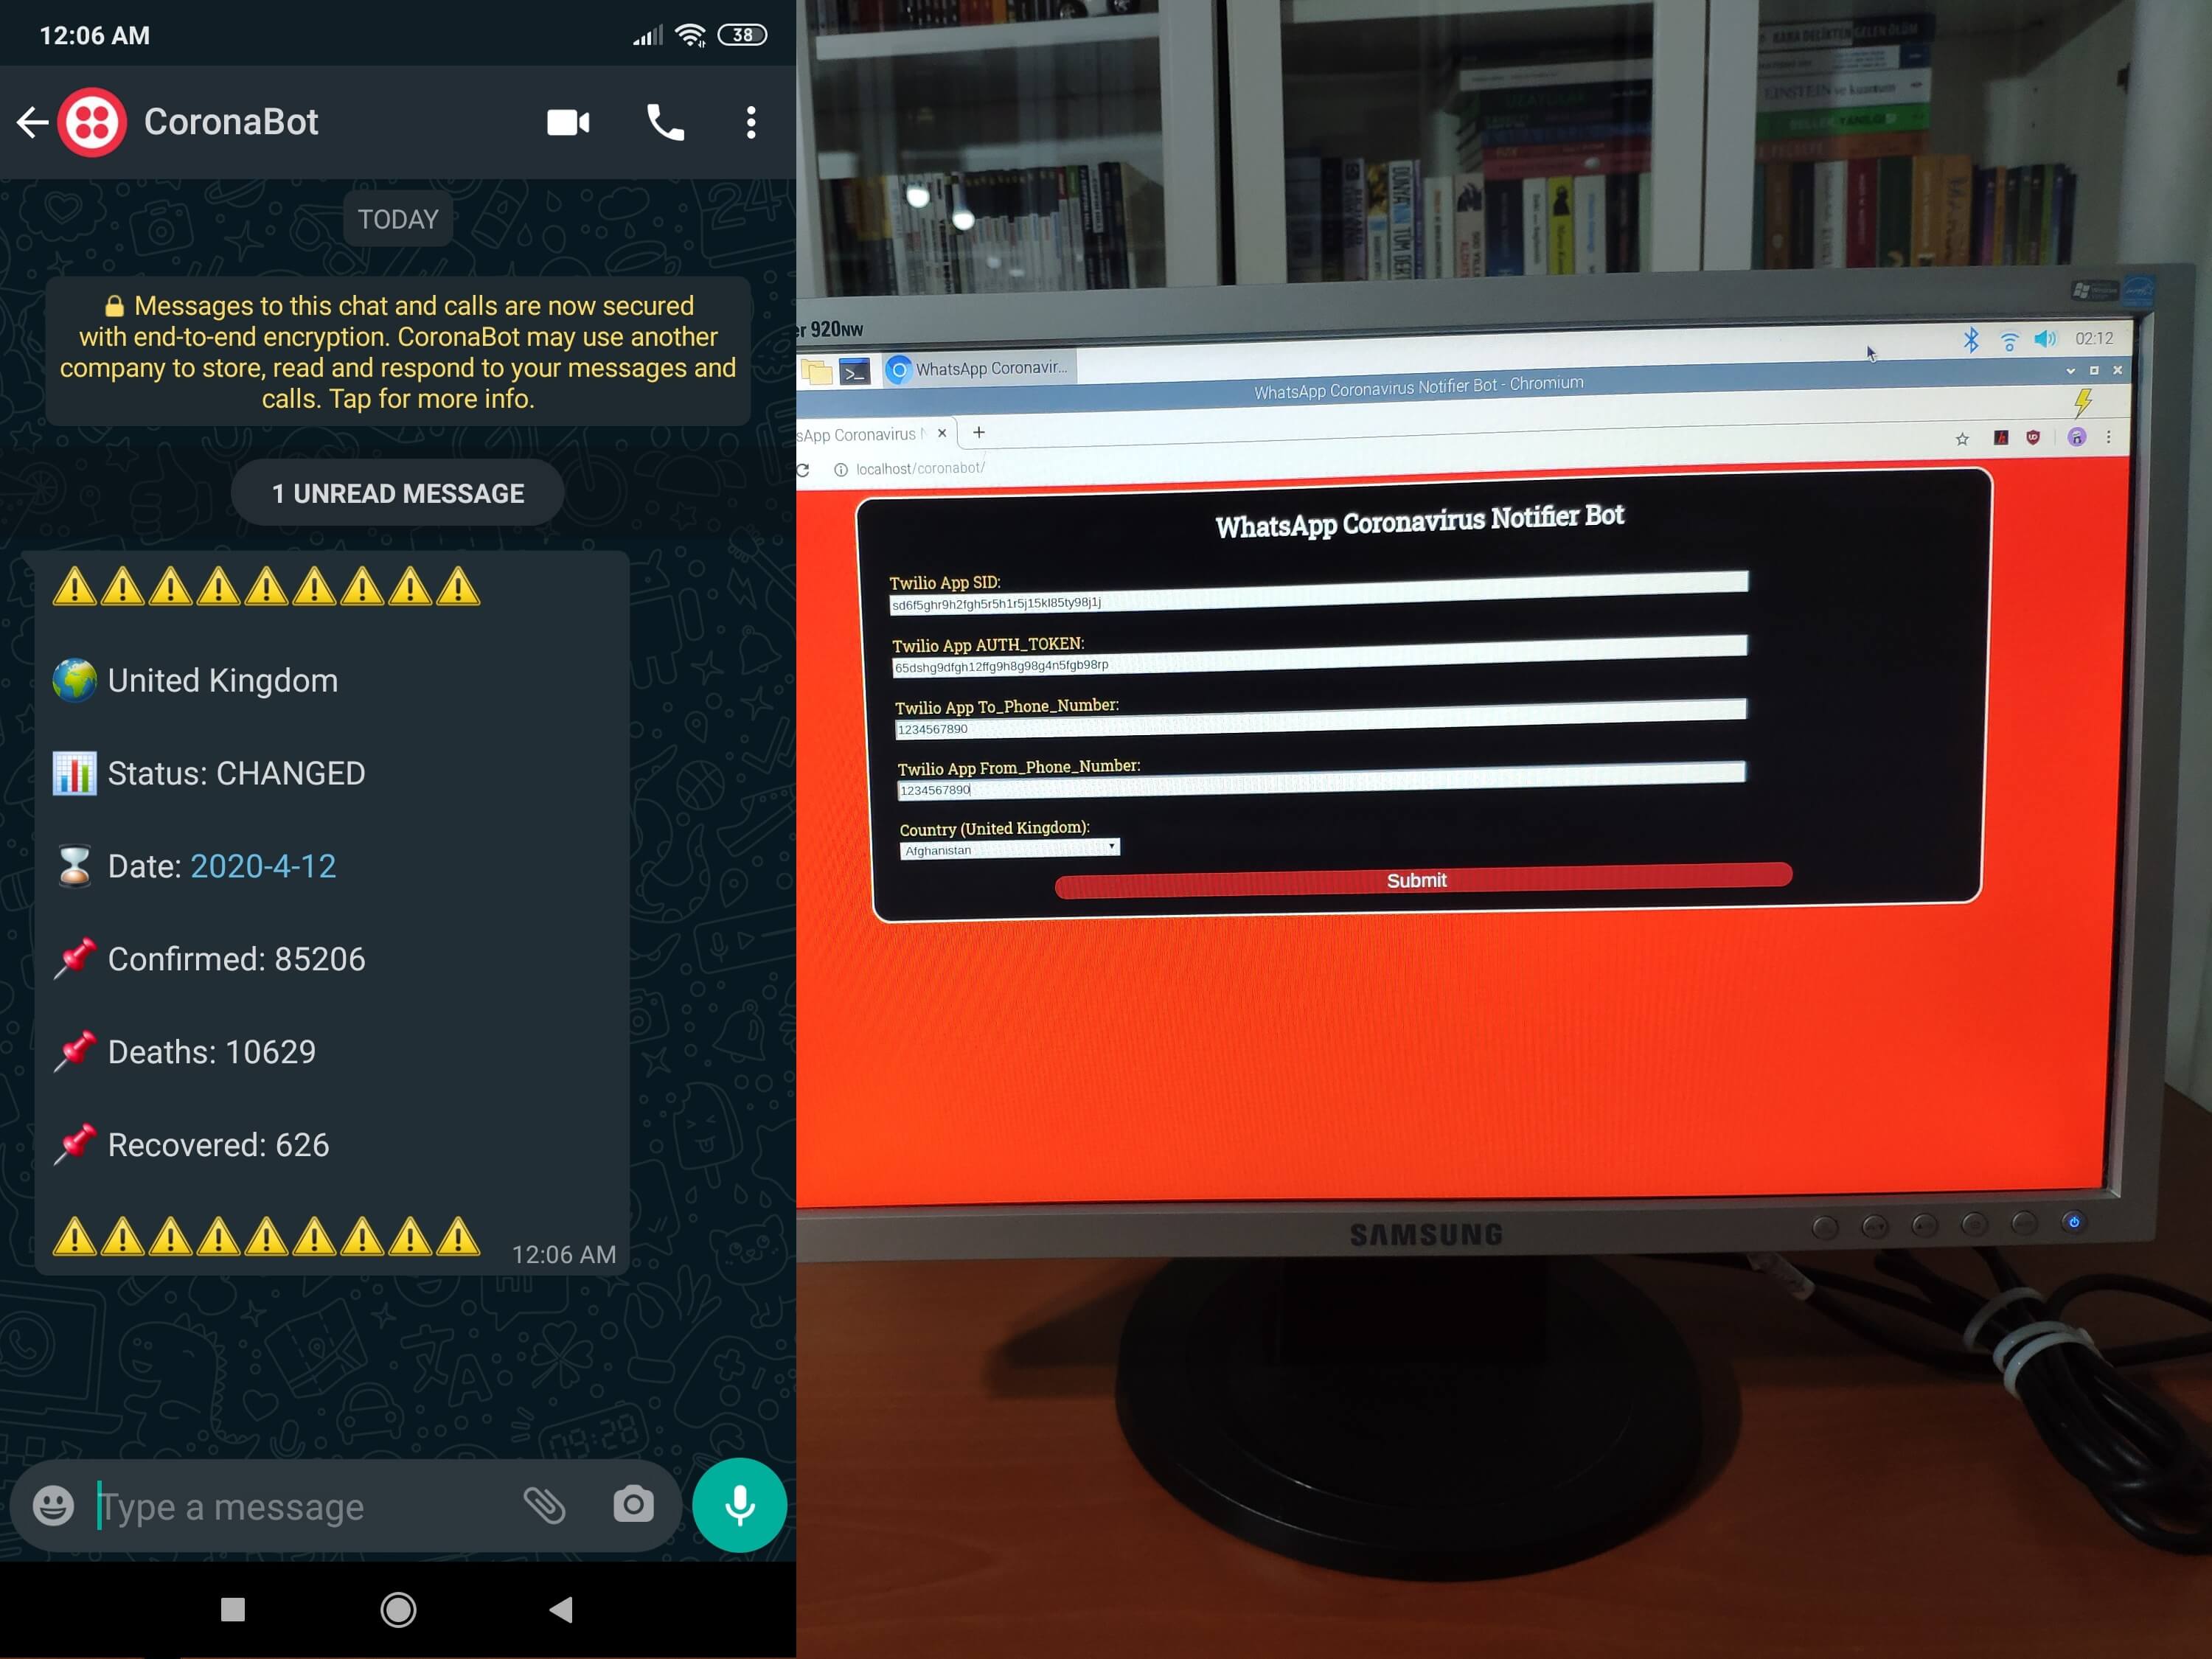
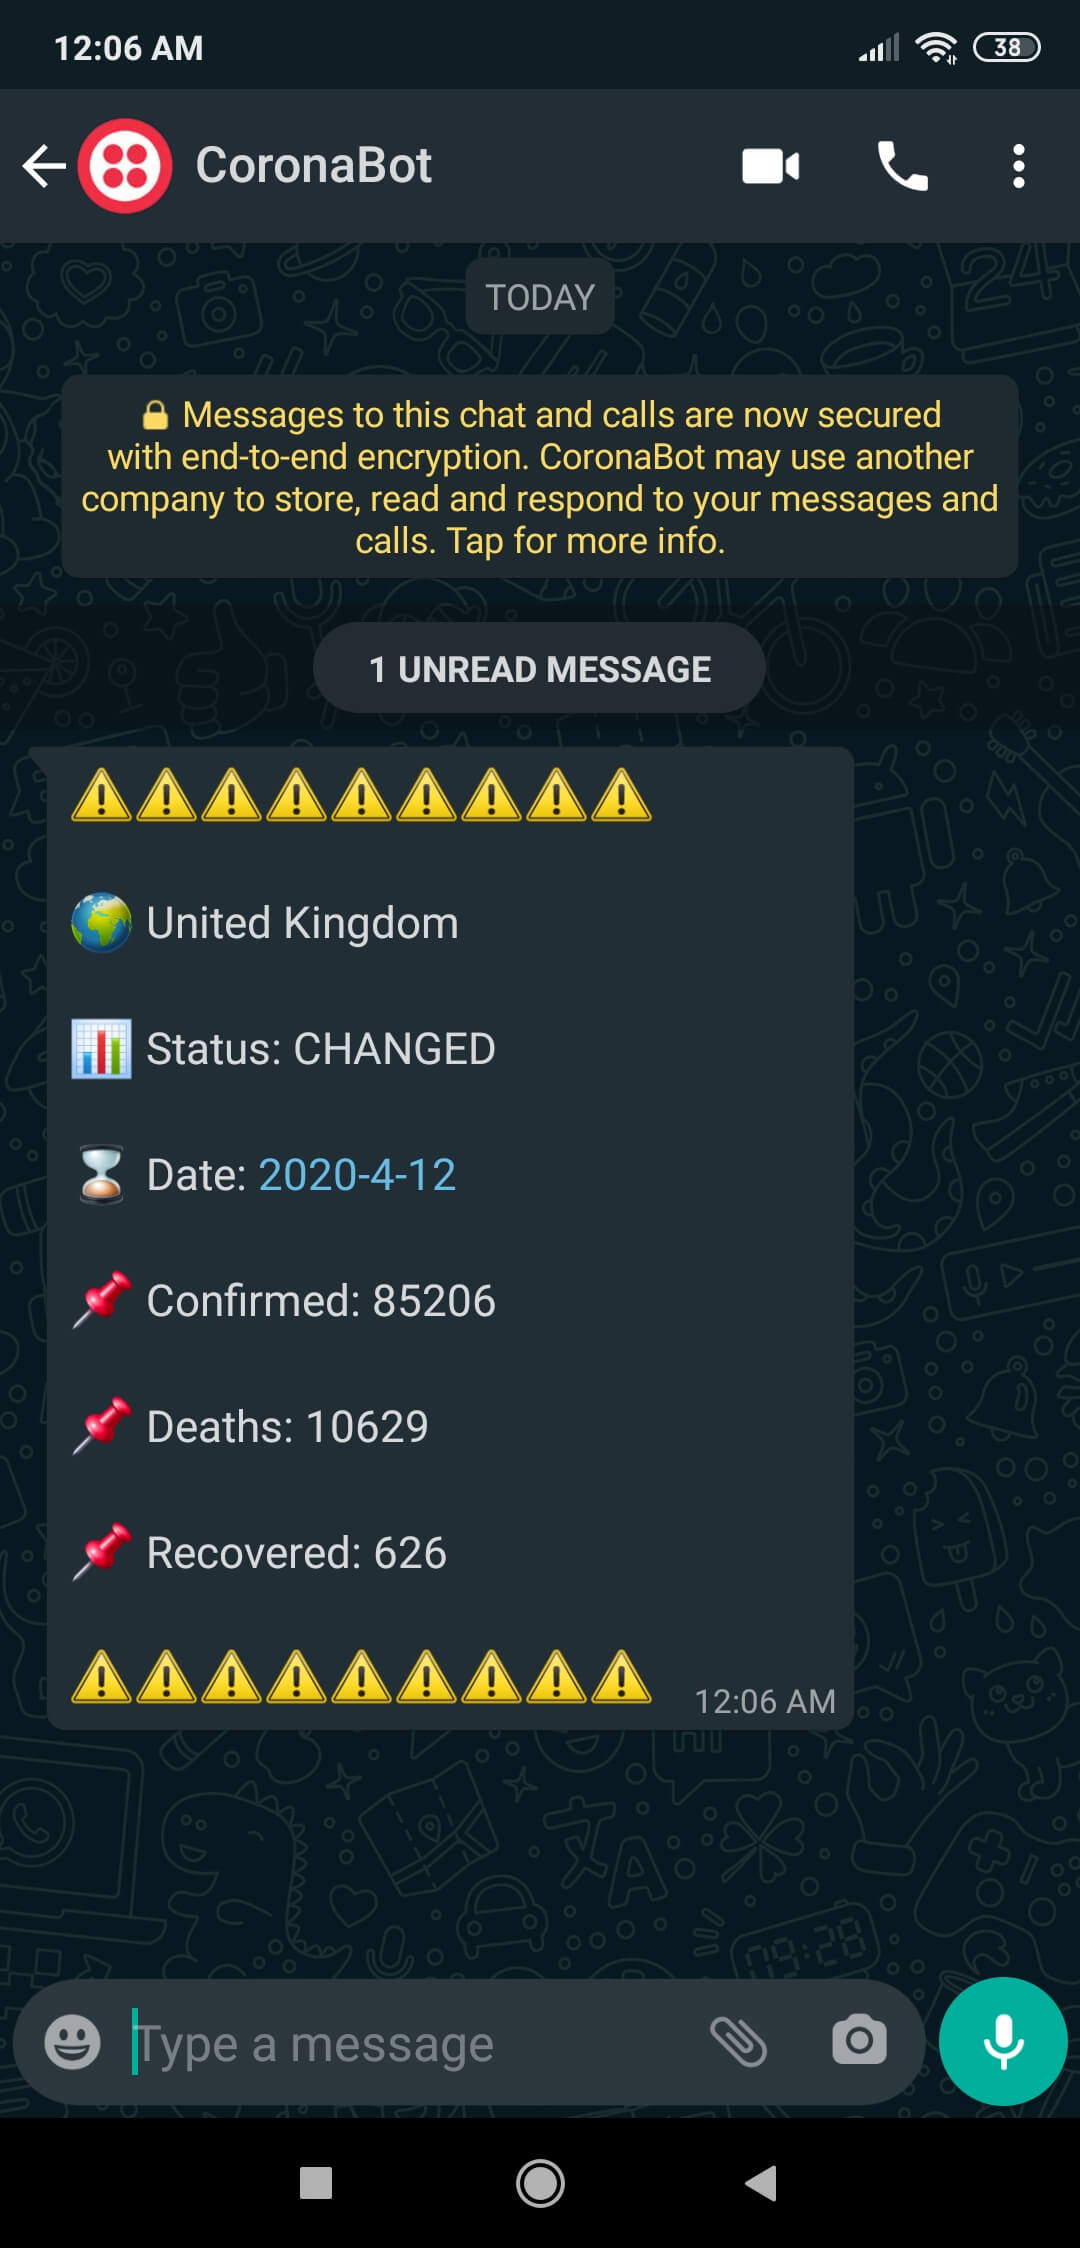
WhatsApp Coronavirus Notifier Bot Running on Raspberry Pi | Raspberry Pi
In a nutshell:
Via WhatsApp, observe the daily coronavirus(COVID-19) case report of your country in a given period and get notified when there is a change.
Tracking the current data on the daily impact of the coronavirus had encumbered lots of my friends' and acquaintances' thought processes due to the uncertain data update times. Hence, I developed a bot hosted by a Raspberry Pi, which notifies the user when there is a change in the daily case report of the selected country via WhatsApp, in the hope of soothing their minds even a little bit. In other words, you will get notified via WhatsApp (as notification messages) when the daily case report of your country is uploaded or updated by the data provider - The 2019 Novel Coronavirus Visual Dashboard operated by the Johns Hopkins University Center for Systems Science and Engineering (JHU CSSE) with the support of ESRI Living Atlas Team and the Johns Hopkins University Applied Physics Lab (JHU APL). Also, the notifier bot sends an information message in the given period if there is no change (STABLE).