Mechanical anomaly detection is critical in autonomous manufacturing processes so as to prevent equipment failure, ameliorate the effects of expensive overhaul procedures on the production line, reduce arduous diagnostic workload, and improve workplace safety[1]. In light of recent developments towards the fourth industrial revolution (Industry 4.0)[2], many renowned companies focused on enhancing manufacturing and production processes by applying artificial intelligence in tandem with the Internet of Things for anomalous behavior detection. Although companies take different approaches, and each technique has specific strengths and weaknesses based on the applied manufacturing mechanisms, autonomous anomalous behavior detection enables businesses to preclude detrimental mechanical malfunctions that are challenging to detect manually by operators.
Nevertheless, there are still a few grand challenges to overcome while applying mechanical anomaly detection to mass production operations, such as the scarcity of data sources leading to false positives (or negatives) and time-consuming (or computationally expensive) machine learning methods[3]. Since every manufacturing system setup produces conflicting mechanical deviations, the optimal anomaly detection method should be deliberately specialized for the targeted setup, which minimizes false negatives and maintains exceptional precision. If the mechanical anomaly detection method is applied without proper tuning for interconnected manufacturing processes, the applied method cannot pinpoint the potential root cause of the detected mechanical anomaly. In that regard, inefficient anomaly detection methods still require operators to conduct manual inspections to diagnose the crux of the system failure.
After inspecting recent research papers on autonomous anomalous behavior detection, I noticed that there are very few appliances focusing on detecting mechanical deviations and diagnosing the root cause of the detected anomaly so as to provide operators with precise maintenance analysis to expedite the overhaul process. Therefore, I decided to develop a device to detect mechanical anomalies based on sound (via an onboard microphone), diagnose the root cause of the detected deviation via object detection, and then inform the user of the diagnosed root cause via SMS.
To be able to detect mechanical anomalies and diagnose the root cause efficiently, I decided to build two different neural network models — audio classification and image classification — and run them on separate development boards to avoid memory allocation issues, latency, and reduced model accuracy due to multi-sensor conflict.
Since FireBeetle 2 ESP32-S3 is a high-performance and budget-friendly IoT development board providing a built-in OV2640 camera, 16MB Flash, and 8MB PSRAM, I decided to utilize FireBeetle 2 ESP32-S3 to run the object detection model. To run the neural network model for audio classification, I decided to utilize Beetle ESP32-C3, which is an ultra-small-sized IoT development board based on a RISC-V single-core processor. Then, I connected a Fermion 2.0'' IPS TFT display to FireBeetle 2 ESP32-S3 in order to benefit from its built-in microSD card module while saving image samples and notify the user of the device status by showing feature-associated icons. To perform on-device audio classification, I connected a Fermion I2S MEMS microphone to Beetle ESP32-C3.
Even though this mechanical anomaly detector is composed of two separate development boards, I focused on enabling the user to access all interconnected device features (mostly via serial communication) within a single interface and get notified of the root cause predicted by two different neural network models — sound-based and image-based. Since I wanted to capitalize on smartphone features (e.g., Wi-Fi, BLE, microphone) to build a capable mechanical anomaly detector, I decided to develop an Android application from scratch with the MIT APP Inventor. As the user interface of the anomaly detector, the Android application can utilize the Wi-Fi network connection to obtain object detection model results with the resulting images from a web application, save audio samples via the built-in phone microphone, and communicate with Beetle ESP32-C3 over BLE so as to get audio-based model detection results and transmit commands for image sample collection.
As explained earlier, each manufacturing setup requires a unique approach to mechanical anomaly detection, especially for interconnected processes. Hence, I decided to build a basic frequency-controlled apparatus based on Arduino Mega to replicate mechanical anomalous behavior. I designed 3D parts to contain servo motors to move a timing belt system consisting of a GT2 60T pulley, a GT2 20T pulley, and a 6 mm belt. Since I utilized potentiometers to adjust servo motors, I was able to produce accurate audio samples for mechanical anomalies. Although I was able to generate anomalies by shifting the belt manually, I decided to design diverse 3D-printed components (parts) restricting the belt movement in order to demonstrate the root cause of the inflicted mechanical anomaly. In other words, these color-coded components represent the defective parts engendering mechanical anomalies in a production line. Since I did not connect a secondary SD card module to Beetle ESP32-C3, I decided to utilize the Android application to record audio samples of inflicted anomalies via the phone microphone instead of the onboard I2S microphone. To collect image samples of the 3D-printed components, I utilized the built-in OV2640 camera on FireBeetle 2 ESP32-S3 and saved them via the integrated microSD card module on the Fermion TFT display. In that regard, I was able to construct notable data sets for sound-based mechanical anomaly detection and image-based component (part) recognition.
After completing constructing two different data sets, I built my artificial neural network model (audio-based anomaly detection) and my object detection model (image-based component detection) with Edge Impulse to detect sound-based mechanical anomalies and diagnose the root cause of the detected anomaly — the restricting component (part). I utilized the Edge Impulse FOMO (Faster Objects, More Objects) algorithm to train my object detection model, which is a novel machine learning algorithm that brings object detection to highly constrained devices. Since Edge Impulse is nearly compatible with all microcontrollers and development boards, I have not encountered any issues while uploading and running both of my models on FireBeetle 2 ESP32-S3 and Beetle ESP32-C3. As the labels of the object detection model, I utilized the color-coded names of the 3D-printed components (parts):
Red
Green
Blue
For the neural network model, I simply differentiate audio samples with these labels denoting the operation status:
anomaly
normal
After training and testing my object detection (FOMO) model and my neural network model, I deployed and uploaded both models on FireBeetle 2 ESP32-S3 and Beetle ESP32-C3 as Arduino libraries respectively. Therefore, this mechanical anomaly detector is capable of detecting sound-based mechanical deviations and diagnosing the root cause of the detected anomaly by running both models independently without any additional procedures or latency.
Since I focused on building a full-fledged AIoT mechanical anomaly detector, supporting only BLE data transmission for displaying the detection results from both models was not suitable. Therefore, I decided to develop a versatile web application from scratch in order to obtain the object detection model predictions with the resulting images (including bounding box measurements) via HTTP POST requests from FireBeetle 2 ESP32-S3, save the received information to a MySQL database table, and inform the user of the detected anomaly and the diagnosed root cause via SMS through Twilio's SMS API. Since FireBeetle 2 ESP32-S3 cannot modify resulting images to draw bounding boxes directly, the web application executes a Python script to convert the received raw image buffer (RGB565) to a JPG file and draw the bounding box on the generated image with the measurements passed as Python Arguments. Furthermore, I employed the web application to transfer the latest model detection results, the prediction dates, and the modified resulting images (as URLs) to the Android application as a list via an HTTP GET request.
Considering the harsh operating conditions in industrial plants and the dual development board setup, I decided to design a unique PCB after completing the wiring on a breadboard for the prototype. Since I wanted my PCB design to symbolize a unique and captivating large-scale industrial plant infrastructure, I decided to design an Iron Giant-inspired PCB. Thanks to the unique matte black mask and yellow silkscreen combination, the Iron Giant theme shines through the PCB.
Lastly, to make the device as robust and compact as possible, I designed a complementing Iron Giant-inspired case with a removable top cover and a modular PCB holder (3D printable) providing a cable-free assembly with the external battery.
So, this is my project in a nutshell 😃
In the following steps, you can find more detailed information on coding, recording audio samples, capturing 3D-printed component pictures, building neural network and object detection models with Edge Impulse, running both models on FireBeetle 2 ESP32-S3 and Beetle ESP32-C3, and developing full-fledged Android and web applications to inform the user via SMS.
🎁🎨 Huge thanks to PCBWay for sponsoring this project.
🎁🎨 Huge thanks to DFRobot for sponsoring these products:
Step 1: Designing and soldering the Iron Giant-inspired PCB
Before prototyping my Iron Giant-inspired PCB design, I tested all connections and wiring with FireBeetle 2 ESP32-S3 and Beetle ESP32-C3. Then, I checked the BLE connection quality between Beetle ESP32-C3 and the Android application for transferring data packets.
Figure - 94.33
Figure - 94.34
Then, I designed my Iron Giant-inspired PCB by utilizing Autodesk Fusion 360 and KiCad. Since I wanted to design a unique 3D-printed PCB holder to simplify cable management, I designed the PCB outline on Fusion 360 and then imported it to KiCad. As mentioned earlier, I drew my inspiration from Iron Giant's industrial-esque vibe and captivating demeanor to create a unique mechanical anomaly detector.
To replicate this anomaly detector, you can download the Gerber file below and order my PCB design from PCBWay directly.
Figure - 94.35
Figure - 94.36
Figure - 94.37
First of all, by utilizing a TS100 soldering iron, I attached headers (female), pushbuttons (6x6), a 5 mm common anode RGB LED, a long-shaft 10K potentiometer, and a power jack to the PCB.
#️⃣ Before testing connections and wiring on a breadboard, I needed to solder male headers to some components by utilizing the soldering iron.
#️⃣ Since FireBeetle 2 ESP32-S3 provides a built-in camera interface with an independent camera power supply (AXP313A), I was able to attach the provided OV2640 camera effortlessly.
#️⃣ Since FireBeetle 2 ESP32-S3 and Beetle ESP32-C3 operate at 3.3V logic level voltage, I did not encounter any issues while connecting their hardware serial ports together.
#️⃣ Even though the Android application lets the user record audio samples via the phone microphone, since Beetle ESP32-C3 does not have an integrated microSD card module, I needed to connect a Fermion I2S MEMS microphone to Beetle ESP32-C3 in order to run the neural network model for audio classification in the field.
#️⃣ Then, I inserted a microSD card into the microSD card module on the Fermion TFT LCD display to save image samples easily. I also utilized the Fermion TFT LCD display to inform the user of the performed operations by showing the feature-associated icons.
#️⃣ Although the Android application allows the user to select a component (part) class to save image samples, I connected two control buttons and a long-shaft potentiometer to Beetle ESP32-C3 so as to provide the user with the option to save image samples and run the object detection model manually for debugging. Also, I added an RGB LED to inform the user of the device status while performing different operations.
#️⃣ After completing soldering and adjustments, I attached all remaining components to the Iron Giant PCB via the female headers.
Figure - 94.42
Figure - 94.43
Figure - 94.44
Step 2: Designing and printing the Iron Giant-inspired case
Since I focused on building a budget-friendly and accessible mechanical anomaly detector that detects sound-based mechanical anomalies and diagnoses the root cause of the detected deviations via object detection so as to notify the user via SMS, I decided to design a robust and compact case allowing the user to place the Iron Giant PCB and position the OV2640 camera on FireBeetle 2 ESP32-S3 effortlessly. To avoid overexposure to dust and prevent loose wire connections, I added a removable top cover mountable to the main case via triangular snap-fit joints. Then, I designed a unique PCB holder by utilizing the PCB outline, mountable to the top cover diagonally via M3 screws and nuts. Also, I decided to emboss gear icons and the DFRobot symbol on the top cover to emphasize the capabilities of this AI-based mechanical anomaly detector.
Since I drew my inspiration from Iron Giant's industrial-esque vibe while designing this mechanical anomaly detector, I decided to print an Iron Giant bust to highlight the design similarities.
I designed the main case, the removable top cover, and the PCB holder in Autodesk Fusion 360. You can download their STL files below.
Figure - 94.45
Figure - 94.46
Figure - 94.47
Figure - 94.48
Figure - 94.49
Figure - 94.50
Figure - 94.51
Figure - 94.52
Figure - 94.53
Figure - 94.54
Figure - 94.55
For the Iron Giant bust accentuating the device design, I utilized this model from Thingiverse:
Then, I sliced all 3D models (STL files) in Ultimaker Cura.
Figure - 94.56
Figure - 94.57
Figure - 94.58
Figure - 94.59
Figure - 94.60
Figure - 94.61
Since I wanted to create a metallic structure for the device case and apply a unique industrial-esque theme manifesting mechanical plants, I utilized this PLA filament:
ePLA-Metal Antique Brass
Finally, I printed all parts (models) with my brand-new Anycubic Kobra 2 Max 3D Printer.
Figure - 94.62
Since Anycubic Kobra 2 Max is budget-friendly and specifically designed for high-speed printing with a gigantic build volume, I highly recommend Anycubic Kobra 2 Max if you are a maker or hobbyist needing to print large prints without compartmentalizing your design and losing structural integrity while working on multiple prototypes before finalizing a complex project.
Thanks to its upgraded direct extruder and vibration compensation features, Anycubic Kobra 2 Max provides 300 mm/s recommended print speed (up to 500 mm/s) and enhanced layer quality. Also, it provides a high-speed optimized cooling system, reducing visible layer lines and complementing the fast printing experience. Since the Z-axis has dual-motors and dual-support rods, it prevents vibration from affecting layer smoothness and integrity, even at higher print speeds.
Furthermore, Anycubic Kobra 2 Max provides a magnetic suction platform on the heated bed for the scratch-resistant PEI spring steel build plate, allowing the user to remove prints without any struggle, even for larger prints up to 420x420x500 mm. Most importantly, you can level the bed automatically via its user-friendly LeviQ 2.0 automatic leveling system and custom Z-axis compensation. Also, it has a smart filament runout sensor and supports Anycubic APP for remote control and management.
#️⃣ First of all, remove all fixing plates. Then, install the gantry frame and support rods.
Figure - 94.63
Figure - 94.64
#️⃣ Install the print head and adjust the X-axis belt tensioner. Then, install the touchscreen and the filament runout sensor.
Figure - 94.65
Figure - 94.66
#️⃣ Connect the stepper, switch, screen, and print head cables. Then, attach the filament tube and use cable ties to secure the cables properly.
Figure - 94.67
Figure - 94.68
#️⃣ If the print head or bed is shaking, adjust the hexagonal isolation columns underneath them.
Figure - 94.69
#️⃣ To avoid software-related print failures, update the device firmware manually via USB or directly over Wi-Fi.
I encountered some errors due to Cura configurations before the official 2.3.6 firmware.
Figure - 94.70
#️⃣ After the firmware upgrade, go to Settings ➡ More Settings ➡ Guide so as to initiate the LeviQ 2.0 automatic bed leveling system and configure vibration calibration.
Figure - 94.71
#️⃣ Finally, fix the filament tube with the cable clips, install the filament holder, and insert the filament into the extruder.
Figure - 94.72
#️⃣ Since Anycubic Kobra 2 Max is not officially supported by Cura yet, we need to set it manually. Fortunately, Anycubic provides detailed configuration steps for Anycubic Kobra 2 Max on Cura.
#️⃣ First of all, create a custom printer profile on Cura for Anycubic Kobra 2 Max with given printer settings.
Figure - 94.73
Figure - 94.74
Figure - 94.75
#️⃣ Then, import the printer profile (configuration) file provided by Anycubic, depending on the filament type.
Figure - 94.76
Figure - 94.77
Step 2.1: Assembling the 3D-printed case
After printing all parts (models), I fastened the external battery (Xiaomi 10000 mAh power bank) into the main case via a hot glue gun.
Then, I attached the PCB holder to the removable top cover via M3 screws and nuts. After mounting the PCB holder, I fastened the Iron Giant PCB to the PCB holder via the hot glue gun. I also attached the built-in OV2640 camera to the back of the PCB holder via the hot glue gun.
Since the top cover has a slot for the USB power cable, the PCB power jack can be directly connected to the external battery contained in the main case.
Finally, I affixed the top cover to the main case via its triangular snap-fit joints.
Figure - 94.78
Figure - 94.79
Figure - 94.80
Figure - 94.81
Figure - 94.82
Figure - 94.83
Figure - 94.84
Figure - 94.85
Figure - 94.86
Figure - 94.87
Figure - 94.88
Figure - 94.89
Figure - 94.90
Figure - 94.91
Since the main case supports the cable-free PCB assembly, the anomaly detector can be placed in any machinery effortlessly.
Figure - 94.92
Figure - 94.93
Figure - 94.94
Figure - 94.95
Figure - 94.96
After completing the case assembly, I showcased my mechanical anomaly detector with the Iron Giant bust to emphasize the design resemblances.
Figure - 94.97
Step 3: Designing a frequency-controlled apparatus to demonstrate mechanical anomalies w/ Arduino Mega
As explained earlier, each manufacturing system requires a unique approach to mechanical anomaly detection due to conflicting mechanical deviations, especially for interconnected processes. Therefore, engineers must deliberately specialize the optimal anomaly detection method to minimize false negatives (or positives), yield exceptional accuracy, and maintain stable equipment performance.
Since I did not have the resources to examine an industrial plant or production line while working on this project, I decided to build a basic frequency-controlled apparatus based on Arduino Mega to manifest mechanical anomalous behavior. Thanks to this apparatus, I was able to adjust each operational parameter while constructing my audio-based data set. Therefore, I managed to apply proper tuning to my anomaly detection method.
I decided to replicate the X-axis timing belt system of a 3D printer to build my testing apparatus since it is easier to demonstrate mechanical anomalies with single-purposed mechanisms. In that regard, I utilized a GT2 60T pulley, a GT2 20T pulley, and a 6 mm belt as the timing belt system. Since I decided to move the timing belt manually via potentiometers, I decided to utilize SG90 servo motors instead of stepper motors.
Since I had a spare Arduino Mega, I employed it to control servo motors with potentiometers. You can inspect the code for moving the timing belt below — AIoT_Mechanical_Anomaly_Detector_Tester.ino.
After testing wiring and connections, I designed a motor mount compatible with the SG90 servo motor. I also designed a simple GT2 60T pulley holder to utilize the timing belt system with one servo motor and potentiometer pair.
Although I was able to generate anomalies by shifting the belt manually, I decided to design three diverse (color-coded) 3D components (parts) restricting the belt movement in order to exemplify the root cause of the induced mechanical anomaly for the object detection model.
I designed the servo motor mount, the pulley holder, and the restricting components in Autodesk Fusion 360. You can download their STL files below.
Figure - 94.100
Figure - 94.101
Figure - 94.102
Figure - 94.103
Figure - 94.104
Figure - 94.105
Then, I sliced all 3D models (STL files) in Ultimaker Cura.
Figure - 94.106
Figure - 94.107
Figure - 94.108
Figure - 94.109
#️⃣ First of all, screw the servo motor mounts into the double-layer plywood.
Figure - 94.110
Figure - 94.111
#️⃣ Attach the SG90 servo motor and the GT2 60T pulley holder to the servo motor mounts via their slots.
Figure - 94.112
Figure - 94.113
Figure - 94.114
#️⃣ Position the GT2 60T pulley and the GT2 20T pulley. Then, tension the 6 mm timing belt between them with clamps (or pins).
Figure - 94.115
Figure - 94.116
Figure - 94.117
#️⃣ Finally, fasten the half-sized breadboard to the plywood, including the adjustment potentiometers.
Figure - 94.118
Figure - 94.119
Step 4: Developing a Wi-Fi and BLE-enabled Android application w/ the MIT APP Inventor
Although this mechanical anomaly detector utilizes two separate development boards to operate, I wanted to enable the user to access all interconnected device features within a single interface, especially for data collection. Since I wanted to capitalize on smartphone features to build a feature-rich mechanical anomaly detector, I decided to develop an Android application from scratch with the MIT APP Inventor. As the user interface of the anomaly detector, the Android application can:
utilize the Wi-Fi network connection to retrieve model detection results with resulting images from the web application by making HTTP GET requests,
save audio samples (3GP files) to the internal storage (application root folder) through the built-in phone microphone,
communicate with Beetle ESP32-C3 via BLE so as to obtain audio-based anomaly detection results (neural network model) and transmit selected classes for image sample collection with FireBeetle 2 ESP32-S3.
MIT App Inventor is an intuitive visual programming environment that allows developers to build fully functional Android applications. Its blocks-based tool (drag-and-drop) facilitates the creation of complex high-impact apps in significantly less time than the traditional programming environments.
After developing my application, named Mechanical Anomaly Detector, I published it on Google Play. So, you can install this application on any compatible Android device via Google Play.
#️⃣ Download the Mechanical Anomaly Detector app's project file in the AIA format (Mechanical_Anomaly_Detector.aia) and import the AIA file into the MIT App Inventor.
#️⃣ Since the MIT App Inventor does not support BLE connectivity by default, download the latest version of the BluetoothLE extension and import the BluetoothLE extension into the Mechanical Anomaly Detector project.
#️⃣ In this tutorial, you can get more information regarding enabling BLE connectivity on the MIT App Inventor.
Figure - 94.120
#️⃣ In the Blocks editor, you can inspect the functions I programmed with the drag-and-drop menu components.
#️⃣ In the following steps, you can get more information regarding all features of this Android application working in conjunction with Beetle ESP32-C3 and the web application.
Since the built-in sound recorder object can only access the ASD (app-specific dir), I saved the audio samples (3GP) to the audio_samples folder in the root directory of the application.
Figure - 94.121
Figure - 94.122
Figure - 94.123
Figure - 94.124
Figure - 94.125
After installing this Android application on a compatible mobile phone, you can start communicating with Beetle ESP32-C3 over BLE to access all interconnected features of this mechanical anomaly detector.
Figure - 94.126
Step 5: Creating an account to utilize Twilio's SMS API
Since I decided to notify the user of the latest detected audio-based anomaly and the diagnosed root cause (faulty component) via SMS, I needed to utilize Twilio's SMS API. In this regard, I was also able to transfer the prediction date and the resulting image link through the web application.
Twilio provides a trial text messaging service to transfer an SMS from a virtual phone number to a verified phone number internationally. Also, Twilio supports official helper libraries for different programming languages, including PHP, enforcing its suite of APIs.
#️⃣ First of all, sign up for Twilio and navigate to the default (provided) trial account (project).
I noticed that creating free subsidiary accounts (projects) more than once may lead to the permanent suspension of a Twilio user account. So, I recommend using the default trial account (project) for each new iteration if not subscribed to a paid plan.
Figure - 94.127
#️⃣ After verifying a phone number for the selected account (project), set the initial account settings for SMS in PHP.
Figure - 94.128
#️⃣ To configure the SMS settings, go to Messaging ➡ Send an SMS.
#️⃣ Since a virtual phone number is required to transfer an SMS via Twilio, click Get a Twilio number.
Figure - 94.129
#️⃣ Since Twilio provides a trial (free) 10DLC phone number for each trial account, it lets the user utilize the text messaging service immediately after assigning a virtual phone number to the given account.
#️⃣ After activating the virtual number, download the Twilio PHP Helper Library to send an SMS via the web application.
Figure - 94.130
#️⃣ Finally, go to Geo permissions to adjust the allowed recipients depending on your region.
Figure - 94.131
#️⃣ After configuring SMS settings, go to Account ➡ API keys & tokens to get the account SID and the auth token under Live credentials so as to employ Twilio's SMS API to send SMS.
Figure - 94.132
Step 6: Developing a web application to communicate w/ the Android app and process requests from FireBeetle 2 ESP32-S3
Since I needed to obtain the model detection results and the resulting image from FireBeetle 2 ESP32-S3 after running the object detection model so as to notify the user, I decided to develop a basic web application to utilize Twilio's SMS API.
Also, the web application converts the received raw image buffer (RGB565) to a JPG file and draws the bounding box generated by the model on the converted image by executing a Python script.
In addition to creating the modified resulting images, the web application transfers the latest object detection results, the prediction dates, and the modified resulting images (URLs) to the Android application in an indexed list as the response to an HTTP GET request.
As shown below, the web application consists of four folders and four code files:
/assets
-- /twilio-php-main
-- class.php
/detections
-- /images
-- rgb565_converter.py
results.php
update.php
Figure - 94.133
Figure - 94.134
📁 class.php
In the class.php file, I created a class named _main to bundle the following functions under a specific structure.
⭐ Include the Twilio PHP Helper Library.
require_once 'twilio-php-main/src/Twilio/autoload.php';
use Twilio\Rest\Client;
⭐ Define the _main class and its functions.
⭐ In the __init__ function, define the Twilio account credentials, object, and the Twilio-verified phone number.
class _main {
	public $conn;
	private $twilio;

	public function __init__($conn){
		$this->conn = $conn;
		// Define the Twilio account information and object.
		$_sid    = <__SID__>";
        $token  = "<__TOKEN__>";
        $this->twilio = new Client($_sid, $token);
		// Define the user and the Twilio-verified phone numbers.
		$this->user_phone = "+___________";
		$this->from_phone = "+___________";
	}
⭐ In the insert_new_results function, save the object detection model results, the prediction date, and the resulting image file name to the detections MySQL database table.
	public function insert_new_results($date, $img_name, $class){
		$sql_insert = "INSERT INTO `detections`(`date`, `img_name`, `class`)
		               VALUES ('$date', '$img_name', '$class');"
			          ;
		if(mysqli_query($this->conn, $sql_insert)){ return true; } else{ return false; }
	}
⭐ In the get_model_results function, retrieve all model detection results and the associated resulting image file names from the detections database table in descending order, transferred by FireBeetle 2 ESP32-S3.
	public function get_model_results(){
		$date=[]; $class=[]; $img_name=[];
		$sql_data = "SELECT * FROM `detections` ORDER BY `id` DESC";
		$result = mysqli_query($this->conn, $sql_data);
		$check = mysqli_num_rows($result);
		if($check > 0){
			while($row = mysqli_fetch_assoc($result)){
				array_push($date, $row["date"]);
				array_push($class, $row["class"]);
				array_push($img_name, $row["img_name"]);
			}
			return array($date, $class, $img_name);
		}else{
			return array(["Not Found!"], ["Not Found!"], ["waiting.png"]);
		}
	}
⭐ In the Twilio_send_SMS function:
⭐ Configure the Twilio SMS object with the given message.
⭐ Then, send an SMS to the Twilio-verified phone number via the SMS API.
	public function Twilio_send_SMS($body){
		// Configure the SMS object.
        $sms_message = $this->twilio->messages
			->create($this->user_phone,
				array(
					   "from" => $this->from_phone,
                       "body" => $body
                     )
                );
		// Send the SMS.
		echo("SMS SID: ".$sms_message->sid);
	}
⭐ Define the required MySQL database connection settings for LattePanda 3 Delta 864.
⭐ If FireBeetle 2 ESP32-S3 transfers the object detection model results via GET query parameters, save the received information to the detections MySQL database table.
⭐ If FireBeetle 2 ESP32-S3 transfers a resulting image via an HTTP POST request after running the object detection model:
⭐ Save the received raw image buffer (RGB565) as a TXT file to the detections folder.
⭐ Execute the rgb565_converter.py file with the built-in shell_exec function to convert the saved RGB565 buffer to a JPG file. While executing the Python code, pass the received bounding box measurements (via GET query parameters) as Python Arguments.
⭐ After generating the JPG file, remove the recently converted TXT file from the server.
⭐ After saving the received model detection results and the generated resulting image name to the detections database table successfully, send an SMS to the given user phone number via Twilio so as to notify the user, including the resulting image URL path.
if(!empty($_FILES["resulting_image"]['name'])){
// Image File:
$received_img_properties = array(
"name" => $_FILES["resulting_image"]["name"],
"tmp_name" => $_FILES["resulting_image"]["tmp_name"],
"size" => $_FILES["resulting_image"]["size"],
"extension" => pathinfo($_FILES["resulting_image"]["name"], PATHINFO_EXTENSION)
);
// Check whether the uploaded file's extension is in the allowed file formats.
$allowed_formats = array('jpg', 'png', 'bmp', 'txt');
if(!in_array($received_img_properties["extension"], $allowed_formats)){
echo 'FILE => File Format Not Allowed!';
}else{
// Check whether the uploaded file size exceeds the 5 MB data limit.
if($received_img_properties["size"] > 5000000){
echo "FILE => File size cannot exceed 5MB!";
}else{
// Save the uploaded file (image).
move_uploaded_file($received_img_properties["tmp_name"], "./detections/".$img_file.".".$received_img_properties["extension"]);
echo "FILE => Saved Successfully!";
}
}
// Convert the recently saved RGB565 buffer (TXT file) to a JPG image file by executing the rgb565_converter.py file.
// Transmit the passed bounding box measurements (query parameters) as Python Arguments.
$raw_convert = shell_exec('python "C:\Users\kutlu\New E\xampp\htdocs\mechanical_anomaly_detector\detections\rgb565_converter.py" --x='.$_GET["x"].' --y='.$_GET["y"].' --w='.$_GET["w"].' --h='.$_GET["h"]);
print($raw_convert);
// After generating the JPG file, remove the converted TXT file from the server.
unlink("./detections/".$img_file.".txt");
// After saving the generated JPG file and the received model detection results to the MySQL database table successfully,
// send an SMS to the given user phone number via Twilio in order to inform the user of the latest detection results, including the resulting image.
$message_body = "⚠️🚨⚙️ Anomaly Detected ⚠️🚨⚙️"
."\n\r\n\r📌 Faulty Part: ".$_GET["class"]
."\n\r\n\r⏰ Date: ".$date
."\n\r\n\r🌐 🖼️ http://192.168.1.22/mechanical_anomaly_detector/detections/images/".$img_file.".jpg"
."\n\r\n\r📲 Please refer to the Android application to inspect the resulting image index.";
$anomaly->Twilio_send_SMS($message_body);
}
⭐ 📁 results.php
⭐ Include the class.php file.
⭐ Define the anomaly object of the _main class.
include_once "assets/class.php";
// Define the new 'anomaly ' object:
$anomaly = new _main();
$anomaly->__init__($conn);
⭐ Fetch all model detection results and the associated resulting image file names from the detections database table in descending order.
⭐ Generate a comma-separated string list from the retrieved data records. If there are not enough data records to create a list of three elements, fill the list with default variables.
⭐ Then, print the generated string list.
$date=[]; $class=[]; $img_name=[];
list($date, $class, $img_name) = $anomaly->get_model_results();
// Print the retrieved results as a list separated by commas.
$web_app_img_path = "http://192.168.1.22/mechanical_anomaly_detector/detections/images/";
$data_packet = "";
for($i=0;$i<3;$i++){
if(isset($date[$i])){
$data_packet .= $class[$i].",".$date[$i].",".$web_app_img_path.$img_name[$i].",";
}else{
$data_packet .= "Not Found!,Not Found!,".$web_app_img_path."waiting.png,";
}
}
echo($data_packet);
Figure - 94.135
Figure - 94.136
Figure - 94.137
Step 6.1: Converting the buffers transferred by FireBeetle 2 ESP32-S3 via POST requests to JPG files and obtaining the resulting bounding box measurements as Python Arguments
As explained earlier, FireBeetle 2 ESP32-S3 cannot modify resulting image buffers (RGB565) to draw bounding boxes generated by the object detection model directly. Therefore, I utilized the web application to process the resulting image buffers, convert them to JPG files, and add bounding boxes to the converted images.
I programmed a simple Python script to perform the mentioned operations. Since the Python script accepts parameters as Python Arguments, the web application passes the bounding box measurements received via GET query parameters effortlessly.
You can inspect the code for modifying RGB565 image buffers and passing Python Arguments below — rgb565_converter.py.
⭐ Include the required modules.
import argparse
from glob import glob
import numpy as np
from PIL import Image, ImageDraw
⭐ Enable Python Arguments and acquire the bounding box measurements passed by the web application.
⭐ Obtain all the RGB565 buffer arrays transferred by FireBeetle 2 ESP32-S3 and saved as text (.txt) files in the detections folder.
⭐ Convert each retrieved RGB565 buffer (TXT file) to a JPG image file.
⭐ Then, modify the converted JPG file to draw the model bounding box by utilizing the passed measurements.
⭐ Finally, save the modified resulting image with the provided file name to the images folder under the detections folder.
if __name__ == '__main__':
parser = argparse.ArgumentParser()
parser.add_argument("--x", required=True, help="bounding box [X]")
parser.add_argument("--y", required=True, help="bounding box [Y]")
parser.add_argument("--w", required=True, help="bounding box [Width]")
parser.add_argument("--h", required=True, help="bounding box [Height]")
args = parser.parse_args()
x = int(args.x)
y = int(args.y)
w = int(args.w)
h = int(args.h)
# Obtain all RGB565 buffer arrays transferred by FireBeetle 2 ESP32-S3 as text (.txt) files.
path = "C:\\Users\\kutlu\\New E\\xampp\\htdocs\\mechanical_anomaly_detector\\detections"
images = glob(path + "/*.txt")
# Convert each RGB565 buffer (TXT file) to a JPG image file and save the generated image files to the images folder.
for img in images:
loc = path + "/images/" + img.split("\\")[8].split(".")[0] + ".jpg"
size = (240,240)
# RGB565 (uint16_t) to RGB (3x8-bit pixels, true color)
raw = np.fromfile(img).byteswap(True)
file = Image.frombytes('RGB', size, raw, 'raw', 'BGR;16', 0, 1)
# Modify the converted RGB buffer (image) to draw the received bounding box on the resulting image.
offset = 50
m_file = ImageDraw.Draw(file)
m_file.rectangle([(x, y), (x+w+offset, y+h+offset)], outline=(225,255,255), width=3)
file.save(loc)
#print("Converted: " + loc)
Figure - 94.138
Figure - 94.139
Figure - 94.140
Step 6.2: Setting and running the web application on LattePanda 3 Delta
Since I wanted to build a budget-friendly and accessible AIoT mechanical anomaly detector not dependent on cloud or hosting services, I decided to host my web application on LattePanda 3 Delta 864. Therefore, I needed to set up a LAMP web server.
LattePanda 3 Delta is a pocket-sized hackable computer that provides ultra performance with the Intel 11th-generation Celeron N5105 processor.
Plausibly, LattePanda 3 Delta can run the XAMPP application. So, it is effortless to create a server with a MariaDB database on LattePanda 3 Delta.
#️⃣ Then, go to the XAMPP Control Panel and click the MySQL Admin button.
#️⃣ Once the phpMyAdmin tool pops up, create a new database named mechanical_anomaly.
Figure - 94.141
Figure - 94.142
#️⃣ After adding the database successfully, go to the SQL section to create a MySQL database table named detections with the required data fields.
CREATE TABLE `detections`(
id int AUTO_INCREMENT PRIMARY KEY NOT NULL,
`date` varchar(255) NOT NULL,
img_name varchar(255) NOT NULL,
`class` varchar(255) NOT NULL
);
Figure - 94.143
Figure - 94.144
Figure - 94.145
Step 7: Setting up FireBeetle 2 ESP32-S3 and Beetle ESP32-C3 on Arduino IDE
Since the Fermion IPS TFT display provides a microSD card module to read and write files on a microSD card, I decided to capture image samples with the built-in OV2640 camera on FireBeetle 2 ESP32-S3 and save them directly without applying any additional data transfer procedures.
I employed Beetle ESP32-C3 to communicate with the Android application over BLE to obtain the given user commands (for instance, the selected component class for image sample collection) and transfer audio-based neural network model detection results. Also, I utilized Beetle ESP32-C3 to send the BLE-transmitted commands to FireBeetle 2 ESP32-S3 via serial communication as a proxy.
Since I utilized Beetle ESP32-C3 in combination with FireBeetle 2 ESP32-S3, I needed to set both development boards on the Arduino IDE, install the required libraries, and configure some default settings before proceeding with the following steps.
#️⃣ To add the FireBeetle 2 ESP32-S3 board package to the Arduino IDE, navigate to File ➡ Preferences and paste the URL below under Additional Boards Manager URLs.
#️⃣ Then, to install the required core, navigate to Tools ➡ Board ➡ Boards Manager and search for esp32.
Figure - 94.148
Figure - 94.149
#️⃣ After installing the core, navigate to Tools ➡ Board ➡ ESP32 Arduino and select DFRobot FireBeetle 2 ESP32-S3.
Figure - 94.150
#️⃣ To ensure the FireBeetle 2 ESP32-S3 integrated hardware functions work faultlessly, configure some default ESP32 board settings on the Arduino IDE.
#️⃣ To add the Beetle ESP32-C3 board package to the Arduino IDE, after following the steps above, navigate to Tools ➡ Board ➡ ESP32 Arduino and select ESP32C3 Dev Module.
Figure - 94.152
#️⃣ Download and inspect the required libraries for the Fermion IPS TFT display, the Fermion I2S MEMS microphone, and the AXP313A power output:
#️⃣ To be able to display images (icons) on the Fermion TFT display, convert image files to a C/C++ array format. I decided to utilize an online converter to save image files in the XBM format, a monochrome bitmap format in which data is stored as a C data array.
#️⃣ Then, save all the converted C arrays in the XBM format to the logo.h file.
Figure - 94.153
Figure - 94.154
Step 8: Recording sound-based anomaly samples via the Android application
As explained earlier, Beetle ESP32-C3 does not have a secondary storage option for audio sample collection via the onboard I2S microphone. Therefore, I decided to capitalize on the phone microphone and internal storage via the Android application while recording audio samples.
#️⃣ First of all, I utilized the specialized components (parts) to manifest a mechanical anomaly by shifting the timing belt and jamming the GT2 60T pulley.
#️⃣ Due to the fact that the pulley is jammed, the servo motor starts vibrating and humming, which demonstrates an audio-based mechanical anomaly.
Figure - 94.155
⚙️⚠️🔊📲 After installing the Mechanical Anomaly Detector application, open the user interface and search for the peripheral device named BLE Anomaly Detector to communicate with Beetle ESP32-C3 over BLE.
⚙️⚠️🔊📲 If the Scan button is pressed, the Android application searches for compatible peripheral devices and shows their address information as a list.
⚙️⚠️🔊📲 If the Stop button is pressed, the Android application suspends the scanning process.
Figure - 94.156
Figure - 94.157
⚙️⚠️🔊📲 If the Connect button is pressed, the Android application attempts to connect to the selected peripheral device.
Figure - 94.158
Figure - 94.159
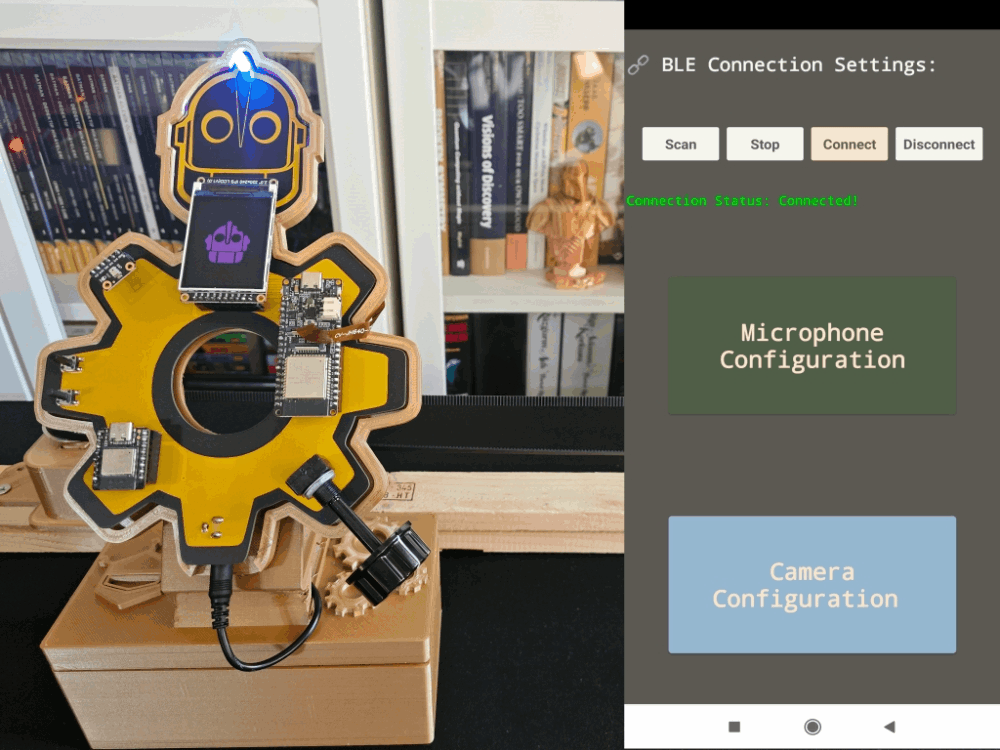
⚙️⚠️🔊📲 As the Android application connects to Beetle ESP32-C3 over BLE successfully, the application shows two main configuration options on the interface:
Microphone Configuration
Camera Configuration
Figure - 94.160
⚙️⚠️🔊📲 To record a new audio sample, go to the microphone configuration section and select an audio-based anomaly class via the spinner:
NORMAL
ANOMALY
Figure - 94.161
Figure - 94.162
⚙️⚠️🔊📲 After selecting an audio-based anomaly class, click the Record Sample button to start recording a new audio sample.
⚙️⚠️🔊📲 The Android application adds the current date & time to the file name of the recording audio sample and displays its internal storage path.
⚙️⚠️🔊📲 When the Stop Recording button is pressed, the Android application halts recording and saves the currently recorded sample of the selected class to the internal storage.
NORMAL_01_11_2024_06_13_13.3gp
ANOMALY_01_11_2024_06_22_46.3gp
Figure - 94.163
Figure - 94.164
Figure - 94.165
Figure - 94.166
⚙️⚠️🔊📲 Since the Android application can only access the ASD (app-specific dir) without additional permission, it saves the audio samples (3GP files) to the audio_samples folder in the root directory of the application.
⚙️⚠️🔊📲 The Android application saves 3GP audio samples since the built-in sound recorder object of the MIT APP Inventor only supports the 3GP format.
Figure - 94.167
Figure - 94.168
After conducting tests with the specialized components (parts) to manifest mechanical deviations and collecting audio-based anomaly samples via the Android application, I acquired a valid and notable data set for the neural network model (audio classification).
Figure - 94.169
Figure - 94.170
Step 9: Capturing faulty component (part) images w/ the built-in OV2640 camera
After setting FireBeetle 2 ESP32-S3 and Beetle ESP32-C3 on the Arduino IDE, I programmed FireBeetle 2 ESP32-S3 to communicate with Beetle ESP32-C3 to obtain the commands transferred by the Android application via serial communication, capture raw image buffers, convert the captured buffers to JPG files, and save them as samples to the microSD card on the Fermion TFT display.
Since I needed to add color-coded component classes as labels to the file names of each sample while collecting data to create a valid data set for the object detection model, I decided to utilize the Android application to transmit commands to Beetle ESP32-C3 over BLE. Then, I utilized Beetle ESP32-C3 as a proxy to transfer the passed commands to FireBeetle 2 ESP32-S3 via serial communication so as to capture an image sample with the incrementing sample number and save it to the microSD card with the selected class. Despite the fact that the Android application supports remote image sample collection, I decided to provide the user to collect image samples onboard (manually) considering the extreme operating conditions. In this regard, I connected a long-shaft potentiometer and two control buttons to Beetle ESP32-C3 in order to let the user transfer commands to FireBeetle 2 ESP32-S3 via serial communication manually.
Since different UUID sets, a 128-bit value used to specifically identify an object or entity, are required to assign services and characteristics for a stable BLE connection, it is crucial to generate individualized UUIDs with an online UUID generator. After generating your UUIDs, you can update the given UUIDs, as shown below.
As explained earlier, this mechanical anomaly detector is composed of two separate development boards — FireBeetle 2 ESP32-S3 and Beetle ESP32-C3 — performing interconnected features for data collection and running neural network models. Therefore, the described code snippets are parts of separate code files. Please refer to the code files to inspect all interconnected functions in detail.
⭐ Check the BLE initialization status and print the Beetle ESP32-C3 address information on the serial monitor.
while(!BLE.begin()){
Serial.println("BLE initialization is failed!");
}
Serial.println("\nBLE initialization is successful!\n");
// Print this peripheral device's address information:
Serial.print("MAC Address: "); Serial.println(BLE.address());
Serial.print("Service UUID Address: "); Serial.println(Anomaly_Detector.uuid()); Serial.println();
⭐ Set the local name (BLE Anomaly Detector) for Beetle ESP32-C3 and the UUID for the advertised (transmitted) service.
⭐ Add the given data characteristics to the service. Then, add the given service to the advertising device.
⭐ Assign event handlers for connected and disconnected devices to/from Beetle ESP32-C3.
⭐ Assign event handlers for the data characteristics modified (written) by the central device (via the Android application). In this regard, obtain the transferred (written) data packets from the Android application over BLE.
BLE.setLocalName("BLE Anomaly Detector");
// Set the UUID for the service this peripheral advertises:
BLE.setAdvertisedService(Anomaly_Detector);
// Add the given data characteristics to the service:
Anomaly_Detector.addCharacteristic(audio_detected_Characteristic);
Anomaly_Detector.addCharacteristic(selected_img_class_Characteristic);
Anomaly_Detector.addCharacteristic(given_command_Characteristic);
// Add the given service to the advertising device:
BLE.addService(Anomaly_Detector);
// Assign event handlers for connected and disconnected devices to/from this peripheral:
BLE.setEventHandler(BLEConnected, blePeripheralConnectHandler);
BLE.setEventHandler(BLEDisconnected, blePeripheralDisconnectHandler);
// Assign event handlers for the data characteristics modified (written) by the central device (via the Android application).
// In this regard, obtain the transferred (written) data packets from the Android application over BLE.
selected_img_class_Characteristic.setEventHandler(BLEWritten, get_central_BLE_updates);
given_command_Characteristic.setEventHandler(BLEWritten, get_central_BLE_updates);
// Start advertising:
BLE.advertise();
Serial.println("Bluetooth device active, waiting for connections...");
⭐ If the long-shaft potentiometer value is altered from its previous value, change the selected component class depending on the current potentiometer value for image sample collection. Then, adjust the RGB LED according to the assigned color code of the selected class.
⭐ If the control button (A) is pressed, transfer the given image class (selected manually or via BLE) to FireBeetle 2 ESP32-S3 via serial communication.
⭐ If the control button (B) is pressed, transfer the Run Inference command to FireBeetle 2 ESP32-S3 via serial communication.
⭐ Obtain the recently transmitted data packets from the central device over BLE via the Android application.
⭐ If the user transmits a component class via the Android application, transfer the passed image class to FireBeetle 2 ESP32-S3 via serial communication for image sample collection.
⭐ If the user sends a device command via the Android application, decode the received data packet to acquire the transmitted command (number).
⭐ From 30 to 120, change the interval for running the neural network model (audio classification) to detect sound-based mechanical anomalies.
⭐ Greater than 130, transfer the Run Inference command to FireBeetle 2 ESP32-S3 via serial communication.
void get_central_BLE_updates(BLEDevice central, BLECharacteristic characteristic){
delay(500);
// Obtain the recently transferred data packets from the central device over BLE.
if(characteristic.uuid() == selected_img_class_Characteristic.uuid()){
// Get the given image class for data collection.
selected_img_class = selected_img_class_Characteristic.value();
if(selected_img_class == 0) adjustColor(true, false, false);
if(selected_img_class == 1) adjustColor(false, true, false);
if(selected_img_class == 2) adjustColor(false, false, true);
Serial.print("\nSelected Image Data Class (BLE) => "); Serial.println(selected_img_class);
// Transfer the passed image class to FireBeetle 2 ESP32-S3 via serial communication.
Serial1.print("IMG_Class=" + String(selected_img_class)); delay(500);
}
if(characteristic.uuid() == given_command_Characteristic.uuid()){
int command = given_command_Characteristic.value();
// Change the interval for running the neural network model (microphone) to detect mechanical anomalies.
if(command < 130){
audio_model_interval = command;
Serial.print("\nGiven Model Interval (Audio) => "); Serial.println(audio_model_interval);
// Force FireBeetle 2 ESP32-S3 to run the object detection model despite not detecting a mechanical anomaly via the neural network model (microphone).
}else if(command > 130){
Serial1.print("Run Inference"); delay(500); adjustColor(true, false, true);
}
}
}
⭐ If Beetle ESP32-C3 transfers the selected component (part) class (adjusted manually or received via the Android application) via serial communication:
⭐ Decode the received data packet as substrings to acquire the passed component class.
⭐ Capture a new frame (RGB565 buffer) with the onboard OV2640 camera.
⭐ Convert the captured RGB565 buffer to a JPEG buffer by executing the built-in frame2jpg function.
⭐ Depending on the passed component (part) class:
⭐ Generate the file name with the current sample number of the passed class.
⭐ Save the converted frame as an image sample to the microSD card.
⭐ Notify the user on the Fermion TFT LCD display by displaying the assigned class icon.
⭐ Increase the sample number of the passed class.
⭐ Then, draw the recently saved image sample on the screen to ensure the sample quality.
⭐ Finally, release the image buffers.
if(data_packet != ""){
Serial.println("\nReceived Data Packet => " + data_packet);
// If Beetle ESP32 - C3 transfers a component (part) class via serial communication:
if(data_packet.indexOf("IMG_Class") > -1){
// Decode the received data packet to elicit the passed class.
int delimiter_1 = data_packet.indexOf("=");
// Glean information as substrings.
String s = data_packet.substring(delimiter_1 + 1);
int given_class = s.toInt();
// Capture a new frame (RGB565 buffer) with the OV2640 camera.
camera_fb_t *fb = esp_camera_fb_get();
if(!fb){ Serial.println("Camera => Cannot capture the frame!"); return; }
// Convert the captured RGB565 buffer to JPEG buffer.
size_t con_len;
uint8_t *con_buf = NULL;
if(!frame2jpg(fb, 10, &con_buf, &con_len)){ Serial.println("Camera => Cannot convert the RGB565 buffer to JPEG!"); return; }
delay(500);
// Depending on the given component (part) class, save the converted frame as a sample to the SD card.
String file_name = "";
file_name = "/" + classes[given_class] + "_" + String(sample_number[given_class]) + ".jpg";
// After defining the file name by adding the sample number, save the converted frame to the SD card.
if(save_image(SD, file_name.c_str(), con_buf, con_len)){
screen.fillScreen(COLOR_RGB565_BLACK);
screen.setTextColor(class_color[given_class]);
screen.setTextSize(2);
// Display the assigned class icon.
screen.drawXBitmap(/*x=*/10,/*y=*/250,/*bitmap gImage_Bitmap=*/save_bits,/*w=*/save_width,/*h=*/save_height,/*color=*/class_color[given_class]);
screen.setCursor(20+save_width, 255);
screen.println("IMG Saved =>");
screen.setCursor(20+save_width, 275);
screen.println(file_name);
delay(1000);
// Increase the sample number of the given class.
sample_number[given_class]+=1;
Serial.println("\nImage Sample Saved => " + file_name);
// Draw the recently saved image sample on the screen to notify the user.
decoder.drawPicture(/*filename=*/file_name.c_str(),/*sx=*/0,/*sy=*/0,/*ex=*/240,/*ey=*/240,/*screenDrawPixel=*/screenDrawPixel);
delay(1000);
}else{
screen.fillScreen(COLOR_RGB565_BLACK);
screen.setTextColor(class_color[given_class]);
screen.setTextSize(2);
screen.drawXBitmap(/*x=*/10,/*y=*/250,/*bitmap gImage_Bitmap=*/save_bits,/*w=*/save_width,/*h=*/save_height,/*color=*/class_color[given_class]);
screen.setCursor(20+save_width, 255);
screen.println("SD Card =>");
screen.setCursor(20+save_width, 275);
screen.println("File Error!");
delay(1000);
}
// Release the image buffers.
free(con_buf);
esp_camera_fb_return(fb);
...
⭐ In the save_image function:
⭐ Create a new file with the given file name on the microSD card.
⭐ Save the given image buffer to the generated file on the microSD card.
bool save_image(fs::FS &fs, const char *file_name, uint8_t *data, size_t len){
// Create a new file on the SD card.
volatile boolean sd_run = false;
File file = fs.open(file_name, FILE_WRITE);
if(!file){ Serial.println("SD Card => Cannot create file!"); return sd_run; }
// Save the given image buffer to the created file on the SD card.
if(file.write(data, len) == len){
Serial.printf("SD Card => IMG saved: %s\n", file_name);
sd_run = true;
}else{
Serial.println("SD Card => Cannot save the given image!");
}
file.close();
return sd_run;
}
Figure - 94.172
Figure - 94.173
Step 9.1: Saving the captured images as samples via the Android application
In any Bluetooth® Low Energy (also referred to as Bluetooth® LE or BLE) connection, devices can have one of these two roles: the central and the peripheral. A peripheral device (also called a client) advertises or broadcasts information about itself to devices in its range, while a central device (also called a server) performs scans to listen for devices broadcasting information. You can get more information regarding BLE connections and procedures, such as services and characteristics, from here.
To avoid latency or packet loss while advertising (transmitting) audio-based model detection results and receiving data packets from the Android application over BLE, I utilized an individual float data characteristic for the advertised information and byte data characteristics for the incoming information.
#️⃣ As explained earlier, I designed three specialized components (color-coded) representing the defective parts causing mechanical anomalies in a production line.
#️⃣ I conducted additional tests with each color-coded component to construct a valid image data set for the object detection model.
Figure - 94.174
Figure - 94.175
Figure - 94.176
⚙️⚠️🔊📲 To select a component (part) class on the Android application, go to the camera configuration section.
⚙️⚠️🔊📲 After selecting a component class via the spinner, the Android application transmits the selected class to Beetle ESP32-C3 over BLE when the user clicks the Capture Sample button.
⚙️⚠️🔊📲 As Beetle ESP32-C3 receives the transmitted class over BLE, it sends the passed class to FireBeetle 2 ESP32-S3 via serial communication for image sample collection.
Figure - 94.177
Figure - 94.178
Figure - 94.179
Figure - 94.180
⚙️⚠️🔊📲 Although the Android application lets the user capture image samples remotely, Beetle ESP32-C3 supports selecting a component class by changing the current potentiometer value by hand.
⚙️⚠️🔊📲 When the user presses the control button (A), Beetle ESP32-C3 sends the manually selected class to FireBeetle 2 ESP32-S3 via serial communication for image sample collection.
Figure - 94.181
Figure - 94.182
⚙️⚠️🔊📲 When a component class is selected manually or via the Android application, Beetle ESP32-C3 adjusts the RGB LED according to the assigned color code of the selected class.
Red
Green
Blue
⚙️⚠️🔊📲 After FireBeetle 2 ESP32-S3 receives the selected class from Beetle ESP32-C3 via serial communication, it captures an image sample of the passed class via the built-in OV2640 camera and saves the captured sample with the incremented sample number of the passed class via the built-in microSD card module on the Fermion TFT display.
Red_6.jpg
Green_8.jpg
Blue_12.jpg
⚙️⚠️🔊📲 After saving an image sample successfully, FireBeetle 2 ESP32-S3 shows the recently saved image sample (JPG file) and the Saved icon with the associated class color on the TFT display so as to inform the user of the sample quality.
Figure - 94.183
Figure - 94.184
Figure - 94.185
Figure - 94.186
Figure - 94.187
Figure - 94.188
Figure - 94.189
Figure - 94.190
⚙️⚠️🔊📲 Also, Beetle ESP32-C3 prints progression notifications on the serial monitor for debugging.
Figure - 94.191
After collecting image samples of faulty components (color-coded) manifesting mechanical anomalies, I constructed a valid and notable image data set for the object detection model.
Figure - 94.192
Figure - 94.193
Figure - 94.194
Step 10: Building a neural network model with Edge Impulse
As explained earlier, I built a basic frequency-controlled apparatus (the X-axis timing belt system) to demonstrate mechanical deviations since I did not have the resources to conduct experiments in an industrial plant.
Then, I utilized the specialized components (3D-printed) to restrict the timing belt movements to engender mechanical anomalies. While recording audio samples for audio classification, I simply differentiate the samples with the current operation status:
normal
anomaly
When I completed collecting audio samples via the Android application, I started to work on my artificial neural network model (ANN) to detect sound-based mechanical anomalies before diagnosing the root cause of the manifested deviation.
Since Edge Impulse supports almost every microcontroller and development board due to its model deployment options, I decided to utilize Edge Impulse to build my artificial neural network model. Also, Edge Impulse makes scaling embedded ML applications easier and faster for edge devices such as Beetle ESP32-C3.
Furthermore, Edge Impulse provides the required tools for inspecting audio samples, slicing them into smaller windows, and modifying windows to extract features. Although Edge Impulse supports various audio formats (WAV, MP4, etc.), it does not support the 3GP format yet. Therefore, I needed to follow the steps below to format my data set so as to train my neural network model for audio classification accurately:
Data Formatting
Data Labeling
As explained in the following step, I programmed a simple Python script to convert the 3GP audio samples recorded by the Android application to the WAV format compatible with Edge Impulse. Nevertheless, you can utilize an online converter for the file conversion while constructing your data set for simplicity.
Plausibly, Edge Impulse allows building predictive models optimized in size and accuracy exceptionally and deploying the trained model as an Arduino library. Therefore, after formatting and preprocessing my data set, I was able to build a valid neural network model for audio classification to detect sound-based mechanical anomalies and run the model on Beetle ESP32-C3 without any additional requirements.
Step 10.1: Converting the recorded 3GP audio samples to WAV
Since Edge Impulse does not support audio samples in the 3GP format, I needed to convert my audio samples to the officially supported WAV format for audio classification.
Even though there are various methods to convert audio files, including online converters, I decided to program a simple Python script (3gp_to_WAV.py) to modify my samples since it might be hindering to employ online tools for constructing large data sets.
Since I employed the ffmpeg module for the file conversion, I needed to run my Python script on a Linux operating system. Thankfully, I have a secondary Ubuntu operating system installed on LattePanda 3 Delta. Therefore, I booted into Ubuntu and started converting my audio samples effortlessly.
#️⃣ First of all, install the ffmpeg module on Ubuntu.
sudo apt-get install ffmpeg
Figure - 94.195
📁 In the 3gp_to_WAV.py file:
⭐ Include the required modules.
⭐ Obtain all 3GP audio samples in the audio_samples folder.
⭐ Convert each 3GP file to the WAV format and save them in the wav folder.
from glob import glob
import os
from time import sleep
path = "/home/kutluhan/Desktop/audio_samples"
audio_files = glob(path + "/*.3gp")
for audio in audio_files:
new_path = audio.replace("audio_samples/", "audio_samples/wav/")
new_path = new_path.replace(".3gp", ".wav")
os.system('ffmpeg -i ' + audio + ' ' + new_path)
Figure - 94.196
Figure - 94.197
Figure - 94.198
Step 10.2: Uploading formatted samples to Edge Impulse
After collecting training and testing audio samples, I uploaded them to my project on Edge Impulse.
#️⃣ First of all, sign up for Edge Impulse and create a new project.
Figure - 94.199
#️⃣ Navigate to the Data acquisition page and click the Upload data icon.
Figure - 94.200
#️⃣ Choose the data category (training or testing) and select WAV audio files.
#️⃣ Utilize the Enter Label section to label audio samples manually with the operation status mentioned in the file names.
#️⃣ Then, click the Upload data button to upload the selected audio samples.
Figure - 94.201
Figure - 94.202
Figure - 94.203
Figure - 94.204
Figure - 94.205
Figure - 94.206
Figure - 94.207
Step 10.3: Training the model on sound-based anomalous behavior
After uploading and labeling my training and testing samples successfully, I designed an impulse and trained the model to detect sound-based mechanical anomalies.
An impulse is a custom neural network model in Edge Impulse. I created my impulse by employing the Audio (MFE) processing block and the Classification learning block.
As mentioned earlier, Edge Impulse supports splitting raw audio samples into multiple windows by adjusting the parameters of the Time series data section.
Window size — duration in milliseconds
Window increase — offset (padding) of each subsequent window
The MFE (Mel Frequency Energy) signal processing block simplifies the generated raw audio windows, which contain a large amount of redundant information.
The Classification learning block represents a Keras neural network model. Also, it lets the user change the model settings, architecture, and layers.
#️⃣ Go to the Create impulse page and set Window size and Window increase parameters to 2000 and 600 respectively. In this regard, slice the given training and testing raw audio samples.
Figure - 94.208
#️⃣ Before generating features for the neural network model, go to the MFE page to configure the MFE block if required.
#️⃣ Since the MFE block transforms a generated window into a table of data where each row represents a range of frequencies and each column represents a span of time, you can configure block parameters to adjust the frequency amplitude to change the MFE's output — spectrogram.
#️⃣ After inspecting each audio sample, I decided to utilize the default MFE parameters since my audio samples are simple enough not to require precise tuning.
#️⃣ Click Save parameters to save the given MFE parameters.
Figure - 94.209
Figure - 94.210
Figure - 94.211
Figure - 94.212
#️⃣ After saving parameters, click Generate features to apply the MFE signal processing block to training samples.
Figure - 94.213
Figure - 94.214
#️⃣ Finally, navigate to the Classifier page and click Start training.
Figure - 94.215
Figure - 94.216
According to my experiments with my neural network model, I modified the neural network settings and architecture to build a neural network model with high accuracy and validity:
📌 Neural network settings:
Number of training cycles ➡ 100
Learning rate ➡ 0.010
Validation set size ➡ 10
After generating features and training my model with training samples, Edge Impulse evaluated the precision score (accuracy) as 100%.
The precision score (accuracy) is approximately 100% due to the modest volume of training samples of sound-based mechanical anomalies, manifesting only timing belt malfunctions due to defective parts. Since the model can easily identify the inflicted anomaly, it performs excellently with a single-anomaly-type validation set. Therefore, I highly recommend retraining the model with specific mechanical deviation sounds before running inferences to detect complex system flaws in a production line.
Figure - 94.217
Figure - 94.218
Step 10.4: Evaluating the model accuracy and deploying the model
After building and training my neural network model, I tested its accuracy and validity by utilizing testing samples.
The evaluated accuracy of the model is 100%.
#️⃣ To validate the trained model, go to the Model testing page and click Classify all.
Figure - 94.219
Figure - 94.220
Figure - 94.221
After validating my neural network model, I deployed it as a fully optimized and customizable Arduino library.
#️⃣ To deploy the validated model as an Arduino library, navigate to the Deployment page and search for Arduino library.
#️⃣ Then, choose the Quantized (int8) optimization option to get the best performance possible while running the deployed model.
#️⃣ Finally, click Build to download the model as an Arduino library.
Figure - 94.222
Figure - 94.223
Figure - 94.224
Step 11: Building an object detection (FOMO) model with Edge Impulse
When I completed capturing images of specialized components representing defective parts causing mechanical deviations in a production line and storing the captured samples on the microSD card, I started to work on my object detection (FOMO) model to diagnose the root cause of the detected mechanical anomaly as a result of audio classification.
Since Edge Impulse supports almost every microcontroller and development board due to its model deployment options, I decided to utilize Edge Impulse to build my object detection model. Also, Edge Impulse provides an elaborate machine learning algorithm (FOMO) for running more accessible and faster object detection models on edge devices such as FireBeetle 2 ESP32-S3.
Edge Impulse FOMO (Faster Objects, More Objects) is a novel machine learning algorithm that brings object detection to highly constrained devices. FOMO models can count objects, find the location of the detected objects in an image, and track multiple objects in real-time, requiring up to 30x less processing power and memory than MobileNet SSD or YOLOv5.
Even though Edge Impulse supports JPG or PNG files to upload as samples directly, each target object in a training or testing sample needs to be labeled manually. Therefore, I needed to follow the steps below to format my data set so as to train my object detection model accurately:
Data Scaling (Resizing)
Data Labeling
Since I added the component (part) classes and assigned sample numbers to the file names while capturing images of 3D-printed components (color-coded), I preprocessed my data set effortlessly to label each target object on an image sample on Edge Impulse by utilizing the color-coded component name:
Red
Green
Blue
Plausibly, Edge Impulse allows building predictive models optimized in size and accuracy exceptionally and deploying the trained model as a supported firmware (Arduino library) for FireBeetle 2 ESP32-S3. Therefore, after scaling (resizing) and preprocessing my data set to label target objects, I was able to build an accurate object detection model to recognize specialized components (parts), which runs on FireBeetle 2 ESP32-S3 without any additional requirements.
Step 11.1: Uploading images (samples) to Edge Impulse and labeling objects
After collecting training and testing image samples, I uploaded them to my project on Edge Impulse. Then, I labeled each target object on the image samples.
#️⃣ First of all, sign up for Edge Impulse and create a new project.
Figure - 94.225
Figure - 94.226
#️⃣ To be able to label image samples manually on Edge Impulse for object detection models, go to Dashboard ➡ Project info ➡ Labeling method and select Bounding boxes (object detection).
Figure - 94.227
#️⃣ Navigate to the Data acquisition page and click the Upload data icon.
Figure - 94.228
#️⃣ Then, choose the data category (training or testing), select image files, and click the Upload data button.
Figure - 94.229
Figure - 94.230
Figure - 94.231
Figure - 94.232
Figure - 94.233
After uploading my data set successfully, I labeled each target object on the image samples by utilizing the color-coded component (part) class names. In Edge Impulse, labeling an object is as easy as dragging a box around it and entering a class. Also, Edge Impulse runs a tracking algorithm in the background while labeling objects, so it moves the bounding boxes automatically for the same target objects in different images.
#️⃣ Go to Data acquisition ➡ Labeling queue. It shows all unlabeled items (training and testing) remaining in the given data set.
#️⃣ Finally, select an unlabeled item, drag bounding boxes around target objects, click the Save labels button, and repeat this process until all samples have at least one labeled target object.
Figure - 94.234
Figure - 94.235
Figure - 94.236
Figure - 94.237
Figure - 94.238
Figure - 94.239
Figure - 94.240
Figure - 94.241
Figure - 94.242
Step 11.2: Training the FOMO model on the faulty component images
After labeling target objects on my training and testing samples successfully, I designed an impulse and trained the model on detecting specialized components representing faulty parts causing mechanical anomalies in a production line.
An impulse is a custom neural network model in Edge Impulse. I created my impulse by employing the Image preprocessing block and the Object Detection (Images) learning block.
The Image preprocessing block optionally turns the input image format to grayscale and generates a features array from the raw image.
The Object Detection (Images) learning block represents a machine learning algorithm that detects objects on the given image, distinguished between model labels.
In this case, I configured the input image format as RGB since the 3D-printed components (parts) are identical except for their colors.
#️⃣ Go to the Create impulse page and set image width and height parameters to 240. Then, select the resize mode parameter as Fit shortest axis so as to scale (resize) given training and testing image samples.
#️⃣ Select the Image preprocessing block and the Object Detection (Images) learning block. Finally, click Save Impulse.
Figure - 94.243
#️⃣ Before generating features for the object detection model, go to the Image page and set the Color depth parameter as RGB. Then, click Save parameters.
Figure - 94.244
#️⃣ After saving parameters, click Generate features to apply the Image preprocessing block to training image samples.
Figure - 94.245
Figure - 94.246
#️⃣ After generating features successfully, navigate to the Object detection page and click Start training.
Figure - 94.247
Figure - 94.248
According to my experiments with my object detection model, I modified the neural network settings and architecture to build an object detection model with high accuracy and validity:
📌 Neural network settings:
Number of training cycles ➡ 70
Learning rate ➡ 0.015
Validation set size ➡ 10
📌 Neural network architecture:
FOMO (Faster Objects, More Objects) MobileNetV2 0.35
After generating features and training my FOMO model with training samples, Edge Impulse evaluated the F1 score (accuracy) as 90.9%.
The F1 score (accuracy) is approximately 90.9% due to the modest volume of training samples of diverse defective parts with distinct shapes and colors. Since the model can precisely recognize the 3D-printed components (parts) that are identical but their colors, it performs excellently with a small validation set. Therefore, I highly recommend retraining the model with the specific faulty parts for the targeted production line before running inferences.
Figure - 94.249
Step 11.3: Evaluating the model accuracy and deploying the model
After building and training my object detection model, I tested its accuracy and validity by utilizing testing image samples.
The evaluated accuracy of the model is 66.67%.
#️⃣ To validate the trained model, go to the Model testing page and click Classify all.
Figure - 94.250
Figure - 94.251
Figure - 94.252
After validating my object detection model, I deployed it as a fully optimized and customizable Arduino library.
#️⃣ To deploy the validated model as an Arduino library, navigate to the Deployment page and search for Arduino library.
#️⃣ Then, choose the Quantized (int8) optimization option to get the best performance possible while running the deployed model.
#️⃣ Finally, click Build to download the model as an Arduino library.
Figure - 94.253
Figure - 94.254
Figure - 94.255
Step 12: Setting up the neural network model on Beetle ESP32-C3
After building, training, and deploying my neural network model as an Arduino library on Edge Impulse, I needed to upload the generated Arduino library on Beetle ESP32-C3 to run the model directly so as to detect sound-based mechanical anomalies with minimal latency, memory usage, and power consumption.
Since Edge Impulse optimizes and formats signal processing, configuration, and learning blocks into a single package while deploying models as Arduino libraries, I was able to import my model effortlessly to run inferences.
#️⃣ After downloading the model as an Arduino library in the ZIP file format, go to Sketch ➡ Include Library ➡ Add .ZIP Library...
#️⃣ Then, include the AI-Based_Mechanical_Anomaly_Detector_Audio__inferencing.h file to import the Edge Impulse neural network model.
After importing my model successfully to the Arduino IDE, I programmed Beetle ESP32-C3 to run inferences to detect sound-based mechanical anomalies.
Then, I employed Beetle ESP32-C3 to transfer the model detection results to the Android application via BLE after running an inference successfully.
As explained earlier, Beetle ESP32-C3 can communicate with the Android application over BLE to receive commands and transfer data packets to FireBeetle 2 ESP32-S3 via serial communication.
Since interconnected features for data collection and running neural network models are parts of two separate code files, you can check the overlapping functions and instructions in Step 9. Please refer to the code files to inspect all interconnected functions in detail.
📁 AIoT_Mechanical_Anomaly_Detector_Audio.ino
⭐ Define the required parameters to run an inference with the Edge Impulse neural network model for audio classification.
⭐ Obtain the data generated by the I2S microphone and save it to the input buffer — sampleBuffer.
⭐ If the I2S microphone works accurately, scale (resize) the collected audio buffer (data) depending on the given model. Otherwise, the sound might be too quiet for audio classification.
bool microphone_sample(int range){
// Display the collected audio data according to the given range (sensitivity).
// Serial.print(range * -1); Serial.print(" "); Serial.print(range); Serial.print(" ");
// Obtain the information generated by the I2S microphone and save it to the input buffer — sampleBuffer.
size_t bytesIn = 0;
esp_err_t result = i2s_read(I2S_PORT, &sampleBuffer, sample_buffer_size, &bytesIn, portMAX_DELAY);
// If the I2S microphone generates audio data successfully:
if(result == ESP_OK){
Serial.println("\nAudio Data Generated Successfully!");
// Depending on the given model, scale (resize) the collected audio buffer (data) by the I2S microphone. Otherwise, the sound might be too quiet.
for(int x = 0; x < bytesIn/2; x++) {
sampleBuffer[x] = (int16_t)(sampleBuffer[x]) * 8;
}
/*
// Display the average audio data reading on the serial plotter.
int16_t samples_read = bytesIn / 8;
if(samples_read > 0){
float mean = 0;
for(int16_t i = 0; i < samples_read; ++i){ mean += (sampleBuffer[i]); }
mean /= samples_read;
Serial.println(mean);
}
*/
return true;
}else{
Serial.println("\nAudio Data Failed!");
return false;
}
}
⭐ In the run_inference_to_make_predictions function:
⭐ Summarize the Edge Impulse neural network model inference settings and print them on the serial monitor.
⭐ If the I2S microphone generates an audio (data) buffer successfully:
⭐ Create a signal object from the resized (scaled) audio buffer.
⭐ Run an inference.
⭐ Print the inference timings on the serial monitor.
⭐ Obtain the prediction results for each label (class).
⭐ Print the model detection results on the serial monitor.
⭐ Get the imperative predicted label (class).
⭐ Print inference anomalies on the serial monitor, if any.
void run_inference_to_make_predictions(){
// Summarize the Edge Impulse neural network model inference settings (from model_metadata.h):
ei_printf("\nInference settings:\n");
ei_printf("\tInterval: "); ei_printf_float((float)EI_CLASSIFIER_INTERVAL_MS); ei_printf(" ms.\n");
ei_printf("\tFrame size: %d\n", EI_CLASSIFIER_DSP_INPUT_FRAME_SIZE);
ei_printf("\tSample length: %d ms.\n", EI_CLASSIFIER_RAW_SAMPLE_COUNT / 16);
ei_printf("\tNo. of classes: %d\n", sizeof(ei_classifier_inferencing_categories) / sizeof(ei_classifier_inferencing_categories[0]));
// If the I2S microphone generates an audio (data) buffer successfully:
bool sample = microphone_sample(2000);
if(sample){
// Run inference:
ei::signal_t signal;
// Create a signal object from the resized (scaled) audio buffer.
signal.total_length = EI_CLASSIFIER_RAW_SAMPLE_COUNT;
signal.get_data = µphone_audio_signal_get_data;
// Run the classifier:
ei_impulse_result_t result = { 0 };
EI_IMPULSE_ERROR _err = run_classifier(&signal, &result, false);
if(_err != EI_IMPULSE_OK){
ei_printf("ERR: Failed to run classifier (%d)\n", _err);
return;
}
// Print the inference timings on the serial monitor.
ei_printf("\nPredictions (DSP: %d ms., Classification: %d ms., Anomaly: %d ms.): \n",
result.timing.dsp, result.timing.classification, result.timing.anomaly);
// Obtain the prediction results for each label (class).
for(size_t ix = 0; ix < EI_CLASSIFIER_LABEL_COUNT; ix++){
// Print the prediction results on the serial monitor.
ei_printf("%s:\t%.5f\n", result.classification[ix].label, result.classification[ix].value);
// Get the imperative predicted label (class).
if(result.classification[ix].value >= threshold) predicted_class = ix;
}
ei_printf("\nPredicted Class: %d [%s]\n", predicted_class, classes[predicted_class]);
// Detect anomalies, if any:
#if EI_CLASSIFIER_HAS_ANOMALY == 1
ei_printf("Anomaly: ");
ei_printf_float(result.anomaly);
ei_printf("\n");
#endif
// Release the audio buffer.
//ei_free(sampleBuffer);
}
}
⭐ In the microphone_audio_signal_get_data function, convert the passed audio data buffer from the I2S microphone to the out_ptr format required by the Edge Impulse neural network model.
static int microphone_audio_signal_get_data(size_t offset, size_t length, float *out_ptr){
// Convert the given microphone (audio) data (buffer) to the out_ptr format required by the Edge Impulse neural network model.
numpy::int16_to_float(&sampleBuffer[offset], out_ptr, length);
return 0;
}
⭐ In the update_characteristics function, update the float data characteristic to transmit (advertise) the detected sound-based mechanical anomaly.
void update_characteristics(float detection){
// Update the selected characteristics over BLE.
audio_detected_Characteristic.writeValue(detection);
Serial.println("\n\nBLE: Data Characteristics Updated Successfully!\n");
}
⭐ Every 80 seconds, the default model interval which can be configured from 30 to 120 via the Android application, run an inference with the Edge Impulse neural network model.
⭐ If the model detects a sound-based mechanical anomaly successfully:
⭐ Transfer the model detection results to the Android application over BLE.
⭐ Via serial communication, make FireBeetle 2 ESP32-S3 run the object detection model to diagnose the root cause of the detected mechanical anomaly.
⭐ Clear the predicted class (label).
⭐ Finally, update the timer.
if(millis() - timer > audio_model_interval*1000){
// Run inference.
run_inference_to_make_predictions();
// If the Edge Impulse neural network model detects a mechanical anomaly successfully:
if(predicted_class > -1){
// Update the audio detection characteristic via BLE.
update_characteristics(predicted_class);
delay(2000);
// Make FireBeetle 2 ESP32-S3 to run the object detection model to diagnose the root cause of the detected mechanical anomaly.
if(classes[predicted_class] == "anomaly") Serial1.print("Run Inference"); delay(500); adjustColor(true, false, true);
// Clear the predicted class (label).
predicted_class = -1;
}
// Update the timer:
timer = millis();
}
Figure - 94.256
Figure - 94.257
Figure - 94.258
Figure - 94.259
Figure - 94.260
Step 13: Setting up the object detection model on FireBeetle 2 ESP32-S3
After building, training, and deploying my object detection model as an Arduino library on Edge Impulse, I needed to upload the generated Arduino library to FireBeetle 2 ESP32-S3 to run the model directly so as to recognize the specialized components (parts) with minimal latency, memory usage, and power consumption.
Since Edge Impulse optimizes and formats signal processing, configuration, and learning blocks into a single package while deploying models as Arduino libraries, I was able to import my model effortlessly to run inferences.
#️⃣ After downloading the model as an Arduino library in the ZIP file format, go to Sketch ➡ Include Library ➡ Add .ZIP Library...
#️⃣ Then, include the AI-Based_Mechanical_Anomaly_Detector_Camera__inferencing.h file to import the Edge Impulse object detection model.
After importing my model successfully to the Arduino IDE, I programmed FireBeetle 2 ESP32-S3 to run inferences to diagnose the root cause of the inflicted mechanical anomaly.
As explained earlier, FireBeetle 2 ESP32-S3 runs an inference with the object detection model automatically if Beetle ESP32-C3 detects a sound-based mechanical anomaly. Nevertheless, the user can force FireBeetle 2 ESP32-S3 to run the object detection model manually or via the Android application for debugging.
Since interconnected features for data collection and running neural network models are parts of two separate code files, you can check the overlapping functions and instructions in Step 9. Please refer to the code files to inspect all interconnected functions in detail.
📁 AIoT_Mechanical_Anomaly_Detector_Camera.ino
⭐ Include the built-in Edge Impulse image functions.
⭐ Define the required parameters to run an inference with the Edge Impulse FOMO model.
#include "edge-impulse-sdk/dsp/image/image.hpp"
// Define the required parameters to run an inference with the Edge Impulse FOMO model.
#define CAPTURED_IMAGE_BUFFER_COLS 240
#define CAPTURED_IMAGE_BUFFER_ROWS 240
#define EI_CAMERA_FRAME_BYTE_SIZE 3
uint8_t *ei_camera_capture_out;
⭐ Define the color-coded component (part) class names.
String classes[] = {"red", "green", "blue"};
⭐ Define the Wi-Fi network and the web application settings hosted by LattePanda 3 Delta 864.
⭐ Initialize the WiFiClient object.
char ssid[] = "<__SSID__>"; // your network SSID (name)
char pass[] = "<__PASSWORD__>"; // your network password (use for WPA, or use as key for WEP)
int keyIndex = 0; // your network key Index number (needed only for WEP)
// Define the server on LattePanda 3 Delta 864.
char server[] = "192.168.1.22";
// Define the web application path.
String application = "/mechanical_anomaly_detector/update.php";
// Initialize the WiFiClient object.
WiFiClient client; /* WiFiSSLClient client; */
⭐ Create a struct (_data) including all resulting bounding box parameters.
⭐ Initialize the Wi-Fi module and attempt to connect to the given Wi-Fi network.
WiFi.mode(WIFI_STA);
WiFi.begin(ssid, pass);
// Attempt to connect to the given Wi-Fi network.
while(WiFi.status() != WL_CONNECTED){
// Wait for the network connection.
delay(500);
Serial.print(".");
}
// If connected to the network successfully:
Serial.println("Connected to the Wi-Fi network successfully!");
⭐ In the run_inference_to_make_predictions function:
⭐ Summarize the Edge Impulse FOMO model inference settings and print them on the serial monitor.
⭐ Convert the passed RGB565 raw image buffer to an RGB888 image buffer by utilizing the built-in fmt2rgb888 function.
⭐ Depending on the given model, resize the converted RGB888 buffer by utilizing built-in Edge Impulse image functions.
⭐ Create a signal object from the converted and resized image buffer.
⭐ Run an inference.
⭐ Print the inference timings on the serial monitor.
⭐ Obtain labels (classes) and bounding box measurements for each detected target object on the given image buffer.
⭐ Print the model detection results and the calculated bounding box measurements on the serial monitor.
⭐ Get the imperative predicted label (class) and save its bounding box measurements as the box struct parameters.
⭐ Print inference anomalies on the serial monitor, if any.
⭐ Release the image buffer.
void run_inference_to_make_predictions(camera_fb_t *fb){
// Summarize the Edge Impulse FOMO model inference settings (from model_metadata.h):
ei_printf("\nInference settings:\n");
ei_printf("\tImage resolution: %dx%d\n", EI_CLASSIFIER_INPUT_WIDTH, EI_CLASSIFIER_INPUT_HEIGHT);
ei_printf("\tFrame size: %d\n", EI_CLASSIFIER_DSP_INPUT_FRAME_SIZE);
ei_printf("\tNo. of classes: %d\n", sizeof(ei_classifier_inferencing_categories) / sizeof(ei_classifier_inferencing_categories[0]));
if(fb){
// Convert the captured RGB565 buffer to RGB888 buffer.
ei_camera_capture_out = (uint8_t*)malloc(CAPTURED_IMAGE_BUFFER_COLS * CAPTURED_IMAGE_BUFFER_ROWS * EI_CAMERA_FRAME_BYTE_SIZE);
if(!fmt2rgb888(fb->buf, fb->len, PIXFORMAT_RGB565, ei_camera_capture_out)){ Serial.println("Camera => Cannot convert the RGB565 buffer to RGB888!"); return; }
// Depending on the given model, resize the converted RGB888 buffer by utilizing built-in Edge Impulse functions.
ei::image::processing::crop_and_interpolate_rgb888(
ei_camera_capture_out, // Output image buffer, can be same as input buffer
CAPTURED_IMAGE_BUFFER_COLS,
CAPTURED_IMAGE_BUFFER_ROWS,
ei_camera_capture_out,
EI_CLASSIFIER_INPUT_WIDTH,
EI_CLASSIFIER_INPUT_HEIGHT);
// Run inference:
ei::signal_t signal;
// Create a signal object from the converted and resized image buffer.
signal.total_length = EI_CLASSIFIER_INPUT_WIDTH * EI_CLASSIFIER_INPUT_HEIGHT;
signal.get_data = &ei_camera_cutout_get_data;
// Run the classifier:
ei_impulse_result_t result = { 0 };
EI_IMPULSE_ERROR _err = run_classifier(&signal, &result, false);
if(_err != EI_IMPULSE_OK){
ei_printf("ERR: Failed to run classifier (%d)\n", _err);
return;
}
// Print the inference timings on the serial monitor.
ei_printf("\nPredictions (DSP: %d ms., Classification: %d ms., Anomaly: %d ms.): \n",
result.timing.dsp, result.timing.classification, result.timing.anomaly);
// Obtain the object detection results and bounding boxes for the detected labels (classes).
bool bb_found = result.bounding_boxes[0].value > 0;
for(size_t ix = 0; ix < EI_CLASSIFIER_OBJECT_DETECTION_COUNT; ix++){
auto bb = result.bounding_boxes[ix];
if(bb.value == 0) continue;
// Print the calculated bounding box measurements on the serial monitor.
ei_printf(" %s (", bb.label);
ei_printf_float(bb.value);
ei_printf(") [ x: %u, y: %u, width: %u, height: %u ]\n", bb.x, bb.y, bb.width, bb.height);
// Get the imperative predicted label (class) and the detected object's bounding box measurements.
if(bb.label == "red") predicted_class = 0;
if(bb.label == "green") predicted_class = 1;
if(bb.label == "blue") predicted_class = 2;
box.x = String(bb.x);
box.y = String(bb.y);
box.w = String(bb.width);
box.h = String(bb.height);
ei_printf("\nPredicted Class: %d [%s]\n", predicted_class, classes[predicted_class]);
}
if(!bb_found) ei_printf("\nNo objects found!\n");
// Detect anomalies, if any:
#if EI_CLASSIFIER_HAS_ANOMALY == 1
ei_printf("Anomaly: ");
ei_printf_float(result.anomaly);
ei_printf("\n");
#endif
// Release the image buffer.
free(ei_camera_capture_out);
}
}
⭐ In the ei_camera_cutout_get_data function,
⭐ Convert the passed image data (buffer) to the out_ptr format required by the Edge Impulse FOMO model.
⭐ Since the given image data is already converted to an RGB888 buffer and resized, directly recalculate the given offset into pixel index.
static int ei_camera_cutout_get_data(size_t offset, size_t length, float *out_ptr){
// Convert the given image data (buffer) to the out_ptr format required by the Edge Impulse FOMO model.
size_t pixel_ix = offset * 3;
size_t pixels_left = length;
size_t out_ptr_ix = 0;
// Since the image data is converted to an RGB888 buffer, directly recalculate offset into pixel index.
while(pixels_left != 0){
out_ptr[out_ptr_ix] = (ei_camera_capture_out[pixel_ix] << 16) + (ei_camera_capture_out[pixel_ix + 1] << 8) + ei_camera_capture_out[pixel_ix + 2];
// Move to the next pixel.
out_ptr_ix++;
pixel_ix+=3;
pixels_left--;
}
return 0;
}
⭐ In the make_a_post_request function:
⭐ Connect to the web application named mechanical_anomaly_detector.
⭐ Create the query string by adding the given URL query (GET) parameters, including model detection results and the bounding box measurements.
⭐ Define the boundary parameter named AnomalyResult so as to send the captured raw image buffer (RGB565) as a TXT file to the web application.
⭐ Get the total content length.
⭐ Make an HTTP POST request with the created query string to the web application in order to transfer the captured raw image buffer as a TXT file and the model detection results.
⭐ Wait until transferring the image buffer.
void make_a_post_request(camera_fb_t * fb, String request){
// Connect to the web application named mechanical_anomaly_detector. Change '80' with '443' if you are using SSL connection.
if (client.connect(server, 80)){
// If successful:
Serial.println("\nConnected to the web application successfully!\n");
// Create the query string:
String query = application + request;
// Make an HTTP POST request:
String head = "--AnomalyResult\r\nContent-Disposition: form-data; name=\"resulting_image\"; filename=\"new_image.txt\"\r\nContent-Type: text/plain\r\n\r\n";
String tail = "\r\n--AnomalyResult--\r\n";
// Get the total message length.
uint32_t totalLen = head.length() + fb->len + tail.length();
// Start the request:
client.println("POST " + query + " HTTP/1.1");
client.println("Host: 192.168.1.22");
client.println("Content-Length: " + String(totalLen));
client.println("Connection: Keep-Alive");
client.println("Content-Type: multipart/form-data; boundary=AnomalyResult");
client.println();
client.print(head);
client.write(fb->buf, fb->len);
client.print(tail);
// Wait until transferring the image buffer.
delay(2000);
// If successful:
Serial.println("HTTP POST => Data transfer completed!\n");
}else{
Serial.println("\nConnection failed to the web application!\n");
delay(2000);
}
}
⭐ If Beetle ESP32-C3 transfers the Run Inference command via serial communication:
⭐ Capture a new frame (RGB565 buffer) with the onboard OV2640 camera.
⭐ Run an inference with the Edge Impulse FOMO model to make predictions on the specialized component (part) classes.
⭐ If the Edge Impulse FOMO model detects a component (part) class successfully:
⭐ Define the query (GET) parameters, including the calculated bounding box measurements.
⭐ Send the model detection results, the bounding box measurements, and the resulting image (RGB565 buffer) to the given web application via an HTTP POST request.
⭐ Then, notify the user by showing the Gear icon with the assigned class color on the Fermion TFT display.
⭐ Clear the predicted class (label).
⭐ Release the image buffer.
⭐ Finally, clear the data packet received via serial communication and return to the initialization screen.
...
}else if(data_packet.indexOf("Run") > -1){
// Capture a new frame (RGB565 buffer) with the OV2640 camera.
camera_fb_t *fb = esp_camera_fb_get();
if(!fb){ Serial.println("Camera => Cannot capture the frame!"); return; }
// Run inference.
run_inference_to_make_predictions(fb);
// If the Edge Impulse FOMO model detects a component (part) class successfully:
if(predicted_class > -1){
// Define the query parameters, including the passed bounding box measurements.
String query = "?results=OK&class=" + classes[predicted_class]
+ "&x=" + box.x
+ "&y=" + box.y
+ "&w=" + box.w
+ "&h=" + box.h;
// Make an HTTP POST request to the given web application so as to transfer the model results, including the resulting image and the bounding box measurements.
make_a_post_request(fb, query);
// Notify the user of the detected component (part) class on the Fermion TFT LCD display.
screen.fillScreen(COLOR_RGB565_BLACK);
screen.setTextColor(class_color[predicted_class]);
screen.setTextSize(4);
// Display the gear icon with the assigned class color.
screen.drawXBitmap(/*x=*/(240-gear_width)/2,/*y=*/(320-gear_height)/2,/*bitmap gImage_Bitmap=*/gear_bits,/*w=*/gear_width,/*h=*/gear_height,/*color=*/class_color[predicted_class]);
screen.setCursor((240-(classes[predicted_class].length()*20))/2, ((320-gear_height)/2)+gear_height+30);
String t = classes[predicted_class];
t.toUpperCase();
screen.println(t);
delay(3000);
// Clear the predicted class (label).
predicted_class = -1;
}else{
screen.fillScreen(COLOR_RGB565_BLACK);
screen.setTextColor(COLOR_RGB565_WHITE);
screen.drawXBitmap(/*x=*/(240-gear_width)/2,/*y=*/(320-gear_height)/2,/*bitmap gImage_Bitmap=*/gear_bits,/*w=*/gear_width,/*h=*/gear_height,/*color=*/COLOR_RGB565_WHITE);
delay(3000);
}
// Release the image buffer.
esp_camera_fb_return(fb);
}
// Clear the received data packet.
data_packet = "";
// Return to the initialization screen.
delay(500);
s_init = true;
}
Figure - 94.261
Figure - 94.262
Figure - 94.263
Figure - 94.264
Step 14: Running neural network and object detection models simultaneously to inform the user of the root cause of the detected anomaly via SMS
My Edge Impulse neural network model predicts possibilities of labels (operation status classes) for the given audio (features) buffer as an array of 2 numbers. They represent the model's "confidence" that the given features buffer corresponds to each of the two different status classes [0 - 1], as shown in Step 10:
0 — anomaly
1 — normal
My Edge Impulse object detection (FOMO) model scans a captured image buffer and predicts possibilities of trained labels to recognize a target object on the given picture. The prediction result (score) represents the model's "confidence" that the detected object corresponds to each of the three different color-coded component (part) classes [0 - 2], as shown in Step 11:
0 — blue
1 — green
2 — red
You can inspect overlapping Android application features, such as BLE peripheral scanning in the previous steps.
After setting up and running both models on Beetle ESP32-C3 and FireBeetle 2 ESP32-S3:
⚙️⚠️🔊📲 The Android application allows the user to configure the model interval value for running the neural network model for audio classification.
⚙️⚠️🔊📲 To change the model interval over BLE, go to the microphone configuration section and adjust the slider from 30 to 120 seconds.
⚙️⚠️🔊📲 Then, click the Set Interval button to update the default model interval — 80 seconds.
Figure - 94.265
Figure - 94.266
Figure - 94.267
⚙️⚠️🔊📲 If the neural network model detects a sound-based mechanical anomaly successfully, Beetle ESP32-C3 transmits the model detection results to the Android application over BLE.
Figure - 94.268
Figure - 94.269
⚙️⚠️🔊📲 Then, Beetle ESP32-C3, via serial communication, makes FireBeetle 2 ESP32-S3 run the object detection model to diagnose the root cause of the detected sound-based mechanical anomaly.
Figure - 94.270
Figure - 94.271
⚙️⚠️🔊📲 In addition to consecutive model running, the user can force FireBeetle 2 ESP32-S3 to run the object detection model:
by manually pressing the control button (B),
or via the Android application by clicking the Run Inference button on the microphone configuration section.
Figure - 94.272
Figure - 94.273
⚙️⚠️🔊📲 If the object detection model cannot detect a specialized component (part), FireBeetle 2 ESP32-S3 displays the Gear icon as white on the Fermion TFT screen.
Figure - 94.274
⚙️⚠️🔊📲 After detecting a specialized component representing a defective part causing mechanical deviations in a production line, FireBeetle 2 ESP32-S3 notifies the user by showing the Gear icon with the assigned class color on the Fermion TFT display.
Red
Green
Blue
Figure - 94.275
Figure - 94.276
Figure - 94.277
Figure - 94.278
Figure - 94.279
Figure - 94.280
⚙️⚠️🔊📲 Then, FireBeetle 2 ESP32-S3 sends the model detection results, the bounding box measurements, and the resulting image (RGB565 buffer) to the web application via an HTTP POST request.
⚙️⚠️🔊📲 After obtaining the information transferred by FireBeetle 2 ESP32-S3, the web application:
saves the results with the generated resulting image name to the detections MySQL database table,
saves the raw image buffer (RGB565) as a TXT file,
converts the saved RGB565 buffer to a JPG file by executing a Python script,
passes the received bounding box measurements (via GET query parameters) as Python Arguments to the Python script to modify the converted JPG file to draw the model bounding box,
then sends an SMS to the user's phone number via Twilio so as to inform the user of the diagnosed root cause (component), including the resulting image URL path.
Figure - 94.281
Figure - 94.282
Figure - 94.283
Figure - 94.284
⚙️⚠️🔊📲 When requested by the Android application via an HTTP GET request, the web application yields a list of three elements from the data records in the database table, including the latest model detection results, the prediction dates, and the modified resulting images (URLs).
⚙️⚠️🔊📲 If there are not enough data records to create a list of three elements, the web application fills each missing element with default variables.
⚙️⚠️🔊📲 As the user clicks the Get latest detection button on the camera configuration section, the Android application makes an HTTP GET request to the web application in order to acquire the mentioned list.
⚙️⚠️🔊📲 Then, the Android application utilizes this list to showcase the latest diagnosed root causes of the inflicted mechanical anomalies on the camera configuration section.
Figure - 94.285
Figure - 94.286
Figure - 94.287
Figure - 94.288
⚙️⚠️🔊📲 Also, Beetle ESP32-C3 and FireBeetle 2 ESP32-S3 print progression notifications on the serial monitor for debugging.
Figure - 94.289
Figure - 94.290
Figure - 94.291
After conducting various experiments, I obtained pretty accurate results for detecting sound-based mechanical anomalies and the specialized components representing the faulty parts causing deviations in a production line.
Figure - 94.292
Figure - 94.293
Videos and Conclusion
Further Discussions
By applying multi-model methods (audio classification and object detection) to detect sound-based mechanical anomalies and diagnose the root causes of the detected deviations, we can achieve to:
⚙️⚠️🔊📲 maintain stable and profitable production lines,
⚙️⚠️🔊📲 diagnose the crux of the system failure to expedite the overhaul process,
⚙️⚠️🔊📲 eliminate the defective parts engendering mechanical anomalies,
⚙️⚠️🔊📲 assist operators in pinpointing potential mechanical failures,
⚙️⚠️🔊📲 avoid expensive part replacements due to neglected mechanical anomalies.
Figure - 94.294
References
[1]Anomaly Detection in Industrial Machinery using IoT Devices and Machine Learning: a Systematic Mapping, 14 Nov 2023, https://arxiv.org/pdf/2307.15807.pdf.
[2] Martha Rodríguez, Diana P. Tobón, Danny Múnera, Anomaly classification in industrial Internet of things: A review, Intelligent Systems with Applications, Volume 18, 2023, ISSN 2667-3053, https://doi.org/10.1016/j.iswa.2023.200232.
[3]Industrial Anomaly Detection in manufacturing, Supper & Supper, https://supperundsupper.com/en/usecases/industrial-anomaly-detection-in-manufacturing.
/////////////////////////////////////////////
// Multi-Model AI-Based Mechanical //
// Anomaly Detector w/ BLE //
// --------------- //
// (Beetle ESP32 - C3) //
// by Kutluhan Aktar //
// //
/////////////////////////////////////////////
//
// Apply sound data-based anomalous behavior detection, diagnose the root cause via object detection concurrently, and inform the user via SMS.
//
// For more information:
// https://www.theamplituhedron.com/projects/Multi_Model_AI_Based_Mechanical_Anomaly_Detector
//
//
// Connections
// Beetle ESP32 - C3 :
// Fermion: I2S MEMS Microphone
// 3.3V ------------------------ 3v3
// 0 ------------------------ WS
// GND ------------------------ SEL
// 1 ------------------------ SCK
// 4 ------------------------ DO
// Long-Shaft Linear Potentiometer
// 2 ------------------------ S
// Control Button (A)
// 8 ------------------------ +
// Control Button (B)
// 9 ------------------------ +
// 5mm Common Anode RGB LED
// 5 ------------------------ R
// 6 ------------------------ G
// 7 ------------------------ B
// FireBeetle 2 ESP32-S3
// RX (20) ------------------------ TX (43)
// TX (21) ------------------------ RX (44)
// Include the required libraries:
#include
#include
#include
// Include the Edge Impulse neural network model converted to an Arduino library:
#include
// Define the required parameters to run an inference with the Edge Impulse neural network model.
#define sample_buffer_size 512
int16_t sampleBuffer[sample_buffer_size];
// Define the threshold value for the model outputs (predictions).
float threshold = 0.60;
// Define the anomaly class names:
String classes[] = {"anomaly", "normal"};
// Create the BLE service:
BLEService Anomaly_Detector("e1bada10-a728-44c6-a577-6f9c24fe980a");
// Create data characteristics and allow the remote device (central) to write, read, and notify:
BLEFloatCharacteristic audio_detected_Characteristic("e1bada10-a728-44c6-a577-6f9c24fe984a", BLERead | BLENotify);
BLEByteCharacteristic selected_img_class_Characteristic("e1bada10-a728-44c6-a577-6f9c24fe981a", BLERead | BLEWrite);
BLEByteCharacteristic given_command_Characteristic("e1bada10-a728-44c6-a577-6f9c24fe983a", BLERead | BLEWrite);
// Define the Fermion I2S MEMS microphone configurations.
#define I2S_SCK 1
#define I2S_WS 0
#define I2S_SD 4
#define DATA_BIT (16) //16-bit
// Define the I2S processor port.
#define I2S_PORT I2S_NUM_0
// Define the potentiometer settings.
#define potentiometer_pin 2
// Define the RGB pin settings.
#define red_pin 5
#define green_pin 6
#define blue_pin 7
// Define the control buttons.
#define control_button_1 8
#define control_button_2 9
// Define the data holders:
volatile boolean _connected = false;
int predicted_class = -1;
int pre_pot_value = 0, selected_img_class, audio_model_interval = 80;
long timer;
void setup(){
Serial.begin(115200);
// Initiate the serial communication between Beetle ESP32 - C3 and FireBeetle 2 ESP32-S3.
Serial1.begin(9600, SERIAL_8N1, /*RX=*/20, /*TX=*/21);
pinMode(red_pin, OUTPUT); pinMode(green_pin, OUTPUT); pinMode(blue_pin, OUTPUT);
digitalWrite(red_pin, HIGH); digitalWrite(green_pin, HIGH); digitalWrite(blue_pin, HIGH);
pinMode(control_button_1, INPUT_PULLUP);
pinMode(control_button_2, INPUT_PULLUP);
// Configure the I2S port for the I2S microphone.
i2s_install(EI_CLASSIFIER_FREQUENCY);
i2s_setpin();
i2s_start(I2S_PORT);
delay(1000);
// Check the BLE initialization status:
while(!BLE.begin()){
Serial.println("BLE initialization is failed!");
}
Serial.println("\nBLE initialization is successful!\n");
// Print this peripheral device's address information:
Serial.print("MAC Address: "); Serial.println(BLE.address());
Serial.print("Service UUID Address: "); Serial.println(Anomaly_Detector.uuid()); Serial.println();
// Set the local name this peripheral advertises:
BLE.setLocalName("BLE Anomaly Detector");
// Set the UUID for the service this peripheral advertises:
BLE.setAdvertisedService(Anomaly_Detector);
// Add the given data characteristics to the service:
Anomaly_Detector.addCharacteristic(audio_detected_Characteristic);
Anomaly_Detector.addCharacteristic(selected_img_class_Characteristic);
Anomaly_Detector.addCharacteristic(given_command_Characteristic);
// Add the given service to the advertising device:
BLE.addService(Anomaly_Detector);
// Assign event handlers for connected and disconnected devices to/from this peripheral:
BLE.setEventHandler(BLEConnected, blePeripheralConnectHandler);
BLE.setEventHandler(BLEDisconnected, blePeripheralDisconnectHandler);
// Assign event handlers for the data characteristics modified (written) by the central device (via the Android application).
// In this regard, obtain the transferred (written) data packets from the Android application over BLE.
selected_img_class_Characteristic.setEventHandler(BLEWritten, get_central_BLE_updates);
given_command_Characteristic.setEventHandler(BLEWritten, get_central_BLE_updates);
// Start advertising:
BLE.advertise();
Serial.println("Bluetooth device active, waiting for connections...");
delay(5000);
// Update the timer.
timer = millis();
}
void loop(){
// Poll for BLE events:
BLE.poll();
// If the potentiometer value is altered, change the selected image class for data collection manually.
int current_pot_value = map(analogRead(potentiometer_pin), 360, 4096, 0, 10);
delay(100);
if(abs(current_pot_value-pre_pot_value) > 1){
if(current_pot_value == 0){ adjustColor(true, true, true); }
if(current_pot_value > 0 && current_pot_value <= 3){ adjustColor(true, false, false); selected_img_class = 0; }
if(current_pot_value > 3 && current_pot_value <= 7){ adjustColor(false, true, false); selected_img_class = 1; }
if(current_pot_value > 7){ adjustColor(false, false, true); selected_img_class = 2; }
pre_pot_value = current_pot_value;
}
// If the control button (A) is pressed, transfer the given image class (manually or via BLE) to FireBeetle 2 ESP32-S3 via serial communication.
if(!digitalRead(control_button_1)){ Serial1.print("IMG_Class=" + String(selected_img_class)); delay(500); adjustColor(false, true, true); }
// If the control button (B) is pressed, force FireBeetle 2 ESP32-S3 to run the object detection model despite not detecting a mechanical anomaly via the neural network model (microphone).
if(!digitalRead(control_button_2)){ Serial1.print("Run Inference"); delay(500); adjustColor(true, false, true); }
// Depending on the configured model interval (default 80 seconds) via the Android application, run the Edge Impulse neural network model to detect mechanical anomalies via the I2S microphone.
if(millis() - timer > audio_model_interval*1000){
// Run inference.
run_inference_to_make_predictions();
// If the Edge Impulse neural network model detects a mechanical anomaly successfully:
if(predicted_class > -1){
// Update the audio detection characteristic via BLE.
update_characteristics(predicted_class);
delay(2000);
// Make FireBeetle 2 ESP32-S3 to run the object detection model to diagnose the root cause of the detected mechanical anomaly.
if(classes[predicted_class] == "anomaly") Serial1.print("Run Inference"); delay(500); adjustColor(true, false, true);
// Clear the predicted class (label).
predicted_class = -1;
}
// Update the timer:
timer = millis();
}
}
void run_inference_to_make_predictions(){
// Summarize the Edge Impulse neural network model inference settings (from model_metadata.h):
ei_printf("\nInference settings:\n");
ei_printf("\tInterval: "); ei_printf_float((float)EI_CLASSIFIER_INTERVAL_MS); ei_printf(" ms.\n");
ei_printf("\tFrame size: %d\n", EI_CLASSIFIER_DSP_INPUT_FRAME_SIZE);
ei_printf("\tSample length: %d ms.\n", EI_CLASSIFIER_RAW_SAMPLE_COUNT / 16);
ei_printf("\tNo. of classes: %d\n", sizeof(ei_classifier_inferencing_categories) / sizeof(ei_classifier_inferencing_categories[0]));
// If the I2S microphone generates an audio (data) buffer successfully:
bool sample = microphone_sample(2000);
if(sample){
// Run inference:
ei::signal_t signal;
// Create a signal object from the resized (scaled) audio buffer.
signal.total_length = EI_CLASSIFIER_RAW_SAMPLE_COUNT;
signal.get_data = µphone_audio_signal_get_data;
// Run the classifier:
ei_impulse_result_t result = { 0 };
EI_IMPULSE_ERROR _err = run_classifier(&signal, &result, false);
if(_err != EI_IMPULSE_OK){
ei_printf("ERR: Failed to run classifier (%d)\n", _err);
return;
}
// Print the inference timings on the serial monitor.
ei_printf("\nPredictions (DSP: %d ms., Classification: %d ms., Anomaly: %d ms.): \n",
result.timing.dsp, result.timing.classification, result.timing.anomaly);
// Obtain the prediction results for each label (class).
for(size_t ix = 0; ix < EI_CLASSIFIER_LABEL_COUNT; ix++){
// Print the prediction results on the serial monitor.
ei_printf("%s:\t%.5f\n", result.classification[ix].label, result.classification[ix].value);
// Get the imperative predicted label (class).
if(result.classification[ix].value >= threshold) predicted_class = ix;
}
ei_printf("\nPredicted Class: %d [%s]\n", predicted_class, classes[predicted_class]);
// Detect anomalies, if any:
#if EI_CLASSIFIER_HAS_ANOMALY == 1
ei_printf("Anomaly: ");
ei_printf_float(result.anomaly);
ei_printf("\n");
#endif
// Release the audio buffer.
//ei_free(sampleBuffer);
}
}
static int microphone_audio_signal_get_data(size_t offset, size_t length, float *out_ptr){
// Convert the given microphone (audio) data (buffer) to the out_ptr format required by the Edge Impulse neural network model.
numpy::int16_to_float(&sampleBuffer[offset], out_ptr, length);
return 0;
}
bool microphone_sample(int range){
// Display the collected audio data according to the given range (sensitivity).
// Serial.print(range * -1); Serial.print(" "); Serial.print(range); Serial.print(" ");
// Obtain the information generated by the I2S microphone and save it to the input buffer — sampleBuffer.
size_t bytesIn = 0;
esp_err_t result = i2s_read(I2S_PORT, &sampleBuffer, sample_buffer_size, &bytesIn, portMAX_DELAY);
// If the I2S microphone generates audio data successfully:
if(result == ESP_OK){
Serial.println("\nAudio Data Generated Successfully!");
// Depending on the given model, scale (resize) the collected audio buffer (data) by the I2S microphone. Otherwise, the sound might be too quiet.
for(int x = 0; x < bytesIn/2; x++) {
sampleBuffer[x] = (int16_t)(sampleBuffer[x]) * 8;
}
/*
// Display the average audio data reading on the serial plotter.
int16_t samples_read = bytesIn / 8;
if(samples_read > 0){
float mean = 0;
for(int16_t i = 0; i < samples_read; ++i){ mean += (sampleBuffer[i]); }
mean /= samples_read;
Serial.println(mean);
}
*/
return true;
}else{
Serial.println("\nAudio Data Failed!");
return false;
}
}
void update_characteristics(float detection){
// Update the selected characteristics over BLE.
audio_detected_Characteristic.writeValue(detection);
Serial.println("\n\nBLE: Data Characteristics Updated Successfully!\n");
}
void get_central_BLE_updates(BLEDevice central, BLECharacteristic characteristic){
delay(500);
// Obtain the recently transferred data packets from the central device over BLE.
if(characteristic.uuid() == selected_img_class_Characteristic.uuid()){
// Get the given image class for data collection.
selected_img_class = selected_img_class_Characteristic.value();
if(selected_img_class == 0) adjustColor(true, false, false);
if(selected_img_class == 1) adjustColor(false, true, false);
if(selected_img_class == 2) adjustColor(false, false, true);
Serial.print("\nSelected Image Data Class (BLE) => "); Serial.println(selected_img_class);
// Transfer the passed image class to FireBeetle 2 ESP32-S3 via serial communication.
Serial1.print("IMG_Class=" + String(selected_img_class)); delay(500);
}
if(characteristic.uuid() == given_command_Characteristic.uuid()){
int command = given_command_Characteristic.value();
// Change the interval for running the neural network model (microphone) to detect mechanical anomalies.
if(command < 130){
audio_model_interval = command;
Serial.print("\nGiven Model Interval (Audio) => "); Serial.println(audio_model_interval);
// Force FireBeetle 2 ESP32-S3 to run the object detection model despite not detecting a mechanical anomaly via the neural network model (microphone).
}else if(command > 130){
Serial1.print("Run Inference"); delay(500); adjustColor(true, false, true);
}
}
}
void i2s_install(uint32_t sampling_rate){
// Configure the I2S processor port for the I2S microphone (ONLY_LEFT).
const i2s_config_t i2s_config = {
.mode = i2s_mode_t(I2S_MODE_MASTER | I2S_MODE_RX),
.sample_rate = sampling_rate,
.bits_per_sample = i2s_bits_per_sample_t(DATA_BIT),
.channel_format = I2S_CHANNEL_FMT_ONLY_LEFT,
.communication_format = i2s_comm_format_t(I2S_COMM_FORMAT_STAND_I2S),
.intr_alloc_flags = 0,
.dma_buf_count = 8,
.dma_buf_len = sample_buffer_size,
.use_apll = false
};
i2s_driver_install(I2S_PORT, &i2s_config, 0, NULL);
}
void i2s_setpin(){
// Set the I2S microphone pin configuration.
const i2s_pin_config_t pin_config = {
.bck_io_num = I2S_SCK,
.ws_io_num = I2S_WS,
.data_out_num = -1,
.data_in_num = I2S_SD
};
i2s_set_pin(I2S_PORT, &pin_config);
}
void blePeripheralConnectHandler(BLEDevice central){
// Central connected event handler:
Serial.print("\nConnected event, central: ");
Serial.println(central.address());
_connected = true;
}
void blePeripheralDisconnectHandler(BLEDevice central){
// Central disconnected event handler:
Serial.print("\nDisconnected event, central: ");
Serial.println(central.address());
_connected = false;
}
void adjustColor(boolean r, boolean g, boolean b){
if(r){ digitalWrite(red_pin, LOW); }else{digitalWrite(red_pin, HIGH);}
if(g){ digitalWrite(green_pin, LOW); }else{digitalWrite(green_pin, HIGH);}
if(b){ digitalWrite(blue_pin, LOW); }else{digitalWrite(blue_pin, HIGH);}
}
<?php
// Include the Twilio PHP Helper Library.
require_once 'twilio-php-main/src/Twilio/autoload.php';
use Twilio\Rest\Client;
// Define the _main class and its functions:
class _main {
public $conn;
private $twilio;
public function __init__($conn){
$this->conn = $conn;
// Define the Twilio account information and object.
$_sid = "<__SID__>";
$token = "<__TOKEN__>";
$this->twilio = new Client($_sid, $token);
// Define the user and the Twilio-verified phone numbers.
$this->user_phone = "+___________";
$this->from_phone = "+___________";
}
// Database -> Insert Model Detection Results:
public function insert_new_results($date, $img_name, $class){
$sql_insert = "INSERT INTO `detections`(`date`, `img_name`, `class`)
VALUES ('$date', '$img_name', '$class');"
;
if(mysqli_query($this->conn, $sql_insert)){ return true; } else{ return false; }
}
// Retrieve all model detection results and the assigned resulting image names from the detections database table, transferred by FireBeetle 2 ESP32-S3.
public function get_model_results(){
$date=[]; $class=[]; $img_name=[];
$sql_data = "SELECT * FROM `detections` ORDER BY `id` DESC";
$result = mysqli_query($this->conn, $sql_data);
$check = mysqli_num_rows($result);
if($check > 0){
while($row = mysqli_fetch_assoc($result)){
array_push($date, $row["date"]);
array_push($class, $row["class"]);
array_push($img_name, $row["img_name"]);
}
return array($date, $class, $img_name);
}else{
return array(["Not Found!"], ["Not Found!"], ["waiting.png"]);
}
}
// Send an SMS to the registered phone number via Twilio so as to inform the user of the model detection results.
public function Twilio_send_SMS($body){
// Configure the SMS object.
$sms_message = $this->twilio->messages
->create($this->user_phone,
array(
"from" => $this->from_phone,
"body" => $body
)
);
// Send the SMS.
echo("SMS SID: ".$sms_message->sid);
}
}
// Define database and server settings:
$server = array(
	"name" => "localhost",
	"username" => "root",
	"password" => "",
	"database" => "mechanical_anomaly"
);

$conn = mysqli_connect($server["name"], $server["username"], $server["password"], $server["database"]);
?>
<?php
include_once "assets/class.php";

// Define the new 'anomaly ' object:
$anomaly  = new _main();
$anomaly->__init__($conn);
# Get the current date and time.
$date = date("Y_m_d_H_i_s");
# Define the resulting image file name.
$img_file = "%s_".$date;
// If FireBeetle 2 ESP32-S3 sends the model detection results, save the received information to the detections MySQL database table.
if(isset($_GET["results"]) && isset($_GET["class"]) && isset($_GET["x"])){
	$img_file = sprintf($img_file, $_GET["class"]);
	if($anomaly->insert_new_results($date, $img_file.".jpg", $_GET["class"])){
		echo "Detection Results Saved Successfully!";
	}else{
		echo "Database Error!";
	}
}
// If FireBeetle 2 ESP32-S3 transfers a resulting image after running the object detection model, save the received raw image buffer (RGB565) as a TXT file to the detections folder.
if(!empty($_FILES["resulting_image"]['name'])){
	// Image File:
	$received_img_properties = array(
	    "name" => $_FILES["resulting_image"]["name"],
	    "tmp_name" => $_FILES["resulting_image"]["tmp_name"],
		"size" => $_FILES["resulting_image"]["size"],
		"extension" => pathinfo($_FILES["resulting_image"]["name"], PATHINFO_EXTENSION)
	);

    // Check whether the uploaded file's extension is in the allowed file formats.
	$allowed_formats = array('jpg', 'png', 'bmp', 'txt');
	if(!in_array($received_img_properties["extension"], $allowed_formats)){
		echo 'FILE => File Format Not Allowed!';
	}else{
		// Check whether the uploaded file size exceeds the 5 MB data limit.
		if($received_img_properties["size"] > 5000000){
			echo "FILE => File size cannot exceed 5MB!";
		}else{
			// Save the uploaded file (image).
			move_uploaded_file($received_img_properties["tmp_name"], "./detections/".$img_file.".".$received_img_properties["extension"]);
			echo "FILE => Saved Successfully!";
		}
	}

	// Convert the recently saved RGB565 buffer (TXT file) to a JPG image file by executing the rgb565_converter.py file.
	// Transmit the passed bounding box measurements (query parameters) as Python Arguments.
	$raw_convert = shell_exec('python "C:\Users\kutlu\New E\xampp\htdocs\mechanical_anomaly_detector\detections\rgb565_converter.py" --x='.$_GET["x"].' --y='.$_GET["y"].' --w='.$_GET["w"].' --h='.$_GET["h"]);
	print($raw_convert);

	// After generating the JPG file, remove the converted TXT file from the server.
	unlink("./detections/".$img_file.".txt");

	// After saving the generated JPG file and the received model detection results to the MySQL database table successfully,
	// send an SMS to the given user phone number via Twilio in order to inform the user of the latest detection results, including the resulting image.
	$message_body = "⚠️🚨⚙️ Anomaly Detected ⚠️🚨⚙️"
	                ."\n\r\n\r📌 Faulty Part: ".$_GET["class"]
			        ."\n\r\n\r⏰ Date: ".$date
				    ."\n\r\n\r🌐 🖼️ http://192.168.1.22/mechanical_anomaly_detector/detections/images/".$img_file.".jpg"
				    ."\n\r\n\r📲 Please refer to the Android application to inspect the resulting image index.";
	$anomaly->Twilio_send_SMS($message_body);
}
?>
<?php
include_once "assets/class.php";

// Define the new 'anomaly ' object:
$anomaly  = new _main();
$anomaly->__init__($conn);
// Obtain the latest model detection results from the detections MySQL database table, including the resulting image names.
$date=[]; $class=[]; $img_name=[];
list($date, $class, $img_name) = $anomaly->get_model_results();
// Print the retrieved results as a list separated by commas.
$web_app_img_path = "http://192.168.1.22/mechanical_anomaly_detector/detections/images/";
$data_packet = "";
for($i=0;$i<3;$i++){
	if(isset($date[$i])){
		$data_packet .= $class[$i].",".$date[$i].",".$web_app_img_path.$img_name[$i].",";
	}else{
		$data_packet .= "Not Found!,Not Found!,".$web_app_img_path."waiting.png,";
	}
}

echo($data_packet);
?>